सोमवार, 31 मई 2021

Mouth-Watering Fruit Pizza

This Fruit Pizza is a sweet refreshing dessert that is always a hit! Full of color, and pizzaz this is a delicious way to eat your fruit!

When summer hits, all I want is fruit, it’s sweet, good for you and so refreshing. You have to try these summertime fruit favorites, Skewers, Salad, and Dip!
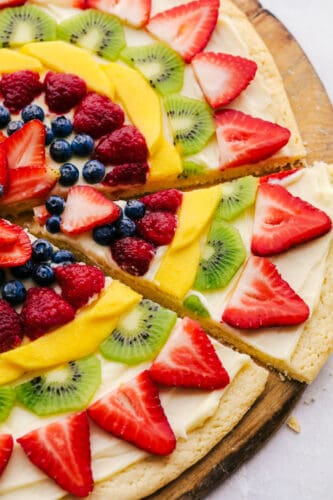
Fruit pizza cut into slices.

Fruit Pizza

I love this pizza! I do not think that this refreshing fruit pizza can claim its origins from Italy, but that doesn’t matter. It is still luscious. A sweet sugar cookie crust forms the base of this sweet treat. Then it is topped with a cream cheese layer that helps hold it all together. It is creamy, sweet and the perfect frosting for the fruit. Then comes the fun part, decorating it with your favorite fruit. It becomes so colorful and inviting. Slice it up and watch it disappear.

Fruit pizza, is the perfect dessert for BBQs, parties and family gatherings. It’s light and fresh, which is so nice on a hot day. Nobody wants anything too heavy, and although it has fruit on it, it’s sweet and tastes so heavenly, no one will complain. If you haven’t tried a fruit pizza yet, it’s time. and this is the recipe to do it with, tried and true, and a family favorite!

Ingredients For Fruit Pizza

Fresh, sweet and a little bit tart, this a more than just a treat, it’s an occasion all by it’s self!

  • Unsalted butter: softened and at room temperature.
  • Granulated sugar: Sweet white sugar.
  • Egg: Provides structure and moisture.
  • Vanilla: Sweet flavor.
  • Flour: All-purpose flour
  • Baking powder: This will help your cookie crust be light and fluffy.
  • Salt: Balances the sweet.

Cream Cheese Frosting

  • Cream cheese: softened and at room temperature.
  • Powdered sugar: Sift it for easier mixing.
  • Instant vanilla pudding powder: Adds an incredible vanilla flavor.
  • Vanilla extract: Sweetness and great flavor.

Whether you make it round or square, this absolutely scrumptious.

Cookie Crust

  1. Prep: Preheat the oven to 350.
  2. Cream: Using a stand mixer, beat together the butter and granulated sugar until light and fluffy. Add in the egg and mix until combined.
  3. Dry Ingredients: Add the flour, baking powder, and salt and mix until combined, about 2 minutes.
  4. Roll out: Either press the dough evenly into a 14-inch pizza pan or roll it out into a 14-inch circle and put it on a cookie sheet. You can use a sharp paring knife to trim up the edges or leave them for a more rustic look.
  5. Bake and Enjoy: Bake for 12-15 minutes, until lightly browned. Let cool completely.

Cream Cheese Frosting

  1. Cream: Beat the cream cheese, powdered sugar, pudding powder, and vanilla together until smooth and light. Spread evenly across the cooled crust.
  2. Fruit: Prep your fruits by rinsing them and allowing them to drain completely. Slice as desired and arrange on the pizza as desired. If you would like the glazed look of a fruit tart, mix a few tablespoons of apricot jam with a little water and then brush across the fruit. Serve immediately.
The process of making the cookie dough and icing.

Tips For the Ultimate Fruit Pizza

With a crust that is golden brown, soft and chewy, and a creamy decadent topping this fruit pizza is amazing!

  • Cookie: This is meant to be soft and a bit chewy. You do not want to overcook the cookie too much, it will make the crust hard and crumbly and hard to eat.
  • Chill: If you find the dough a bit too sticky, try chilling the dough for about 30 minutes before rolling out.
  • Cool Completely: You want the cooked cookie dough to be completely cool before adding the cream cheese frosting. Otherwise, it will melt and run.
  • Fruit: Use fresh colorful bright fruit that is ripe for the best flavor. See below for more fruit ideas. If you are worried about extra moisture on your fruit pizza, after you slice the fruit, let it lay on paper towels for a bit to soak up extra moisture.
  • Keep it Pretty: I try to avoid using fruits that will brown fast when left out, like bananas, apples, and pears. If you want to use those fruits, toss with some pineapple then allow to dry. This will help keep them from turning brown.
  • Pattern: There is no wrong way to decorate a fruit pizza! Just let your imagination go with the flow, this is a great way to kids involved and let them put the fruit on!
  • Holidays: Use fruits and patterns to celebrate certain holidays and occasions. Like red white and blue for the 4th of July or all red fruits for Valentine’s.
Fruit pizza with fresh fruit cut up and frosting underneath.

Fruit Pizza Variations and Short Cuts

This can come together in a pinch. Prebake your cookie and have the toppings cut and ready to go.

  • Make-Ahead: This can be made ahead but keep the parts separate till ready to serve. Bake the crust and even put the cream cheese frosting on, but wait to put the fruit on till right before serving. This will keep the cookie from getting too soggy.
  • Fruit: There are so many options you can use. Strawberries, blueberries, blackberries, raspberries, pineapple, kiwi, mango, grapes Oranges, clementines, peaches, and nectarines. Even canned fruit works, just drain well. Canned pineapple, mandarin oranges, pears, and peaches all would be yummy.
  • Cookie Base: Yes you can use store-bought sugar cookie dough, just roll and bake and top!
  • Shape: This can be rolled out onto a cookie sheet or even a 9×13 pan. Even though it’s pizza doesn’t mean it has to be a circle to be delicious. Use what works for you.
  • Frosting: The cream cheese will give it a much-needed bit of tang and creaminess that compliments the fruit perfectly. You can use regular frosting or store-bought vanilla frosting as well. If you do not have vanilla pudding powder, you can omit it and add a bit more vanilla extract.
  • Store: This is best eaten the day you make it. The longer it is stored the soggier it will get. It is best eaten within 2 days. Keep tightly covered in the fridge.
Taking a slice of fruit pizza.
Print

Fruit Pizza

This Fruit Pizza is a sweet refreshing dessert that is always a hit! Full of color, and pizzaz this is a delicious way to eat your fruit!
Course Dessert
Cuisine American
Keyword fruit pizza, fruit pizza recipes
Prep Time 20 minutes
Cook Time 20 minutes
Total Time 40 minutes
Servings 15 People
Calories 158kcal
Author Alyssa Rivers

Ingredients

Cookie Crust

  • ½ cup unsalted butter softened
  • ¾ cup granulated sugar
  • 1 large egg
  • 1 teaspoon vanilla
  • 1 ¼ cup flour
  • 2 teaspoon baking powder
  • ¼ teaspoon salt

Cream Cheese Topping

  • 1 8 ounces package of cream cheese softened
  • 2/3 cup powdered sugar
  • 1 Tablespoon instant vanilla pudding powder
  • 1 teaspoon vanilla extract

Instructions

Cookie Crust

  • Preheat the oven to 350.
  • Using a stand mixer, beat together the butter and granulated sugar until light and fluffy. Add in the egg and mix until combined.
  • Add the flour, baking powder, and salt and mix until combined, about 2 minutes.
  • Either press the dough evenly into a 14 inch pizza pan, or roll out into a 14 inch circle and put on a cookie sheet. You can use a sharp paring knife to trim up the edges, or leave them for a more rustic look.
  • Bake for 12-15 minutes, until lightly browned. Let cool completely.

Cream cheese frosting

  • Beat the cream cheese, powdered sugar, pudding powder, and vanilla together until smooth and light. Spread evenly across the cooled crust.
  • Prep your fruits by rinsing them and allowing them to drain completely. Slice as desired and arrange on the pizza as desired. If you would like the glazed look of a fruit tart, mix a few tablespoons of apricot jam with a little water and then brush across the fruit. Serve immediately.

Notes

Ideas for fruit: Strawberries, raspberries, blueberries, kiwi, mandarins, peaches, grapes, bananas, passion fruit (just the seeds), mango, currants, blackberries, pomegranate seeds.

Nutrition

Calories: 158kcal | Carbohydrates: 24g | Protein: 2g | Fat: 7g | Saturated Fat: 4g | Trans Fat: 1g | Cholesterol: 29mg | Sodium: 45mg | Potassium: 73mg | Fiber: 1g | Sugar: 15g | Vitamin A: 207IU | Calcium: 29mg | Iron: 1mg


from The Recipe Critic https://ift.tt/34x2k9l
https://ift.tt/2RXiBlo

रविवार, 30 मई 2021

Instant Pot Beef Stroganoff

Instant Pot Beef Stroganoff creates the most tender, full-flavored stroganoff I’ve ever had! Made hands-off in the instant pot, this creamy dish is going to be your favorite way to cook it!

Stroganoff is an easy delicious meal the whole family can get behind. If you do not have an instant pot, try these other tried and true favorite stroganoff recipes instead, One Pot Ground Beef, Slow Cooker Chicken Mushroom, and One-Pot Steak Stroganoff!

Instant Pot Stroganoff being stirred with a wooden spoon.

Beef Stroganoff

Making beef stroganoff in the instant pot has changed everything! This family favorite, comfort food has been elevated by making it in the instant pot. No more babysitting the pan on the stove all day to get the most tender juicy beef ever. The instant pot infuses the flavors into the beef creating a robust and savory taste that is scrumptious. The mushrooms and onions add that little bit of something extra. And the sour cream gives it a smooth creamy texture with a bit of tang that is classic with stroganoff.

Making it all in one pot saves on clean up, which is always a plus. Also using an instant pot keeps the heat from heating up your whole kitchen. Pressure cooking beef allows the tough fibers to break down even faster and more thoroughly, guaranteeing melt in the mouth beef. A perfect compliment to the noodles and broth. My family loves stroganoff and I love how easy the instant pot makes it! This is a must try!

What You Need For Instant Pot Stroganoff

Basic ingredients come together in an infusion of flavor in the instant pot.

  • Olive oil: For browning and sauteing the meat and vegetables.
  • Stew meat: Cut in one-inch cubes
  • Salt and pepper: Add to taste
  • Small white onion: chopped, can use yellow too.
  • Mushrooms: White button or cremini sliced
  • Garlic: Fresh cloves minced
  • Flour: All-purpose is all you need.
  • Beef broth: Adds flavor and creates the sauce.
  • Worchestershire sauce: Classic umami flavor that is so good.
  • Wide egg noodles: Other noodles will work too.
  • Sour cream: Full fat or low fat, but not no fat.
  • Parsley for garnish: Optional but it adds color.

Making Stroganoff in the Instant Pot

This could not be easier, and the instant pot takes the work out of it.

  1. Sauté Meat: Set the instant pot to sauté. Add the olive oil. Working in batches add the stew meat and brown on all sides. Remove from the instant pot and set aside on a plate.
  2. VegetablesAdd in the onion, mushrooms, and garlic. Sauté until they are almost tender.
  3. Combine: Add the stew meat back to the instant pot and add the flour. Cook until the four are brown and the mixture is coated.
  4. Cook: Add in the beef broth and Worcestershire sauce. Cover and set the instant pot in the sealed position. Turn on high pressure and cook for 12 minutes.
  5. Release: Manually release the pressure. And carefully remove the lid. Add in the egg noodles and stir. Cover and seal the instant pot and cook for 3 minutes.
  6. Add Sour Cream: Manually release the pressure. Stir in sour cream and salt and pepper to taste. Garnish with parsley and serve.
Sauteing the beef, mushrooms and onions, then adding the flour and broth. After it's cooked adding the sour cream.

What Goes Great With Instant Pot Stroganoff

This is such a great dish as it has both the starch and protein combined together. All you need are vegetables, some fruit and if you are my kids, they’d say more carbs. I always like to add side dishes that add color and complete the meal. It is a hearty, soul-satisfying meal that will be perfect any night of the year!

Instant Pot Beef Stroganoff Tips and Variations

Savory, filling and delicious, this is will hit the spot any night of the week!

  • Beef: I used stew meat in this recipe because the instant pot helps it become tender and juicy. You can also use chuck roast cut up into bite-sized pieces. Ground beef can also be used successfully. Cook the ground beef till no longer pink and drain off the grease. Remove from the instant pot and then saute the vegetables as the recipe directs.
  • Mushrooms: Not everyone is a fan of mushrooms, you can either leave them out or substitute them for zucchini or beans.
  • Noodles: You will need enough liquid to just cover the dry noodles before cooking them. If you need more liquid add more beef broth to just cover.
  • Thicken: If your stroganoff is too liquidy, after cooking turn on the saute feature and boil off any extra liquid.
  • Sour Cream: Using full or low-fat sour cream work best, non-fat does not provide the creaminess and can end up looking separated.
  • Storage: This can be kept in a tightly covered airtight container in the fridge for 4-5 days. Reheat in the microwave or on the stove top. I do not recommend freezing as the dairy will separate and it will not warm up well.
A serving of Instant pot stroganoff in a bowl garnished with parsley.
Print

Instant Pot Beef Stroganoff

Instant Pot Beef Stroganoff creates the most tender, full-flavored stroganoff I've ever had! Made hands-off in the instant pot, this creamy dish is going to be your favorite way to cook it!
Course Dinner, Main Course
Cuisine American
Keyword beef stroganoff, instant pot beef stroganoff
Prep Time 10 minutes
Cook Time 20 minutes
Total Time 30 minutes
Servings 6 people
Calories 550kcal
Author Alyssa Rivers

Ingredients

  • 1 Tablespoon olive oil
  • 2 pounds stew meat in one inch cubes
  • salt and pepper
  • 1 small white onion chopped
  • 6 ounces mushrooms sliced
  • 3 cloves garlic minced
  • 1/4 cup flour
  • 3 1/2 cups beef broth
  • 1 Tablespoon worchestershire sauce
  • 12 ounce wide egg noodles
  • 3/4 cup sour cream
  • chopped parsley for garnish

Instructions

  • Set the instant pot to sauté. Add the olive oil. Working in batches add the stew meat and brown on all sides. Remove from the instant pot and set aside on a plate.
  • Add in the onion, mushrooms and garlic. Sauté until they are almost tender.
  • Add the stew meat back to the instant pot and add the flour. Cook until the four is brown and the mixture is coated.
  • Add in the beef broth and worchestershire sauce. Cover and set the instant pot in the sealed position. Turn on high pressure and cook for 12 minutes.
  • Manually release the pressure. And carefully remove the lid. Add in the egg noddles and stir. Cover and seal the instant pot and cook for 3 minutes.
  • Manually release the pressure. Stir in sour cream and salt and pepper to taste. Garnish with parsley and serve.

Nutrition

Calories: 550kcal | Carbohydrates: 48g | Protein: 45g | Fat: 18g | Saturated Fat: 7g | Trans Fat: 1g | Cholesterol: 156mg | Sodium: 670mg | Potassium: 912mg | Fiber: 3g | Sugar: 3g | Vitamin A: 217IU | Vitamin C: 3mg | Calcium: 99mg | Iron: 5mg


from The Recipe Critic https://ift.tt/3fxfvgJ
https://ift.tt/2RUW3lf

शुक्रवार, 28 मई 2021

Italian Chopped Salad

Italian Chopped Salad is stuffed with flavor and texture that is highly satisfying. Full of classic Italian flavors, this salad is going to be a huge hit at your next gathering!

I love chopped salads, you get a bit of everything in every bite, and it’s all bite-sized. You have to try some of my other favorite chopped salads, Avocado, Chicken and Bacon, Thai Cashew, and an Autumn Salad.

A bowl of Italian chopped salad with serving spoons

Italian Chopped Salad

If you can chop stuff up, you can make this incredible salad. Italian chopped salad is zesty, fresh, and full of Italian flavors you are going to love. This salad comes together quickly and easily, making it a go-to when I’m short on time but need a big flavor. The cheese and salami give it a boost of protein that allows this salad to be either a main dish or a side salad. Either way your family is going to love the uniqueness of it.

The lettuce and tomatoes lighten the salad, so it isn’t super heavy. Red onion and pepperoncini give it that classic Italian zesty kick. And the black olives add flavor and a bit texture. Chopping everything in this Italian salad makes it super easy to eat and ensures every bit gets a good dose of that insanely delicious dressing. You have to make this salad, it’s so good!

What You Need For Chopped Italian Salad

  • Romaine Lettuce: thinly chopped
  • Pepperoncini: deseeded and sliced
  • Cherry tomatoes: chopped
  • Olives: I buy mine already sliced in a can, or you can slice them yourself.
  • Red Onion: Slice and chop the red onion nice and thin.
  • Italian salami: thinly sliced, can also use bite-sized salami
  • Mozzarella cheese: cubed
  • Homemade Italian Dressing: Yes, make sure it’s Homemade, it is so much better, it’s fast and delicious.

Let’s Get Chopping!

  1. Chop and Combine: In a large bowl combine the romaine, pepperoncini, cherry tomatoes, olives, red onions, salami, cheese, and dressing.
  2. Dress and Toss: Make the recipe for homemade Italian dressing and use as much as desired. Toss the salad until combined.
Ingredients for Italian chopped salad in a clear bowl, ready to be mixed.

Tips and Variations for Italian Chopped Salad

The beauty of this salad is you can customize it to your liking.

  • Chop: This is called a chopped salad for a reason, everything in it should be chopped, not just sliced or diced. This helps the salad mix thoroughly, makes it easier to eat, and better-tasting.
  • Lettuce: I like to use romaine lettuce because it has both crunchy and leafy parts that give all the texture I could want. You can use iceberg or a mixture of both. Also, try mixing in some spinach for an extra boost of iron.
  • Meat: Salami is the meat most often found in a chopped salad, you can also substitute in pepperoni, just note it will give you a slightly different flavor. To save time buy the bite-sized salami all ready to go.
  • Cheese: For a shortcut, you can use cheese sticks and cut them up. They are a perfect size already! Try substituting parmesan or provolone or using a mixture of all of the above too.
  • Add-Ins: For other ingredient ideas try chickpeas, sun-dried tomatoes, kalamata olives, and fresh diced peppers.
  • Storage: Unfortunately once the salad and dressing have combined, it is hard to store. The salad will get soggy. Only dress what you plan on eating and store the salad and dressing separately for longer storage. Both will keep in the fridge for 2-3 days.
Pouring the dressing over the salad ingredients.

What to Serve with this

This is a robust, satisfying salad that can be used either as a main course or a side dish. The meat and cheese give it protein and the vegetables, well are your vegetables. Serve it along with a nice fruit salad and a hunk of toasted crusty bread and you have a light dinner or hearty lunch ready to go.  Here are more ideas to serve insanely delicious salad with.

Mixed Italian chopped salad ready to serve.
Print

Italian Chopped Salad

Italian Chopped Salad is stuffed with flavor and texture that is highly satisfying. Full of classic Italian flavors, this salad is going to be a huge hit at your next gathering!
Course Salad
Cuisine Italian, Italian American
Keyword chopped salad, italian chopped salad
Prep Time 15 minutes
Total Time 15 minutes
Servings 4 people
Calories 219kcal
Author Alyssa Rivers

Ingredients

  • 4 cups romaine thinly chopped
  • 1 cup pepperoncinis deseeded and sliced
  • 1 cup cherry tomatoes chopped
  • 1 cup olives sliced
  • 1/2 medium red onion sliced
  • 1/2 cup italian salami thinly sliced
  • 1 cup mozzarella cheese cubed
  • Recipe for Homemade Italian Dressing

Instructions

  • In a large bowl combine the romaine, pepperoncinis, cherry tomatoes, olives, red onions, salami, cheese, and dressing.
  • Make recipe for homemade italian dressing and use as much as desired. Toss the salad until combined.

Nutrition

Calories: 219kcal | Carbohydrates: 8g | Protein: 11g | Fat: 17g | Saturated Fat: 6g | Cholesterol: 33mg | Sodium: 1032mg | Potassium: 386mg | Fiber: 4g | Sugar: 3g | Vitamin A: 4703IU | Vitamin C: 37mg | Calcium: 188mg | Iron: 1mg


from The Recipe Critic https://ift.tt/3yKziRC
https://ift.tt/3hYqjpQ