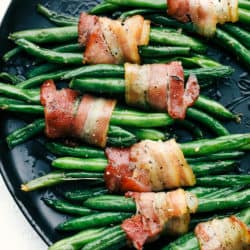
These Green Bean Bundles are going to up your side dish game, without a lot of work, but with all the glory. They look so elegant and refined, but they are so easy! Crispy bacon wrapped around succulent green beans will be your tradition this holiday season.
Green Beans are a classic side dish, they go with just about anything and are so scrumptious no matter how you cook them. Whether it’s Garlic Butter String Beans or the World’s Best Green Bean Casserole, they’re just a great choice.

Green Bean Bundles
Everyone loves a good side dish. They are just as important as the main dish in most cases. Especially around the holidays. Everyone is looking for that special side dish that’s really going to make the meal special. These Green Bean Bundles will elevate your meal to whole new level. They will ooh and ahh and eat them faster than you can make them. I suggest you make extras.
These bundles are so fun and easy to make. Involve your loved ones and have them wrap the bacon around the beans for you. It’s an easy one for littles to help with. They are wonderful to serve to. They are already portioned out! Of course don’t be surprised when people take multiples. Like I said make sure you make extras! No one will be able to resist the smokey bacon wrapped around tender crisp beans!!
Easy Green Bean Ingredients
It’s such a short ingredient list, perfect for a busy holiday.
- Green Beans: Fresh is the only way to go
- Bacon: Cut the bacon in half
- Butter: Melted
- Brown Sugar: Creates a caramelized sweetness
- Salt and Pepper: To Taste
Making the Bacon Bundles
These look complicated but they are so easy
- Blanch: Bring a large pot of water to boil. Add the beans and blanch for 3-5 min
- Ice Bath: Drain the beans and plunge into a bowl full of cold water and ice cubes
- Wrap: Take a small handful and wrap with a piece of bacon and secure with a toothpick
- Brush: Place the bundles in a single layer on a cookie sheet. Mix the melted butter with brown sugar and brush on the bean bundles.
- Bake: Bake at 400 degrees F for 15-18 min or till bacon begins to crisp.

Blanching Beans
- What is it: Blanching is a cooking method in which a food, usually a vegetable or fruit, is scalded in boiling water, removed after a brief, timed interval, and finally plunged into iced water or placed under cold running water to halt the cooking process.
- Why: Blanching is a great method to use because it stops enzyme actions which can cause a loss of flavor, color, and texture. Further, it cleanses the surface of dirt and organisms, brightens the color, and helps to prevent loss of vitamins. It’s often used before freezing or canning fruits and vegetables. Besides the added benefits of blanching the beans in this recipe it also begins the cooking process for the beans, which can take a long time to cook. It shortens the cooking time for the beans.
- Make it Greener: Add a pinch of baking soda for an even brighter green color
Tips for Bean and Bacon Bundles
These are so fun to serve up, these tips will make it easy and perfect
- Bacon: You want to make sure the bacon cooks, so pick thin bacon, not thick sliced. Cut it in half so it’s smaller and you wrap it around fewer times allowing it easier access to cook.
- Wrap: Off set the wrapping so it barely overlaps itself, this is another trick to the bacon to cook through.
- Pre-Bake: If you are really worried about the bacon cooking, you can pre cook the bacon. Cook the bacon till it’s still pliable.
- Pre-Cooked: You can also use pre-cooked bacon bought from the store. This will alter the cook time, so watch it carefully.
- Beans: Use French Green beans if you can, they are longer and thinner and easier to wrap and bundle. They will also cook faster and more even.

Everything’s Better Wrapped in Bacon!
Don’t believe me? Try these recipes out and see for yourself!
- Sweet and Crunchy Bacon Wrapped Chestnuts
- Awesome Bacon Wrapped Brussel Sprouts
- Sweet and Savory Bacon Wrapped Shrimp
- Sweet and Spicy Bacon Chicken Bites
- Grilled Bacon Wrapped Corn
Green Bean Bundles
Ingredients
- 1 pound fresh green beans
- 1/2 pound bacon sliced in half
- salt and pepper
- 1/4 cup butter melted
- 1/4 brown sugar
Instructions
-
Preheat 400 degrees. In a large pot add water and bring to a boil. Blanch the green beans for 3-5 minutes. Rinse and put in an ice bath to stop the cooking process.
-
Grab a handful of green beans and wrap the bacon around tightly and secure with a toothpick. Lay in a single layer on a baking sheet.
-
In a small bowl combine the melted butter and brown sugar. Brush on each green bean bundle.
-
Cook in the oven for 15-18 minutes or until the bacon is crisp.
Nutrition
from The Recipe Critic https://ift.tt/3lTO0ib
https://ift.tt/3lSZouW