बुधवार, 10 फ़रवरी 2021

Tapioca Pudding

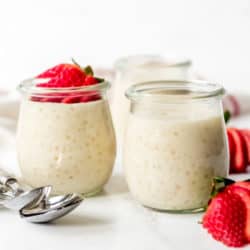
Homemade Tapioca Pudding is easy to make and a wonderfully textured, classic dessert! It’s naturally gluten-free and looks elegant presented in individual dessert cups with a little fruit on top!

Puddings are such a sweet, simple dessert that should be enjoyed more often! We also really love Banana, Rice , and Chia puddings for a homey, creamy treat as well!

Individual servings of chilled tapioca pudding.

Old-Fashioned Tapioca Pudding

Tapioca is always such a fun treat! It’s got a vintage vibe with timeless, classic flavors that never go out of style. The recipe I’m sharing today is 1,000x better than the boring pudding cup versions you pick up at the store. My tapioca pudding recipe is made with small pearl tapioca and has a wonderful balance of sweetness from the milk, cream, and sugar with a hint of vanilla and the soft tapioca beads that are so fun to squish around in your mouth!

Our favorite way of enjoying tapioca is in small dessert cups with a strawberry fanned out on top. It’s so simple and unassuming, but it’s also excellent to make ahead for parties and unique enough to surprise and delight guests.

What is Tapioca?

Tapioca comes from the root of the cassava plant, which grows in Brazil. They are starchy little balls that are also often used for thickening pies and other desserts.

A fanned strawberry on top of homemade tapioca pudding.

Ingredients in Homemade Tapioca Pudding

Don’t be fooled by the simple list of unassuming ingredients. They come together to make a truly uniquely textured and flavored dessert that tapioca-lovers will be wild for!

  • Small Pearl Tapioca: This ingredient gives tapioca pudding both its name and its signature texture. Look for small pearl tapioca instead of the “instant” or “minute” kind.
  • Milk: Whole milk gives the best results, although we have even made this with skim milk and it turns out tasty.
  • Cream: A little heavy cream adds to the richness and complexity of flavors.
  • Sugar: The amount of sugar gives just the right degree of sweetness to this tapioca pudding without making it overly sweet. Remember that slowly cooked milk develops a sweetness all it’s own, so that’s factoring in here as well.
  • Eggs: These are added at the end to help thicken and enrich the tapioca pudding.
  • Vanilla Extract: The vanilla, sugar, and cream notes in this tapioca pudding are heavenly! We recommend high quality vanilla extract instead of imitation vanilla.

Let’s Get Cooking!

Making classic tapioca pudding is a bit of a labor of love that takes about an hour, but it’s worth it! As the pearls soften and thicken the cooking liquid, the natural sugars in the milk take on a sweet, toasty flavor.

  1. Soften the tapioca: Combine the milk, cream, sugar, and salt in a medium saucepan over medium heat. When the liquid comes to a simmer, stir in the tapioca pearls and reduce the heat all the way to low. Continue to cook, stirring frequently, for 45 to 60 minutes until the tapioca pearls turn translucent and the liquid starts to thicken.
  2. Temper the eggs: Whisk the eggs in a medium bowl, then add ½ cup of the hot tapioca mixture. Stir together, then add another ½ cup of the hot liquid and stir again. This helps to gently bring up the temperature of the eggs without scrambling them.
  3. Cook until thickened: Add the tempered eggs to tapioca mixture and stir to combine. Increase the heat to medium and continue to cook, stirring frequently, until you reach your desired thickness. For us, that’s only about 1 minute. Remove from the heat and stir in the vanilla extract.
  4. Divide between serving cups: Fill each cup as much as you like, then serve warm or cover with plastic wrap directly touching the top of the tapioca and chill to serve cold. It’s delicious both ways!

A step-by-step collage showing how to make tapioca pudding.

Tips for Making Tapioca Pearls

  • Don’t forget to stir! I have gotten distracted a time or two before and had the pearls congeal at the bottom of my pot. It can usually be salvaged with some vigorous elbow grease and a strong wooden spoon stirring and breaking the tapioca apart, but it’s much easier to just give the mixture a quick stir every five minutes or so.
  • Serve warm or cold: This dish is really fantastic both ways, so it’s really up to you how you want to serve it and personal preference.
  • Check the brand of tapioca you buys for specific instructions: Some brands might require you to soak the tapioca in water first, then drain it. We like Bob’s Red Mill’s small pearl tapioca, which doesn’t require any soaking time.
  • Using “quick” or “minute” tapioca: This is the same thing as small tapioca pearls, just cut down smaller for quicker cooking. You can follow this same recipe and just decrease the cooking time to around 20 minutes. It’s faster, but the smaller pieces aren’t as nice as the bigger pearls, in our opinion.

Variations

  • Chocolate version: Add 3 ounces of chopped semisweet or dark chocolate at the end along with the eggs, stirring until the chocolate has melted for a decadent chocolate version.
  • Add fruit: Strawberries, raspberries, blueberries, blackberries, and even mango are all delicious served with this pudding.
  • Swap out the extract: You can substitute ½ teaspoon of almond or coconut extract in place of the vanilla extract.

Three glass jars of tapioca pudding next to sliced strawberries.

More Simple Dessert Recipes You’ll Enjoy

Each of these creamy, cool dessert recipes are guaranteed to bring smiles to your family’s faces!

  • Cheesecake Dessert Cups
  • Easy English Trifle
  • Pineapple Cheesecake Dessert Bars
  • No-Bake Cookie Dough Chocolate Cups
  • Easy Creme Brûlée
    Print

    Tapioca

    Homemade Tapioca Pudding is easy to make and a wonderfully textured, classic dessert! It's naturally gluten-free and looks elegant presented in individual dessert cups with a little fruit on top!
    Course Dessert
    Cuisine American
    Keyword tapioca, tapioca pudding
    Prep Time 5 minutes
    Cook Time 1 hour
    Total Time 1 hour 5 minutes
    Servings 8 servings
    Calories 205kcal
    Author Amy Nash

    Ingredients

    • 3 1/2 cups milk
    • 1/2 cup heavy cream
    • 1/2 cup granulated sugar
    • 1/8 teaspoon salt
    • 1/3 cup small pearl tapioca
    • 2 large eggs
    • 1 teaspoon vanilla extract

    Instructions

    • Whisk milk, cream, sugar, and salt together in a medium saucepan over medium heat. Cook, stirring occasionally, until the liquid barely comes to a simmer.
    • Stir in the tapioca pearls and immediately reduce the heat all the way to the lowest setting. Continue to cook and stir for 45 to 60 minutes until the tapioca pearls are translucent and soft and the mixture has begun to thicken. Please note that different types and brands of tapioca may require shorter cooking times.
    • Whisk the eggs in a medium bowl. Add ½ cup of the hot tapioca mixture, stirring well. Add another ½ cup of the hot liquid, stirring again, before combining the tempered egg mixture back into the saucepan with the tapioca and milk mixture.
    • Continue to cook 1 to 10 minutes, until thickened to your liking. Remove from heat and stir in the vanilla extract. Cool for at least 20 minutes before pouring into individual serving cups. Serve warm or cover with plastic wrap directly in contact with the top of the tapioca to prevent it from forming a skin and chill to serve cold.

    Nutrition

    Calories: 205kcal | Carbohydrates: 24g | Protein: 5g | Fat: 10g | Saturated Fat: 6g | Trans Fat: 1g | Cholesterol: 72mg | Sodium: 104mg | Potassium: 169mg | Fiber: 1g | Sugar: 18g | Vitamin A: 451IU | Vitamin C: 1mg | Calcium: 138mg | Iron: 1mg


from The Recipe Critic https://ift.tt/2Z9NqmF
https://ift.tt/3q6VXmw

मंगलवार, 9 फ़रवरी 2021

Homemade Italian Seasoning

Super easy and better than store bought, Italian Seasoning is a MUST have in your pantry! One of the best seasonings there is, this Italian Seasoning is used on most everything!

Making your own seasoning is cheap, easy and just smart! You will know exactly what is and isn’t in your spice rack. Try my homemade ranch, taco and fajita seasonings for more homemade goodness, with optimal flavor!

Homemade Italian seasoning in a white croc.

Italian Seasoning Recipe

Making your own seasonings just make sense. It’s easy and you know exactly what’s in them. Italian seasoning is one I reach for over and over again. It has the perfect balance of earthy, sweet, and savory flavors. It blends beautifully with so many dishes from potatoes, chicken, beef, fish, vegetables and even bread.

Italian seasoning is one of the best of the seasoning blends out there. Having a good blend on hand speeds up your cooking. You don’t have to measure out multiple seasonings. It’s all together in a nice little package. It also takes all the guesswork out of how much spice to add to a dish to make it balanced. The Italian Seasoning blend is already balanced for you. You are going to love having this staple in your pantry! If you’re a fan of Italian seasoning you’ll notice this is the classic herb only version. Often you’ll see it with garlic and onion powder and even red pepper flakes added. Which is delicious, but I wanted to be able to control the amount of those ingredients more depending on the recipe.

What is in Italian Seasoning

If you have a grocery store that carries bulk spices, buy them there. You can also get bulk spices sometimes at restaurant supply stores. As you make your Italians seasoning again and again, you can play with the amounts and add in more or less according to your tastes.

  • Basil: This is spice has a balance between sweet and savory, with hints of mint, anise, and pepper.
  • Oregano: This is a strongly aromatic herb.
  • Rosemary: It has a sage-like, peppery flavor
  • Marjoram: milder flavor than oregano and tastes similar to thyme.
  • Thyme: It has a sharp, almost minty flavor. It is earthy with floral hints and is a little bit sweet and a little bit peppery.

How to Make Italian Seasoning at Home

This homemade Italian seasoning comes together in minutes, but keeps for a long time. Whip some up to use in your favorite dishes. In a small bowl combine the basil, oregano, rosemary, marjoram and thyme. Use as needed.

All the different spices that make up homemade Italian seasoning.

How to Use Italian Seasoning Mix

Italian seasoning is one of those blends that goes with so many things. When you’re making a dish and it just needs a touch of something. Reach for the Italian seasoning. It’s quite perfect for just about anything.

  • Add: Italian seasoning is a fantastic addition to any recipe using chicken, beef or fish. When a recipe just needs a little bit of something extra, try Italian seasoning.
  • Sprinkle: Enhance your popcorn, vegetables and potatoes by sprinkling some over the top, or mixing it with melted butter and topping them.
  • Mix: Create a delicious bread by melting butter and brush on bread sticks, French Bread, or Focaccia.
  • Add: Mix it in butter on the outside of toasted cheese sandwiches.
  • Use: Add to pastas, potatoes, and soups.
  • Dressing: Combine the seasoning with oil and vinegar for your own homemade Italian dressing. YUM!
  • Marinade: Italian seasoning makes incredible marinades. Try it in this world famous steak marinade!
  • Don’t forget: Italian seasoning is obviously perfect for your Italian favorites from lasagna, pizza, pasta salads, to classic soups and spaghetti. It seriously goes on everything!

Storing Homemade Italian Seasoning

This mix is quick and easy to make, so you’ll want to store it properly so it lasts a long time, and stays fresh. The beauty of dried herbs is that as long as they are in a tightly sealed jar or tin, they can keep for a really long time. Even up to 2-3 years sometimes. They don’t mold or spoil like fresh herbs can. You will know they are no longer good when they are no longer aromatic.

To ensure the longest and freshest herbs store away from heat and light which will cause them to lose their flavor and smell faster. If you keep spices in a spice rack on your counter keep far enough away from the stove to prevent heat damage.  For this Italian seasoning simply add the seasoning to a sealed jar or container.  This seasoning will last 6 months or more in a sealed jar stored in a dry, cool area away from direct sunlight. Italian seasoning does not need to be refrigerated.

Italian seasoning in a glass jar with a teaspoon full beside it.

More Italian Recipe to Try!

I love Italian food. It’s comfort food. Full of rich spices, savory sauces and decadent desserts, you can’t go wrong with an Italian dish. The list is long on favorites and absolutely crazy delicious Italian recipes. Start with these and then search up some more. Have Italian for every meal!

Print

Homemade Italian Seasoning

Super easy and better than store bought, Italian Seasoning is a MUST have in your pantry! One of the best seasonings there is, this Italian Seasoning is used on most everything!
Course Seasoning
Cuisine American
Keyword homemade italian seasoning, italian seasoning
Prep Time 5 minutes
Total Time 5 minutes
Calories 38kcal
Author Alyssa Rivers

Ingredients

  • 2 Tablespoons Basil
  • 2 Tablespoons Oregano
  • 1 Tablespoon Rosemary
  • 1/2 Tablespoon Marjoran
  • 1/2 Tablespoon Thyme

Instructions

  • In a small bowl combine basil, oregano, rosemary, marjoram, and thyme. Use as needed.

Nutrition

Calories: 38kcal | Carbohydrates: 9g | Protein: 1g | Fat: 1g | Saturated Fat: 1g | Sodium: 4mg | Potassium: 178mg | Fiber: 6g | Sugar: 1g | Vitamin A: 610IU | Vitamin C: 8mg | Calcium: 207mg | Iron: 5mg


from The Recipe Critic https://ift.tt/3jzkVIH
https://ift.tt/3jvGmuf

सोमवार, 8 फ़रवरी 2021

Chocolate Covered Pretzels

Chocolate Covered Pretzels are fast, easy and delicious! A perfect sweet and salty treat that’s perfect for parties, holidays or any special occasion.

Add pretzels to a dish for a sweet and salty combination! The salty crunch adds to this Chicken dish is divine along with this Strawberry and Raspberry salad version too!

White and Dark chocolate covered pretzels.

Easy Chocolate Covered Pretzels

Every now and then we all need a sweet treat that looks beautiful and tastes amazing, but we need it to be easy and simple. This is the recipe for you! With no more than two essential ingredients, you can have a favorite treat ready in no time, and it’s a sweet treat everyone is going to love.

The sweet richness of the chocolate and the salty crunch of the pretzel is a match made in heaven. These chocolate pretzels are the perfect addition to any party, special occasion or just because you want them. This is a fun recipe to get the kids involved in. They can dip and decorate, and they’ll have so much fun doing it. Chocolate covered pretzels are a classic that are easy to customize and fun to eat!

Ingredients for Covered Pretzels

With only two ingredients, you can’t get much easier than that! Use your favorite brand of pretzels and chocolate and get ready to dip!

  • Chocolate: Choose from semi-sweet, milk, dark, white or all of the above.
  • Pretzels: 2 cups of mini pretzels is what I used, but see variations for other pretzel options.

How to Make Chocolate Covered Pretzels

The hardest part about making these pretzels is the waiting for them to harden so you can eat them.

  1. Melt: In a small microwave safe bowl add the chocolate chips. Microwave 30 seconds at a time stirring in between until chocolate is smooth.
  2. Dip: Using a fork, dip each pretzel into the chocolate and put it on parchment paper. Drizzle the pretzels using the remaining chocolate.
  3. Set: Let set until the chocolate hardens then enjoy!


Melting chocolate chips and dipping pretzels in it.

Tips for the Best Chocolate Covered Pretzels

Crunchy pretzels and velvety smooth chocolate, and sweet and salty, chocolate covered pretzels are the perfect example of opposites attract. These are so insanely delicious, they’re addicting! You should make a double batch, just to be safe.

  • Don’t Overheat your chocolate: When melting your chocolate, you don’t want to burn it or overheat it, this will cause it seize and take away that shiny finish. In between the 30 second intervals, really give the chocolate a good stir. This will help distribute the warmth and melt the chocolate faster and more evenly.
  • Avoid Moisture: Water and melting chocolate don’t mix. Water will cause the chocolate to also seize. Don’t cover the chocolate when melting it to avoid condensation.
  • Use Parchment Paper: If you have it, use parchment paper to allow your pretzels to harden on. They won’t stick to it and it works a bit better than wax paper.
  • Decorate While Wet: You will want to add any sprinkles, or crushed nuts, candies etc while the chocolate is still wet before it hardens so it will stick better.
  • Faster Dipping: I like to take a handful of pretzels and stir them in the chocolate and fish them out with the fork. It’s a faster way of coating the pretzels than one at time.
  • Keep the Chocolate hard: If it’s a warm time of year you might want to consider keeping these chocolate covered pretzels in the fridge so that the chocolate doesn’t soften.

Melting white chocolate chips and dipping pretzels.

Variations for Mini Chocolate Pretzels

Chocolate covered pretzels are fantastic year round, although I see them mostly around Christmas and Valentines. Because they are so customizable you can make them whenever you want and all year long!

  • Add Color: If you are using white chocolate, add food coloring to match the holiday or theme of the party. Green, pink, blue, yellow, they will all taste amazing but look super festive.
  • Toppings: Add sprinkles of all kinds to your pretzels for decorations and pizazz. Be sure to add them when the chocolate is still wet so they’ll stick.
  • Crushed Toppings: It’s also fun to customize these covered pretzels with crushed peppermint, Oreos, Reese’s, or nuts. Crushed cookies and candies add flavor and style.
  • Pretzel Options: Pretzel rods make great chocolate covered pretzels.  Transfer the melted chocolate to a glass and dip the rods in the chocolate coating them about 3/4 of the way up. Decorate and let them harden on parchment.
  • Chocolate: You can also use melting chocolate to cover these pretzels. Chocolate chips and even chopped chocolate bars all work.

How to Store Your Covered Pretzels

Chocolate Covered Pretzels need a dry cool place to keep the chocolate from going hard. Be sure that before you put the pretzels away they are completely hard and not still wet. Store in an airtight container and they will keep for 2 weeks. If you have a hard time keeping the chocolate from going soft, store in the fridge. Note that keeping them in the fridge can cause condensation to form, making spots on the chocolate.

A bowl full of white and dark chocolate covered pretzels.

More Love Inspired Recipes

Chocolate covered pretzels are a delicious treat around Valentines Day. Chocolate, roses, strawberries etc. Are all synonymous with the day of Love. There are so many amazing recipes that go wonderfully on that day, that it’s impossible to make them all. I guess make everyday a Valentine’s Day by whipping up any of these love inspired treats all year long.

Print

Chocolate Covered Pretzels

Chocolate Covered Pretzels are fast, easy and delicious! A perfect sweet and salty treat that's perfect for parties, holidays or any special occasion.
Course Dessert
Cuisine American
Keyword chocolate covered pretzels, chocolate pretzels
Prep Time 10 minutes
Cook Time 5 minutes
Total Time 15 minutes
Servings 24 Pretzels
Calories 25kcal
Author Alyssa Rivers

Ingredients

  • 12 ounces chocolate of choice white chocolate, milk, or semi-sweet
  • 2 cups mini pretzels

Instructions

  • In a small microwave safe bowl add the chocolate chips. Microwave 30 seconds at a time stirring in between until chocolate is smooth.
  • Using a fork, dip each pretzel into the chocolate and put it on parchment paper. Drizzle the pretzels using the remaining chocolate.
  • Let set until chocolate is hard. Enjoy!

Nutrition

Calories: 25kcal | Carbohydrates: 5g | Protein: 1g | Fat: 1g | Saturated Fat: 1g | Sodium: 84mg | Potassium: 9mg | Fiber: 1g | Sugar: 1g | Calcium: 1mg | Iron: 1mg


from The Recipe Critic https://ift.tt/3jtAr8N
https://ift.tt/3twy2yO

गुरुवार, 4 फ़रवरी 2021

Chocolate Hummus (5 Minutes!)

Chocolate Hummus is a healthier dessert dip your going to love! Made with cocoa, peanut butter and garbanzo beans, this hummus is a smooth dreamy fix for those chocolate cravings!

When you think hummus, you probably think of the traditional hummus that tops savory gyros or maybe a chipotle hummus, that tops barbacoa beef beautifully. But this dessert hummus is a game changer!

Chocolate Hummus with strawberries, pretzels and blackberries.

Chocolate Hummus

When that craving hits for something chocolaty but you don’t want the extra junk, you have to reach for this chocolate hummus recipe. It’s going to hit that sweet spot and you won’t leave you feeling guilty. Full of healthy nutrients chocolate hummus is a great way to sneak some goodness into your kids diets as well. If you don’t tell them, they’ll never know. Everyone will love dipping their favorite dippers again and again! Perfect for a party, snack or dessert. It’s a healthy dessert you will actually love to eat.

Chocolate Hummus is so quick and easy, you will be making this recipe on a daily basis. It’s just that good and simple. Don’t let the word hummus through you off or keep you from trying it. Chocolate Hummus looks and tastes a lot like brownie batter, but one you can eat without the worry and guilt. You have to try this, you won’t regret it. It’s insanely delicious!

Is Chocolate Hummus Healthy?

Chocolate Hummus does have added sweetner so that ups the calorie count a bit. But it’s made with all natural ingredients which makes it healthier than most desserts. Chocolate hummus is made with Garbanzo beans which are high in plant protein and fiber which will help you feel fuller longer, curb cravings, and help you feel satisfied. So yes I would consider this to be healthier than cookies, brownies or most other choices.

Ingredients for Creamy Chocolate Hummus

Simple ingredients make this super easy. You probably have all the ingredients for this chocolate hummus sitting in your pantry right now! Perfect for a late night snack!

  • Garbanzo Beans: Drain and rinse them, reserve some of the liquid to thin your hummus if needed.
  • Peanut Butter: Can be substituted if needed, see below.
  • Cocoa Powder: Not to be confused with hot chocolate mix. This is unsweetened cocoa powder.
  • Maple Syrup: Use real maple syrup for best results.
  • Vanilla: Adds extra flavoring
  • Optional: Chocolate syrup and Mini chocolate chips

How to Make Easy Chocolate Hummus

This chocolate hummus whips up in about 5 minutes flat. Perfect for when you need something sweet and chocolaty fast! Use a food processor for best results. This is going to rock your world!

  1. Combine: In a food processor add the garbanzo beans, peanut butter, cocoa powder, maple syrup, and vanilla.
  2. Mix:  Pulse on high until smooth and creamy.
  3. Serve: Put into a serving bowl and drizzle with chocolate syrup and mini chocolate chips. Serve with pretzels, fruit, or graham crackers.

A food processor with the ingredients for chocolate hummus.

Tips and Variations For Dessert Hummus

This dip is super easy and versatile, making chocolate hummus a win win for everyone.

  • Peanut Butter: You can substitute the peanut butter for Tahini, Almond butter, or even sunflower butter. Most all nut butters will work in place of peanut butter.
  • Garbanzo Beans: If you want a smoother finish to your hummus, try to remove as many of the skins as possible from the beans. While rinsing them gently squeeze the skins from off the beans. You can also cook your own beans and over cook them to create a softer texture.
  • Substitute Beans: If you don’t have garbanzo beans on hand try black beans instead. The flavor will be slightly different, but still amazing and still healthy.
  • Thinning: If you want a tad thinner dip add some of the reserved garbanzo liquid a tablespoon at a time till you reach your desired consistency.
  • Maple Syrup: Use pure maple syrup, not the artificially flavored pancake syrup. You can also substitute honey instead of the syrup.
  • Flavorings: Experiment with flavorings, add a dash of cinnamon, a splash of peppermint flavoring or even a pinch of chili powder. Stir in coconut flakes and a splash of almond flavoring for an almond joy flavor.

Processed chocolate hummus all whipped together.

What Can I Serve Chocolate Hummus With?

Well if you can keep yourself from eating it by the spoonful, there are many ways to serve this decadent chocolate hummus. This is a perfect dish for dipping, and everyone loves to dip! Whether your dipping into hummus or million dollar dip, hot crab dip or chicken alfredo dip, it’s going to be delicious!

  • Sweet n’ Salty: The ultimate combination of sweet and salty is always satisfying, think pretzels, potato chips, or pita chips.
  • Fruit: Chocolate is a golden combination with fruit. Strawberries, blackberries, raspberries, bananas, apples, pineapple, dried fruit and anything else you can imagine.
  • Crackers/ Cookies:  Serve chocolate hummus with graham crackers, shortbread cookies, or wafer cookies for a fun twist.
  • Spread it:  Use chocolate hummus in place of hazelnut spread on bagels, or toast. Use it for fillings in cakes, frosting on cookies and pie.  Spread it on pancakes, waffles or crepes.

Storing and Using Homemade Hummus

This recipe keeps really well, meaning you can use it all week, if it lasts that long. Create individual portions with fruit for quick grab and go snacks.

  • Fridge: Chocolate hummus will keep in an airtight container in the fridge for up to 10 days. It will thicken in the fridge so bring to room temperature to serve. You can also add some non dairy milk, or even water to help thin it.
  • Freeze: This freezes beautifully. Keep in an airtight container for up to 3 months. Let it thaw in the fridge, then bring to room temperature on the counter before serving. If the hummus is too thick, thin it with non dairy milk or water.


Dipping a strawberry in chocolate hummus garnished with chocolate chips and syrup.

More Chocolate Loving Recipes

Chocolate has a rich long history, making it a fascinating food to discover. Most people have very strong opinions about chocolate. Whether it’s dark, milk or white, it’s a divine food. It’s complex, it’s rich, sweet and decadent. Chocolate is just sublime and perfect in all its ways.

Print

Chocolate Hummus

Chocolate Hummus is a healthier dessert dip your going to love! Made with cocoa, peanut butter and garbanzo beans, this hummus is a smooth dreamy fix for those chocolate cravings!
Course Appetizer, Dessert
Cuisine American
Keyword chocolate hummus
Prep Time 10 minutes
Total Time 10 minutes
Servings 8 People
Calories 116kcal
Author Alyssa Rivers

Ingredients

  • 1 15 ounce can Garbanzo Beans, drained
  • 1/4 cup peanut butter*
  • 1/2 cup cocoa powder
  • 1/2 cup maple syrup
  • 1 teaspoon vanilla
  • chocolate syrup and mini chocolate chips (optional)

Instructions

  • In a food processor add the garbanzo beans, peanut butter, cocoa powder, maple syrup, and vanilla. Pulse on high until smooth and creamy.
  • Put into a serving bowl and drizzle with chocoalte syrup and mini chocolate chips. Serve with pretzels, fruit, or graham crackers.

Notes

*can also sub with tahini 

Nutrition

Calories: 116kcal | Carbohydrates: 18g | Protein: 3g | Fat: 5g | Saturated Fat: 1g | Sodium: 40mg | Potassium: 181mg | Fiber: 2g | Sugar: 13g | Vitamin A: 1IU | Vitamin C: 1mg | Calcium: 32mg | Iron: 1mg


from The Recipe Critic https://ift.tt/36JjJx7
https://ift.tt/2MUEyPf