गुरुवार, 18 फ़रवरी 2021

Donut Holes

Donut Holes have to be the best part of making donuts. They are bite size and fun to eat!

Donuts are fairly simple to make and making them homemade is even better. For the best in homemade pastries try my tried and true donuts, Apple Fritters and Beignets.

A plate full of powdered sugared and cinnamon sugared donut holes.

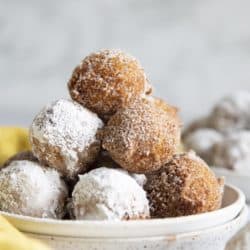
Homemade Donut Holes

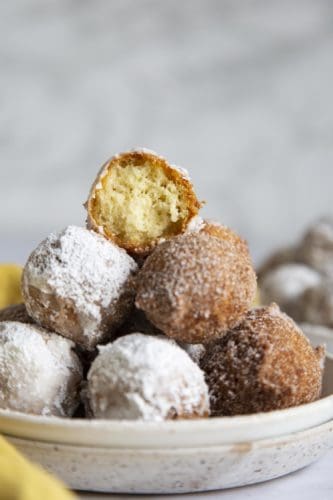
Whenever we make homemade donuts at home, everyone gobbles up the donut holes first. Donut holes are bite sized pieces of perfectly fried dough covered in a variety of toppings. They are a great way to try all the different coatings and glazes without having to eat a whole donut each time.

These donuts are truly the best, They are fast, no rise, no yeast donuts for starters. This means you can make your donuts and eat them too! You don’t have to wait forever for them to rise. These donut holes will cook faster than a regular sized donut, which will also save you time in the kitchen. The donut recipe calls for buttermilk which will make them light and airy, but have tons of flavor. Don’t have buttermilk on hand? Don’t panic, you can make your own here in a matter of minutes. Toss them in your favorite topping or frosting and watch them disappear.

Ingredients for Traditional Donut Holes

These donuts holes can be made with ingredients you probably in have sitting already in your pantry. Whip them up in a matter of minutes and have a great treat or dessert in no time.

  • Flour: Both all purpose and unbleached flour work here beautifully.
  • Sugar: Need a little bit of white sugar for sweetness.
  • Baking Powder: This acts a neutralizer and a leavening agent.
  • Baking Soda: Baking soda works with the buttermilk to create lift and flavor.
  • Salt: Brings out the flavors in the donuts.
  • Egg: Make sure your egg is at room temperature
  • Buttermilk: Your buttermilk also needs to be at room temperature. Make your own buttermilk if you don’t have any on hand.
  • Vanilla Extract: Adds an extra bit of sweet flavor.
  • Butter: Melt the butter in this donut hole recipe.
  • Oil for Frying: The best oils for frying are Peanut oil and Canola

How to Make Donut Holes at Home

These donut holes can’t be much easier and you are going to love it. If you have a legless dutch oven, it will work best for frying.

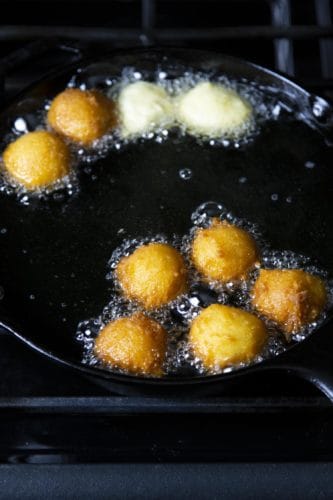
  1. Prepare Oil: Heat the oil in a heavy pot to 350°F, use a thermometer to monitor the temperature during frying as you may need to adjust the heat to keep the temperature constant.
  2. Liquid Ingredients: In a small mixing bowl, beat together the egg, buttermilk, vanilla and melted butter. 
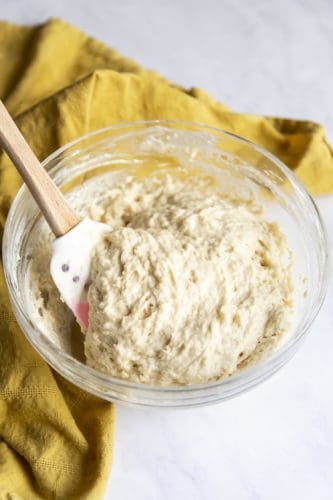
  3. Dry Ingredients: Sift together the flour, baking powder, and baking soda in a large mixing bowl. Stir in salt and sugar.
  4. Combine: Add the liquid mixture to the bowl and mix until a thick batter forms. 
  5. Fry: Use a small cookie scoop to drop dough into the fryer, and fry until golden brown, about 3 – 4 minutes, turning the donuts halfway through cooking. Don’t crowd the pot.
  6. Drain: Remove the donuts from the hot oil and rest them on a wire rack placed over a baking sheet to drain excess oil or simply place them on some paper towels to absorb the excess oil.
  7. Eat: Serve warm or at room temperature.

The donut batter in a bowl.

Toppings are Endless!

One of the best things about donut holes is that they are so easy to top or glaze. Add sprinkles or any other toppings you can think of to this mix. My kids love to do this part, so grab your whole family for the topping part. They will love it!

  • Powdered sugar: Classic white powder that is a favorite for many. Use a bowl to hold your powdered sugar and roll the holes in them once they are cool enough to touch. Fluff the powdered sugar with a fork if it gets matted down.
  • Plain sugar: Use a drop of food coloring to color your sugar before rolling the donut holes in for a fun festive twist.
  • Cinnamon sugar: Mix cinnamon and sugar together in a bowl and roll the cooling donut holes in the mixture.
  • Glaze: In a small bowl whisk together  1 cup of powdered sugar, 3 Tablespoons milk and 2 teaspoons vanilla. Roll the donut holes in the glaze and have them cool completely on a wire rack. The glaze will dry as it cools.
  • Chocolate Glaze: Don’t forget about the chocolate!  Use 1 cups powdered sugar, ¼ cup unsweetened dutch cocoa powder, 3  Tablespoons milk and 2 ½ teaspoons vanilla. Whisk together and glaze!

Donut holes frying in a pan of oil.

Tips and Variations for Easy Donut Holes

These are perfect for a quick dessert or special treat for a party. Donut holes are the perfect size for a dessert buffet or party too. Easy to grab and better to eat, they will become a fast favorite.

  • Oil: Use a thermometer to keep your oil at the right temperature. This will help the donut holes cook evenly and for the same amount of time.
  • Start with One: Cook just one donut hole to start with. Check it at the recommended time and cut it in half to make sure it’s cooked all the way through. If it is still gooey cook one more adding on 30 seconds to 1 minute more or until you get the desired doneness. Use the time you get as your base time for all the donut holes. This way you can make sure your donut holes are cooked all the way through.
  • Cookie Scoop: To get the ideal round shape a cookie scoop is your best bet. If you don’t have a cookie scoop a good spoon will also work. They might be a bit oblong though, instead of super round. Either way they’ll taste the same!
  • Flavor: If you want a bit of a different flavor you can sub out the vanilla for almond, coconut or butter rum flavoring.
  • Store: Keep the donuts at room temperature in a plastic airtight container. They will sweat a bit, the longer they are stored, which will cause the toppings to dissolve and melt. These are best served immediately.

A tower of donut holes with one half eaten on top.

More Fried Heavenly Recipes!

If you are going to fry something, you want it to come out delicious, and perfect every time. The next time you’re looking for a great recipe, check these out.

Print

Donut Holes

Donut Holes have to be the best part of making donuts. They are bite size and fun to eat!
Course Breakfast
Cuisine American
Keyword donut holes
Prep Time 10 minutes
Cook Time 30 minutes
Total Time 40 minutes
Servings 40 Donut Holes
Calories 44kcal
Author Alyssa Rivers

Ingredients

Dough

  • 2 cups all-purpose flour
  • ¼ cup granulated sugar
  • 1 tablespoons baking powder
  • 1 teaspoon baking soda
  • ½ teaspoon salt
  • 1 large egg room temperature
  • 1 cup buttermilk room temperature
  • 1 teaspoon vanilla extract
  • ¼ cup butter melted
  • Oil for frying

Topping Options

  • Powdered sugar
  • Plain sugar
  • Cinnamon sugar
  • Glaze

Instructions

  • Heat the oil in a heavy pot to 350°F, use a thermometer to monitor the temperature during frying as you may need to adjust the heat to keep the temperature constant.
  • In a small mixing bowl, beat together the egg, buttermilk, vanilla and melted butter.
  • Sift together the flour, baking powder, and baking soda in a large mixing bowl. Stir in salt and sugar. Add the liquid mixture to the bowl and mix until a thick batter forms.
  • Use a small cookie scoop to drop dough into the fryer, and fry until golden brown, about 3 - 4 minutes, turning the donuts halfway through cooking. Don’t crowd the pot.
  • Remove the donuts from the hot oil and rest them on a wire rack placed over a baking sheet to drain excess oil or simply place them on some paper towels to absorb the excess oil.
  • Serve warm or at room temperature.

Notes

To dress up your donut holes, you can roll them in powdered sugar, plain sugar, cinnamon sugar or dip them in a glaze.
For plain sugar and cinnamon sugar topping, roll the donut holes in the sugar while they are still warm.
For powdered sugar and glaze topping, allow the donut holes to cool slightly before rolling, sprinkling or dipping.

Nutrition

Calories: 44kcal | Carbohydrates: 6g | Protein: 1g | Fat: 2g | Saturated Fat: 1g | Trans Fat: 1g | Cholesterol: 8mg | Sodium: 75mg | Potassium: 47mg | Fiber: 1g | Sugar: 2g | Vitamin A: 52IU | Calcium: 22mg | Iron: 1mg


from The Recipe Critic https://ift.tt/3avuw0c
https://ift.tt/3sahyuV

बुधवार, 17 फ़रवरी 2021

Creamy Tuscan Sausage Pasta

Creamy Tuscan Sausage Pasta is pretty much a one pan wonder you will want to cook over and over again!  Perfect for a busy night, this is a hearty comforting dish that will truly satisfy.

Creamy Tuscan flavor is exquisite, divine and goes are favorites on my blog. These tried and true tuscan recipes are a perfect example, try Creamy Tuscan Scallops, Shrimp or Chicken.

Creamy Tuscan Sausage Pasta in a pan garnished with parmesan.

Italian Sausage Pasta

This is super easy pasta that will taste like you slaved over it all day. This Tuscan pasta has tender pasta, savory sausage, flavorful sun-dried tomatoes and spinach all smothered in a creamy decadent sauce. It’s insanely delicious and it’s fast. You can even argue that it’s made in one pan, especially if you already had pasta already cooked. This creamy sausage pasta hits the spot when comes to wanting something full of flavor and comforting. It’s going to become a quick family favorite.

This will feel like you’re eating at a fancy restaurant or having an intimate dinner for two all in the comfort of your own home. Pair this with a side of breadsticks, some roasted vegetables and a tasty chocolate dessert and you have fine dining on busy weekday at home. Whether it’s your first time with a Tuscan sauce or not, you have to try this tonight! You are going to love the way the sausage and sun-dried tomato come together in this sauce. It’s heavenly.

What Does “Tuscan” Mean?

Tuscan food is based on the Italian idea of cucina povera or “poor cooking.” It’s a concept of cooking that started very literally. It means simple meals that are inexpensive and could easily be made into large amounts. For instance this recipe can be doubled super easily as could this Tuscan pasta salad or vegetable and chicken stew. They are filling dishes that taste amazing without super expensive ingredients.

Tuscan cooking doesn’t use complicated seasonings or elaborate ingredients or even fancy creations. This is because they focus on using fresh, high quality ingredients that bring out incredible flavors without the extras. It’s delicious done simply and done right!

Ingredients for Sausage Pasta

Creating this creamy dish is fast and easy and doesn’t take a bunch of crazy ingredients. Pick your favorite type of ground sausage, pork, chicken and turkey all work really well. And you can control the spice level by what kind of sausage you get. Look for sun dried tomatoes either in the produce section or the canned vegetable aisle.

  • Penne Pasta: Cook the pasta al dente
  • Ground Sausage: Pick your favorite kind, mild, or spicy.
  • Olive Oil: Olive oil goes perfectly with this Italy inspired dish.
  • Heavy Cream: This will create the creaminess in the sauce.
  • Chicken Broth: Adds richness and flavor.
  • Garlic Powder: Garlic is great flavor in this tuscan pasta.
  • Italian Seasoning: I love this seasoning, it has all the great spices together. You can make your own here.
  • Parmesan cheese: Love this cheese with this dish. Fresh is best if you have it.
  • Spinach: Gives color, vitamins and nutrition.
  • Sun Dried Tomatoes: Sweet and savory, these are just too good.

Making Pasta with Sausage

Truly this dish couldn’t be easier. You are going to love that it tastes so amazing but is so simple to through together. It’s perfect for a busy weekday, or a quiet weekend. Either way you have to try it!

  1. Pasta:  Bring a large pot to boil and cook the pasta according to package directions.
  2. Sausage: In a large skillet add the sausage. Cook and crumble until it is no longer pink. Set aside on a plate
  3. Sauce: Add the heavy cream, chicken broth, garlic powder, Italian seasoning and parmesan cheese.  Whisk over medium high heat until it starts to thicken. Add the spinach and sun-dried tomatoes and let it simmer until the spinach starts to wilt. Add the sausage back to the pan and add the pasta and stir until heated throughout.

Cooking the sausage, making the cream sauce and mixing it all together in the pan.

Tips and Variations for Tuscan Sausage Pasta

Use your imagination and what you have on hand to create this splendid dish.

  • Pasta: I love using pasta that can really soak up the sauce and hold it in its crevices. For this creamy sausage pasta you can use almost any pasta you like, even spaghetti if that’s what you have on hand. Try cavatappi, rigatoni, conchiglie, or fusilli for fun and ease.
  • Al dente: Cook your pasta al dente. This means that the pasta is tender but is still chewy and holds it shape with a bit of firmness. This will allow the pasta to absorb the sauce a bit and hold on to the flavor in every bite.
  • Sausage: You can use just about any sausage you would like. I prefer to use Italian sausage, which is just sausage flavored with Italians type spices versus regular sausage, but both will work. Italian sausage can be found in both mild and spicy, and either taste amazing. For lower fat versions try chicken or turkey Italian sausage.
  • Heavy Cream:  You can use half and half instead of heavy cream to also cut a few calories but it won’t quite have that richness.
  • Spinach: If you don’t have fresh spinach, frozen will work. Be sure to really squeeze out any of the extra liquid. Kale and Swiss chard can also be used.

How to Store Creamy Tuscan Sausage Pasta

Like most Italian dishes, they are almost better the next day after the flavors have had time to meld together. Keep leftovers tightly covered in fridge for up to 4 days.

You can also keep this frozen for up to 4 months. Thaw overnight in the fridge and reheat in the microwave or on the stove. If it needs thinning add a bit of chicken broth or water as it heats.

Tuscan sausage pasta in a white bowl with a fork.

More Pasta Recipes to Devour

Pasta is an ideal comfort food, its customizable, filling and a great energy source. Adding pasta to leftovers is a great way to stretch meals and make them go further. Pasta is tender and you can flavor it in so many ways and with so many different foods, and it all just works. Pasta comes in so many fun shapes too. Try something new the next time you are at the store and grab a type of pasta you’ve never tried before. It puts a fun spin on old favorites. Need a new way to serve up pasta tonight? Try one of these tried and true favorites for dinner that’s guaranteed to win the family over.

Print

Creamy Tuscan Sausage Pasta

Creamy Tuscan Sausage Pasta is pretty much a one pan wonder you will want to cook over and over again!  Perfect for a busy night, this is a hearty comforting dish that will truly satisfy.
Course Dinner, Main Course
Cuisine Italian, Italian American
Keyword italian sausgae pasta, sausage pasta
Prep Time 20 minutes
Cook Time 20 minutes
Total Time 40 minutes
Servings 6 People
Calories 778kcal
Author Alyssa Rivers

Ingredients

  • 8 ounce penne pasta uncooked
  • 1 Pound Ground Sausage
  • 2 Tablespoons olive oil
  • 2 cups heavy cream
  • 1/2 cup chicken broth
  • 1 teaspoon garlic powder
  • 1 teaspoon italian seasoning
  • 1 cup parmesan cheese
  • 2 cups spinach chopped
  • 1/2 cup sun dried tomatoes

Instructions

  • Bring a large pot to boil and cook the pasta according to package directions.
  • In a large skillet add the sausage. Cook and crumble until it is no longer pink. Set aside on a plate.
  • Add the heavy cream, chicken broth, garlic powder, italian seasoning, and parmesan cheese. Whisk over medium high heat until it starts to thicken. Add the spinach and sundried tomatoes and let it simmer until the spinach starts to wilt. Add the sausage back to the pan and add the pasta and stir until heated throughout.

Nutrition

Calories: 778kcal | Carbohydrates: 37g | Protein: 25g | Fat: 59g | Saturated Fat: 28g | Trans Fat: 1g | Cholesterol: 174mg | Sodium: 875mg | Potassium: 687mg | Fiber: 3g | Sugar: 5g | Vitamin A: 1439IU | Vitamin C: 6mg | Calcium: 281mg | Iron: 3mg


from The Recipe Critic https://ift.tt/3s2NZvi
https://ift.tt/3dyIC31

सोमवार, 15 फ़रवरी 2021

Crockpot Chicken Noodle Soup

Top down view of a white bowl filled with chicken noodle soup.

Comforting and hearty, this crockpot chicken noodle soup is so easy to make, and right in the slow cooker. Let the house fill with the most wonderful aroma knowing a cozy dinner is on the way!

For more easy slow cooker soups try this pasta e Fagiolilentil soup and potato soup.

Top down view of a white bowl filled with chicken noodle soup.

Crockpot Chicken and Noodles

When the cold weather sets in there’s nothing quite like a big bowl of soup to warm you up and is there any soup more classic than chicken noodle soup? What makes this one even better is the fact that it’s made completely in a slow cooker or crockpot.

This flavorful soup is as easy as throwing ingredients straight into the slow cooker and just letting it do it’s thing, while you’re off running errands or maybe even putting your feet up. You deserve it. Towards the end of the cooking time, you’ll just shred the chicken and add some dried pasta and it’ll be ready for the table in another 30 minutes.

Chicken Noodle Soup Ingredients

  • Chicken: While I’ve used chicken breast here, thighs will work too. Remove the skin and any excess fat as this could leave an unsightly scum on top of the soup when it’s done.
  • Onion, Celery, Carrot, Garlic: This 4 ingredient vegetable combination gives most of the flavor base to the soup. It’s a classic combo for a reason.
  • Chicken Stock: All chicken stocks are not equal. Make sure you purchase a good quality one as it will make a huge difference to the flavor of the soup. If the stock is completely clear, it likely doesn’t have the flavor we’re after here. Use a cloudier stock and notice the difference.
  • Dried herbs: This version uses dried oregano and thyme which give a good herby flavor without being overpowering. You could use herbs like basil, sage or rosemary too but note rosemary will give a more intense herbiness to the soup.
  • Salt & Pepper: It’s always important to season your soup. Add these in as per the recipe but taste test before serving and add a little more to your taste before serving if needed.

How To Make Slow Cooker Chicken Noodle Soup

Perfect for a busy and cold day, this soup only has two steps and the longest amount of time you’ll need to spend on it is chopping vegetables and shredding chicken. It couldn’t be easier.

  1. Add vegetables, dried herbs, seasonings and chicken to a slow cooker and pour over the stock.
  2. Cook on low for 7 hours (or until the chicken can be easily shredded).
  3. Remove the chicken and shred it using two forks then add it back to the slow cooker.
  4. Break dried pasta, like fettucine or spaghetti, into 3 and add it to the slow cooker, leaving it on low.
  5. As different pastas are different thickness’ check to see if it’s done after 20 minutes but it should take no longer than 30 minutes.

4 images showing the steps to making chicken noodle soup in a slow cooker

Can I Add More Vegetables?

You can certainly add more vegetable to your slow cooker noodle soup. I wouldn’t change the base of celery, onion and carrot due to the flavor they impart though. Try adding some diced bell pepper along with them or adding frozen peas with the pasta at the end. Just know if they are still frozen, it will cool the soup down so you may need to cook it longer for the pasta to cook through.

If you want to get really fancy, saute some mushrooms in butter at any point during the day, keep them in the fridge and add them in the last ½ an hour. This is exactly what I do in my slow cooker beef stroganoff which also happens to work great with chicken thighs.

chicken noodle soup in the black bowl of a slow cooker

How to Store Leftovers

This is definitely best eaten fresh. The pasta will continue to swell and soften the longer it sits in the soup so will be much softer the next day. However, leftovers can be stored in an airtight container in the fridge.

If you want to freeze the soup, it’s best to freeze it without the pasta, then cook the pasta up when you heat the soup.

A white bowl filled with chicken noodle soup and a spoon digging in

More Recipes You Will Love

Top down view of a white bowl filled with chicken noodle soup.
Print

Crockpot Chicken Noodle Soup

Comforting and hearty, this crockpot chicken noodle soup is so easy to make, and right in the slow cooker. Let the house fill with the most wonderful aroma knowing a cosy dinner is on the way.
Course Dinner, main dish, Side Dish, Soup
Cuisine American
Keyword chicken noodle soup, crockpot chicken noodle soup, slow cooker chicken noodle soup
Prep Time 20 minutes
Cook Time 7 hours 30 minutes
0 minutes
Total Time 7 hours 50 minutes
Servings 8 Servings
Calories 235kcal
Author Marie Roffey

Ingredients

  • 1 ½ pounds skinless chicken breast notes 1
  • 3 large carrots, sliced (approx 2 ½ cups)
  • 3 stalks celery, sliced (approx 2 cups)
  • ½ large onion, diced (approx ¾ cup)
  • 4 medium cloves garlic, minced
  • 1 ½ teaspoon dried oregano
  • ½ teaspoon dried thyme
  • 2 teaspoon salt
  • ½ teaspoon pepper
  • 8 cups low sodium chicken stock
  • 6 ounces dried long pasta like linguine, fettucine, spaghetti
  • extra salt and pepper to taste
  • fresh parsley to serve

Instructions

  • Place everything except the pasta into the slow cooker - chicken, carrots, celery, onion, garlic, oregano, thyme, salt, pepper and chicken stock.
  • Cook on low for 7 hours (or until the chicken can be easily shredded).
  • Remove chicken and transfer to a plate or chopping board. Use two forks to shred apart the meat then return it to the slow cooker.
  • Break the pasta into thirds so the pieces are shorter and stir it into the soup. Place the lid back on and cook for another 20-30 minutes, until pasta is cooked. (notes 2).
  • Taste and add seasoning to taste. Serve immediately.

Notes

  1. You can also use chicken thigh. Make sure to remove the skin and any excess fat.
  2. Different pasta will take different lengths of time to cook. The thinner the pasta the quicker it will be.

Nutrition

Calories: 235kcal | Carbohydrates: 23g | Protein: 26g | Fat: 4g | Saturated Fat: 1g | Trans Fat: 1g | Cholesterol: 54mg | Sodium: 784mg | Potassium: 717mg | Fiber: 2g | Sugar: 3g | Vitamin A: 4613IU | Vitamin C: 4mg | Calcium: 46mg | Iron: 1mg


from The Recipe Critic https://ift.tt/2Nxf62j
https://ift.tt/37eQK4u

रविवार, 14 फ़रवरी 2021

Split Pea Soup

Split Pea Soup with ham is the perfect comfort food for any occasion. Full of vegetables, flavored with ham and cooked to perfection, you and your family are going to LOVE this soup.

Soups are one of the most comforting food, especially on chilly nights! Try Broccoli Cheese, Zuppa Toscana or my Winning Cheeseburger soup when you want to come home to something warm and delicious.

Homemade Split pea soup with ham in a bowl.

Split Pea Soup with Ham Bone

Split Pea Soup flavored with ham is just like the one you grew up on. Full of vegetables and tender split peas this soup is easy to make and even better to eat. It is  hearty and soul warming. Split pea soup is one of those feel good soups that’s also good for you. Don’t let the color of this incredibly delicious soup throw you. Its vibrant color just means it tastes good and is healthy too. The aroma is unbelievable and the flavor will keep you coming back bowl after bowl.

Split pea soup is one my go to favorites after I’ve cooked a ham and have leftovers. It’s the perfect way to use the hambone and not let it go to waste. It gives the pea soup just enough of that salty smoky flavor that makes this soup irresistible. The ham also gives it an extra punch of protein and will help satisfy your hunger.  Another plus to this recipe is the fact that split peas are so cheap. So if you use leftover ham, it’s quite a low cost hearty dish. Serve it with a side of rolls and a nice green salad and you’ve got a meal that’s sure to delight!

Ingredients For Pea Soup

Hearty and wholesome, this soup is chock full of good for you ingredients. Herbs and spices give that extra umph and flavor. If you don’t have a leftover ham bone you can use, ask the butcher for one at your local grocery store. You can also leave out the ham bone and just add ham. It won’t be quite as flavorful but still amazing.

  • Butter: For sautéing the vegetables.
  • Onion: A classic ingredient for most soups.
  • Carrots: Dice into bite sized pieces.
  • Celery: Add incredible flavor to the stock.
  • Garlic: Gives the split pea soup a nice flavor.
  • Dried Split Peas: These can be found with other dried beans at your local store.
  • Chicken Broth: Flavor and the base of the soup.
  • Ham bone: If you don’t have one on hand, see if you can get one from your local butcher.
  • Salt and pepper: Add more or less to taste.
  • Fresh Thyme: Fresh gives a nice light flavor. You can use dry, just use ½ teaspoon.
  • Chopped Ham: This is optional, but you’re going to love the extra flavor it gives.

How to Make Split Pea Soup

Like most soups this Split pea soup is pretty hands off once you sauté the vegetables. The longer you can let it simmer the more the flavors will meld together. Whip this up with plenty of time to make some biscuits to go with it.

  1. Sauté: In a large pot over medium high heat ad the butter and let it melt. Add the onion, carrots, celery and garlic. Sauté until tender
  2. Add: Pour in the split peas and chicken broth. Next carefully place in the hambone.
  3. Simmer:  Bring to a boil and simmer uncovered for 60-90 minutes stirring occasionally. Cook until the peas split and soup has thickened.
  4. Shred: Remove the hambone and shred the ham. Add it back to the soup. Add salt and pepper and thyme. Garnish with additional ham if needed.

Sauteing vegetables, cooking the ham bone and stirring in ham for spit pea soup.

What are Split Peas?

  • What are they? Split peas are field peas that are dried, peeled and split in half for easy cooking. They come in both green and yellow varieties, which can be fun to add both to the soup. The yellow ones tend to be more mild in flavor and the green split peas are sweeter. That’s why they pair so perfectly with the salty ham. As they cook they will thicken and create a wonderful creamy texture, perfect for soup.
  • Do you need to Soak Them? Split peas are small so they don’t need to be soaked. The long cooking time for the soup is more than enough to give these split peas the soft texture you want.  Just give the split peas a nice rinse before adding them to the soup. Since you don’t have to soak the peas, it saves you time in the beginning. The long cooking time also allows the flavors to meld beautifully together and they will cook down and thicken to a perfect texture.
  • Are they Nutritious? Split peas are definitely good for you. They are low in fat, high in fiber and protein, and are a great source of vitamins and minerals including magnesium.

Tips and Variations for Pea Soup

  • Add Vegetables: This is a hearty soup already, but you can even more depth to it by adding in a few red or yellow potatoes with the diced carrots.
  • Thicken: When cooking the peas should break down and thicken on their own, if you feel you want it thicker, simmer uncovered for the last 20-30 minutes. Do note that the soup will thicken as it rests and cools. You might actually need to thin it out with water the next day.
  • No Ham Bone: If you don’t have a ham bone don’t worry. You can still get that great flavor from thick chunks of sliced ham. Throw them in with the stock and allow it to simmer along with the rest.  Add bacon at the end for garnish and even more flavor if you desire.

Storing Leftover Soup

If you have any leftovers, which are always better the next day, they can be kept in the refrigerator for up to 4 days. Keep it tightly sealed, and remember it will thicken as it sits. Add broth or water to thin it as needed. Reheat on the stove top on medium low or microwave individual portions.

Can I Freeze It?

Yes, this soup will freeze well! First let the soup completely cool and place in airtight containers or freezer safe ziplock bags. This will keep in the freezer for up 3 months. Thaw overnight in the fridge and reheat the next day.

Ladling split pea soup out of stock pot.

More Soups to Love!

Soup is so good and such an easy way to make dinner. They can be super healthy, super comforting, and always super yummy! There’s nothing quite like a nice warm bowl of goodness to cheer you up on a chilly night after a hard day. Soups are relatively easy too. You can throw everything in a pot and let it simmer away till you’re ready to eat. Soup is easy to change and adapt as well. If you don’t have a certain ingredient it can usually be substituted for another, depending on what it is. Soup is just so delicious, try some of these tried and true scrumptious soups tonight!

Print

Split Pea Soup

Split Pea Soup with ham is the perfect comfort food for any occasion. Full of vegetables, flavored with ham and cooked to perfection, you and your family are going to LOVE this soup.
Course Dinner, main dish, Side Dish, Soup
Cuisine American
Keyword pea soup, split pea soup, split pea soup recipe
Prep Time 20 minutes
Cook Time 1 hour 30 minutes
Total Time 1 hour 50 minutes
Servings 8 People
Calories 259kcal
Author Alyssa Rivers

Ingredients

  • 2 Tablespoons butter
  • 1 small onion chopped
  • 3 large carrots diced
  • 3 celery stalks diced
  • 3 cloves garlic minced
  • 1 pound dried split peas
  • 6 cups chicken broth more if needed
  • 1 ½ - 2 pound ham bone
  • 1/2 teaspoon salt
  • 1/4 teaspoon pepper
  • 1 teaspoon fresh thyme
  • 1 cup chopped ham for garnish

Instructions

  • In a large pot over medium high heat add the butter and let it melt. Add the onion, carrots, celery, and garlic. Sauté until tender.
  • Add in the split peas and chicken broth. Add in the ham bone. Bring to a boil and simmer uncovered for 60-90 minutes stirring occasionally. Cook until the peas split and the soup has thickened.
  • Remove the ham bone and shred the ham. Add it back to the soup. Add salt, pepper, and thyme. Garnish with additional ham if needed.

Nutrition

Calories: 259kcal | Carbohydrates: 39g | Protein: 18g | Fat: 4g | Saturated Fat: 2g | Trans Fat: 1g | Cholesterol: 15mg | Sodium: 1030mg | Potassium: 808mg | Fiber: 15g | Sugar: 6g | Vitamin A: 4705IU | Vitamin C: 16mg | Calcium: 58mg | Iron: 3mg


from The Recipe Critic https://ift.tt/3pi0XU8
https://ift.tt/3piwJjJ