मंगलवार, 2 मार्च 2021

Air Fryer Hot Dogs

Air Fryer Hot Dogs taste better than any grilled, boiled or game-day hot dog you have ever had! Making them in the Air Fryer is a game changer!

Serve up these summertime hot dogs anytime of the year! Have them with my famous potato salad, pasta salad or just some amazing homemade fries.

Air fryer hot dogs in a bun with mustard, ketchup and relish on a plate.

Easy and Delicious Air Fryer Hot Dogs

Air Frying is usually faster, healthier and the results are just impeccable. Hot dogs are no exception! The circulating air wraps around the hot dog cooking the inside to a tender, juicy perfection and creating perfect texture to the outside. They taste better than from the grill, boiled, or even cooked over an open flame. They are so delicious!

Now you don’t have to wait for summer to have the perfect hot dog. Any time of the year you can serve up a hot dog worthy meal right in your air fryer. Placing the bun in the air fryer with the hot dog at the end warms the bun and toasts it perfectly, without dirtying another pan or burning it in the toaster. So when your family is in need of a quick meal, or you are just craving a good hot dog, all you have to do is reach for the air fryer!

Classic Hot Dog Ingredients

With only two main ingredients you can’t get much simpler than this.

  • Hot Dogs: Pick your favorite high quality hot dog for excellent results.
  • Hot Dog Buns: Be sure to buy a bun that fits the hot dog.
  • Optional Toppings: Whatever you desire. Think ketchup, mustard, pickles , etc. See below for more ideas.

How to Make Hot Dogs in the Air Fryer

Air frying hot dogs makes these taste better than fresh off the grill and it is faster! You are going to love it!

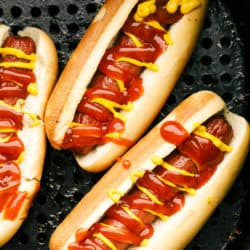
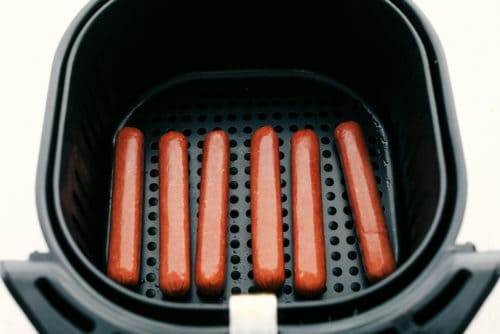
  • Cook: Place the hot dogs in your air fryer basket. Cook at 400 degrees for 6-8 minutes.
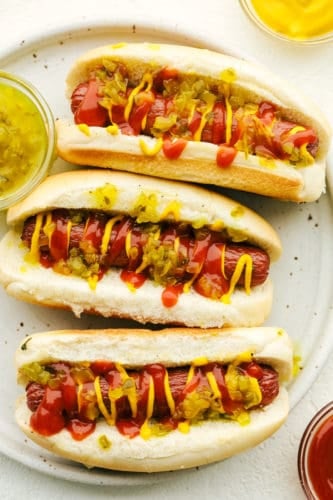
  • Buns: For a toasty bun, add your hot dogs to your bun the last 2 minutes of cooking if desired. Top with your favorite toppings!

Hot dogs ready to cook.

Know your Air Fryer!

For the first batch of hot dogs, check after 6 minutes to see how they are doing. Some air fryers cook faster, hotter, slower or at a lower temperature. Cook the hot dogs until your desired doneness.  Use my times as a guide.

Up close picture of cooked hot dogs.

Tips For The Best Air Fryer Hot Dogs

Hot dogs are easy and a fast meal on those buys weekdays or lazy weeknights.

  • Slice or Prick Hot Dogs: Nope, you do not have to prick or slice your hot dogs before air frying. They will not explode on you. You can give them diagonal slits if you want to give them kind of a grilled look, but it is not necessary.
  • Quality Hot Dog: The better the quality of hot dog the better the flavor and taste. One of the great things about hot dogs is how cheap they are. You can make a great dinner on a budget and it will taste fantastic.
  • No Oil Needed:  You do not need to pre-oil your air fryer basket or spray the hot dogs with oil.
  • Bun: Toasting the bun in the air fryer is a must try. It creates the perfect soft bun on the inside and a slight toasty crunch to the outside.

Hot dogs in buns in an air fryer.

How to Serve your Hot and Ready Hot Dogs

There are multiple ways to eat a hot dog and everyone has their opinions. Just remember everyone is right in their opinion when comes to how to eat a hot dog.  Here are some ideas though if you need them.

Hot dogs in buns with ketchup and mustard up close.

More Air Fryer Recipes You Have to Try!

Air frying is changing the way we cook. It creates crispy crusts, juicy tender centers and it is just so easy to use. Using less oil makes foods more healthy and better for you. Air frying often is a faster way to cook too. It just creates foods with tastes and textures you cannot get any other way. Here are some of our favorite Air Fryer Recipes you have to try so you know exactly what I mean!

Print

Air Fryer Hot Dog

Air Fryer Hot Dogs taste better than any grilled, boiled or game-day hot dog you have ever had! Making them in the Air Fryer is a game changer!
Course Dinner, Main Course
Cuisine American
Keyword air fryer hot dogs, hot dogs
Prep Time 5 minutes
Cook Time 10 minutes
Total Time 15 minutes
Servings 4 Hot Dogs
Calories 229kcal
Author Alyssa Rivers

Ingredients

  • 4 hot dogs
  • 4 hot dog buns

Optional toppings:

  • relish
  • ketchup
  • mustard

Instructions

  • Place the hot dogs in your air fryer basket. Cook at 400 degrees for 6-8 minutes.
  • For a toasty bun, add your hot dogs to your bun the last 2 minutes of cooking if desired. Top with your favorite toppings!

Nutrition

Calories: 229kcal | Carbohydrates: 30g | Protein: 9g | Fat: 8g | Saturated Fat: 3g | Cholesterol: 20mg | Sodium: 520mg | Potassium: 120mg | Fiber: 1g | Sugar: 3g | Vitamin A: 1IU | Vitamin C: 1mg | Calcium: 84mg | Iron: 3mg


from The Recipe Critic https://ift.tt/3qdn4eY
https://ift.tt/3bOAQPT

सोमवार, 1 मार्च 2021

Easy Salsa Verde

Salsa Verde is fresh, spicy and way better than anything you will find in a jar. Super easy and quick, whip it up for a party in no time!

I love a good salsa, especially when they are homemade and fresh! If you love salsa you have to try these Restaurant Style, Blender Salsa and Mango Lime Avocado Salsa!

Fresh homemade salsa verde.

Salsa Verde Recipe

Do not be intimidated by roasting tomatillos, when I say this is an easy salsa verde, I mean it. This is simple, delicious and worth the bit of extra work. You are going to love the fresh flavors that come together in this salsa. Roasting the tomatillos brings depth and richness. And because it is not jarred, there is no weird aftertaste to this incredible salsa. It is going to become a staple in your household!

Salsa Verde is a green based salsa thus the name verde, which means green. Made with tomatillos and peppers give it its distinct color and flavor. It has a distinctly different tangy zesty flavor versus red salsas. It is often a more mild tasting salsa, but you can always add more kick if you need to.  Use this salsa to top Navajo Tacos, Chicken Fajitas, and Homemade Empanadas. You can also just serve it as an appetizer with corn chips.

Ingredients for Tomatillos Salsa

Look for tomatillos in the produce section near the jalapeños. They will have a husk on them that is easy to remove.

  • Tomatillos: Look for firm ones that are not squishy, wrinkled or blemished.
  • Small Onion: Roughly chop the onion.
  • Jalapeño Pepper: For more spice leave in the seeds, otherwise remove and chop.
  • Garlic Cloves: Adds extra flavor and heat.
  • Cilantro: Fresh and vibrant, cilantro is a classic herb used in Mexican cooking.
  • Salt to Taste: Don’t skip the salt, it helps brighten the flavors.

How to Make Green Salsa!

The longest part of making this salsa is roasting your tomatillos, and even that does not take that long. You will love the deep flavor in this salsa verde that comes from roasting!

  1. Tomatillos: Husk the tomatillos and rinse. Lay on a baking sheet. Heat the broiler to high and roast for about 10 minutes, turning half way through. Remove from oven and let cool.
  2. Combine: In a food processor or blender add the tomatillos, onion, jalapeño, garlic, cilantro and salt to taste.
  3. Blend: Pulse until it reaches the desired consistency. Serve as desired.

Tomatillos, roasted and other ingredients in food processor.

Tips for Incredible Salsa Verde

You and your family will love the mellow flavor of this salsa, you can add or delete according to your tastes.

  • Jalapeño: Get more of that roasted flavor by roasting your jalapeños with the tomatillos. If you want a bit more spice leave the seeds in your peppers or just remove part of them.
  • Tomatillos: Pick ones that are roughly the same size so they roast at the same rate. Be sure to peel back the husk before buying and check for that nice bright green color and smooth firm skin. Once peeled be sure to rinse them. Unlike tomatoes, you can store tomatillos in the fridge which will help them keep longer.
  • Thin it: If your salsa needs thinning add a Tablespoon or two of water.
  • Do not over process: This salsa shines when it is a bit chunky. Do not puree, unless you want to.
  • Better With Time:  Salsa Verde is amazing fresh, but it is divine when the flavors have time to really meld together too. Make this at least a day ahead for delightful flavor.

Variation of Homemade Salsa Verde

There are different ways to achieve the incredible flavor of a salsa verde, which you prefer is up to you.

  • Roast: You can roast your tomatillos in a pan on the stove over medium high heat. You want a good char on the skins, but not burned.
  • Boil: Another way to cook your tomatillos is to boil them. Place in a large saucepan and cover with water. Boil for 5 minutes then drain.
  • Sugar: You can 1/2-1 teaspoon of sugar to help balance the acidity from the tomatillos if you desire. Do not worry, you cannot taste it.
  • Canned Tomatillos: Yes you can use canned, you won’t need to char them and the flavor will be incredible but slightly different.
  • Boil it: To intensify the flavors once you have blended it place in a large pan or saucepan. Bring it to a boil then turn it down and let it simmer for about 10-15 minutes. Let cool before serving.

How to Use and Store the Best Salsa

Dipping a chip in homemade salsa verde.

More Mexican Inspired Dishes

I love Mexican food. It is so fresh, full of flavor and easy to customize. It is also super fast whip up. When I have trouble figuring out what to make, and no time, Mexican food is one of my all time favorite go to recipes. It is a food we can all agree on. Rich with spices and full of flavor and fresh ingredients, it is no wonder it is one of the most popular foods around.  Next time you are craving Mexican reach for one of these tried and true favorites.

Print

Salsa Verde

Salsa Verde is fresh, spicy and way better than anything you will find in a jar. Super easy and quick, whip it up for a party in no time!
Course Appetizer, Side Dish
Cuisine Mexican
Keyword salsa verde
Prep Time 10 minutes
Cook Time 10 minutes
Total Time 20 minutes
Servings 2 cups
Calories 143kcal
Author Alyssa Rivers

Ingredients

  • 1 1/2 pounds tomatillos
  • 1 small onion coarsely chopped
  • 2 jalapeño peppers seeded and roughly chopped
  • 3 Garlic Cloves
  • 1/2 cup cilantro packed
  • salt to taste

Instructions

  • Husk the tomatillos and rinse. Lay on a baking sheet. Heat the broiler to high and roast for about 10 minutes, turning half way through. Remove from the oven and let cool.
  • In a food processor or blender add the tomatillos, onion, jalapeño, garlic, cilantro, and salt to taste.
  • Pulse until it reaches the desired consistency. Serve with chips.

Nutrition

Calories: 143kcal | Carbohydrates: 28g | Protein: 4g | Fat: 4g | Saturated Fat: 1g | Sodium: 9mg | Potassium: 1066mg | Fiber: 8g | Sugar: 16g | Vitamin A: 810IU | Vitamin C: 63mg | Calcium: 49mg | Iron: 2mg


from The Recipe Critic https://ift.tt/2NPNk1F
https://ift.tt/2PnZgIs

रविवार, 28 फ़रवरी 2021

Better than Takeout Shrimp Fried Rice

Shrimp Fried Rice is better than any restaurant that you have had! Made with fresh shrimp, peas, carrots, egg, rice and topped with green onions, you will never have takeout again!

Fried rice is a staple in our house, and there are so many ways you can make it amazing. Try Original, Bacon or even Cauliflower fried rice!

Shrimp fried rice in a bowl.

Easy Shrimp Fried Rice

After I perfected the better than takeout fried rice… (seriously it is so much better than takeout!)   I knew that a shrimp version had to make the debut. The hubby loves shrimp and I have to admit it is starting to grow on me. But when you add it to some fried rice I am in love with it! There is nothing better than rice, peas, carrots, eggs, with shrimp hidden inside!

There are a few secrets to getting that restaurant quality taste. My sister in law who is Chinese made us the most amazing fried rice for a family dinner. She suggests that day old chilled rice is the best.  If you have to make the rice that day, it is still delicious! And the secret flavor is the sesame oil. And boy oh boy this rice is good. This is great eaten as a side or by itself. You are going to love the tender shrimp hidden inside. This will become an instant family favorite that will make you have better than takeout meal right at home!

Ingredients for Homemade Shrimp Fried Rice

Super easy and insanely delicious, these ingredients meld together in the most perfect way.

  • Shrimp: Peeled and deveined, can use fresh or frozen that’s been thawed.
  • Vegetable Oil: For sautéing.
  • Sesame oil: The secret to incredible flavor.
  • Cooked Rice: Use cold day old rice if you have it.
  • Onion: I used a small white onion for good flavor.
  • Frozen Peas and Carrots: These should be thawed.
  • Soy Sauce: Use more or less to taste. Low sodium is ok to use.
  • Eggs: Lightly beat your eggs.
  • Green Onion: These are optional, but in my opinion should not be skipped.

Let’s Make Amazing Shrimp Fried Rice!

You will not want to take out again after you taste this shrimp fried rice. It is fast easy and cheaper!

  1. Prep: Preheat a large skillet or wok to medium heat. Add vegetable oil and sesame oil
  2. Sauté: Add the shrimp to the skillet and salt and pepper. Cook the shrimp for 2-3 minutes or until no longer pink. Remove with a slotted spoon and set aside.
  3. Vegetables: Add the white onion, peas and carrots and fry until tender.
  4. Egg: Slide the onion, peas and carrots to the side and pour the beaten eggs onto the other side. Using a spatula, scramble the eggs, once cooked mix the eggs with the vegetable mix.
  5. Rice: Add the rice and shrimp to the veggie and egg mixture.
  6. Finish: Pour the soy sauce and another Tablespoon of sesame oil on top. Stir and fry the rice and vegetable mixture until heated through and combined. Add chopped green onions if desired.

The Recipe Critic Pro Tip

Cold rice is a Must! If it is a day old cold rice even better. You want the rice cold so it’ll fry when it hits the pan. Using freshly cooked, or even lukewarm rice it will go soggy and clump together. If you need to cook your rice the same day, never fear you can get the same results. Take your cooked rice and spread it out on a sheet pan in thin layer. Cover with plastic wrap. Place in the fridge for up to 30 minutes or freezer for 15, you do not want it frozen, just cold. Trust me on this one.

Sauteing shrimp, vegetables, eggs and rice for Shrimp fried rice.

Tips for the Best Fried Rice with Shrimp

There are a few things that really truly need to be done so this tastes absolutely amazing.

  • Use some Butter: For impeccable flavor use some butter with your oil or even sub out the oil for butter. It adds so much flavor and goodness.
  • Use High Heat:  This will keep the rice from steaming and fry it well.
  • Sesame Oil: This is a Must have for the best authentic fried rice flavor. Keep in mind it’s a finishing oil, not a frying oil You need to add it at the end and off the heat.
  • Use Fresh Shrimp: Using precooked shrimp can make your shrimp rubbery when you warm it up.

Variations and Storing Chinese Fried Rice

This recipe for shrimp fried rice is a classic, but you add, delete and vary ingredients to make it your own.

  • Vegetables: For a heavy on the vegetable shrimp fried rice, add diced peppers or sautéed mushrooms, and zucchini. You can also use broccoli, cauliflower. Cabbage, green beans or sugar snap peas.
  • Rice: Substitute brown rice or quinoa for the white rice if you desire. You can even make this with cauliflower rice.
  • Protein: Add bacon, ham, chicken or tofu to up the protein.
  • Storage: This shrimp fried rice will keep nicely in an airtight container for up to 3 days in the fridge. Warm up in a skillet or wok to get that fried texture back.

Close up of Shrimp fried rice in a pan.

More Better Than Take Out From Home!

There are lots of reasons why you should want to have a few good restaurant worthy recipes in your back pocket. First of all they will always taste better than take out, they are cheaper than take out, and you can control the ingredients and flavors just the way you want them. I have many tried and true restaurant worthy recipes on the blog, but here are just a few favorites to try.

Print

Better than Takeout Shrimp Fried Rice

Better than Takeout Shrimp Fried Rice is better than any restaurant that you have had!  Made with fresh shrimp, peas, carrots, egg, rice and topped with green onions, you will never have takeout again!! 
Course Side Dish
Cuisine Asian American, Chinese
Keyword fried rice, shrimp fried rice
Prep Time 20 minutes
Cook Time 20 minutes
Total Time 40 minutes
Servings 8 People
Calories 129kcal
Author Alyssa Rivers

Ingredients

  • 1 pound large shrimp peeled and deveined
  • 1 Tablespoon vegetable oil
  • 2 Tablespoon sesame oil divided
  • 3 cups cooked rice *
  • 1 small white onion chopped
  • 1 cup frozen peas and carrots thawed
  • 2-3 Tablespoons soy sauce more or less to taste
  • 3 eggs lightly beaten
  • 2 Tablespoon chopped green onions optional

Instructions

  • Preheat a large skillet or wok to medium heat. Add vegetable oil, 1 Tablespoon sesame oil and shrimp to the skillet and salt and pepper. Cook the shrimp for 2-3 minutes or until no longer pink. Remove with a slotted spoon and set aside.
  • Add white onion and peas and carrots and fry until tender. Slide the onion, peas and carrots to the side, and pour the beaten eggs onto the other side.
  • Using a spatula, scramble the eggs. Once cooked, mix the eggs with the vegetable mix.
  • Add the rice and shrimp to the veggie and egg mixture. Pour the soy sauce and 1 Tablespoons sesame oil on top. Stir and fry the rice and veggie mixture until heated through and combined. Add chopped green onions if desired.
  • *Use day old cold cooked rice for best results. If you don't have precooked rice, it is just fine to cook the rice the same day.

Notes

Updated on February 27, 2021
Originally Posted on August 13, 2017

Nutrition

Calories: 129kcal | Carbohydrates: 1g | Protein: 14g | Fat: 8g | Saturated Fat: 3g | Cholesterol: 204mg | Sodium: 715mg | Potassium: 78mg | Fiber: 1g | Sugar: 1g | Vitamin A: 90IU | Vitamin C: 2.3mg | Calcium: 91mg | Iron: 1.6mg


from The Recipe Critic https://ift.tt/2L25lqT
https://ift.tt/3uBEPI1

शुक्रवार, 26 फ़रवरी 2021

Glazed Lemon Brownies

Quick and easy Lemon Brownies that are perfectly moist and chewy! The Lemon Glaze on top is the perfect finishing touch, it will be hard to stop at one!

Lemon is a favorite flavor that makes winning favorites divine! You have to try this Chicken, Scallops and Shortbread Cookies.

Rich and zippy Lemon Brownies cut and stacked.

Lemony Lemon Brownies

These lemon brownies are AMAZING!!! Like I can’t stop thinking about them, I want to make another pan right now amazing. Even my family members that do not appreciate lemon like I do, loved these brownies. They are tart and sweet. Thick and chewy these lemon brownies can really satisfy your sweet lemon cravings.

My favorite part about these brownies is that they are so easy! Grab some lemons from the store and you probably have all of the ingredients on hand. They mix in no time at all and are ready to throw into the oven! But let’s be honest. The glaze is probably my favorite part to these brownies. It is the perfect sweet n’ tart, lemony finishing touch. I know that you guys are going to love these brownies! You have to try them today!

What you Need for Easy Lemon Brownies

All you need is a lemon or two and you are set for the best lemon brownies ever!

  • Butter: Soften the butter by bringing to room temperature or softening in the microwave. Do not melt.
  • Sugar: Adds the necessary sweet.
  • Eggs: Adds richness and acts as the binder.
  • Lemon Juice: Use fresh lemon juice.
  • Lemon Zest: From the same lemon you juiced.
  • Flour: All purpose flour will work perfectly.
  • Salt: Adds balance to the flavors.

Lemon Glaze Ingredients 

  • Powdered Sugar: Perfect counterbalance to the lemon.
  • Lemon Juice: Fresh from the same lemon you used for the bars.
  • Lemon Zest: From the other half of the lemon.

How to Make One Bowl Lemon Brownies

These only make a 8×8 inch pan. This can cause problems when everyone eats them before you get one! Don’t take chances and make a double batch. hide the other half just for you.

  1. Prep: Preheat oven to 350 degrees. Line an 8×8 inch pan with aluminum foil or parchment paper for easy removal.
  2. Mix: In a large mixing bowl or using a stand mixer add the butter, sugar, and lemon zest and beat until it is fluffy.
  3. Add: Add in the eggs and lemon juice, mix till combined.
  4. Beat: Add in the flour and baking powder and beat until it is combined.
  5. Bake: Pour into the 8×8 inch prepared pan and bake for 25 minutes. remove and let cool.
  6. Glaze: Whisk together the powdered sugar, lemon juice, and zest from the other half of the lemon. Pour over the top of the slightly cooled lemon brownies.

Mixing the ingredients and spreading it in the pan for lemon brownies.

Why Are They Called Brownies?

If these are filled with lemons instead of chocolate, how can they be called brownies? It is because these Lemon morsels have the same texture as your favorite fudgy brownie.  They are thick and rich. Yet you find them a bit lighter than your average fudgy brownie, which is divine. The fudge like texture melts in your mouth, leaving you wanting more. You’ll notice there is no leavening agent (baking soda or powder) in this lemon brownie recipe. This helps create that fudgy brownie like texture you are going to fall in love with. Now when you want a dense rich dessert but not the chocolate, you can reach for these!

Tips for the Best Lemon Brownies

You might need more than 1 lemon depending on its size. Look for bright yellow lemons with thin firm skin.

  • Zesting Lemons: Wash your lemons thoroughly before zesting. If you don’t have a zester you can use the smallest holes of a cheese grater. You want to stop zesting once you hit the pith or white part as it is quite bitter.
  • Juicing Tip: Cut and quarter your lemons and then microwave them for about 30 seconds. This helps the lemons release more of its juice.
  • Can I use bottled lemon juice instead of lemons? You can but it will definitely change the flavor a bit. I always prefer fresh. When substituting lemon concentrate for real lemon juice in a recipe, use two tablespoons of bottled lemon juice to replace the juice of one lemon. Substitute lemon juice concentrate for equal proportions in any recipe calling for lemon juice.
  • Glaze: If you add the glaze while the lemon brownies are slightly warm, it’ll seep in to the brownie making it that much more moist and tender. But make sure they have cooled mostly first.
  • Add more Lemon: If you are fan of lemons like me, add more zest for more zing.
  • Store: Keep these in an airtight container for up to 4 days at room temperature or in the fridge for 1 week. Note they will become more moist and dense as they sit. Day 2 is divine. Freeze these as well for up to 3 months. Thaw on the counter till ready to serve.

Lemon Brownies cut into squares ready to eat.

More Brownie Recipes to try

Whether it is a truly fudgy chocolate rich brownie or these lemon brownies, they are just exquisite. Brownies are a comfort food that satisfies with the moist dense texture and flavors that explode in the mouth. When you want to reach for a brownie next time, reach for one of these AMAZING recipes. You will not be sorry!

Print

Glazed Lemon Brownies

Quick and easy lemon brownies that are perfectly moist and chewy! The Lemon Glaze on top is the perfect finishing touch! It will be hard to stop at one!
Course Dessert
Cuisine American
Keyword brownies, lemon, lemon brownies
Prep Time 5 minutes
Cook Time 25 minutes
Total Time 30 minutes
Servings 10 Bars
Calories 212kcal
Author Alyssa Rivers

Ingredients

  • 1/2 cup butter softened
  • 3/4 cup sugar
  • 2 large eggs
  • 1 Tablespoon of Lemon juice
  • zest from ½ of a lemon
  • 3/4 cup flour
  • 1/4 teaspoon salt

Lemon Glaze:

  • 1/2 cup powdered sugar
  • 1 Tablespoon lemon juice
  • zest from ½ lemon

Instructions

  • Preheat oven to 350 degrees. Line an 8x8 inch pan with aluminum foil or parchment paper for easy removal.
  • In a large mixing bowl or using a stand mixer add the butter, sugar, and lemon zest and beat until it is fluffy.
  • Add in the eggs and lemon juice.
  • Add in the flour and baking powder and beat until it is combined.
  • Pour into the 8x8 inch prepared pan and bake for 25 minutes. Remove and let cool.
  • To make the glaze: Whisk together the powdered sugar, lemon juice, and zest from the other half of the lemon. Pour over the top of the cooled lemon brownies.

Video

Notes

Updated on February 26, 2021
Originally Posted on March 22, 2015

Nutrition

Calories: 212kcal | Carbohydrates: 28g | Protein: 2g | Fat: 10g | Saturated Fat: 6g | Trans Fat: 1g | Cholesterol: 62mg | Sodium: 154mg | Potassium: 30mg | Fiber: 1g | Sugar: 21g | Vitamin A: 338IU | Vitamin C: 1mg | Calcium: 10mg | Iron: 1mg


from The Recipe Critic https://ift.tt/3bEpjCJ
https://ift.tt/3pVA3Sb