बुधवार, 3 मार्च 2021

Air Fryer Garlic Butter Hasselback Potatoes

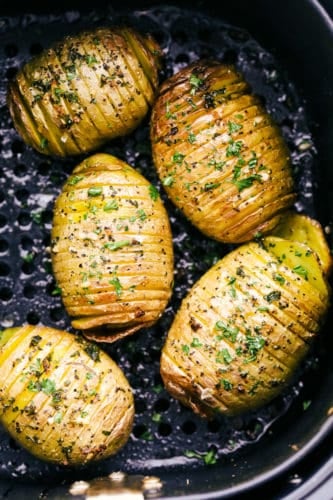
Air Fryer Hasselback Potatoes are going to be your new favorite side dish. They are fried to a golden brown and the flavor is amazing!

Air fryers and potatoes just go together, everything just turns out divine. Try these other air fried potato recipes,French Fries, “Roasted” Potatoes and Baked Potatoes.

Hasselback potatoes in the air fryer with herbs and salt.

Air Fryer Hasselback Potatoes

With just a little extra time and effort you can turn ordinary baked potatoes into something extraordinary. Perfect for holidays and special occasions or just because, these garlic butter potatoes will be the hit of the dinner. The little cuts open up beautifully as they cook in the air fryer and the garlic butter oozes into every nook and granny. Topped with herbs and salt these potatoes are insanely delicious. Your whole family is going to love them.

Hasselback potatoes are simply an ordinary potato thinly slices in such a way that when they bake the slices separate and create a fan like appearance. This allows for butter, herbs and seasonings to sink deep into the cracks and throughout the potatoes. They are crispy, flavorful and super impressive! Serve them up with Slow Cooker Beef Tips, Cast Iron Pork Chops or Instant Pot Chicken.

Ingredients for Garlic Butter Potatoes

I love the extra freshness that comes from the fresh herbs, if you don’t have them you can used dried. Use half the amount of dried as you would for fresh, as dried will have concentrated flavor.

  • Potatoes: About 4-5 Russets.
  • Salt and Pepper: Add more or less to taste.
  • Butter: Butter and potatoes just go together.
  • Fresh Parsley, Thyme and Rosemary: Incredible fresh flavor.
  • Garlic: Mince the garlic for best flavor.

Making Air Fryer Hasselbacks

The hardest part of these potatoes is waiting for them to cook!

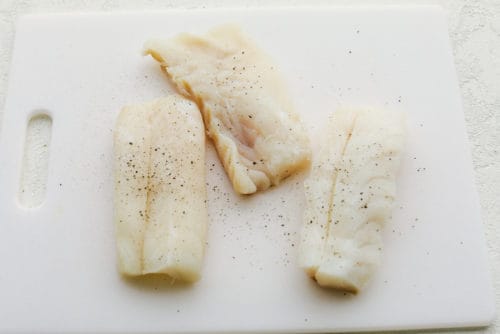
  1. Potatoes: Wash and scrub the potatoes. Slice the potatoes thinly leaving a half inch base at the bottom.
  2. Season: Salt and pepper the potatoes as desired
  3. Butter: In a small bowl combine melted butter, parsley, thyme, rosemary and garlic.
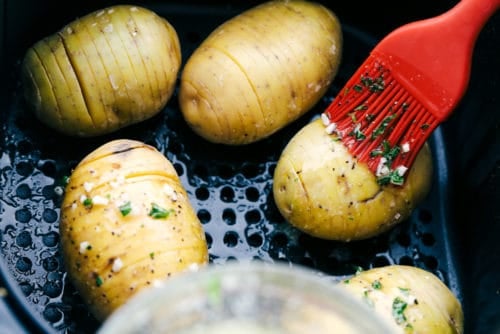
  4. Baste: Place the potatoes in the bottom of your air fryer basket. Brush the garlic herb butter along the tops of the potatoes.
  5. Bake: Cook at 360 degrees for 15-20 minutes or until tender.

Preparing potatoes for the air fryer with butter, herbs and salt.

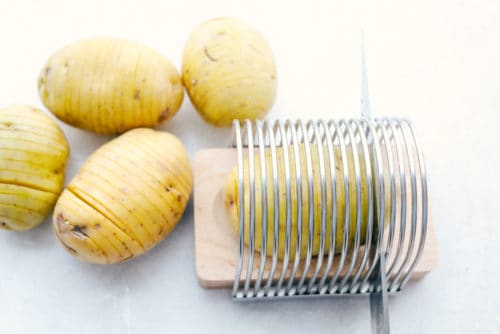
How to Cut the Perfect Hasselback Potatoes

There are a couple of different ways to achieve this classic look, and there are a few tips to make it easier.

  1. Sharp knife: Make sure your knife is sharp and do not use a serrated knife. They’re not the right tool for the job
  2. Hasselback Cutter: Yes there is such a thing, and I use this one here found on Amazon.
  3. Spoons: If you don’t have a hasselback cutter never fear. Take two wooden spoons and place them on either side of your potato as you slice them. This will create a natural stop for your knife so you don’t accidently cut all the way through.
  4. Chopsticks:  These will do the same thing as the spoons. Place on either side of the potato and again it will create a natural stop for your knife.

Tips and Toppings!

These take a bit more time than regular baked potatoes but the taste and appearance is totally worth it.

  • Potatoes: Russets are the go to potatoes for this side dish. You can use golden or red potatoes too, but they will be softer, and the outsides will not crisp up as nicely.
  • To Peel or Not to Peel: It a total preference. We love the way the skin adds flavor, texture and crisps so nicely. It also houses a good portion of the nutrition in potatoes, but you can definitely peel them if you are not a potato skin person.
  • Flavor: Experiment with flavors and seasonings. You can use chili powder, Italian seasoning, and ranch or create your own mix of flavors.
  • Top it: Top these with cheese, sour cream, bacon, any of your favorite toppings or just a little bit more butter. You can eat them straight from the air fryer as well.
  • Baste it: For more intense flavor save half of your seasonings and reapply half way through the cooking time. The potatoes will have opened up some and allow for more butter goodness to seep down it.

Crispy air fryer hasselback potatoes on a plate.

More Air Fryer Goodness

Air frying is hands down one my most favorite ways to cook. When I can I cook it in the air fryer i will. Air frying uses circulating air to perfectly cook your food. It creates crispy golden crusts and tender juicy centers. It usually cooks food faster than in the oven or fryer. Air Frying is also more healthy than conventional methods. When “frying” in the air fryer you use less to almost no oil. It is a total win win. If you are need of some scrumptious recipes to use in yours, you have to try some of these tried and true.

Print

Air Fryer Garlic Butter Hasselback Potatoes

Air Fryer Garlic Butter Hasselback Potatoes are going to be your new favorite side dish. They are fried to a golden brown and the flavor is amazing!
Course Side Dish
Cuisine American
Keyword air fryer haselback potatoes, haselback potatoes
Prep Time 5 minutes
Cook Time 15 minutes
Total Time 20 minutes
Servings 4 Potatoes
Calories 341kcal
Author Alyssa Rivers

Ingredients

  • 4-5 small size russet potatoes
  • salt and pepper to taste
  • 1/2 cup butter melted
  • 1 teaspoon fresh parsley finely chopped
  • 1 teaspoon fresh thyme finely chopped
  • 1 teaspoon fresh rosemary finely chopped
  • 3 cloves garlic minced

Instructions

  • Wash and scrub the potatoes. Slice the potatoes thinly leaving a half an inch base at the bottom.
  • Salt and pepper the potatoes.
  • In a small bowl combine melted butter, parsley, thyme, rosemary and garlic.
  • Place the potatoes in the bottom of your air fryer basket. Brush the garlic herb butter along the tops of the potatoes.
  • Cook at 360 degrees for 15-20 minutes or until tender.

Nutrition

Calories: 341kcal | Carbohydrates: 31g | Protein: 4g | Fat: 23g | Saturated Fat: 15g | Trans Fat: 1g | Cholesterol: 61mg | Sodium: 211mg | Potassium: 725mg | Fiber: 2g | Sugar: 1g | Vitamin A: 711IU | Vitamin C: 10mg | Calcium: 33mg | Iron: 2mg


from The Recipe Critic https://ift.tt/2NWnQ2I
https://ift.tt/3sHZZm8

मंगलवार, 2 मार्च 2021

Incredible Crispy Parmesan Air Fryer Cod

Air Fryer Cod will change the way you eat fish! Crispy golden outside and flakey tender inside, you are going to love this!

We love fish at our house, especially when it tastes this amazing! More favorites include Fish and Chips, Baja Tacos and this Salmon.

Crispy parmesan air fryer cod with asparagus on a plate.

Air Fryer Cod Filets

Air frying fish is one of the best ways to cook this delicate tender meat.  The air fryer basket is perfect, it allows the circulating air to cook the outside and the inside while keeping the fish intact. So many times I have lost chunks down between the slats of a grill or they stick to the pan. Air frying gives you delicate delightful fish that looks and tastes better than any restaurant. The panko breading is perfectly seasoned and the cheese adds a touch of saltiness and nuttiness. It’s so easy to make and tastes just as delicious!

Air fried parmesan cod is the perfect dinner choice. It has a light mild flavor and it is good for you. Serve it up with some rice, vegetables, or potatoes and a nice salad. Perfect for a busy weekday or a nice weekend dinner. Put this air fryer cod in your recipe rotation.

Ingredients for Parmesan Cod

Fresh and basic, this Cod could not be any easier or taste any better! It is so good!

  • Cod Fillets: You can use fresh or frozen.
  • Salt and Pepper: Season just to taste.
  • Flour: All purpose or unbleached will work.
  • Eggs: Large lightly beaten.
  • Salt: Adds flavor
  • Panko: I do not recommend breadcrumbs but they will work.
  • Parmesan: Grated will stick best to the fish.
  • Bay Seasoning: A classic flavoring for fish.
  • Garlic Powder: Adds more flavor.
  • Olive oil spray: Use this only if you need it.

Making Crispy Air Fryer Cod

Super easy parmesan cod is going to become a family favorite!

  1. Cod: Pat the cod dry and salt and pepper.
  2. Breading Station: Create a breading station for the fish. In one bowl add the flour. In the second whisk together the eggs and salt. Then in the last bowl add the Panko, parmesan cheese, old bay seasoning, and garlic powder.
  3. Flour: First dip the cod in the flour.
  4. Egg: Then in the egg mixture.
  5. Panko: And lastly in the panko.
  6. Air Fryer: Spray the bottom of your basket with olive oil. Place the fish in the basket of your air fryer.
  7. Bake: Cook at 400 degrees for 10 minutes. Carefully flip the fish. Continue to cook for 3-5 minutes or until the internal temperature reaches 145 degrees.

Seasoning, and breading the cod.

Tips For Dipping and Breading Cod

Breading any food can be messy. Here is sure fire way to at least keep it manageable.

  • One hand: With one hand dip the cod into the flour mixture and coat evenly. Using the same hand dip it into the egg mixture, shake off any excess egg.  Then drop into the panko mixture.
  • The Other Hand:  Use your other dry hand to press the panko into the cod evenly and all over. Coat it well. Then you place in the air fryer basket. Repeat.

Breaded panko in air fryer basket.

Tips for the Best Air Fryer Parmesan Cod

I love cooking with an air fryer for lots of reasons but one of them is that it is hard to mess up your food. Air frying makes it easy to make luscious meals, every single time.

  • Don’t Over Crowd: Given the fish space to breath, if they are too close together, they will steam instead of “fry”
  • Cod: Use a good quality cod fillet. Fresh or frozen is fine. You don’t them too thin or the fish won’t have time to crisp up before it starts to dry out. Thaw frozen cod according to package directions. Pat both dry with a paper towel to remove any extra moisture. This will help the crust crisp nicely.
  • Oil: Using oil is optional but can help it become crispy. Use an oil only spray. Not a non-stick spray, such as pam, they have additives that will ruin your air fryer.
  • Panko: Panko bread crumbs are larger and absorb less moisture so they will produce the best crust. It will be crispy and golden. Regular breadcrumbs will not give you the same results.
  • Fish: This will work with any type of white fish and turn out amazing. Think snapper, tilapia, bass and haddock.

Cooked cod in the air fryer with wedges of lemon.

What to Serve Crispy Air Fryer Parmesan Cod with

This crispy cod is awesome all by itself but you can add to it as you like.

  • Sauce: Tartar sauce is a fan favorite. Malt vinegar, ranch, yum yum sauce, or a squeeze of lemon might be all you need.
  • Use it in: Use this fried cod for fish tacos, mix into a salad, or make a fish sandwich to remember.

How to Store Cod Filets

Keep leftovers in the fridge for 2-3 days. Reheat in the air fryer for 2-3 minutes or till heated through. It won’t have the same crunchiness but it will still be good. Crispy Air Fryer Cod is best right out of the air fryer.

Upclose picture of a fork cutting into the air fryer cod.

More Seafood Favorites

We love a good seafood recipe at our house. Even the kids love it.  Fish is a healthy protein that is good to put in your mix of recipes on a weekly basis. Some seafood is rich like lobster and some is mild and light like shrimp. Whatever you prefer to eat I have a recipe for you. Here are a few tried and true to get you started.

Print

Air Fryer Cod

Air Fryer Cod will change the way you eat fish! Crispy golden outside and flakey tender inside, you are going to love this!
Course Dinner, Main Course
Cuisine American
Keyword air fryer cod, cod filets, Cod Fish
Prep Time 10 minutes
Cook Time 15 minutes
Total Time 25 minutes
Servings 4 Cod
Calories 303kcal
Author Alyssa Rivers

Ingredients

  • 1 pound cod filets
  • salt and pepper
  • 1/2 cup flour
  • 2 large eggs
  • 1/2 teaspoon salt
  • 1 cup Panko
  • 1/2 cup grated parmesan
  • 2 teaspoons old bay seasoning
  • 1/2 teaspoon garlic powder
  • olive oil spray if needed

Instructions

  • Salt and pepper the cod filets.
  • Create a breading station for the fish. In one bowl add the flour. In the second bowl whisk together the eggs and salt. In the last bowl add the Panko, parmesan cheese, old bay seasoning, and garlic powder.
  • First dip the cod in the flour.
  • Then in the egg mixture.
  • And lastly in the Panko.
  • Spray the bottom of your basket with olive oil. Place the fish in the basket of your air fryer. Cook at 400 degrees for 10 minutes. Carefully flip the fish. Continue to cook for 3-5 minutes or until the internal temperature reaches 145 degrees.

Nutrition

Calories: 303kcal | Carbohydrates: 24g | Protein: 32g | Fat: 8g | Saturated Fat: 3g | Trans Fat: 1g | Cholesterol: 153mg | Sodium: 689mg | Potassium: 576mg | Fiber: 1g | Sugar: 1g | Vitamin A: 315IU | Vitamin C: 1mg | Calcium: 211mg | Iron: 3mg


from The Recipe Critic https://ift.tt/381m7jE
https://ift.tt/3dZDjtk

Air Fryer Hot Dogs

Air Fryer Hot Dogs taste better than any grilled, boiled or game-day hot dog you have ever had! Making them in the Air Fryer is a game changer!

Serve up these summertime hot dogs anytime of the year! Have them with my famous potato salad, pasta salad or just some amazing homemade fries.

Air fryer hot dogs in a bun with mustard, ketchup and relish on a plate.

Easy and Delicious Air Fryer Hot Dogs

Air Frying is usually faster, healthier and the results are just impeccable. Hot dogs are no exception! The circulating air wraps around the hot dog cooking the inside to a tender, juicy perfection and creating perfect texture to the outside. They taste better than from the grill, boiled, or even cooked over an open flame. They are so delicious!

Now you don’t have to wait for summer to have the perfect hot dog. Any time of the year you can serve up a hot dog worthy meal right in your air fryer. Placing the bun in the air fryer with the hot dog at the end warms the bun and toasts it perfectly, without dirtying another pan or burning it in the toaster. So when your family is in need of a quick meal, or you are just craving a good hot dog, all you have to do is reach for the air fryer!

Classic Hot Dog Ingredients

With only two main ingredients you can’t get much simpler than this.

  • Hot Dogs: Pick your favorite high quality hot dog for excellent results.
  • Hot Dog Buns: Be sure to buy a bun that fits the hot dog.
  • Optional Toppings: Whatever you desire. Think ketchup, mustard, pickles , etc. See below for more ideas.

How to Make Hot Dogs in the Air Fryer

Air frying hot dogs makes these taste better than fresh off the grill and it is faster! You are going to love it!

  • Cook: Place the hot dogs in your air fryer basket. Cook at 400 degrees for 6-8 minutes.
  • Buns: For a toasty bun, add your hot dogs to your bun the last 2 minutes of cooking if desired. Top with your favorite toppings!

Hot dogs ready to cook.

Know your Air Fryer!

For the first batch of hot dogs, check after 6 minutes to see how they are doing. Some air fryers cook faster, hotter, slower or at a lower temperature. Cook the hot dogs until your desired doneness.  Use my times as a guide.

Up close picture of cooked hot dogs.

Tips For The Best Air Fryer Hot Dogs

Hot dogs are easy and a fast meal on those buys weekdays or lazy weeknights.

  • Slice or Prick Hot Dogs: Nope, you do not have to prick or slice your hot dogs before air frying. They will not explode on you. You can give them diagonal slits if you want to give them kind of a grilled look, but it is not necessary.
  • Quality Hot Dog: The better the quality of hot dog the better the flavor and taste. One of the great things about hot dogs is how cheap they are. You can make a great dinner on a budget and it will taste fantastic.
  • No Oil Needed:  You do not need to pre-oil your air fryer basket or spray the hot dogs with oil.
  • Bun: Toasting the bun in the air fryer is a must try. It creates the perfect soft bun on the inside and a slight toasty crunch to the outside.

Hot dogs in buns in an air fryer.

How to Serve your Hot and Ready Hot Dogs

There are multiple ways to eat a hot dog and everyone has their opinions. Just remember everyone is right in their opinion when comes to how to eat a hot dog.  Here are some ideas though if you need them.

Hot dogs in buns with ketchup and mustard up close.

More Air Fryer Recipes You Have to Try!

Air frying is changing the way we cook. It creates crispy crusts, juicy tender centers and it is just so easy to use. Using less oil makes foods more healthy and better for you. Air frying often is a faster way to cook too. It just creates foods with tastes and textures you cannot get any other way. Here are some of our favorite Air Fryer Recipes you have to try so you know exactly what I mean!

Print

Air Fryer Hot Dog

Air Fryer Hot Dogs taste better than any grilled, boiled or game-day hot dog you have ever had! Making them in the Air Fryer is a game changer!
Course Dinner, Main Course
Cuisine American
Keyword air fryer hot dogs, hot dogs
Prep Time 5 minutes
Cook Time 10 minutes
Total Time 15 minutes
Servings 4 Hot Dogs
Calories 229kcal
Author Alyssa Rivers

Ingredients

  • 4 hot dogs
  • 4 hot dog buns

Optional toppings:

  • relish
  • ketchup
  • mustard

Instructions

  • Place the hot dogs in your air fryer basket. Cook at 400 degrees for 6-8 minutes.
  • For a toasty bun, add your hot dogs to your bun the last 2 minutes of cooking if desired. Top with your favorite toppings!

Nutrition

Calories: 229kcal | Carbohydrates: 30g | Protein: 9g | Fat: 8g | Saturated Fat: 3g | Cholesterol: 20mg | Sodium: 520mg | Potassium: 120mg | Fiber: 1g | Sugar: 3g | Vitamin A: 1IU | Vitamin C: 1mg | Calcium: 84mg | Iron: 3mg


from The Recipe Critic https://ift.tt/3qdn4eY
https://ift.tt/3bOAQPT

सोमवार, 1 मार्च 2021

Easy Salsa Verde

Salsa Verde is fresh, spicy and way better than anything you will find in a jar. Super easy and quick, whip it up for a party in no time!

I love a good salsa, especially when they are homemade and fresh! If you love salsa you have to try these Restaurant Style, Blender Salsa and Mango Lime Avocado Salsa!

Fresh homemade salsa verde.

Salsa Verde Recipe

Do not be intimidated by roasting tomatillos, when I say this is an easy salsa verde, I mean it. This is simple, delicious and worth the bit of extra work. You are going to love the fresh flavors that come together in this salsa. Roasting the tomatillos brings depth and richness. And because it is not jarred, there is no weird aftertaste to this incredible salsa. It is going to become a staple in your household!

Salsa Verde is a green based salsa thus the name verde, which means green. Made with tomatillos and peppers give it its distinct color and flavor. It has a distinctly different tangy zesty flavor versus red salsas. It is often a more mild tasting salsa, but you can always add more kick if you need to.  Use this salsa to top Navajo Tacos, Chicken Fajitas, and Homemade Empanadas. You can also just serve it as an appetizer with corn chips.

Ingredients for Tomatillos Salsa

Look for tomatillos in the produce section near the jalapeños. They will have a husk on them that is easy to remove.

  • Tomatillos: Look for firm ones that are not squishy, wrinkled or blemished.
  • Small Onion: Roughly chop the onion.
  • Jalapeño Pepper: For more spice leave in the seeds, otherwise remove and chop.
  • Garlic Cloves: Adds extra flavor and heat.
  • Cilantro: Fresh and vibrant, cilantro is a classic herb used in Mexican cooking.
  • Salt to Taste: Don’t skip the salt, it helps brighten the flavors.

How to Make Green Salsa!

The longest part of making this salsa is roasting your tomatillos, and even that does not take that long. You will love the deep flavor in this salsa verde that comes from roasting!

  1. Tomatillos: Husk the tomatillos and rinse. Lay on a baking sheet. Heat the broiler to high and roast for about 10 minutes, turning half way through. Remove from oven and let cool.
  2. Combine: In a food processor or blender add the tomatillos, onion, jalapeño, garlic, cilantro and salt to taste.
  3. Blend: Pulse until it reaches the desired consistency. Serve as desired.

Tomatillos, roasted and other ingredients in food processor.

Tips for Incredible Salsa Verde

You and your family will love the mellow flavor of this salsa, you can add or delete according to your tastes.

  • Jalapeño: Get more of that roasted flavor by roasting your jalapeños with the tomatillos. If you want a bit more spice leave the seeds in your peppers or just remove part of them.
  • Tomatillos: Pick ones that are roughly the same size so they roast at the same rate. Be sure to peel back the husk before buying and check for that nice bright green color and smooth firm skin. Once peeled be sure to rinse them. Unlike tomatoes, you can store tomatillos in the fridge which will help them keep longer.
  • Thin it: If your salsa needs thinning add a Tablespoon or two of water.
  • Do not over process: This salsa shines when it is a bit chunky. Do not puree, unless you want to.
  • Better With Time:  Salsa Verde is amazing fresh, but it is divine when the flavors have time to really meld together too. Make this at least a day ahead for delightful flavor.

Variation of Homemade Salsa Verde

There are different ways to achieve the incredible flavor of a salsa verde, which you prefer is up to you.

  • Roast: You can roast your tomatillos in a pan on the stove over medium high heat. You want a good char on the skins, but not burned.
  • Boil: Another way to cook your tomatillos is to boil them. Place in a large saucepan and cover with water. Boil for 5 minutes then drain.
  • Sugar: You can 1/2-1 teaspoon of sugar to help balance the acidity from the tomatillos if you desire. Do not worry, you cannot taste it.
  • Canned Tomatillos: Yes you can use canned, you won’t need to char them and the flavor will be incredible but slightly different.
  • Boil it: To intensify the flavors once you have blended it place in a large pan or saucepan. Bring it to a boil then turn it down and let it simmer for about 10-15 minutes. Let cool before serving.

How to Use and Store the Best Salsa

Dipping a chip in homemade salsa verde.

More Mexican Inspired Dishes

I love Mexican food. It is so fresh, full of flavor and easy to customize. It is also super fast whip up. When I have trouble figuring out what to make, and no time, Mexican food is one of my all time favorite go to recipes. It is a food we can all agree on. Rich with spices and full of flavor and fresh ingredients, it is no wonder it is one of the most popular foods around.  Next time you are craving Mexican reach for one of these tried and true favorites.

Print

Salsa Verde

Salsa Verde is fresh, spicy and way better than anything you will find in a jar. Super easy and quick, whip it up for a party in no time!
Course Appetizer, Side Dish
Cuisine Mexican
Keyword salsa verde
Prep Time 10 minutes
Cook Time 10 minutes
Total Time 20 minutes
Servings 2 cups
Calories 143kcal
Author Alyssa Rivers

Ingredients

  • 1 1/2 pounds tomatillos
  • 1 small onion coarsely chopped
  • 2 jalapeño peppers seeded and roughly chopped
  • 3 Garlic Cloves
  • 1/2 cup cilantro packed
  • salt to taste

Instructions

  • Husk the tomatillos and rinse. Lay on a baking sheet. Heat the broiler to high and roast for about 10 minutes, turning half way through. Remove from the oven and let cool.
  • In a food processor or blender add the tomatillos, onion, jalapeño, garlic, cilantro, and salt to taste.
  • Pulse until it reaches the desired consistency. Serve with chips.

Nutrition

Calories: 143kcal | Carbohydrates: 28g | Protein: 4g | Fat: 4g | Saturated Fat: 1g | Sodium: 9mg | Potassium: 1066mg | Fiber: 8g | Sugar: 16g | Vitamin A: 810IU | Vitamin C: 63mg | Calcium: 49mg | Iron: 2mg


from The Recipe Critic https://ift.tt/2NPNk1F
https://ift.tt/2PnZgIs