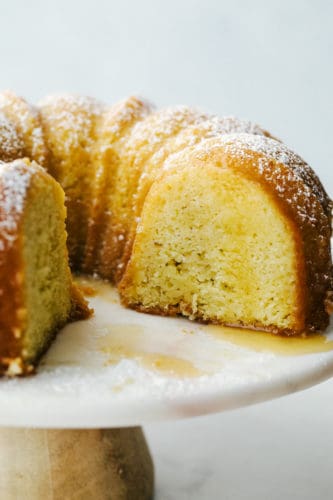
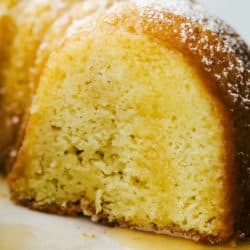
Kentucky Butter Cake is a moist, soft, buttery cake that is incredibly delicious. This luscious cake soaks up a buttery sweet sauce, that leaves a golden scrumptious crust you are going to love!
Cake is a favorite dessert of everyone’s. Reach for one of these favorites the next time you need a piece of cake Better than ANYTHING Cake, Cinnabon Cinnamon Roll Cake and Pineapple Upside Down Cake!

What is Kentucky Butter Cake?
Kentucky Butter Cake actually hails from Platte City Missouri. Back in 1963 Nell Lewis entered it into the Pillsbury Bake-Off and won. It has been making its way into homes ever since. This old-fashioned vanilla buttermilk pound cake is saturated with a luscious buttery syrup. It will create the most decadent glaze on the cake as it cools, similar to the glaze on a donut. The best part is that the heavenly syrup is in every bite of this incredible Kentucky Cake. All thanks to the holes that you slowly fill and drench the cake in its delightful flavor.
This Butter Cake is a favorite for holidays, and special occasions a like. You are going to love the fact that you don’t have to decorate this cake. The glaze will do it for you. Cooking the Kentucky Butter Cake in a bundt is key. It gives it a distinctive shape that is a decoration on it’s own. Dust the cake with a bit of powdered sugar for a finishing touch. This Butter Cake is the favorite where ever I take it. When you pull out this Butter cake be ready for oohs and aahs, oh and have the recipe ready to hand out! Everyone will want a copy!
Homemade Kentucky Butter Cake Ingredients
You probably have everything you need in your pantry right now. This cake is incredible. Don’t panic if you do not have buttermilk, I have a recipe link below to make your own. It is super easy so don’t let that stop you from indulging!
- Flour: All purpose flour works best.
- Salt: Use regular table salt. This helps balance the sweet.
- Baking Powder and Baking Soda: Together these will help create a lighter cake that will rise.
- Butter: The butter adds moisture and flavor.
- Sugar: A cake would not be cake without sugar. White sugar is used here.
- Eggs: Make sure your eggs are at room temperature for best results.
- Buttermilk: Adds an incredible tangy flavor and also creates a super soft moist dense crumb. If you don’t have buttermilk, make your own here.
What you need for Butter Glaze
- Butter: The star of the cake!
- Sugar: Just enough sweetness and helps create that sugary sweet crust on the outside.
- Vanilla: Flavor enhancer.
- Water: Helps to thin out the sauce to the right consistency.
Let’s Make Butter Cake!
This cake is wonderful the day it is made, but it is divine the next day. If you can plan ahead and make this the day before. If not at least let it sit for as long as possible for the cake to really soak up the buttery sauce and create that beautiful sweet crust on the outside.
- Preheat: Turn the oven on to preheat to 325 degrees.
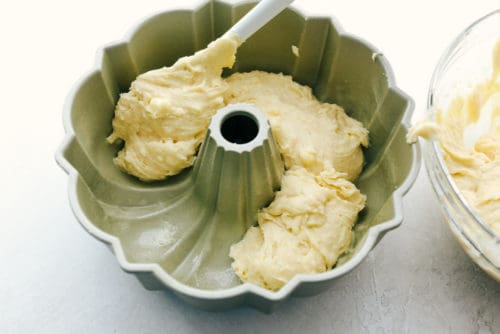
- Grease: Grease and flour a bundt cake pan and set aside.
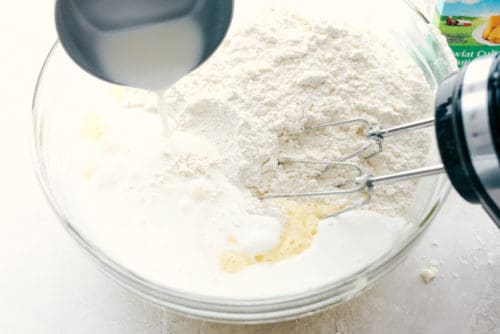
- Mix: In a medium size bowl whisk together the flour, salt, baking powder and baking soda. Set aside.
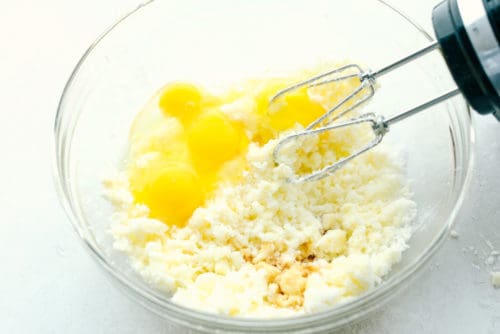
- Combine: In a large mixing bowl with a hand mixer cream together the butter and sugar.
- Add: Add the eggs one at a time and mix just till combined.
- Fold: Add in the flour mixture alternating with the buttermilk and mix gently.
- Pour: Spread evenly into the bundt pan and bake for 55-60 minutes or until a toothpick inserted comes clean. remove from the oven and let cool completely.
Make the Butter Glaze
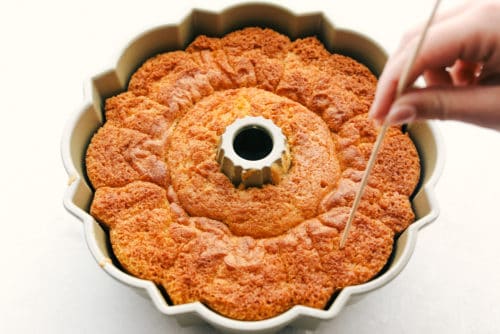
- Poke: With a wooden skewer poke holes into the cake.
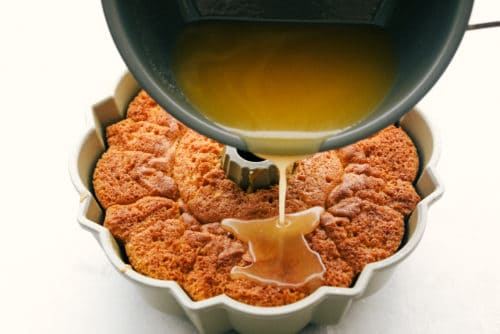
- Heat: In a medium sized saucepan add the butter, sugar, vanilla, and water. Cook over medium high heat until the butter is melted. Do not boil.
- Drizzle: Pour the sauce over the cake and allow for the cake to absorb the sauce.

Homemade Buttermilk Ingredients
So simple you will never need to buy it again. Milk and lemon juice or white vinegar will be a MUST on your grocery list! Follow this homemade buttermilk recipe here.
- Milk: Dairy milk, do not use non-dairy milk.
- Lemon Juice or White Vinegar: Fresh lemon juice and white vinegar are winners, but bottled and cider vinegar will work too.
How to Make Buttermilk
- Ratio: Use 1 Cup of Milk to 1 teaspoon Lemon juice or vinegar.
- Sit: Let it sit 5-10 minutes after mixing to let thicken and create that tang flavor.

Tips For the Best Kentucky Butter Cake
This Kentucky cake is so insanely delicious, you will want to take in these considerations to make sure you get the best one yet!
- Grease: This butter cake is sticky and has a bad reputation of sticking to the pan when trying to be removed. I highly recommend using butter, or shortening to thoroughly grease your pan and then flour it as well. Cooking sprays will not guarantee it coming out.
- Poke: If you can use the back end of some chopsticks or a thicker skewer. I have found toothpicks are too small and wooden spoon handles are too big. You want the holes big enough that the syrup soaks in perfectly, but not so big they destroy your cake.
- Room Temperature: The cake will work best if you use your buttermilk, butter and eggs at room temperature. Room temperature ingredients make it so much easier to mix. This will ensure your Kentucky Butter Cake isn’t overmixed which will give you a high volume soft cake, instead of a dense one.
- Reserve: Pour all but about ½ cup of the syrup into the holes. Then once the cake has mostly cooled and you have removed it from the pan, brush the remaining ½ cup on the cake. Brushing it slowly will help the glaze form that beautiful crust.

Flavor Variations
This is a great basic buttermilk cake that you can change up the flavor with if you like. You can change this up, just by changing the extract and adding a bit of zest. Try orange, lemon, peppermint, almond, coconut, or even rum!

How To Serve Your Bundt Cake
This Butter cake truly doesn’t need anything, it is so delicious on its own! But it can always be added too! Serve with fresh fruit, whip cream, ice cream, chocolate ganache, lemon curd or a fresh berry jam or sauce.

Storing and Freezing Butter Cake
This Kentucky butter cake gets better with time, up to a point of course.
- Store: Keep the cake tightly covered with plastic wrap or a cake container at room temperature for up to 5 days.
- Freeze: Once this has completely cooled wrap several times with plastic wrap and then with foil. If it fits in a freezer bag place inside. Freeze for up to 3 months and thaw on the counter when ready to eat.

More Incredible Buttermilk Recipes to Try
Buttermilk is a magical ingredient that makes regular recipes amazing. It adds a tangy flavor that makes the best tasting pancakes. Buttermilk creates moist fluffy biscuits and crispy fried chicken. It is one of those ingredients that you truly do not want to substitute out for something else. And because you can make your own buttermilk out of milk and lemon juice or vinegar, you’ll never be out of it!
- Crispy Air Fryer “Fried” Chicken
- The Best Fluffy Homemade Buttermilk Pancakes
- To Die For Homemade Buttermilk Syrup
- Homemade Biscuits and Gravy
- The Best and Easiest Hush Puppies
Kentucky Butter Cake
Ingredients
- 3 cups flour
- 1 teaspoon salt
- 1 teaspoon baking powder
- 1/2 teaspoon baking soda
- 1 cup butter softened
- 2 cups sugar
- 4 eggs
- 1 cup buttermilk
Butter Glaze:
- 1/3 cup butter
- 3/4 cup sugar
- 2 teaspoons vanilla
- 3 Tablespoons water
Instructions
-
Preheat oven to 325 degrees. Grease and flour a bundt cake and set aside. In a medium size bowl whisk together the flour, salt, baking powder and baking soda. Set Aside.
-
In a large mixing bowl with a hand mixer cream together the butter and sugar. Add in the eggs and mix until combined.
-
Add in the flour mixture alternating with the buttermilk and mix until combined.
-
Spread evenly into the bundt pan and bake for 55-60 minutes or until a toothpick inserted comes clean. Remove form the oven and let cool completely.
To make the butter glaze:
-
With a wooden skewer poke holes into the cake.
-
In a medium sized saucepan add the butter, sugar, vanilla, and water. Cook over medium high heat until the butter is melted. Do not boil.
-
Pour the sauce over the cake and allow for the cake to absorb the sauce.
Nutrition

from The Recipe Critic https://ift.tt/3rHIwtW
https://ift.tt/30y4vHL