रविवार, 14 मार्च 2021

Best Ever Baked Rigatoni

Baked Rigatoni is full of zesty meat, tender noodles and lots of cheese!  Super simple this is the ultimate comfort food!

Turn this hearty dish into a wonderful meal and serve it with these favorites. Garlic Bread, Asparagus and a Salad!

Baked rigatoni being spooned out of a bowl.

Baked Rigatoni

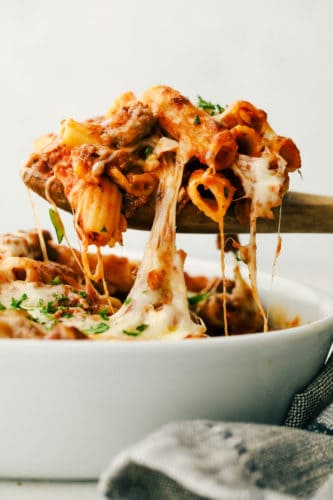
Baked Rigatoni is like taking the best parts of lasagna and spaghetti and putting them together. What you get is a magical hearty, cheesy dish! Everyone loves baked rigatoni! With tons of cheese, zesty tomato sauce and tender noodles, it is just so good! This is truly one of those comfort foods that fills you up both tummy and soul! Baked Rigatoni is a meal everyone loves to come home to and will readily devour.

Rigatoni is named for the noodles typically used in this Italian dish. Rigatoni noodles are large, round, and have ridges that help to hold in all the saucy goodness. They are a larger hollow noodle too which makes it wonderful as will fill with the meaty sauce and cheese. Do not get it confused with ziti which is smaller and does not have ridges or penne which is cut on a diagonal. Baked Rigatoni makes a large amount, so come hungry!

What You Need For Rigatoni

Amazing ingredients on their own, combine to create an incredible homey dish.

  • Rigatoni: Cook the pasta al dente for best results.
  • Olive Oil: The perfect oil for this Italian dish.
  • Small Onion: Finely chopped.
  • Garlic Mince the garlic.
  • Ground Beef: Use lean ground beef.
  • Ground Sausage: Using Italian sausage add a nice bit of spice.
  • Italian Seasoning: A great combination of spices and herbs.
  • Salt and Pepper: Add to taste.
  • Marinara: Use your favorite jarred sauce or even better make your own, it is so easy and delicious!
  • Mozzarella: Use freshly shredded mozzarella over pre-shredded.
  • Parmesan: Finely grated.
  • Chopped Basil: This is optional but adds great flavor.

Making Baked Rigatoni Pasta

You cook the meat and onions and sauce all in the same pan. Saves for easy cleanup.

  1. Prep: Preheat oven to 350 degrees. Spray 9×13 inch baking dish and set aside. In a large pot bring water to a boil and cook the rigatoni according to package directions.
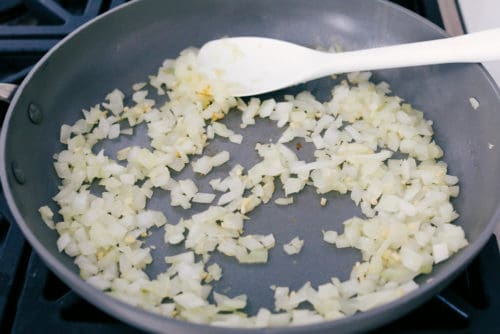
  2. Saute: In a medium sized saucepan over medium high heat add the olive oil, onions and garlic. Saute until tender.
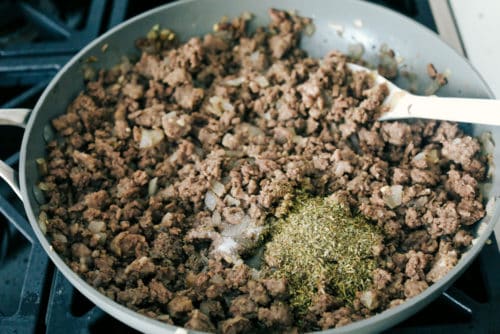
  3. Meat: Add in the ground beef and sausage and cook and crumble until no longer pink.
  4. Sauce: Add in the Italian seasoning, salt and pepper to taste, and marinara sauce. Reduce heat and let simmer.
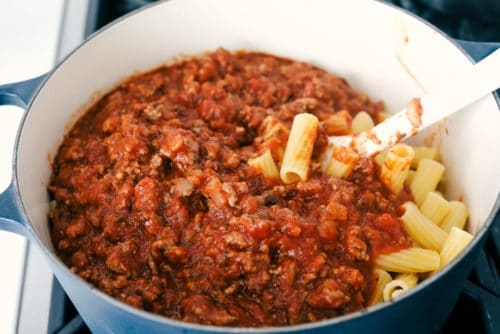
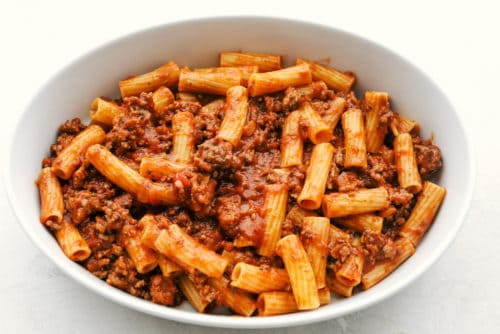
  5. Pasta: Drain the pasta and return to the large pot. Add the meat sauce to the pot and stir until combined.
  6. Layer: Spread half of the pasta in the bottom of your 9×13 inch dish. Layer with half of the pasta.
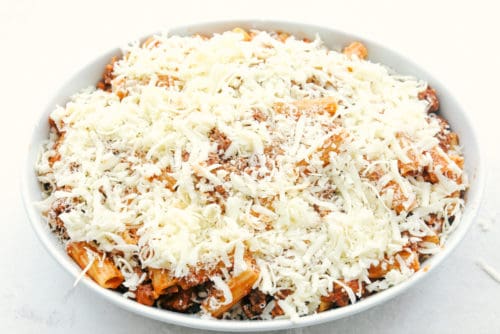
  7. Add: Layer with half of the cheeses. Repeat with remaining pasta and cheese.
  8. Bake: Cover with aluminum foil and bake for 20 minutes. Remove the foil and bake for an additional 15-20 minutes or until bubbly.

Making the meaty sauce and adding the noodles and cheese for Rigatoni.

Tips For The Best Baked Rigatoni

Rigatoni is simple and basic, but you can make it amazing with a few tips.

  • Noodles: Rigatoni is the noodle of choice for this casserole, but you can use other noodles in a pinch. Try to use similar type of noodle. For example rotini, penne, fusilli or large shell pasta. Whichever noodle you use cook the noodles al dente. This helps the noodles absorb the sauce.
  • Fresh Cheese: It is best if you can shred your own cheese, it will melt much easier and taste better. Pre-shredded cheese often comes with anti-caking agents that prevent it from melting the same and can alter the taste.
  • Meat: You can use extra lean ground beef so it isn’t overly greasy. If you find you have a lot of grease in the pan after you cook it. Remove the meat and drain the grease into a can or something you can throw away once the grease has solidified. Do not pour the grease down the sink. It is bad for your pipes. Then back in the meat and continue as directed.
  • Add a little Heat: You can make your baked rigatoni a bit more zesty by using a spicy Italian sausage, or you can add red pepper flakes to taste.
  • Add Vegetables: This is a great dish to add vegetables to or hide them in. Zucchini, mushrooms, peppers, carrots, or spinach.

Baked rigatoni in a white bowl.

Make Ahead and Freeze!

This is one of those amazing recipes that you can make ahead of time and it will actually taste better after it has sit and the flavors have melded together.

  • Make Ahead: Make the baked rigatoni according to directions but do not bake it. Tightly cover and refrigerate for up to 24 hours before baking. Let the 9×13 pan sit for about 20 min before baking.
  • Freeze: If you want to you can even freeze the rigatoni before it is baked or after for up to 3 months. If you don’t bake it let it thaw overnight in the fridge or on the counter for a few hours. Bake as directed, checking to make sure it is done in the middle. It may need more time. If you have baked it, simply thaw and reheat in the oven or microwave.
  • Leftovers: This makes a large dish, so you can feed a crowd or have leftovers. I have to say leftovers taste even better than when it is fresh. There is just something about Italian food that is always better the second day. Leftovers can be kept in the fridge for up to 5 days. Reheat in the microwave.

Two plates with baked rigatoni.

More Pasta Dishes to Fall in Love With

Pasta is one of the best comfort foods there is, it’s filling, and incredibly versatile. Combine it with all sorts of different sauces and meats to create marvelous dishes! Pasta comes in all sorts of shapes and sizes and is so fun to cook with. So when you need a pasta fix reach for some of these divine recipes, they are all delectable.

Print

Baked Rigatoni

Baked Rigatoni is full of zesty meat, tender noodles and lots of cheese!  Super simple this is the ultimate comfort food!
Course Dinner, Main Course
Cuisine American, Italian, Italian American
Keyword baked rigatoni, rigatoni, rigatoni pasta
Prep Time 15 minutes
Cook Time 40 minutes
Total Time 55 minutes
Servings 6 People
Calories 906kcal
Author Alyssa Rivers

Ingredients

  • 16 ounce rotini pasta
  • 1 Tablespoon Olive Oil
  • 1 small onion diced
  • 3 cloves garlic minced
  • 1 pound lean ground beef
  • 1 pound ground sausage
  • 1 Tablespoon italian seasoning
  • salt and pepper
  • 2 (24 ounce jars) marinara sauce or Homemade Marinara
  • 16 ounce mozzarella cheese shredded
  • 1/2 cup parmesan cheese shredded
  • chopped basil for garnish

Instructions

  • Preheat oven to 350 degrees. Spray a 9x13 inch baking dish and set aside. In a large pot bring water to a boil and cook the rotini according to package directions.
  • In a medium sized sauce pan over medium high heat add the olive oil, onions and garlic. Sauté until tender.
  • Add in the ground beef and sausage and cook and crumble until no longer pink.
  • Add in the italian seasoning, salt and pepper to taste, and marinara sauce. Reduce heat and let simmer.
  • Drain the pasta and return to the large pot. Add the meat sauce to the pot and stir until combined.
  • Spread half of the pasta in the bottom of your 9x13 inch dish. Layer with half of the pasta.
  • Layer with half of the cheeses. Repeat with remaining pasta and cheese.
  • Cover with aluminum foil and bake for 20 minutes. Remove the foil and bake for an additional 15-20 minutes or until bubbly.

Nutrition

Calories: 906kcal | Carbohydrates: 61g | Protein: 58g | Fat: 46g | Saturated Fat: 20g | Trans Fat: 1g | Cholesterol: 167mg | Sodium: 1144mg | Potassium: 726mg | Fiber: 3g | Sugar: 4g | Vitamin A: 648IU | Vitamin C: 2mg | Calcium: 530mg | Iron: 4mg


from The Recipe Critic https://ift.tt/3thQjip
https://ift.tt/3vxK8sG

शनिवार, 13 मार्च 2021

Absolute Best Mint Brownies

These are the Absolute Best Mint Brownies Ever! They have a thick fudgy brownie bottom, soft mint middle and a smooth, melt in your mouth ganache top!

Brownies are some of the best desserts out there, and they come in all sorts of varieties. You have to also try these fan favorites, Lemon, Red Velvet and Nutella Blondies!

Mint brownies stacked on top of each other.

Mint Brownies

We are coming up on St. Patrick’s day and Girl Scout Cookie selling is almost over. With those two things on the brain, I automatically think Thin Mints and all things green.  So naturally these insanely delicious green mint brownies were a given. These decadent morsels begin with a thick fudgy brownie layer that is the perfect consistency. Next we cream butter and cream cheese together for a delightful creamy mint filling that you can color green. Then it is topped off with a simple yet rich chocolate ganache that absolutely makes them heavenly.

I love serving these around St. Patrick’s day because of the fun green center, but these make an appearance year round because they are just so good!  They are always the biggest hit wherever I take them. That is, if my family doesn’t eat them all first! You have to make these, you will not regret it!

Ingredients for the Best Mint Brownies

This is one of the best brownie recipes around! If you really just need a chocolate fix, you can skip the mint layer and just eat the brownies. But you might have to make another batch so you can actually taste how divine these mint brownies truly are.

Brownie 

  • Butter: Use butter at room temperature
  • Unsweetened Chocolate: This is unsweetened chocolate bar, not powder.
  • Sugar: Granulated sugar will help cut the bitterness of the chocolate.
  • Vanilla: Vanilla extract makes chocolate taste more like chocolate.
  • Salt: Helps to balance the flavors.
  • Eggs: Take out your eggs early enough that they are at room temperature.
  • Flour: All purpose and unbleached flour will work perfectly.

Mint Frosting 

  • Butter: Again use butter that is at room temperature.
  • Cream Cheese: Soften your cream cheese in the microwave or let sit to come to room temperature.
  • Mint Extract: You can use peppermint extract as well.
  • Green Food Coloring: Add more or less depending on how green you want your layer.
  • Powdered Sugar: Provides the necessary sweetness and mixes in better than just sugar.

Chocolate Ganache Layer

  • Butter: You will melt the butter so it is ok if it is cold.
  • Semi Sweet Chocolate Chips: Semi sweet gives the best combination of dark and regular chocolate that blends perfectly with the mint.

How to Make Mint Brownies

There are a few steps to this amazing brownie recipe, but do not be put off by them. These mint brownies come together really easily. You will be enjoying these brownies in no time!

Brownies:

  1. Prep: Heat oven to 350 degrees. Line a 9×13 pan with foil and spray lightly with cooking spray. Set aside
  2. Melt: In a microwave-safe bowl, melt butter and chocolate 30 seconds at a time until melted and smooth. Stir in sugar, vanilla and salt. Add in eggs and flour. Mix until incorporated.
  3. Spread: Spread brownie mix into the bottom of your 9×13 inch prepared pan. Bake for 40-45 minutes or until toothpick comes out clean. Remove and let cool

Mint Frosting Layer: 

  1. Cream: Beat the butter and the cream cheese together. Add in the mint extract, food coloring and powdered sugar. Beat until smooth and creamy.
  2. Spread: Spread on top of the cooled brownies and put in the fridge for 30 minutes to chill.

Chocolate Ganache: 

  1. Ganache:  In a medium sized microwave safe bowl add the butter and the chocolate chips. Melt in the microwave stirring 30 seconds at a time until smooth. Spread on top of mint frosting layer. Chill 1-3 hours until chocolate has set and brownies can easily be out.

Making the brownies, mint filling and chocolate frosting.

Tips and Notes for Homemade Mint Brownies

These are so scrumptious, I am glad that this makes a 9×13 pan. Anything smaller just would not be enough. I would have to actually stop eating them after the first 3!

  • Brownie:  Homemade brownies are always better, but in a pinch a box mix will do, and they will still taste great! Sometimes we all need a few shortcuts.
  • Coloring: Mint brownies are a huge hit everywhere you take them. Change up the color of the mint middle to whatever color you need for your special occasion. Pink or Blue for baby showers, leave it white, or color it red. It’ll be a nice surprise to bite into the cool mint when it is a different color.
  • Ganache: Many times ganache is made using cream and chocolate. By using butter and chocolate chips it will create a soft top. With all ganache heat it very slowly and stir often. You do not want to over heat it and cause your ganache to split.
  • Add Ins: Mix in extra chocolate chips, crushed cookies, or nuts in to your mint brownies. Add the same to your ganache if you want or decorate with simple sprinkles.

Mint brownies on their sides showing the layers.

Should I Use Mint Extract or Peppermint Extract?

Great question! There is definitely a difference when it comes to mint vs peppermint. It all depends on your taste for which one you will prefer in your mint brownies. Whichever one you use, know that they both go beautifully with chocolate and can be used interchangeably. Not sure which one to use? Make two batches, it will just give you more to eat that way!

  • Mint: Mint is usually made up of a combination of spearmint and peppermint. It has a softer more mild flavor than peppermint and it is not quite as zingy as peppermint would be.  It still has a bright flavor however that is refreshing.
  • Peppermint: Peppermint is made of just straight up peppermint. It will have more of a crisp, cool, clean minty flavor. It can be a bit stronger but still has that refreshing flavor.

How to Store Brownies

  • Store: I love these best when they are cold, so I keep them tightly wrapped or sealed in the fridge for about a week. You can also keep them in an airtight container at room temperature for 4-5 days.
  • Freeze: Wrap mint brownies tightly and store them in the freezer for up to 3 months. Thaw at room temperature.

Layered mint brownies stacked on a white plate.

All Things Mint!

Mint and chocolate were made to go together! The zing of the mint perfectly matches the richness of the chocolate. There is a reason Thin Mints are the all time most sold cookie every year when the Girl Scouts come knocking. It is refreshing and helps lighten chocolate when it can seem too heavy. It is an incredible combination. If you are not sure, then try one of these tried and true mint and chocolate recipe to see for yourself.

Print

Mint Brownies

These are the Absolute Best Mint Brownies Ever! They have a thick fudgy brownie bottom, soft mint middle and a smooth, melt in your mouth ganache top!
Course Dessert
Cuisine American
Keyword mint brownies
Prep Time 30 minutes
Cook Time 1 hour
Total Time 1 hour 30 minutes
Servings 12 Brownies
Calories 891kcal
Author Alyssa Rivers

Ingredients

Brownie Ingredients:

  • 1 cup butter
  • 6- ounce unsweetened chocolate
  • 2 cups sugar
  • 1 teaspoon vanilla
  • 1 teaspoon salt
  • 4 eggs
  • 1 1/4 cup flour

Mint Frosting Ingredients:

  • 3/4 cup butter softened
  • 3 ounces cream cheese softened
  • 2 teaspoons mint extract
  • 5 drops green food coloring
  • 3 cups powdered sugar

Chocolate Ganache Layer:

  • 1/2 cup butter
  • 2 cups semi sweet chocolate chips

Instructions

To Make the brownies:

  • Heat oven to 350 degrees. Line a 13x9 inch pan with foil and spray lightly with cooking spray. Set aside.
  • In a microwave-safe bowl, melt butter and chocolate 30 seconds at a time until melted and smooth. Stir in sugar vanilla and salt. Add in eggs and flour. Mix until incorporated.
  • Spread brownie mix into the bottom of your 13x9 inch prepared pan. Bake for 40-45 minutes or until toothpick comes out clean. Remove and let cool.

To make the mint frosting layer:

  • Beat the butter and the cream cheese together. Add in the mint extract, food coloring, and powdered sugar. Beat until smooth and creamy.
  • Spread on top of the cooled brownies and put in the fridge for 30 minutes to chill.

To make the chocolate ganache:

  • In a medium sized microwave safe bowl add the butter and the chocolate chips. Melt in the microwave stirring 30 seconds at a time until smooth. Spread on top of mint frosting layer. Chill 1-3 hours until chocolate has set and brownies can easily be cut.

Nutrition

Calories: 891kcal | Carbohydrates: 94g | Protein: 8g | Fat: 57g | Saturated Fat: 35g | Trans Fat: 1g | Cholesterol: 156mg | Sodium: 549mg | Potassium: 345mg | Fiber: 5g | Sugar: 74g | Vitamin A: 1253IU | Calcium: 61mg | Iron: 5mg


from The Recipe Critic https://ift.tt/3t9c43O
https://ift.tt/2OPeshg

शुक्रवार, 12 मार्च 2021

Carrot Cake Bars

A carrot cake bar on a plate with a fork.

These carrot cake bars are easy to make and unbelievably delicious. They are moist, perfectly spiced, and topped with an incredibly fluffy cream cheese frosting.

If you love dessert bars, also try these Lemon Coconut Bars and these Cherry Cheesecake Bars!

A carrot cake bar on a plate with a fork.

Carrot Cake Bars

We’ve been told a few times that these are the best carrot cake bars ever. They are perfectly moist, have amazing flavor, and the cream cheese frosting is truly magical. The bars + the frosting is a match made in heaven.

Carrot cake bars are a great way to enjoy carrot cake without the commitment of having to bake (and eat) a whole cake. To make these bars, we’ve taken our loved carrot cake recipe and scaled and tweaked it so that it works in a 9″x9″ pan. The bars turn out very soft yet are firm enough to pick up with your hands. Even so, we sometimes like to cut big squares and eat them with a fork. It’s just so good.

Carrot cake bars are an amazing year-round treat. In the springtime or at Easter, however, they are a must-make recipe. The moist cake, gentle spices, fresh carrots, and soft cream cheese frosting is a delicious way to celebrate and treat yourself!

Do you Love Carrot Cake?

Then you should also check out The BEST Carrot Cake Recipe EVER!

4 pictures showing how to make carrot cake bars.

How To Make Carrot Cake Bars

It’s easy to make carrot cake bars!

  1. Make the cake. Simply mix the wet ingredients in one bowl and the dry ingredients in another bowl. Now mix them together and add some grated carrots. Then bake the cake until a toothpick inserted into the middle comes out clean.
  2. Make the frosting. Beat some room temperature cream cheese with butter, powdered sugar, a little vanilla, and a splash of milk. Easy!
  3. Put it all together. Once the cake is 100% cool (don’t rush this part or you’ll melt the frosting!) spread the cream cheese frosting over the cake then cut it into bars.

How to Decorate These Bars

We like to decorate our carrot cake bars with a little sprinkle of cinnamon. It’s simple yet really pretty. Here are a few other fun toppings you can try:

  • A sprinkle of finely chopped nuts
  • A whole pecan or walnut on top of each bar
  • Small carrot-shaped candies
  • Sprinkles
  • A little finely grated carrot

Keep It Fresh With These Variations

  • Pineapple – instead of the apple sauce, use crushed pineapple.
  • Switch up the nuts – pecans, walnuts, and chopped almonds are all great.
  • Brown butter – nix the oil and add tasty brown butter instead.
  • Coconut – mix ½ cup of shredded or desiccated coconut into the batter.

A closeup of carrot cake bars in a pan.

How Big are These Bars?

That’s totally up to you! In the first picture above, you’ll see the bars cut into nine big, mouthwatering pieces. At this size, it’s a real sweet treat that’s more like a big slice of cake. Cut into twelve pieces is a bit more reasonable, but perhaps not quite as much fun.

We like to cut ours into 36 small pieces that are two bites each. In the last picture, you’ll see one of the bars cut to this size. The easiest way to do this is to cut nine bars then cut each of the large bars into 4 smaller bars.

How Long do Carrot Cake Bars Last?

These bars will keep well for 5-7 days if kept in a covered container on your counter. Make sure to read below to find out about storing the frosting!

How to Store Carrot Cake Bars

We store our frosted carrot cake bars on the counter and make sure that we eat them within 2-3 days. While many people agree that the sugar in the frosting acts as a preservative, other people feel more comfortable refrigerating it. If you live in a hot area, then refrigerating the frosting is a must.

But since carrot cake bars taste best if stored covered at room temperature, you may want to keep the frosting separately in the fridge and frost each bar before you eat it. Remember, the frosting will harden in the fridge and it will need about 10 minutes to soften enough to spread on the carrot cake bars.

A hand holding a carrot cake bar.

Popular Carrot Cake Recipes

A carrot cake bar on a plate with a fork.
Print

Carrot Cake Bars

These carrot cake bars are easy to make and unbelievably delicious. They're moist, perfectly spiced, and topped with an incredibly fluffy cream cheese frosting. 
Course Dessert
Cuisine American
Keyword carrot cake bars
Prep Time 15 minutes
Cook Time 40 minutes
Total Time 55 minutes
Servings 9 large bars
Calories 466kcal
Author Kristen Stevens

Ingredients

Carrot Cake Bars

  • ½ cup unsweetened apple sauce
  • ¼ cup neutral-flavored oil
  • 3 large eggs
  • ½ cup brown sugar
  • ½ cup granulated sugar
  • 1 teaspoon vanilla
  • 2 ½ cups all-purpose flour
  • 2 teaspoons baking soda
  • 1 teaspoon ground cinnamon
  • ½ teaspoon salt
  • ¼ teaspoon ground cloves
  • ¼ teaspoon ground nutmeg
  • 2 cups finely grated carrots
  • ½ cup raisins and chopped nuts (optional)

Cream Cheese Frosting

  • 6 ounces cream cheese softened
  • 2 tablespoons salted butter softened
  • 2 ½ cups powdered sugar
  • 1 tablespoon cream or milk
  • 1 teaspoon vanilla

Instructions

  • Preheat your oven to 350 degrees. Lightly spray or butter a 9x9 inch baking dish
  • In a large mixing bowl, whisk the apple sauce, oil, eggs, sugars, and vanilla. 
  • In a medium-sized mixing bowl, whisk the flour, baking soda, cinnamon, salt, cloves, and nutmeg. Add this to the large bowl then mix until just combined. Fold in the carrots and any optional ingredients then pour the batter into the baking dish. 
  • Bake for 35-40 minutes, or until a toothpick comes out clean. Remove the pan from the oven and let the bars cool completely in the pan. 
  • When the bars are completely cool, make the icing. Add the softened cream cheese and butter to a large bowl or the bowl of your stand mixer and mix to combine. Add the powdered sugar, cream, and vanilla and beat until light and fluffy. Add more powdered sugar for a thicker frosting or more cream for a thinner frosting.
  • Spread the frosting over the carrot cake then cut them into bars.

Nutrition

Calories: 466kcal | Carbohydrates: 86g | Protein: 7g | Fat: 11g | Saturated Fat: 6g | Trans Fat: 1g | Cholesterol: 89mg | Sodium: 484mg | Potassium: 117mg | Fiber: 1g | Sugar: 58g | Vitamin A: 426IU | Vitamin C: 1mg | Calcium: 48mg | Iron: 2mg


from The Recipe Critic https://ift.tt/2OHU3ea
https://ift.tt/2OspHN1

Copycat Chick-fil-A Sandwich

Chick-fil-A sandwiches are just as tender and juicy as the original, only better!  Now you can satisfy your craving for those perfectly breaded and seasoned sandwiches anytime you need to!

Make a full Chick-fil-A menu for a fun night out, that’s actually in!  Make Chicken nuggets, Regular or Frosted Lemonade and of course you have to have the famous Chick-fil-A Sauce to make it complete!

Copycat Chick fil A chicken sandwich on a bun with pickles and fries.

Copycat Chick-fil-A Chicken Sandwich

We absolutely love Chick-fil-A at our house! So you can imagine my excitement when I found this copycat recipe. I kept thinking how awesome it would be to make these at home. They were a lot easier than I thought they would be to make and they tasted identical!  My family loved them!

My little boy kept asking how I got them to look the same and taste the same as Chick-fil-A. They were perfectly crisp on the outside and packed with flavor on the inside. Of course you have to serve them on a toasted bun with pickles and some lemonade. And after you serve them to your family say, “My pleasure!”

What You Need For Chicken Sandwiches

These are surprisingly easy to make and the ingredients are simple. Our secret ingredient, malt powder can be found with the chocolate milk mixes in your local store. So let’s get cooking!

  • Chicken: Boneless skinless chicken breasts.
  • Salt and Pepper: Use freshly ground pepper for the best flavor.
  • Paprika: Gives it color and flavor.
  • Peanut Oil: This oil is the best oil for frying because of its high smoke content.
  • Egg: Large or extra large, not medium sized.
  • Milk: I used nonfat, but you can use any percent or even buttermilk.
  • Flour: All purpose flour
  • Malted Milk Powder: Adds incredible flavor that mimics the original.
  • Confectioners Sugar: Also known as powdered sugar for a bit of sweet and lightness.
  • Baking Soda: Helps the breading fry up light and crispy.
  • Dry Mustard: Flavor enhancer.
  • Pickle Juice: Helps to tenderize the chicken.
  • Hamburger Buns: Lightly toast your buns before putting the chicken on it.
  • Chick-fil-A Sauce: Yes you can make it at home too!

Making Chick-fil-A Sandwiches just like the Original

Super easy and extremely tasty, your whole family will be so impressed how awesome you are when you make these copycat chick-fil-a sandwiches!

  1. Chicken: Pound each chicken breast to be about ¼ to ½ inch thickness. This will help them to fry easier. Season chicken with 1 tsp salt, and ½ tsp each of paprika and pepper. Set chicken aside.
  2. Oil: In a heavy bottom pan, heat 2 inches of peanut oil over medium heat until a deep fry thermometer registers 325 degrees, or until small drops of water sizzle and evaporate.
  3. Flour and Egg mixture: While the oil is heating, whisk the egg, milk, pickle juice, and 2 Tablespoons water in a baking dish. Then whisk flour, malted milk powder, confectioners sugar, baking soda, dry mustard, the remaining paprika and salt and pepper in another dish.
  4. Dip and Dredge: Dip the chicken first in the egg mixture. Then dredge in the flour mixture coating completely.
  5. Fry: Fry the chicken in the hot oil until brown, about 4 minutes, adjusting the heat if needed. Drain on paper towels.
  6. Serve: Serve on lightly toasted buns with desired toppings and chick-fil-a sauce.

Seasoning, breading and frying chicken for sandwiches.

Tips For Perfect Chick-fil-A Sandwiches

Making these is super easy and all it takes is a little time, and then you can enjoy one of the best sandwiches ever in your own home!

  • Chicken: Pounding the chicken thin or even butterflying it is super important. You want the chicken to cook through by the time the breading is done. Otherwise the breading can burn before the chicken is done. Chicken is done when the internal temperature registers 165 degrees.
  • Marinate: You can let the chicken marinate in a mixture of pickle juice and water. Use ½ cup pickle juice and ¼ cup water, let marinate for 30 minutes. This will help the chicken be extra juicy and tender. If you add this step you can skip the pickle juice in the egg mixture.
  • Breading: If you like extra breading on your chicken, double dip your chicken. After you dredge it in the egg and flour mixture, repeat it by dipping it in the egg and then the flour again. It will create an even crispier crunchier breading.
  • Oil: If you do not have peanut oil, you can use canola or another vegetable oil. Do not use olive or other low smoke oils. You want one that can handle the heat.

Copycat Chick-Fil-A Sandwich with fries on a plate.

More Variations and Tips for Chick-Fil-A Chicken

  • Spicy: You can make the spicy version of this Chick-fil-A chicken by adding 1 teaspoon of cayenne to the flour mixture. Add more or less according to your tastes. If you have some who don’t want it spicy, dredge theirs first. Then add the spice to the rest of the flour mixture and continue as directed.
  • Toppings: One thing about Chick-fil-A is that I never get enough pickles! Making these at home you can add all the toppings you want. Lettuce, tomato, pickles, extra sauce and don’t forget the cheese!
  • Storing and Reheating: If you have any leftovers keep them in the fridge tightly sealed for up to 4 days. Reheat in the oven or in a pan to crisp up the outside. Avoid the microwave as it will toughen the chicken and make the outside soggy.
  • Serve: These chicken sandwiches are perfect for a fun dinner or even a special lunch. Serve them up and serve with a side of fries and fry sauce. Add a pasta salad, broccoli and cauliflower salad, 7 layer salad or fruit salad to round it out. Make some homemade Root Beer and brownies and you have a dynamite meal on your hands!

Holding a chicken sandwich with pickles, lettuce and tomatoes.

More Chicken Recipes to Love

Chicken is one of the best proteins. It is relatively cheap, healthy and super easy to customize. Because of its mild flavor you can add all sorts of different spices to make so many different kinds of chicken recipes. Here are some of our tried and true favorites that really allow the chicken to shine!

Print

Copycat Chick-fil-A Sandwich

Deliciously crispy chicken sandwiches that taste just like Chick-fil-A.
Course Dinner, Main Course
Cuisine American
Keyword chick fil a sandwich, chicken sandwich, chicken sandwich recipes, copycat chick fil a sandwich
Prep Time 20 minutes
Cook Time 5 minutes
Total Time 25 minutes
Servings 4 Servings
Calories 531kcal
Author Alyssa Rivers

Ingredients

  • 4 chicken breasts boneless skinless
  • Kosher salt
  • pepper freshly ground
  • 1 teaspoon paprika
  • Peanut oil for frying (at least 2 inches to cover the bottom of a pan)
  • 1 large egg
  • 1/2 cup nonfat milk
  • 1 cup all-purpose flour
  • 1 tablespoon malted milk powder
  • 1 tablespoon confectioners sugar
  • 1/4 teaspoon baking soda
  • 1/4 teaspoon dry mustard
  • 1 Tablespoon Pickle Juice optional
  • 4 soft hamburger buns split
  • Chick Fil A Sauce

Instructions

  • Pound each chicken breast to be about ¼ to ½ inch thickness. This will help them to fry easier. Season chicken with 1 tsp salt, and ½ tsp each of paprika and pepper. Set chicken aside.
  • In a heavy bottom pan, heat 2 inches of peanut oil over medium heat until a deep fry thermometer registers 325 degrees, or until small drops of water sizzle and evaporate.
  • While the oil is heating, whisk the egg, milk, pickle juice* (if using) and 2 T water in a baking dish. Then whisk both flours, the malted milk powder, confectioners sugar, baking soda, dry mustard, the remaining ½ tsp paprika, and 1 teaspoon each of salt and pepper in another dish.
  • Dip the chicken first in the egg mixture.
  • Then dredge in the flour mixture coating completely.
  • Fry the chicken in the hot oil until brown about 4 minutes, adjusting the heat if needed. Drain on paper towels.
  • Serve on lightly toasted buns with desired toppings and Chick Fil A Sauce. Pickles, lettuce, and even a slice of cheese!

Notes

Updated on March 11, 2021
Originally Posted on August 16, 2013

Nutrition

Calories: 531kcal | Carbohydrates: 50g | Protein: 58g | Fat: 9g | Saturated Fat: 2g | Cholesterol: 187mg | Sodium: 636mg | Potassium: 1028mg | Fiber: 3g | Sugar: 7g | Vitamin A: 436IU | Vitamin C: 3mg | Calcium: 139mg | Iron: 4mg


from The Recipe Critic https://ift.tt/3rEzTQJ
https://ift.tt/3crZmXe