मंगलवार, 16 मार्च 2021

Instant Pot Corned Beef and Cabbage

Corned Beef and Cabbage will make your St. Patrick’s Day a breeze. The beef is tender and the cabbage and potatoes is full of flavor, you will love this!

Corned Beef and Cabbage is a classic then add Soda Bread to complete the meal. For dessert enjoy a little green with Mint Brownies or a Shamrock Shake.

Corned beef, potatoes, cabbages, and carrots on a platter.

Corned Beef and Cabbage

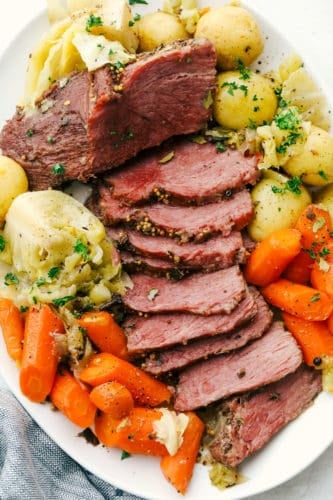
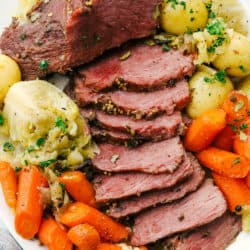
This Irish holiday is a favorite at our house. Along with everything being turned green ( think green milk, pancakes etc), we get to eat this delectable dish! Corned Beef and cabbage is a must for St. Patrick’s Day festivities. Cooking it in the instant pot guarantees tender moist beef and perfectly cooked cabbage and potatoes.Adding the carrots gives it texture, color and flavor. It is the easiest and most delicious way to eat this Irish traditional meal.

Cooking the corned beef and cabbage in the instant pot is a hands off approach that will save you time and stress. If this is your first time cooking it, then the instant pot is the way to go. It will come out perfect and tender! Cook the vegetables separate from the beef so that they don’t get over cooked. This will be a meal that will wow your family! It is so good you may want to make it more than just once a year, which you probably should anyway!

What is Corned Beef?

Traditional Irish made this meal originally with boiled bacon, but when they immigrated to America, they could not afford it pork or bacon. Corned Beef Brisket is what they used instead. They paired it with the cheapest vegetables around, cabbage and potatoes. It has been tradition here in America ever since.

Corned beef is beef brisket that has been soaked in brine and then cured with salt and seasonings. The pink color comes from the sodium nitrate that is used in the  curing process. Corned beef comes in multiple cuts, and is best cooked for a long period of time so that it comes out tender. It can be boiled, slow cooked, or roasted.

What You Need To Make Corned Beef

Now is the time to buy corned beef! I like to buy more than one and stick one in my freezer for later in the year when I get the craving. Corned beef is a favorite.

  • Onion: Roughly chopped
  • Corned Beef Brisket:
  • Water: Needed to create the pressure.
  • Pickling Spice: Many corned beef come with the spices in a packet included.
  • Carrots: Use regular carrots and not baby carrots for best flavor.
  • Baby Potatoes: Red or yellow potatoes work well.
  • Cabbage: Roughly  chopped.

How to Make Corned Beef and Cabbage in the Instant Pot

The instant pot takes the work and fret out of making fork tender corned beef. The vegetables need to be cooked separately so they don’t turn to mush.

  1. Place: Add the onion to the bottom of your instant pot. Place the corned beef on top and sprinkle with pickling spice.
  2. Cook: Add the water the instant pot and make sure the valve is turned to seal. Set the instant pot to high and cook for 80 minutes.
  3. Rest: Once the time is up, carefully turn the valve to release and let the remaining pressure out. Remove the beef and onions from the instant pot and set it aside to rest.
  4. Cook Vegetables: Take out two cups of the water and add the carrots, potatoes, and cabbage. Make sure the valve is turned to seal. Turn the pressure cooker to high for 5 minutes. Once the time is up then release the pressure. Once the pressure is released slice up the meat going against the grain and serve with vegetables.

Putting the corned beef in the instant pot and adding the vegetables.

How to Buy Corned Beef

March is the perfect time to buy corned beef, although you can usually find it year round. It is mostly found in two different cuts. The flat cut brisket and the point cut. You can also sometimes find a corned beef roast, but they are not as popular since they have the least amount of fat and dry out easily.

Flat cut brisket and point cut brisket are the cuts you want to look for and buy. Flat is a favorite because it comes in a uniform shape and size. This makes the corned beef easy to cut and you can trim the fat off easy from the top. Point cuts usually have the most fat, but can be the most tender.  Either one will work beautifully for this Instant pot recipe.

Cooked corned beef with cabbage, potatoes, and carrots.

Tips for the Best Instant Pot Corned Beef

Leftover corned beef is divine! Make a Breakfast Corned Beef Hash or these Incredible Corned Beef Sandwiches!

  • Potatoes: To get the best results you want to use waxy potatoes that won’t break down as easily when cooked. Yukon golds or yellow potatoes, red potatoes and fingerlings are all ideal choices. Avoid russets, they can break down into mush when cooked.
  • Carrots:  Yes baby carrots can be used and are convenient, but if you have the time use large carrots peeled and chunked. They will give you better flavor and hold up nicely to the instant pot.
  • Pickling Spices: Almost all corned beef will come with a package of spices with it. This is the same as pickling spices and you can just use them for ease. If you do not have a packet use a combination of allspice berries, coriander seeds, mustard seeds, whole pepper seeds, bay leaves and whole cloves. Salt and pepper to taste.
  • Cut against the Grain: This is one of the most important steps for insuring tender, melt in your mouth meat. As you look at your corned beef you’ll notice how the strands of meat lay in one direction, usually lengthwise. You are going to want to cut against that or at a perpendicular angle. This automatically will help the meat be tender and not fibrous when you eat it.
  • Leftovers: Store leftovers tightly wrapped or in an airtight container for up to 5 days. You can freeze it for up to 3 months. Thaw and reheat as desired.

Sliced corned beef, cabbage, carrots, and potatoes on a plate.

More Recipes With Cabbage to Rediscover

Cabbage is wonderful little vegetable that gets overlooked sometimes. It is an exceptionally healthy food. Cabbage  is especially high in vitamins C and K. In addition, eating cabbage may even help lower the risk of certain diseases, improve digestion and combat inflammation. It also adds crunch, volume and taste to dishes. So add these tried and true recipes to add more cabbage to your life. It’s good for you!

Print

Instant Pot Corned Beef and Cabbage

Instant Pot Corned Beef and Cabbage will make your St. Patrick's Day a breeze. The beef is tender and the cabbage and potatoes is full of flavor, you will love this!
Course Dinner, Main Course
Cuisine Irish
Keyword Corned beef, Corned beef and cabbage, instant pot corned beef, instant pot corned beef and cabbage
Prep Time 5 minutes
Cook Time 1 hour 25 minutes
Total Time 1 hour 30 minutes
Servings 6 People
Calories 580kcal
Author Alyssa Rivers

Ingredients

  • 1 large onion quartered
  • 3-4 pound corned beef brisket
  • 4 cups water
  • 2 Tablespoons pickling spice
  • 4 large Carrots
  • 1 pound baby potatoes
  • 1 head cabbage quartered

Instructions

  • Add the onion to the bottom of your instant pot. Place the corned beef on top and sprinkle with pickling spice.
  • Add the water the instant pot and make sure the valve is turned to seal. Set the instant pot to high and cook for 80 minutes.
  • Once the time is up, carefully turn the valve to release and let the remaining pressure out. Remove the beef and onions from the instant pot and set it it aside to rest.
  • Take out two cups of the water and add the carrots, potatoes, and cabbage. Make sure the valve is turned to seal. Turn the pressure cooker to high for 5 minutes. Once the time is up then release the pressure. Once the pressure is released slice up the meat going against the grain and serve with the veggies.

Nutrition

Calories: 580kcal | Carbohydrates: 31g | Protein: 38g | Fat: 34g | Saturated Fat: 11g | Cholesterol: 122mg | Sodium: 2835mg | Potassium: 1460mg | Fiber: 8g | Sugar: 9g | Vitamin A: 8180IU | Vitamin C: 137mg | Calcium: 125mg | Iron: 5mg


from The Recipe Critic https://ift.tt/3vpVijb
https://ift.tt/30Nliqr

सोमवार, 15 मार्च 2021

Glazed Lemon Pound Cake

Birdseye view of a glazed cake on a sheet of baking paper.

This bright and zesty glazed lemon pound cake is buttery, soft and topped with an easy lemon glaze. It is perfect for lemon lovers!

If you’re a true lemon lover like me, try this Glazed Lemon Bread or Glazed Lemon Brownies as well.

Birdseye view of a glazed cake on a sheet of baking paper.

Moist Lemon Pound Cake

Marie here from Sugar Salt Magic and I’m so excited to bring you this recipe. Aside from the uplifting aroma that fills your home while this cake bakes (reason enough to make it asap) the flavor and texture are just what you want from a lemon pound cake.

The crumb is soft but tight, the flavor is buttery and oh so lemony with lemon juice and zest starring in both the batter and glaze. This cake is easy to make and with the simple glaze poured over the top, perfect when you feel like a morning or afternoon pick me up.

What is a Pound Cake?

It’s all in the name. Traditionally a pound cake was made with a pound of flour, a pound of eggs, a pound of butter and a pound of sugar and sometimes a leavened. This results in a very rich and dense cake.leavened

Over time, the classic pound cake has been adjusted and adapted. Having no liquid in the traditional recipe, the cake could be prone to turning out a little dry. Not this one.

A loaf cake with glaze dripping down the sides.

Ingredients in Lemon Cake

Technically, this would be a half pound cake, having roughly half a pound of those classic pound cake ingredients like flour, butter, sugar and eggs. In addition, this one has these pantry staple ingredients.

  • Baking powder: to help it rise and lighten it up.
  • Salt: Just a touch for balance
  • Vanilla: for flavor and balance
  • Lemon: both zest and juice make this cake bright and zesty, while the juice adds some moisture.
  • Buttermilk: This helps to make the cake moist and tender.

How to Make The Best Lemon Pound Cake

This lemon pound cake has just a few simple steps and is simply glazed so it isn’t difficult to make. The cake batter will look like it’s split at various stages. Don’t worry, it will bake up perfectly. With buttermilk, lemon zest and juice, it has a high acid content which can react with the butter.

  1. Combine the dry ingredients.
  2. Cream together butter and sugar until pale and fluffy.
  3. Add the eggs (photo 1) one at a time and making sure to scrape down the sides of the bowl often.
  4. Add vanilla and zest and beat them in.
  5. Alternate the dry ingredients with the buttermilk and lemon juice (photos 2 & 3), stirring until just combined.
  6. Tip it into a lined loaf tin (photo 4) and bake for 50-60 minutes.
  7. Once out of the oven, wait 5 minutes before removing it from the tin and onto a cooling rack. Let it cool before glazing so the glaze doesn’t run straight off.
  8. For the glaze, mix together powdered sugar and zest then gradually add lemon juice mixing until it is just barely pourable.

4 images showing the steps to making pound cake.

Top Tips for Pound Cake!

  • The lemon juice and buttermilk add moisture to this cake but cakes, and particularly pound cakes can over-bake if you aren’t paying attention.
  • When baking with lemons, always zest them first, then juice them: it’s nearly impossible to do the other way round. I use a micro-plane to zest them.
  • Bring the butter, eggs and buttermilk to room temperature before starting. Cold ingredients don’t incorporate so well.

How to Know When Your Pound Cake is Done

Remember: all ovens vary and what takes an hour in mine may take 50 minutes in yours. Always check your bake 5-8 minutes (on longer bakes, 2-3 minutes on shorter bakes) before the recipe suggests by poking a toothpick into the centre.

  • If it comes out wet, it’s still not finished baking.
  • If it comes out with just a couple sticky crumbs on, this is perfectly baked. Remove it from the oven.
  • If it comes out with no crumbs attached, it’s already over-baked. Take it out and remove it from the tin immediately to reduce the risk of it cooking further and drying out more.

A slice of cake on a white plate with gold fork nearby.

Can I Freeze Glazed Lemon Pound Cake?

Lemon pound cake has a low moisture content so it’s best eaten within 1-2 days, however it freezes beautifully. Any leftovers can be wrapped tightly in plastic wrap and frozen for up to 3 months.

A stack of flat cake slices on a wooden board.

More Lemon Recipes You Will Love

Birdseye view of a glazed cake on a sheet of baking paper.
Print

Glazed Lemon Pound Cake

This bright and zesty glazed lemon pound cake is buttery, soft and topped with an easy lemon glaze. It’s perfect for lemon lovers.
Course Dessert
Cuisine Europe
Keyword glazed lemon pound cake, lemon pound cake
Prep Time 20 minutes
Cook Time 1 hour
0 minutes
Total Time 1 hour 20 minutes
Servings 10 Slices
Calories 371kcal
Author Marie Roffey

Ingredients

For the Cake

  • 1 ½ cups all purpose flour (195g / 6.8oz)
  • 1 teaspoon baking powder
  • ¼ teaspoon salt
  • 1 cup unsalted butter, softened (226g / 8oz / 2 sticks)
  • 1 cup white granulated sugar (200g / 7oz)
  • 4 large eggs, room temp
  • 1 teaspoon vanilla
  • 1 ½ tablespoons lemon zest
  • ¼ cup lemon juice
  • ¼ cup buttermilk, room temp

For the Glaze

  • 1 ¼ cups powdered sugar (163g / 5.7oz)
  • 1 teaspoon lemon zest
  • 6-8 teaspoons lemon juice

Instructions

Making the Cake:

  • Preheat the oven to 350F / 180C / 160C fan forced. Grease and line a 6 cup capacity loaf tin with baking paper so that its sticking up above the sides.
  • In a small bowl combine the flour, baking powder and salt, then whisk to combine well.
  • In a large bowl or the bowl of stand mixer with paddle attachment, beat the butter and sugar until lightened and creamy.
  • Beat in the eggs, one at a time, making sure each is fully incorporated before adding the next. Scrape the sides of the bowl from time to time.
  • Add the vanilla and lemon zest and beat to combine.
  • Add half the flour mixture and mix on low just until combined (no more).
  • Follow with the combined buttermilk and lemon juice, mix in, then the rest of the flour mixing until only just combined.
  • Tip the mixture into the prepared tin, then level out with a spatula.
  • Bake for 50-60 minutes until a toothpick comes out with a crumb or two attached.
  • Remove from tin after 5 minutes using the baking paper to lift it, then allow to cool completely before glazing.

Making the Glaze:

  • Mix together the icing sugar, zest and half the lemon juice. Slowly add more lemon juice until it gets to the desired consistency, then pour it over the cake.

Notes

You'll need 2-3 lemons for this recipe, depending on size and how juicy they are.

Nutrition

Calories: 371kcal | Carbohydrates: 50g | Protein: 2g | Fat: 19g | Saturated Fat: 12g | Trans Fat: 1g | Cholesterol: 49mg | Sodium: 62mg | Potassium: 78mg | Fiber: 1g | Sugar: 35g | Vitamin A: 568IU | Vitamin C: 5mg | Calcium: 28mg | Iron: 1mg


from The Recipe Critic https://ift.tt/3vtiKvF
https://ift.tt/3rKF8yq

रविवार, 14 मार्च 2021

Best Ever Baked Rigatoni

Baked Rigatoni is full of zesty meat, tender noodles and lots of cheese!  Super simple this is the ultimate comfort food!

Turn this hearty dish into a wonderful meal and serve it with these favorites. Garlic Bread, Asparagus and a Salad!

Baked rigatoni being spooned out of a bowl.

Baked Rigatoni

Baked Rigatoni is like taking the best parts of lasagna and spaghetti and putting them together. What you get is a magical hearty, cheesy dish! Everyone loves baked rigatoni! With tons of cheese, zesty tomato sauce and tender noodles, it is just so good! This is truly one of those comfort foods that fills you up both tummy and soul! Baked Rigatoni is a meal everyone loves to come home to and will readily devour.

Rigatoni is named for the noodles typically used in this Italian dish. Rigatoni noodles are large, round, and have ridges that help to hold in all the saucy goodness. They are a larger hollow noodle too which makes it wonderful as will fill with the meaty sauce and cheese. Do not get it confused with ziti which is smaller and does not have ridges or penne which is cut on a diagonal. Baked Rigatoni makes a large amount, so come hungry!

What You Need For Rigatoni

Amazing ingredients on their own, combine to create an incredible homey dish.

  • Rigatoni: Cook the pasta al dente for best results.
  • Olive Oil: The perfect oil for this Italian dish.
  • Small Onion: Finely chopped.
  • Garlic Mince the garlic.
  • Ground Beef: Use lean ground beef.
  • Ground Sausage: Using Italian sausage add a nice bit of spice.
  • Italian Seasoning: A great combination of spices and herbs.
  • Salt and Pepper: Add to taste.
  • Marinara: Use your favorite jarred sauce or even better make your own, it is so easy and delicious!
  • Mozzarella: Use freshly shredded mozzarella over pre-shredded.
  • Parmesan: Finely grated.
  • Chopped Basil: This is optional but adds great flavor.

Making Baked Rigatoni Pasta

You cook the meat and onions and sauce all in the same pan. Saves for easy cleanup.

  1. Prep: Preheat oven to 350 degrees. Spray 9×13 inch baking dish and set aside. In a large pot bring water to a boil and cook the rigatoni according to package directions.
  2. Saute: In a medium sized saucepan over medium high heat add the olive oil, onions and garlic. Saute until tender.
  3. Meat: Add in the ground beef and sausage and cook and crumble until no longer pink.
  4. Sauce: Add in the Italian seasoning, salt and pepper to taste, and marinara sauce. Reduce heat and let simmer.
  5. Pasta: Drain the pasta and return to the large pot. Add the meat sauce to the pot and stir until combined.
  6. Layer: Spread half of the pasta in the bottom of your 9×13 inch dish. Layer with half of the pasta.
  7. Add: Layer with half of the cheeses. Repeat with remaining pasta and cheese.
  8. Bake: Cover with aluminum foil and bake for 20 minutes. Remove the foil and bake for an additional 15-20 minutes or until bubbly.

Making the meaty sauce and adding the noodles and cheese for Rigatoni.

Tips For The Best Baked Rigatoni

Rigatoni is simple and basic, but you can make it amazing with a few tips.

  • Noodles: Rigatoni is the noodle of choice for this casserole, but you can use other noodles in a pinch. Try to use similar type of noodle. For example rotini, penne, fusilli or large shell pasta. Whichever noodle you use cook the noodles al dente. This helps the noodles absorb the sauce.
  • Fresh Cheese: It is best if you can shred your own cheese, it will melt much easier and taste better. Pre-shredded cheese often comes with anti-caking agents that prevent it from melting the same and can alter the taste.
  • Meat: You can use extra lean ground beef so it isn’t overly greasy. If you find you have a lot of grease in the pan after you cook it. Remove the meat and drain the grease into a can or something you can throw away once the grease has solidified. Do not pour the grease down the sink. It is bad for your pipes. Then back in the meat and continue as directed.
  • Add a little Heat: You can make your baked rigatoni a bit more zesty by using a spicy Italian sausage, or you can add red pepper flakes to taste.
  • Add Vegetables: This is a great dish to add vegetables to or hide them in. Zucchini, mushrooms, peppers, carrots, or spinach.

Baked rigatoni in a white bowl.

Make Ahead and Freeze!

This is one of those amazing recipes that you can make ahead of time and it will actually taste better after it has sit and the flavors have melded together.

  • Make Ahead: Make the baked rigatoni according to directions but do not bake it. Tightly cover and refrigerate for up to 24 hours before baking. Let the 9×13 pan sit for about 20 min before baking.
  • Freeze: If you want to you can even freeze the rigatoni before it is baked or after for up to 3 months. If you don’t bake it let it thaw overnight in the fridge or on the counter for a few hours. Bake as directed, checking to make sure it is done in the middle. It may need more time. If you have baked it, simply thaw and reheat in the oven or microwave.
  • Leftovers: This makes a large dish, so you can feed a crowd or have leftovers. I have to say leftovers taste even better than when it is fresh. There is just something about Italian food that is always better the second day. Leftovers can be kept in the fridge for up to 5 days. Reheat in the microwave.

Two plates with baked rigatoni.

More Pasta Dishes to Fall in Love With

Pasta is one of the best comfort foods there is, it’s filling, and incredibly versatile. Combine it with all sorts of different sauces and meats to create marvelous dishes! Pasta comes in all sorts of shapes and sizes and is so fun to cook with. So when you need a pasta fix reach for some of these divine recipes, they are all delectable.

Print

Baked Rigatoni

Baked Rigatoni is full of zesty meat, tender noodles and lots of cheese!  Super simple this is the ultimate comfort food!
Course Dinner, Main Course
Cuisine American, Italian, Italian American
Keyword baked rigatoni, rigatoni, rigatoni pasta
Prep Time 15 minutes
Cook Time 40 minutes
Total Time 55 minutes
Servings 6 People
Calories 906kcal
Author Alyssa Rivers

Ingredients

  • 16 ounce rotini pasta
  • 1 Tablespoon Olive Oil
  • 1 small onion diced
  • 3 cloves garlic minced
  • 1 pound lean ground beef
  • 1 pound ground sausage
  • 1 Tablespoon italian seasoning
  • salt and pepper
  • 2 (24 ounce jars) marinara sauce or Homemade Marinara
  • 16 ounce mozzarella cheese shredded
  • 1/2 cup parmesan cheese shredded
  • chopped basil for garnish

Instructions

  • Preheat oven to 350 degrees. Spray a 9x13 inch baking dish and set aside. In a large pot bring water to a boil and cook the rotini according to package directions.
  • In a medium sized sauce pan over medium high heat add the olive oil, onions and garlic. Sauté until tender.
  • Add in the ground beef and sausage and cook and crumble until no longer pink.
  • Add in the italian seasoning, salt and pepper to taste, and marinara sauce. Reduce heat and let simmer.
  • Drain the pasta and return to the large pot. Add the meat sauce to the pot and stir until combined.
  • Spread half of the pasta in the bottom of your 9x13 inch dish. Layer with half of the pasta.
  • Layer with half of the cheeses. Repeat with remaining pasta and cheese.
  • Cover with aluminum foil and bake for 20 minutes. Remove the foil and bake for an additional 15-20 minutes or until bubbly.

Nutrition

Calories: 906kcal | Carbohydrates: 61g | Protein: 58g | Fat: 46g | Saturated Fat: 20g | Trans Fat: 1g | Cholesterol: 167mg | Sodium: 1144mg | Potassium: 726mg | Fiber: 3g | Sugar: 4g | Vitamin A: 648IU | Vitamin C: 2mg | Calcium: 530mg | Iron: 4mg


from The Recipe Critic https://ift.tt/3thQjip
https://ift.tt/3vxK8sG

शनिवार, 13 मार्च 2021

Absolute Best Mint Brownies

These are the Absolute Best Mint Brownies Ever! They have a thick fudgy brownie bottom, soft mint middle and a smooth, melt in your mouth ganache top!

Brownies are some of the best desserts out there, and they come in all sorts of varieties. You have to also try these fan favorites, Lemon, Red Velvet and Nutella Blondies!

Mint brownies stacked on top of each other.

Mint Brownies

We are coming up on St. Patrick’s day and Girl Scout Cookie selling is almost over. With those two things on the brain, I automatically think Thin Mints and all things green.  So naturally these insanely delicious green mint brownies were a given. These decadent morsels begin with a thick fudgy brownie layer that is the perfect consistency. Next we cream butter and cream cheese together for a delightful creamy mint filling that you can color green. Then it is topped off with a simple yet rich chocolate ganache that absolutely makes them heavenly.

I love serving these around St. Patrick’s day because of the fun green center, but these make an appearance year round because they are just so good!  They are always the biggest hit wherever I take them. That is, if my family doesn’t eat them all first! You have to make these, you will not regret it!

Ingredients for the Best Mint Brownies

This is one of the best brownie recipes around! If you really just need a chocolate fix, you can skip the mint layer and just eat the brownies. But you might have to make another batch so you can actually taste how divine these mint brownies truly are.

Brownie 

  • Butter: Use butter at room temperature
  • Unsweetened Chocolate: This is unsweetened chocolate bar, not powder.
  • Sugar: Granulated sugar will help cut the bitterness of the chocolate.
  • Vanilla: Vanilla extract makes chocolate taste more like chocolate.
  • Salt: Helps to balance the flavors.
  • Eggs: Take out your eggs early enough that they are at room temperature.
  • Flour: All purpose and unbleached flour will work perfectly.

Mint Frosting 

  • Butter: Again use butter that is at room temperature.
  • Cream Cheese: Soften your cream cheese in the microwave or let sit to come to room temperature.
  • Mint Extract: You can use peppermint extract as well.
  • Green Food Coloring: Add more or less depending on how green you want your layer.
  • Powdered Sugar: Provides the necessary sweetness and mixes in better than just sugar.

Chocolate Ganache Layer

  • Butter: You will melt the butter so it is ok if it is cold.
  • Semi Sweet Chocolate Chips: Semi sweet gives the best combination of dark and regular chocolate that blends perfectly with the mint.

How to Make Mint Brownies

There are a few steps to this amazing brownie recipe, but do not be put off by them. These mint brownies come together really easily. You will be enjoying these brownies in no time!

Brownies:

  1. Prep: Heat oven to 350 degrees. Line a 9×13 pan with foil and spray lightly with cooking spray. Set aside
  2. Melt: In a microwave-safe bowl, melt butter and chocolate 30 seconds at a time until melted and smooth. Stir in sugar, vanilla and salt. Add in eggs and flour. Mix until incorporated.
  3. Spread: Spread brownie mix into the bottom of your 9×13 inch prepared pan. Bake for 40-45 minutes or until toothpick comes out clean. Remove and let cool

Mint Frosting Layer: 

  1. Cream: Beat the butter and the cream cheese together. Add in the mint extract, food coloring and powdered sugar. Beat until smooth and creamy.
  2. Spread: Spread on top of the cooled brownies and put in the fridge for 30 minutes to chill.

Chocolate Ganache: 

  1. Ganache:  In a medium sized microwave safe bowl add the butter and the chocolate chips. Melt in the microwave stirring 30 seconds at a time until smooth. Spread on top of mint frosting layer. Chill 1-3 hours until chocolate has set and brownies can easily be out.

Making the brownies, mint filling and chocolate frosting.

Tips and Notes for Homemade Mint Brownies

These are so scrumptious, I am glad that this makes a 9×13 pan. Anything smaller just would not be enough. I would have to actually stop eating them after the first 3!

  • Brownie:  Homemade brownies are always better, but in a pinch a box mix will do, and they will still taste great! Sometimes we all need a few shortcuts.
  • Coloring: Mint brownies are a huge hit everywhere you take them. Change up the color of the mint middle to whatever color you need for your special occasion. Pink or Blue for baby showers, leave it white, or color it red. It’ll be a nice surprise to bite into the cool mint when it is a different color.
  • Ganache: Many times ganache is made using cream and chocolate. By using butter and chocolate chips it will create a soft top. With all ganache heat it very slowly and stir often. You do not want to over heat it and cause your ganache to split.
  • Add Ins: Mix in extra chocolate chips, crushed cookies, or nuts in to your mint brownies. Add the same to your ganache if you want or decorate with simple sprinkles.

Mint brownies on their sides showing the layers.

Should I Use Mint Extract or Peppermint Extract?

Great question! There is definitely a difference when it comes to mint vs peppermint. It all depends on your taste for which one you will prefer in your mint brownies. Whichever one you use, know that they both go beautifully with chocolate and can be used interchangeably. Not sure which one to use? Make two batches, it will just give you more to eat that way!

  • Mint: Mint is usually made up of a combination of spearmint and peppermint. It has a softer more mild flavor than peppermint and it is not quite as zingy as peppermint would be.  It still has a bright flavor however that is refreshing.
  • Peppermint: Peppermint is made of just straight up peppermint. It will have more of a crisp, cool, clean minty flavor. It can be a bit stronger but still has that refreshing flavor.

How to Store Brownies

  • Store: I love these best when they are cold, so I keep them tightly wrapped or sealed in the fridge for about a week. You can also keep them in an airtight container at room temperature for 4-5 days.
  • Freeze: Wrap mint brownies tightly and store them in the freezer for up to 3 months. Thaw at room temperature.

Layered mint brownies stacked on a white plate.

All Things Mint!

Mint and chocolate were made to go together! The zing of the mint perfectly matches the richness of the chocolate. There is a reason Thin Mints are the all time most sold cookie every year when the Girl Scouts come knocking. It is refreshing and helps lighten chocolate when it can seem too heavy. It is an incredible combination. If you are not sure, then try one of these tried and true mint and chocolate recipe to see for yourself.

Print

Mint Brownies

These are the Absolute Best Mint Brownies Ever! They have a thick fudgy brownie bottom, soft mint middle and a smooth, melt in your mouth ganache top!
Course Dessert
Cuisine American
Keyword mint brownies
Prep Time 30 minutes
Cook Time 1 hour
Total Time 1 hour 30 minutes
Servings 12 Brownies
Calories 891kcal
Author Alyssa Rivers

Ingredients

Brownie Ingredients:

  • 1 cup butter
  • 6- ounce unsweetened chocolate
  • 2 cups sugar
  • 1 teaspoon vanilla
  • 1 teaspoon salt
  • 4 eggs
  • 1 1/4 cup flour

Mint Frosting Ingredients:

  • 3/4 cup butter softened
  • 3 ounces cream cheese softened
  • 2 teaspoons mint extract
  • 5 drops green food coloring
  • 3 cups powdered sugar

Chocolate Ganache Layer:

  • 1/2 cup butter
  • 2 cups semi sweet chocolate chips

Instructions

To Make the brownies:

  • Heat oven to 350 degrees. Line a 13x9 inch pan with foil and spray lightly with cooking spray. Set aside.
  • In a microwave-safe bowl, melt butter and chocolate 30 seconds at a time until melted and smooth. Stir in sugar vanilla and salt. Add in eggs and flour. Mix until incorporated.
  • Spread brownie mix into the bottom of your 13x9 inch prepared pan. Bake for 40-45 minutes or until toothpick comes out clean. Remove and let cool.

To make the mint frosting layer:

  • Beat the butter and the cream cheese together. Add in the mint extract, food coloring, and powdered sugar. Beat until smooth and creamy.
  • Spread on top of the cooled brownies and put in the fridge for 30 minutes to chill.

To make the chocolate ganache:

  • In a medium sized microwave safe bowl add the butter and the chocolate chips. Melt in the microwave stirring 30 seconds at a time until smooth. Spread on top of mint frosting layer. Chill 1-3 hours until chocolate has set and brownies can easily be cut.

Nutrition

Calories: 891kcal | Carbohydrates: 94g | Protein: 8g | Fat: 57g | Saturated Fat: 35g | Trans Fat: 1g | Cholesterol: 156mg | Sodium: 549mg | Potassium: 345mg | Fiber: 5g | Sugar: 74g | Vitamin A: 1253IU | Calcium: 61mg | Iron: 5mg


from The Recipe Critic https://ift.tt/3t9c43O
https://ift.tt/2OPeshg