शुक्रवार, 19 मार्च 2021

Brown Butter Garlic Fried Gnocchi

Brown Butter Garlic Fried Gnocchi are tender morsels tossed in a buttery herb sauce you are going to love! Super easy and quick, this is a perfect dish for busy nights!

Gnocchi is so flavorful, easy to cook and fun to eat. Try these amazing gnocchi recipes; Spinach, Sausage and Sage , Chicken and Sausage Tomato.

Fried gnocchi with browned butter in a skillet.

Pan Fried Gnocchi

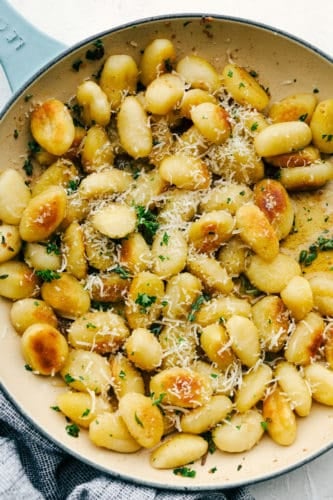
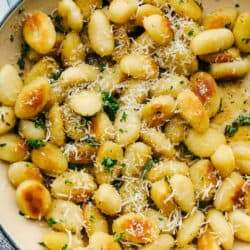
You guys! This brown butter garlic fried gnocchi is one of the easiest and tastiest dishes yet! Tender soft pillowy gnocchi is fried in olive oil till it has a golden crisp crust, but still tender inside. Then butter is melted and cooked till it starts to brown giving you that nutty salty flavor that is divine. Add in some garlic and thyme and voila! You have a meal fit for royalty. Super simple, and super delicious! This is my kind of meal!

You might want to double this recipe, I found that I could have eaten half of this by myself, so you might want to double it. Serve this insanely delicious gnocchi with a nice caesar salad, or roasted asparagus, or beans and some garlic cheesy bread and you are set! This is going to change your weekday dinner plans, or make it for a romantic dinner for two. Either way you have to try this recipe.

What is Gnocchi?

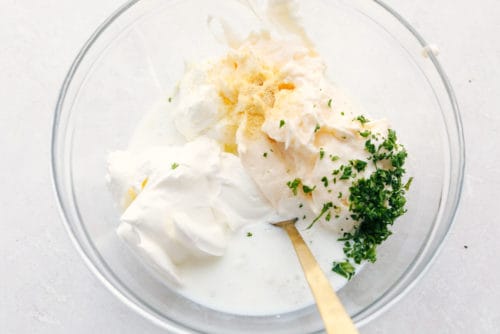
Pronounced nyow·kee, it comes from Italy and is not, as some believe, a pasta. Gnocchi is actually a dumpling and is typically made from cooked mashed potatoes, flour and maybe eggs to form a dough. The dough is then rolled out into long pieces, cut into bite sized and then pressed with a fork to form its classical ridges. These ridges are meant for soaking up and holding on to sauces. Despite not being a pasta, it is often used like one, you can often substitute noodles with gnocchi in many dishes. When cooked correctly, they are light, airy and soft. Perfect for sauces, like this browned butter garlic. Gnocchi also pairs beautifully with Marinara, Pesto, Alfredo or a Creamy Vodka Sauce.  You can find gnocchi made from other ingredients as well, but for this recipe we will use the most popular potato based gnocchi. 

Ingredients for Brown Butter Garlic Fried Gnocchi

Look for gnocchi on the shelf with the other pastas. Shelf stable gnocchi is a bit firmer and will hold up better to the frying than fresh. Fresh is fine if that is all you can find, but it might fall apart as you saute it so toss it gently.

  • Olive Oil: This is the ideal oil for frying the gnocchi, high enough smoke point and adds a bit of flavor.
  • Gnocchi: Use potato gnocchi for this recipe.
  • Unsalted Butter: You cannot substitute the butter for something else. It won’t brown and create that incredible nutty flavor otherwise.
  • Garlic: Mince your garlic for best flavor.
  • Fresh Thyme: I highly recommend using fresh here instead of dried.
  • Parmesan cheese: Grate your own cheese. It tastes so much better.

Making Incredible Fried Gnocchi with Brown Butter

This one of the easiest recipes ever, and it yields one of the fanciest dishes too! It looks and tastes like you ordered it from a fancy Italian restaurant, only its better!

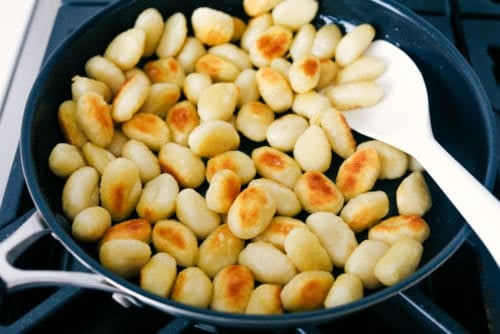
  1. Fry: In a medium sized skillet over medium high heat add the olive oil. Add in the gnocchi and fry until for a few minutes until golden and crisp. Remove the gnocchi from the skillet and set aside.
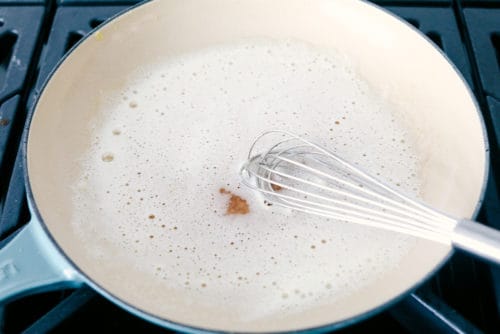
  2. Butter: Add in the butter, whisk until it starts to froth and turn brown.
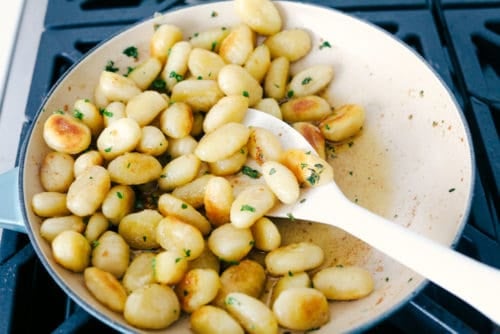
  3. Toss: Remove from heat and add the garlic and thyme. Add the gnocchi back to the butter and toss. Top with parmesan cheese.

Frying the gnocchi, browning the butter and tossing it all together.

Browning Tips!

Don’t be scared by browning butter, it is super simple and foolproof if you follow these tips. To get the best browned butter you really need to use unsalted butter. There are several reasons you want to use unsalted butter. First, unsalted butter is going to be fresher. Salt acts as a preservative so salted butter will have a longer shelf life, meaning unsalted will be fresher.  Second, because you use unsalted you can control the amount of salt in your sauce, which is a good thing. Third, salted butter will foam up more than unsalted which can make it hard to see when the butter is the color you want it to be.

  • Use a light colored pan:  You want to be able to see the brown bits form at the bottom of the pan. Using a dark colored pan will prevent you from seeing when the those have formed and this is a key clue to when your butter is done. Those dark specks are the toasted milk solids that bring the flavor, so don’t leave them behind.
  • Don’t Stop Stirring: This will make sure your butter cooks evenly and will help it from going from brown to burnt too fast, which can happen.
  • Cut the butter into pieces: Again you want it to cook evenly and cutting it will help it do so.
  • Remove from heat and pan: Once your butter has foamed, turned golden brown and the brown specks form, you want to remove it from the heat. Transfer the butter to a different pan as well or as in this case add something to the pan. This will help the butter stop cooking so it doesn’t go from browned to burnt.
  • Smell: It should have a buttery, nutty rich smell as well.

Variations for this Easy Gnocchi Recipe

  • Herbs: Use different herbs with your browned butter if you wish. Sage, rosemary, oregano, basil all work well with this sauce.
  • Brighten: Add a squeeze or two of fresh lemon juice to brighten and add a bit zinginess to the gnocchi.
  • Spice: If you want to add a bit of spice to your browned butter gnocchi, you can add some red pepper flakes to give it a bit of a kick.
  • Leftovers: Keep leftovers in the fridge for 4-5 days and rewarm in a pan on the stove. Add a bit more butter if you need to keep it from drying out.

Fried gnocchi with browned butter in a bowl and parmesan cheese.

More Browned Butter Recipes to Love

Once you try browned butter, you are going to want to use it in and on everything! It has such a beautiful nutty, bold,  rich taste. It takes butter to a whole new level. Even better, is that browned butter works in both sweet and savory dishes, adding so much richness and flavor.  It truly is going to change the way you think about cooking with butter. Here are some tried and true recipes to get you started.

Print

Brown Butter Garlic Fried Gnocchi

Brown Butter Garlic Fried Gnocchi are tender morsels tossed in a buttery herb sauce you are going to love! Super easy and quick, this is a perfect dish for busy nights or unexpected guests!
Course Side Dish
Cuisine Italian
Keyword fried gnocchi, pan fried gnocchi
Prep Time 5 minutes
Cook Time 15 minutes
Total Time 20 minutes
Servings 4 People
Calories 369kcal
Author Alyssa Rivers

Ingredients

  • 1 Tablespoon Olive Oil
  • 1 pound potato gnocchi
  • 1/4 cup butter
  • 3 cloves garlic minced
  • 1 teaspoon fresh thyme
  • 1/2 cup parmesan cheese shredded

Instructions

  • In a medium sized skillet over medium hight heat add the olive oil. Add in the gnocchi and fry until golden for a few minutes until golden and crisp. Remove the gnocchi from the skillet and set aside.
  • Add in the butter. Whisk until it starts to froth turns brown.
  • Remove from the heat and add the garlic and thyme. Add the gnocchi back to the butter and toss. Top with parmesan cheese.

Nutrition

Calories: 369kcal | Carbohydrates: 42g | Protein: 9g | Fat: 19g | Saturated Fat: 10g | Trans Fat: 1g | Cholesterol: 39mg | Sodium: 686mg | Potassium: 27mg | Fiber: 3g | Sugar: 1g | Vitamin A: 476IU | Vitamin C: 2mg | Calcium: 180mg | Iron: 4mg


from The Recipe Critic https://ift.tt/3lxyJoc
https://ift.tt/38X4dyO

गुरुवार, 18 मार्च 2021

Garlic Chicken Stir Fry

This garlic chicken stir fry is a quick and easy dinner that’s perfect for those busy weeknights. Cubes of chicken are cooked with colorful veggies and tossed in a flavorful garlic sauce for a meal that’s way better than take out!

Stir fry is almost a complete meal by itself. Just add some Egg Rolls, a Fruit Salad and some Cream Cheese Wontons for a complete meal!

Chicken Garlic stir fry in the pan with broccoli and mushrooms.

Garlic Chicken Stir Fry

When I am looking for a speedy dinner, I often turn to stir fry. It’s so easy to make and super versatile. It is fast and easy and curbs that temptation to hit the drive-thru. Stir fry is also a guarantee that I can get my kids to eat their vegetables. They love the combination of chicken and sauce. It is always a meal I can count on to feed the masses and they will leave the table with full bellies and smiles.

This incredible garlic chicken stir fry features diced chicken and mixed vegetables in a garlic sauce. This dish is definitely for garlic lovers – there are four cloves of it in the recipe! If you prefer a milder garlic flavor, you can easily cut down to 2-3 cloves and it will still be flavorful. I feel the 4 cloves are just the right amount without overdoing it however, give it a try, you will love it. The whole family will love this stir fry, and you’ll love how quick it is to make!

Ingredients for Chicken Stir Fry

The sauce for this dish is a simple combination of ingredients that you probably already have in the pantry, like chicken broth, sesame oil and soy sauce. Adjust the quantities for your families needs, double it if you like it saucey or have a bigger family. Half the stir fry recipe for a smaller crowd.

  • Vegetable Oil: Canola or vegetable oil will work, need an oil with a high smoke point.
  • Broccoli Florets: Wash and chop the broccoli into bite sized pieces if needed.
  • Mushrooms: Wash and quarter your mushrooms or slice them.
  • Yellow Bell Pepper: Slice the pepper and then cut the slices in half for easy eating.
  • Chicken: Boneless skinless chicken cut into bite sized pieces.
  • Salt and Pepper: Add to taste.
  • Garlic: Minced or finely chopped garlic to spread the flavor.
  • Chicken Broth: This is the base for the garlic sauce.
  • Brown Sugar: Adds a little bit of sweet, use dark or light brown sugar.
  • Soy Sauce: Low sodium soy sauce is ok here, or regular too.
  • Sesame oil: Sesame oil adds a depth and richness to the flavor of the sauce.
  • Cornstarch:This will thicken the sauce so it will stick to the chicken and vegetables.

Making Chicken Stir Fry with Garlic Sauce

  1. Heat: Place 1 teaspoon of oil in a large pan and heat over medium high heat.
  2. Vegetables: Add the broccoli, mushrooms and bell pepper to the pan. Cook for 5-6 minutes or until vegetables are tender.
  3. Transfer: Remove the vegetables from the pan; transfer to a plate and cover with foil to keep warm.
  4. Heat: Wipe the pan clean with a paper towel, then heat the remaining tablespoon of oil over high heat.
  5. Chicken: Add the chicken to the pan in a single layer and season with salt and pepper to taste.
  6. Saute: Cook for 3-4 minutes per side, or until chicken is browned and cooked through.
  7. Garlic: Lower heat to medium, add the garlic and cook for 30 seconds.
  8. Combine: Add the vegetables back to the pan.
  9. Sauce: In a small bowl, whisk together the chicken broth, sugar, soy sauce, sesame oil and cornstarch.
  10. Pour:  Pour the sauce over the chicken mixture and bring to a simmer.
  11. Simmer: Let it simmer for 1-2 minutes or until sauce has just thickened.
  12. Serve: This is best served immediately with steamed rice if desired.

Sauteing mushrooms, peppers, and broccoli.

Tips for Garlic Chicken Stir Fry

The veggies are cooked first, then removed from the pan and the chicken gets seared to golden brown perfection. Cooking them seperate will ensure the chicken gets done and the vegetables don’t over cook.

  • Faster: For even quicker prep, used bagged broccoli florets which are usually washed and already to go. Mushrooms can also be found presliced. It makes preparing the dish a breeze.
  • Pepper: I used a yellow pepper, but you can use whatever color you wish. Try red, or orange peppers, or a mixture. Green peppers will have a different flavor and so I do not recommend them.
  • Chicken: You can use boneless skinless chicken thighs too. Whichever one you use cut your pieces into the same sized pieces. They will cook more evenly.

Stir frying the chicken in the wok.

Variations for Your Chinese Stir Fry

I used chicken breast, broccoli, mushrooms and yellow bell peppers in this dish. You can easily substitute in your family’s favorite vegetables.

  • Vegetables: Other great choices are snow peas, asparagus, zucchini, carrots, beans, water chestnuts, or even celery.
  • Protein: Exchange the chicken for pork, beef, shrimp or tofu.
  • Vegetarian: Make it vegetarian by using no chicken and vegetable broth instead of chicken.
  • Sweetness: Exchange the brown sugar for the same amount of honey. It will had a nice flavor.
  • Zing: Add a teaspoon of ginger to give a bit more spice. It is so good!!

Adding the vegetables to the chicken and the sauce.

What to Serve Your Stir Fry With

Stir fry is awesome just by itself, especially if you are trying to keep it low carb, but serving it on top of a luscious carbohydrate can make it divine.

  • Rice: Serve with rice, brown rice or even fried rice.
  • Quinoa:  High in protein and deliciously nutty.
  • Noodles: Use asian noodles, Lo Mein, Sesame Noodles, or even spaghetti noodles.
  • Cauliflower Rice: Use cauliflower for a low carb option.

Stirring the chicken, broccoli and mushrooms all together.

Storing Leftover Chicken and Vegetables

Stir fry is best eaten immediately before the vegetables get too soggy, and it can be hard to keep them from going soggy when you store them. Leftovers will keep in the fridge for up to 4-5 days. Reheat leftovers in a saute pan or microwave.

Garlic Chicken Stir fry on a plate with rice.

More Take Out Type Recipes To Make At Home

I love being able to recreate restaurant favorites at home. They always taste better and I know exactly what I’m feeding my family. My family is also more likely to eat these meals too. They have more flavor, and I can adapt them to our specific tastes. Add more or less spice, more or less vegetables, etc. And may I add it always cheaper to make it yourself. So the next time you get the craving for take out, reach for one of these tried and true recipes instead.

Print

Garlic Chicken Stir Fry

This garlic chicken stir fry is a quick and easy dinner that's perfect for those busy weeknights! Cubes of chicken are cooked with colorful veggies and tossed in a flavorful garlic sauce for a meal that's way better than take out!
Course Dinner, Main Course
Cuisine Asian American
Keyword chicken stir fry, garlic chicken stir fry
Prep Time 5 minutes
Cook Time 15 minutes
Total Time 20 minutes
Servings 4 People
Calories 183kcal
Author Alyssa Rivers

Ingredients

  • 1 tablespoon + 1 teaspoon vegetable oil divided use
  • 1 cup broccoli florets
  • 1 cup mushrooms halved
  • 1 yellow bell pepper cored, seeded and thinly sliced
  • 1 pound boneless skinless chicken breast cut into 1 inch pieces
  • salt and pepper to taste
  • 4 cloves of garlic minced
  • 3/4 cup chicken broth
  • 1 tablespoon brown sugar
  • 2 tablespoons soy sauce
  • 2 teaspoons sesame oil
  • 2 teaspoons cornstarch

Instructions

  • Place 1 teaspoon of oil in a large pan and heat over medium high heat.
  • Add the broccoli, mushrooms and bell pepper to the pan. Cook for 5-6 minutes or until vegetables are tender.
  • Remove the vegetables from the pan; transfer to a plate and cover with foil to keep warm.
  • Wipe the pan clean with a paper towel, then heat the remaining tablespoon of oil over high heat.
  • Add the chicken to the pan in a single layer and season with salt and pepper to taste.
  • Cook for 3-4 minutes per side, or until chicken is browned and cooked through.
  • Lower heat to medium, add the garlic and cook for 30 seconds.
  • Add the vegetables back to the pan.
  • In a small bowl, whisk together the chicken broth, sugar, soy sauce, sesame oil and cornstarch,
  • Pour the sauce over the chicken mixture and bring to a simmer.
  • Simmer for 1-2 minutes or until sauce has just thickened.
  • Serve immediately, with steamed rice if desired.

Video

Notes

Updated on March 18, 2021
Originally Posted on February 22, 2017

Nutrition

Calories: 183kcal | Carbohydrates: 7g | Protein: 26g | Fat: 5g | Saturated Fat: 1g | Cholesterol: 73mg | Sodium: 554mg | Potassium: 676mg | Fiber: 1g | Sugar: 2g | Vitamin A: 235IU | Vitamin C: 79.9mg | Calcium: 22mg | Iron: 1mg


from The Recipe Critic https://ift.tt/2P9vDKY
https://ift.tt/3sc42HH

Wedge Salad

This Classic Wedge Salad is a crisp, cool and refreshing tasty dish. This perfect side dish is super easy and quick!

Wedge salad is superb favorite as a side dish. Or you can serve it with one of these fantastic soups, Cheeseburger or Broccoli Cheese and homemade bread for a light dinner or lunch.

Classic wedge salad topped with tomatoes, bacon and blue cheese dressing on a plate.

Classic Wedge Salad

Wedge Salad is such a fun salad. It is colorful, full of flavor and crisp and fresh. Just like a salad should be. No one knows where these delightful salads came from, but they seem to have come into major popularity ever since steak houses started putting them on the menu. We are not complaining. Such a simple salad, but with such huge flavor. It takes a knife and a fork to eat this impeccable salad!

It can be served on its own or accompaniment to your favorite dishes. Its unique shape and color will draw attention and the taste will pull them in. Serve wedge salad alongside beef, chicken, pork or fish. See below for ideas. This simple wedge of iceberg has made the super fancy salad list. Your whole family is going to love this fun, delicious salad.

What You Need For The Perfect Wedge Salad

Look for fresh lettuce and tomatoes to really help this salad taste its best. Heads of lettuce can vary in size so pick accordingly. Depending on how many you are serving you may need to buy more than one. Some heads are so small that it will work best to cut them in half or just thirds instead of quarters. If you have them, home grown tomatoes cannot be beat! Below I give you a tip to keep your lettuce fresh for up to 2 weeks!

  • Iceberg Lettuce: Do not substitute for something else. Icebergs shape is what gives the classic wedge its name.
  • Tomato: I used a Roma tomato, choose a firm full flavored tomato.
  • Bacon: Cooked and crumbled.
  • Red Onion: Finely chopped.
  • Blue Cheese Dressing: For the best flavor use homemade, get the recipe here!
  • Blue Cheese Crumbles: Use more or less depending on your tastes

Putting a Wedge Salad Together

This amazing wedge salad is so easy! You are going to love how fast it is to throw together and voila! Your salad is done! Ever since wedge salads gained popularity at steak houses they have become known as the fancier salad, then just a bowl full of greens. The fact that it is so easy to make, and yet so fancy to eat make it a choice salad!

  1. Lettuce: Cut the lettuce wedge in half and cut off the stem. Cut into four equal wedges.
  2. Top it: Top with chopped tomato, bacon, onion, homemade blue cheese dressing and crumbles.

How to cut iceberg lettuce into wedges.

Tips for the BEST Wedge Salad

With this being one of the easiest salads to throw together, there isn’t much that can go wrong. But there are always a few things you can do to make it the easiest and best wedge salad ever.

  • Lettuce: You can prep your salad in advance. Cut the iceberg lettuce into wedges BUT leave the stem on. This will keep the leaves intact better. Wash the quarters carefully, allowing water to run in between the leaves. Drain well. Store in a plastic bag with a paper towel until ready to use. Lettuce will keep like this for up to 2 weeks. If the outside leaves start to turn brown, you ca simply remove them. Cut off the stem right before serving.
  • Tomatoes: Use grape or cherry tomatoes halved or quartered for easy, flavorful tomato flavor.
  • Salt and Pepper:  Add some salt and pepper to taste.

Variations for Topping a Wedge Salad

The classic topping for a wedge salad are bacon, tomato, red onion and more blue cheese along with blue cheese dressing. But that doesn’t mean you cannot take a wedge of iceberg lettuce and make it your own. Wedge salads are easily customizable and still will be absolutely delicious. So mix and match to your liking.

  • Add Different Vegetables: Try avocados, cucumbers, olives and chopped peppers or celery.
  • Add Crunch:  Use croutons to add a bit of crunch. Make your own for the best tasting.
  • Cheese:  Need a different cheese, try cheddar, feta, parmesan or gorgonzola.
  • Not a fan of Blue Cheese Dressing: Although blue cheese is the standard, you can substitute for ranch, caesar or creamy parmesan dressing.
  • Add Some Protein: Add chopped grilled chicken or steak. Or dice up hard boiled eggs.

What to Serve Wedge Salad With

Wedge salads can be a meal on their own or served as the ideal side. Served alongside a hearty meaty dish is exactly what a wedge salad was made for. They are the perfect beginning to your meal as the lettuce is cool and fresh and the toppings creamy and savory. When you need a great main dish to go with your wedge salad try one of these incredible favorites.

Up close picture of a wedge salad on a plate with a fork.

More Salads We Love

Salads are fresh and inviting. They are perfect way to get more vegetables or fruit into your diet. Salads are great side dishes or light main meals. I love how versatile and creative salads can be. You can combine different flavors that come together in delicious ways. And the dressings! You cannot forget about them! They are the ones that meld all the flavors together in their zingy and zesty ways. Here are some of our tried and true favorite salads to try next time you need one.

Print

Wedge Salad

This Classic Wedge Salad is a crisp, cool and refreshing tasty dish. This perfect side dish is super easy and quick!
Course Main Course, Salad
Cuisine American
Keyword wedge salad, wedge salad recipe
Prep Time 10 minutes
Total Time 10 minutes
Servings 4 Wedges
Calories 383kcal
Author Alyssa Rivers

Ingredients

  • 1 head iceberg lettuce
  • 1 roma tomato diced
  • 1/2 pound bacon cooked and crumbled
  • 1/2 red onion diced
  • Homemade Blue Cheese Dressing
  • 1 cup blue cheese crumbles

Instructions

  • Cut the lettuce wedge in half and cut off the stem. Cut into four equal wedges.
  • Top with tomato, bacon, onion, homemade blue cheese dressing and crumbles.

Nutrition

Calories: 383kcal | Carbohydrates: 7g | Protein: 16g | Fat: 32g | Saturated Fat: 14g | Trans Fat: 1g | Cholesterol: 63mg | Sodium: 861mg | Potassium: 445mg | Fiber: 2g | Sugar: 4g | Vitamin A: 1084IU | Vitamin C: 7mg | Calcium: 210mg | Iron: 1mg


from The Recipe Critic https://ift.tt/3r3rBkA
https://ift.tt/2OGxGpG

बुधवार, 17 मार्च 2021

Homemade Blue Cheese Dressing

Homemade Blue Cheese Dressing is way better than anything you can buy in the store. This dressing is creamy, tangy and absolutely luscious!

Making your own condiments is super simple and better for you! Try these popular homemade recipes like this Taco Seasoning, Alfredo Sauce and Cheese Sauce for starters.

Creamy homemade blue cheese dressing in a jar.

Easy Blue Cheese Dressing

Most people either love blue cheese or they are not that big of fan. This homemade blue cheese dressing, however, may make those unbelievers, believers. It is creamy, tangy and full of flavor. Making your own means you can control the blue cheese amount and what kind too, making it just the way you want it. The sour cream and buttermilk give the perfect amount of tanginess and richness. The mayonnaise balances it all together. You are seriously going to love this dressing!

Just like most things homemade dressing are just better than store bought. Just like this ranch, caesar and greek salad dressings, blue cheese dressing made from scratch is SO much better! Store bought dressings are full of additives and preservatives to make them shelf stable and last longer. These can literally leave a bad taste in your mouth and just taste kind of off.  Making dressing at home is easy, simple, and so delicious.

Ingredients for Blue Cheese Dressing Recipe

There are different kinds of blue cheese to choose from. I describe them down below. Any and all of them will work in this recipe. It is up to you on which you prefer.

  • Blue Cheese Crumbles: Some blue cheeses will come in a block, or already crumbled.
  • Buttermilk: If you do not have buttermilk on hand make some in a few minutes with a few simple ingredients. Find the recipe HERE.
  • Sour Cream: Low fat or full fat work perfectly with this blue cheese dressing.
  • Mayonnaise: You can also use low fat mayo here too.
  • Parsley: Fresh parsley finely chopped.
  • Garlic Powder: Provides just a hint of flavor.
  • Salt and Pepper: Add to taste.

How to Make Homemade Blue Cheese Dressing

This is super quick and easy and will take you about 5 minutes or less. Perfect for when you are in a hurry.

  1. Mash: In a small bowl add the blue cheese crumbles and buttermilk. Mash the crumbles with a fork.
  2. Combine: Add in the sour cream, mayonnaise, parsley, garlic powder, and salt and pepper and whisk. Add in more buttermilk if you want a thinner consistency.

Mashing the blue cheese with the buttermilk in a bowl.

Types of Blue Cheese and Which to Use

There are actually different kinds of blue cheeses in the blue cheese family and some are more mild and other rather punchy. It all depends on what you like. If you are not sure which one to choose, most stores sell a basic blue cheese that will be more mild than a stilton but stronger than a gorgonzola. And they all taste amazing!

  • Roquefort: This blue cheese is the strongest flavored of the varieties and is soft and crumbly.  It originates from France and is made from sheep’s milk. If you like a strong flavor, this is the one for you.
  • Stilton: Made from cow’s milk, this blue cheese comes from England. It is firm and on the strong flavor scale comes in at second.
  • Gorgonzola: Originating from Italy, this is a favorite flavor among Americans. Also made from cow’s milk it has a more mild flavor and is much creamier. It is a favorite for baking as it tends to melt more easily and beautifully.
  • American blue cheese: There are several companies that make blue cheese right here in America. They are also made from cow’s milk and are gaining popularity although they still are working on being placed in the same category as the European blue cheeses. They tend to fall somewhere between a stilton and gorgonzola blue cheese as far as flavor.

Adding the rest of the ingredients to the clear bowl.

Tips For the Best Blue Cheese Dressing

With incredible flavor and texture, this is going to be a family favorite!

  • Mash: If you love the flavor of blue cheese, but are not a fan of biting into large chunks of it, make sure you mash it well. Mashing it thoroughly will also distribute the flavor better.  If you do like the chunks then mash it less.
  • Buttermilk:  Add more or less buttermilk depending on how thin or thick you like your dressing.
  • Let it sit: Blue cheese dressing gets better with time. Allow the dressing to sit for at least 8 hours, and overnight is better, before using. Trust me this key to a fantastic dressing, you have to allow those flavors to meld. It will make a huge difference in the flavor.
  • Storing: Keep your blue cheese dressing in a tightly sealed jar or container in the fridge for 2-3 weeks.

Whisking the dressing ingredients together.

How to Serve The Best Blue Cheese Dressing Ever!

Beyond eating it with just a spoon, there are a few favorite ways to serve this creamy, cool blue cheese dressing.

  • Vegetables: When you just don’t want to take the time to make something fancy, but want to taste that incredible blue cheese flavor, grab some vegetables and go dipping! Carrots, celery, peppers, tomatoes, broccoli, cauliflower, peas and jicama are some of our favorites.
  • Wings: Buffalo wings and blue cheese dressing were meant to go together. Try Sticky Honey Garlic Buffalo Wings, Buffalo Cauliflower (yes it is amazing), or Air fryer Wings.
  • Salad:  Wedge salad with bacon and tomatoes is a classic
  • Top it: From Steak to Potatoes blue cheese dressing can take a dish from good to impressive. If you think it would taste good, it probably will!

A wedge salad with blue cheese dressing and toppings.

More Homemade Recipes to Try

Homemade is truly better, not only do you know exactly what you are eating, you can truly say it was made with love. It is surprising how easy and quick it can be to make foods at home. It is often cheaper too. Give these homemade favorites a try and see for yourself.

Print

Blue Cheese Dressing

Blue Cheese Dressing is way better than anything you can buy in the store. This dressing is creamy, tangy and absolutely luscious!
Course Dressing
Cuisine American
Keyword blue cheese dressing, homemade blue cheese dresssing
Prep Time 5 minutes
Total Time 5 minutes
Servings 16 ounces
Calories 85kcal
Author Alyssa Rivers

Ingredients

  • 4 ounces blue cheese crumbles
  • 1/3 cup buttermilk
  • 1/3 cup sour cream
  • 1/2 cup mayonnaise
  • 1 Tablespoon parsley chopped
  • 1/4 teaspoon garlic powder
  • salt and pepper to taste

Instructions

  • In a small bowl add the blue cheese crumbles and buttermilk. Mash the crumbles with a fork.
  • Add in the sour cream, mayonnaise, parsley, garlic powder, and salt and pepper and whisk. Add in more buttermilk if you want a thinner consistency.

Nutrition

Calories: 85kcal | Carbohydrates: 1g | Protein: 2g | Fat: 8g | Saturated Fat: 3g | Trans Fat: 1g | Cholesterol: 11mg | Sodium: 153mg | Potassium: 35mg | Fiber: 1g | Sugar: 1g | Vitamin A: 118IU | Vitamin C: 1mg | Calcium: 49mg | Iron: 1mg


from The Recipe Critic https://ift.tt/3bSFjlG
https://ift.tt/3eL8MA5