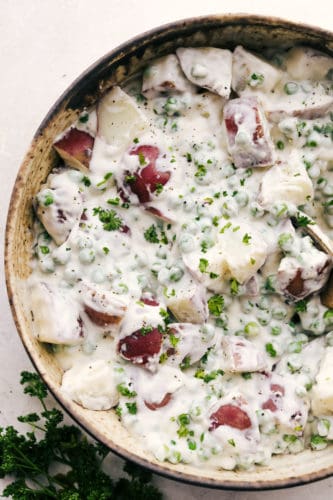
Creamed Peas and Potatoes are a classic side dish that is absolutely delish! Super creamy and full of flavor it’s a side dish that is hearty and comforting!
This amazingly hearty side dish pairs perfectly with a good meat dish. Try one of these favorites from the blog, Glazed Ham, Lamb Shanks and Pot Roast.

Creamed Peas and Potatoes
Creamed peas and potatoes is a side dish made popular back when everyone had gardens and the peas and baby potatoes were ready at the same time. It is a dish that was often made in the springtime. I remember having these creamed peas and potatoes growing up as a kid and I loved it. There is something so comforting and hearty about these peas and potatoes. Now it’s a side dish my whole family loves and I know you will too!
Creamed peas and potatoes and divine when you can get your hands on fresh peas, but frozen peas will work just as well. This is a hearty side dish that works well just about any main dish and serves a lot. I like to take it to big family gatherings or potlucks. If you haven’t tried it, this is the time to do it! You are going to love it!
What You Need For Creamed Peas and Potatoes
Basic ingredients combine for a delightful side dish that could be the most popular dish on the table.
- Red Potatoes: Baby red potatoes work really well or cut up larger reds.
- Peas: Use frozen or fresh.
- Butter: Do not substitute out, this is the foundation for the roux.
- Flour: Together with the butter this will create a thickener.
- Salt and Pepper: Add to taste.
- Milk: Combined with the cream, this is creates incredible sauce.
- Heavy Cream: Definitely a must if you want ultimately creamy potatoes.
- Parmesan Cheese: Use grated parmesan so it will melt easier. Adds the best flavor to the vegetables.
Making Creamed Peas and Potatoes
Creamed peas and potatoes are a classic that comes together easily. You just need a little bit of time.
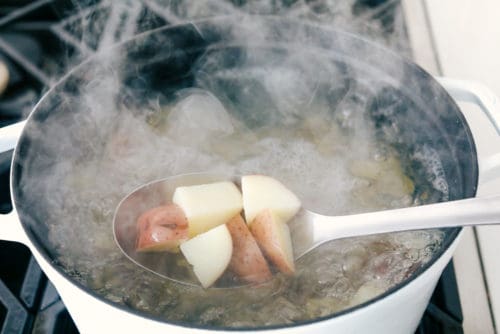
- Potatoes: Bring a large pot to boil the potatoes for 10-12 minutes or until fork tender.
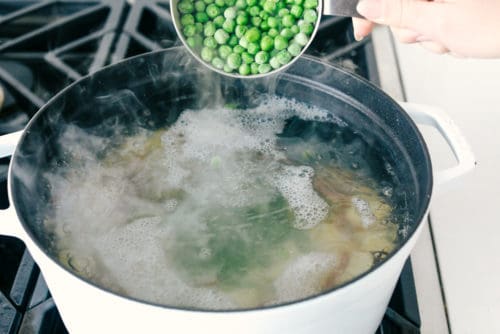
- Peas: Add the peas the last 3 minutes of cooking time. Drain.
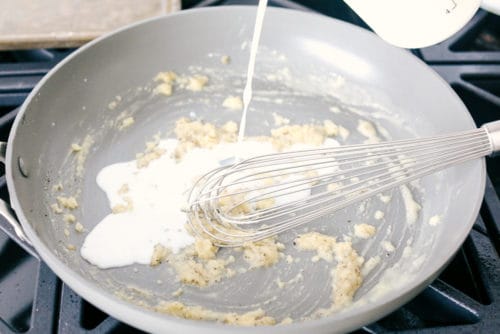
- Roux: In a large saucepan over medium high heat add the butter and melt. Whisk in the flour, salt and pepper until it thickens up.
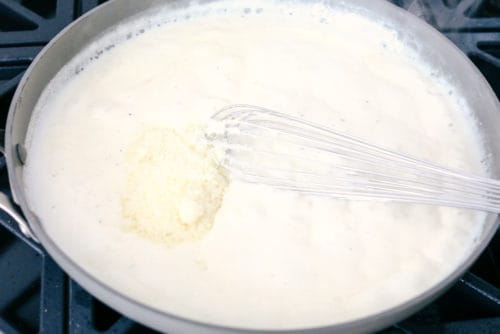
- Thicken: Whisk in the milk, heavy cream and parmesan over medium high heat until thick.
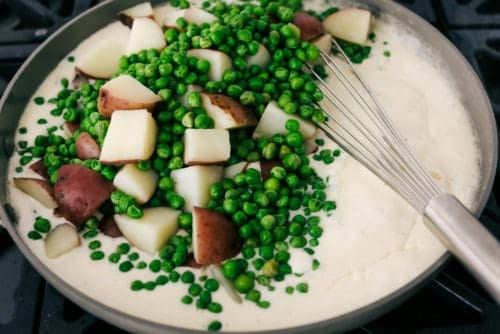
- Add: Add the potatoes and peas back to the sauce for 2-3 minutes and serve.

Pro Tips For Creamed Peas and Potatoes
Simple and basic, this recipe highlights the vegetables of spring, peas and new potatoes. The cream sauce adds texture and binding and just a hint of flavor. The cream sauce is delicious but it really lets the peas and potatoes shine.
- Potatoes: You want to use baby reds or fingerling potatoes for this dish. They are a waxy potato that holds up to being boiled and keeping their shape. They won’t turn to mush like your high starch Idaho russets can.
- Peas: If you don’t have peas growing in your own backyard, a trip to the farmers market just might be worth it. The fresh peas are so yummy in this dish.
- Frozen Peas: I will say frozen are pretty darn good too. Buy petite green peas however, they have a better fresh flavor and hold up better with the potatoes than regular frozen peas. Also if you use frozen peas you can skip the blanching and just thaw them on the counter or in the fridge. They will cook enough in the sauce with the potatoes.
- Sauce: Yes you can use skim milk or regular milk and half and half in this sauce and it will still taste great, it just may not be quite as creamy or thick.
- Salt and Pepper: Be sure to taste the potatoes, peas and sauce and salt and pepper accordingly. Because you are not adding any other spice to the dish, you do not want to skimp on the salt and pepper. It will actually help the potatoes and peas taste amazing.
Variations and Storing Peas and Potatoes
This recipe is a classic and very traditional. The added Parmesan gives it just a touch of flavor and that added salty flavor that takes it above and beyond. Make it your own and enjoy!
- Cheese: Feel free to change out the cheese or leave it out all together. For a bit of a different flavor use shredded swiss cheese, or a stronger flavored Parmigiano-Reggiano.
- Bacon: Because everything is better with a bit of bacon. Cook and crumble bacon and add as a garnish or stir it in.
- Onion: Add some extra depth to the flavor by sauteing finely chopped onion in butter and then add to the sauce with the peas and potatoes.
- Flavor: If you want to add more flavor to the sauce, try adding some herbs. Dill is a go to favorite in this dish that keeps it fresh, but you can try others such as tarragon and parsley.
- Adjust it: If you are making creamed peas and potatoes for the family, keep the recipe as is. If you are making it for a crowd or a potluck, feel free to double the recipe.
- Storage: Store leftovers in the fridge in a tightly sealed container for up to 4 days. Reheat in a saucepan on the stove or in the microwave. Creamed peas and potatoes make wonderful leftovers!

More Side Dishes to Try
Side dishes can be just as important as the main meal. They balance out your main dish and add nutrition, flavor and texture. I have had many a meal where the side dish was more delicious than the main dish, which is totally fine with me. You can even make a whole meal out of simple side dishes. Side dishes are so customizable and diverse. I often make a side dish or two to make sure all my kids will eat something at dinner time, especially if I am trying a new dish out on them and I don’t know how they’ll react. With these tried and true sides, I am guaranteed they’ll eat something and I don’t have to spend more time making several meals to satisfy them.
- Jiffy Corn Casserole (5 ingredients)
- Easy Homemade Naan
- Crispy Parmesan Fried Zucchini
- Crispy Air Fryer Baked Potatoes in less than an Hour
- Classic Deviled Eggs

Creamed Peas and Potatoes
Ingredients
- 1 pound red potatoes
- 4 cups peas fresh or frozen
- 2 Tablespoons butter
- 2 Tablespoons flour
- 1 teaspoon salt
- 1/2 teaspoon pepper
- 2 cups milk
- 1 cup heavy cream
- 1/4 cup parmesan grated
Instructions
-
Bring a large pot to boil and boil the potatoes for 10-12 minutes or until until fork tender.
-
Add the peas the last 3 minutes of cooking time. Drain.
-
In a large saucepan over medium high heat add the butter and melt. Whisk in the flour, salt and pepper until it thickens up.
-
Whisk in the milk, heavy cream, and parmesan over medium high heat until thick.
-
Add the potatoes and peas back to the sauce for 2-3 minutes and serve.
from The Recipe Critic https://ift.tt/39gLqPf
https://ift.tt/2PrCaR8