शुक्रवार, 2 अप्रैल 2021

Baked Honey Sesame Chicken

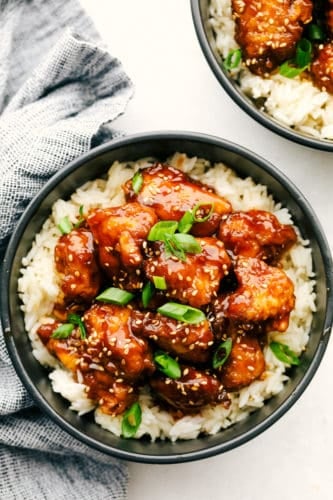
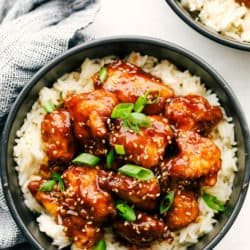
Honey Sesame Chicken is sweet, savory, and perfect for any night of the week. This is so good, it is even better than take out!

Serve this restaurant worthy meal on a bed of rice and with sides such as Wontons, Egg Rolls or Fried Rice for the complete take out from home.

Honey baked chicken in a bed of rice.

Homemade Honey Sesame Chicken

There are recipes that I make that I hope that everyone tries. This is one of those recipes. It all began with my sweet and sour chicken that changed my life. It is actually possible to make the same quality Chinese food as P.F. Chang’s at home. Then came a spicy version of this delicious chicken, my firecracker chicken. I had died and gone to Chinese food heaven with these recipes. I didn’t think that it could get any better than this. Since I love Chinese food so much my life was complete. But then I created honey sesame chicken. Let me tell you this. This is the best of them all!

It first starts with the breading. The cornstarch and egg combo makes it taste straight from a restaurant. Then there is something about baking this chicken that makes the sauce thicken, the chicken brown and absolutely blow your mind. Seriously I could hardly believe how amazing this was while I was eating it. The sauce has a sweet honey flavor to it and is absolute honey sesame perfection. If you love Chinese and make one thing from my blog, make this!

Sesame Chicken Ingredients

These simple ingredients are probably sitting in your pantry right now. I love that this comes together so easily. You are going to love the luscious sauce.

  • Chicken Breasts: About 4 chicken breasts
  • Cornstarch: Needed for the breading
  • Eggs: The binder
  • Salt and Pepper: To taste
  • Canola: Just enough to fry in

Honey Sesame Sauce

  • Honey: The queen of the sauce
  • Soy Sauce: Adds a bit of salty and flavor to the sweet
  • Ketchup: Adds a good balance to the sweet
  • Brown Sugar: Helps bring out the sweetness of the honey
  • Rice Wine Vinegar: The zing to the sweet, you’ll want the tang to balance it
  • Sesame Oil: Adds perfect sesame flavor
  • Garlic: A necessity in asian food
  • Cornstarch: This is the thickener for the sauce

How to Make Easy Honey Sesame Chicken

This could not be any easier. Remember you are just flash frying the chicken, it will finish cooking in the oven.

  1. Cut: Preheat oven to 325 degrees F. Cut chicken into bite sized pieces and season with salt and pepper
  2. Bowls: In one bowl place the cornstarch. In the other bowl place the eggs and beat them slightly. Dip the chicken into the cornstarch first, then into the egg mixture.
  3. Flash Fry: In a skillet heat the oil over medium high heat. Cook the chicken till just golden brown on all sides. Place in a greased 9×13 pan.
  4. Mix: In a medium bowl mix all of the sauce ingredients till thoroughly combined. Pour over the chicken.
  5. Bake: Bake the chicken for 45 min stirring every 15 min to evenly coat the chicken.

Cut up chicken, breading it and dipping it in egg mixture.

Trust Me on these Pro Tips!

This is the same method as my Baked Sweet and Sour Chicken so it shares my same tips.

  1. Method to the Madness: Make sure you first coat your chicken in the cornstarch and then the egg. This method makes the perfect breading for the chicken. You can also use a large gallon ziplock bag to coat the chicken in the cornstarch.
  2. Fast: Do not cook the chicken all the way through before baking.  You just want to get the chicken lightly brown on the outside, and then it bakes to perfection.
  3. Low and Slow: Baking the chicken at a low temperature will not over cook the chicken. This helps to cook the chicken all the way through and thicken up the sauce.

Flash frying chicken in a pan then pour sauce over it in a 9x13 pan.

Tips for the Best Honey Sesame Chicken

Besides taking time to cook in the oven this baked honey chicken comes together really quickly. Cut your chicken when it is still partially frozen to make it easier to cut. But wait to bread and cook them till thawed.

  • Chicken: You can use chicken thighs if you like. Just make sure your pieces of chicken are cut evenly so they cook at the same rate.
  • Vinegar: If you don’t have rice wine vinegar you can easily substitute apple cider vinegar without ruining the taste.
  • Vegetables: You can add in broccoli, peppers, mushrooms, zucchini or other vegetables to round out the meal a bit more.
  • Serve: This is definitely delicious on its own but we love to serve it over rice. You can also try quinoa, brown rice or ramen noodles.
  • Side Dishes: Serve this luscious dish alongside Air Fryer Egg Rolls, Grilled Pineapple, and Vegetable Stir Fry.
  • Sauce: If you want more sauce, make a double batch of the sauce. Pour half over the chicken to bake and heat the other half in a small saucepan over medium heat till thickened. Pour the extra sauce over the chicken once done, or over individual portions. This will help it not get soggy while it cooks, but gives you extra sauce.

Storing Leftovers

Leftovers are some of the best. The sauce really melds into the chicken. The breaded chicken will lose a bit of its crispy tender outside, but the taste is still amazing.

  • Fridge: Place leftovers in an airtight container in the fridge for up to 3-4 days.
  • Freezer: This can be frozen too. Just place in a freezer safe container or bag and freeze for up to 3 months.
  • Reheat: Sweet and Sour Chicken is best reheated on the stove. Reheating it in the microwave can make the chicken rubbery and overcooked. Place leftovers in pan on the stove top and heat on medium heat, stirring often, till heated through.

Baked honey sesame chicken in a white dish.

More Asian Inspiration for Dinner

Asian food is a staple around here at our house. We love to make our favorites at home, instead of getting take out. It always tastes ten times better and when making it at home you can customize it to your tastes. Cooking these take out favorites is actually easier than you think too. I have plenty of tried and true favorites here on the blog, but these favorites are a good place to start.

Print

Baked Honey Sesame Chicken

The sauce has a sweet honey flavor to it and is absolute honey sesame perfection. If you love chinese and make one thing from my blog, make this!
Course Dinner, Main Course
Cuisine American
Keyword baked honey sesame chicken, chicken recipes, honey sesame chicken, sesame chicken
Prep Time 30 minutes
Cook Time 1 hour
Total Time 1 hour 30 minutes
Servings 6 Servings
Calories 622kcal
Author Alyssa Rivers

Ingredients

  • 4 chicken breasts
  • 1 cup cornstarch
  • 3 large eggs
  • salt and pepper
  • 1/4 cup canola oil

Sauce:

  • 3/4 cup honey
  • 3/4 cup soy sauce
  • 1/2 cup ketchup
  • 1/2 cup brown sugar
  • 1/2 cup rice wine vinegar
  • 1 teaspoons sesame oil
  • 1 teaspoons minced garlic
  • 1 Tablespoons cornstarch
  • additional sesame seeds for garnish

Instructions

  • Preheat oven to 325 degrees. Cut chicken breasts into bite-sized pieces and season with salt and pepper.
  • In separate bowls, place cornstarch and slightly beaten eggs. Dip chicken into cornstarch then coat in egg mixture. I have also found that you can put the chicken pieces in a gallon size bag and shake to coat.
  • Heat canola oil in a large skillet over medium-high heat and cook chicken until browned. Place the chicken in a 9 x 13 greased baking dish.
  • In a medium sized mixing bowl, combine honey, soy sauce, ketchup, brown sugar, rice wine vinegar, sesame oil, minced garlic, and 1 T cornstarch. Pour over chicken and bake for 45 minutes or until chicken is cooked through.
  • I stirred the chicken every 15 minutes so that it coated them in the sauce.

Notes

Updated on April 2, 2021
Originally Posted on September 16, 2013

Nutrition

Calories: 622kcal | Carbohydrates: 81g | Protein: 38g | Fat: 16g | Saturated Fat: 2g | Cholesterol: 178mg | Sodium: 2017mg | Potassium: 759mg | Fiber: 1g | Sugar: 58g | Vitamin A: 267IU | Vitamin C: 3mg | Calcium: 47mg | Iron: 2mg

Save


from The Recipe Critic https://ift.tt/3rHTC1m
https://ift.tt/3ua5c6S

गुरुवार, 1 अप्रैल 2021

Potato Rolls

A close up of potato rolls in a pan.

These potato rolls are light, fluffy, and absolutely delicious. They make the perfect dinner buns and are great for sandwiches and dipping into soup, too.

Complete the meal with Roast Lamb, Mashed Potatoes, and some Stuffing.

A close up of potato rolls in a pan.

Potato Buns

Dinner buns don’t get any lighter or fluffier than these potato rolls. They’re made with mashed potatoes in the dough, which keeps them unbelievably soft. You’ve probably tried potato rolls from your local grocery store or bakery so you know how good they can be. But homemade is so much better. And when you serve them still slightly warm from the oven and spread with salted butter they are little bites of heaven.

How to Make this Potato Roll Recipe?

Potato rolls are yeast bread, which means that they take a little time to make as you need to let them rise. But don’t worry, they’re very easy to make. Here’s how you do it:

  1. Make mashed potatoes with lots of butter and milk. Easy!
  2. Mix a little sugar into some of the potato cooking water (or plain warm water) then add the yeast. After a few minutes, it will start to bubble which means it’s ready to use.
  3. Now add the mashed potatoes, eggs, flour, and salt to the yeast and mix it until the dough forms. Now let it rise for one hour.
  4. Time to make the buns! Divide the dough into buns and put them in a baking dish or on a sheet pan. Let them rise for one more hour.
  5. All that you have to do now is pop them into your oven.

Making potato buns takes a little time, but it’s really easy. (Full recipe instructions are in the recipe card below.)

A tray of pull apart potato rolls.

Can I Use Leftover Mashed Potatoes To Make This Recipe?

Yes! Leftover mashed potatoes work well, however, you will need to adjust the amount of flour you use. Start by adding 2 tablespoons of extra flour at a time until the dough comes together and is no longer sticky.

Pro Tip!

Let your leftover mashed potatoes come to room temperature or warm them slightly in the microwave before using them in this recipe.

How Long Do Potato Rolls Last?

Potato rolls will last for up to 7 days. But we find that they are best eaten within 4-5 days.

What Is The Best Way To Store These Buns?

To store potato rolls, put them into a sealable container and store them on your counter.

A potato bun on a plate cut in half.

Potato Roll Variations

  • Cheesy: add ½ cup grated cheddar or parmesan cheese.
  • Herbed: add 2 teaspoons Italian seasoning.
  • Sweet: Add ⅓ cup of sugar.
  • Buns: form them into hamburger-sized buns and bake them on a tray.

How to Serve Potato Rolls

These rolls are a MUST with any big holiday meal. We’ll be serving them beside some classic honey glazed ham at Easter for sure! But they’re just as welcome at a Sunday pot roast dinner or with garlic roasted chicken with vegetables.

But it doesn’t stop there. Potato rolls make amazing sandwiches. Fill them with leftover butter herb turkey or your favorite deli meats. Or try stuffing them with the best egg salad. Or butter up a bun and dunk it into your favorite soup.

With so many delicious ways to eat potato rolls, they won’t last long!

Potato buns in a baking pan with honey butter on top.

Popular bread recipes

Potato buns in a baking pan with honey butter on top.
Print

Potato Rolls

These potato rolls are light, fluffy, and absolutely delicious. They make the perfect dinner buns and are great for sandwiches and dipping into soup, too.
Course Bread
Cuisine American
Keyword potato buns, potato roll
Prep Time 30 minutes
Cook Time 30 minutes
Rise Time 2 hours
Total Time 3 hours
Servings 16 rolls
Calories 184kcal
Author Kristen Stevens

Ingredients

  • 1 (15-ounce) Russet potato, peeled and quartered
  • ¼ cup softened butter
  • ¼ cup milk
  • 1/2 cup potato cooking water
  • 1 tablespoon sugar
  • 2 ½ teaspoons active-dry yeast
  • 2 large eggs
  • 4 ½ cups all-purpose flour
  • 1 teaspoon salt

Optional Honey Butter

  • 1 tablespoon butter
  • 1 tablespoon honey
  • 1 teaspoon flaky sea salt

Instructions

  • Put the quartered Russet potato into a pot and cover it with water. Bring the pot to a boil over high heat and continue to boil until the potato is soft, about 10 minutes. Reserve ½ cup of the cooking water then drain the potatoes.
  • Add the butter and milk to the potatoes and mash well.
  • Put the potato water into the bowl of your stand mixer or large mixing bowl and add the sugar. Let the water cool until it is lukewarm then add the active dry yeast. Let the yeast bloom for 5 minutes.
  • Add the mashed potatoes and eggs to the bowl and mix using a dough hook or a wooden spoon.
  • Add the flour and salt and continue to mix in your stand mixer for 2-3 minutes, or until the dough comes together into a ball. If you're mixing the dough by hand, turn it out onto your counter and kneed it for 5 minutes.
  • Transfer the dough to a lightly oiled bowl and cover tightly. Place the bowl in a warm (not hot) place for 1 hour, or until the dough has doubled in size.

Bake as pull apart potato buns

  • Divide the dough into 15 balls. Place each ball seam-side down in a lightly oiled baking dish. They will be quite close together. Cover the baking dish and let the buns rise for 45 minutes.
  • Preheat your oven to 350 degrees. Bake the buns for 30-35 minutes, or until they are golden on top and they reach an internal temperature of 200 degrees Fahrenheit.
  • Let the buns cool before removing them from the baking dish.

Bake as individual potato buns

  • Divide the dough into 16 balls. Place each ball seam-side down on a lightly oiled baking sheet, spaced 2-inches apart. Bake the buns for 20-25 minutes, or until they are golden on top and they reach an internal temperature of 200 degrees Fahrenheit.
  • Let them cool slightly before serving.

Honey Butter Buns

  • Melt the butter and honey in a small bowl. Once the buns have cooled, brush the tops of the buns with the honey butter then sprinkle with some flaky sea salt.

Notes

You can also use leftover mashed potatoes in this recipe, but you'll need to increase the flour. Start by adding 2 extra tablespoons of flour and add more if needed until the dough is thick and sticky. Ad instead of using potato cooking water, use warm tap water.

Nutrition

Calories: 184kcal | Carbohydrates: 30g | Protein: 5g | Fat: 5g | Saturated Fat: 3g | Trans Fat: 1g | Cholesterol: 33mg | Sodium: 189mg | Potassium: 71mg | Fiber: 1g | Sugar: 2g | Vitamin A: 150IU | Vitamin C: 1mg | Calcium: 15mg | Iron: 2mg


from The Recipe Critic https://ift.tt/39PFr4j
https://ift.tt/3fwUvr9

बुधवार, 31 मार्च 2021

The BEST Lemon Meringue Pie

Lemon Meringue Pie is literally a slice of sunshine! Tart and tangy, bright lemon filling is topped with clouds of fluffy meringue that is going to blow your taste buds.

There is something truly amazing about pie, it is just so good! Just try these blog favorites and see what I mean, Easy Chocolate, Fresh Strawberry and Perfect Banoffee Pie!

Slice of Lemon Meringue pie on a plate.

Homemade Lemon Meringue Pie

Lemon meringue pie has to be one of my all time favorites. It is bright, zingy and fresh. The meringue is like eating a pillowy toasted marshmallow. Together it is like a little slice of heaven, or sunshine! To me this pie just screams springtime! The lemon curd is silky smooth and just the perfect combination of tart and tangy. Then comes the beautiful mountain of meringue that sits on top of the pie like a cloud. When you bake it in the oven it turns the outside into a golden brown with just the right amount of bite. It is sweet and light, the ideal combination for the lemon filling.

This Lemon meringue pie, is one to impress. Everyone loves the clouds of meringue. Do not let the meringue part intimidate you. I am going to give you all the tips and tricks to get a perfect meringue. the Lemon filling is just as easy. You are going to be an expert in this pie in no time. So let’s make this amazing meringue pie!

What You Will Need For Meringue Pie

I love that this recipes doesn’t allow the egg yolks or the egg whites to go to waste. You will use the yolks in the lemon curd and the whites for the meringue.

  • Graham crackers: Crush your graham crackers with a food processor or in a freezer bag with a rolling pin. 
  • Unsalted Butter: Be sure to use unsalted butter, you do not want a salty crust. 
  • Granulated Sugar: The bit of sweet to balance the tart.
  • Lemon Zest: If you do not have a zester, use the smallest holes of a cheese grater. Stop once you get to the white part of the lemon as it can be bitter.
  • Kosher Salt:  Salt makes the sweet and tart, sweeter and more tart.
  • Cornstarch:  The thickener for the lemon filling.
  • Unsalted Butter:  Helps create a rich filling.
  • Lemon Juice: Use fresh lemon juice over concentrate
  • Water:  To mix with the filling
  • Egg Yolks:  save the egg whites for the meringue
  • Egg Whites: Use the whites from the yolk of the filling.
  • Sugar: This the meringue fluff and taste sweet.
  • Cream of Tartar: Stabilizes the egg whites and creates the peaks.
  • Kosher Salt: For flavor
  • Vanilla Extract: Gives the meringue that sweet marshmallow like flavor.

How To Make The Best Lemon Meringue

There are a few steps to this dessert, but it is so worth the effort. Trust me, this is going to be one of the best pies you will ever make.

  1. Crush: Ground Graham crackers in a food processor, mix in melted butter until the crumbs hold in a clump when pressed together.
  2. Pie tin: Press the crust into the bottom and up the side of a pie pan using the flat bottom of a small glass or measuring cup. Place in the refrigerator to set for about 15 minutes while the oven is preheating.
  3. Bake: Preheat the oven to 375°F and bake the crust for 10 minutes.
  4. Cool: Turn the oven off and remove the pie crust. Set it on a wire rack to cool.

Make the Lemon Filling

  1. Mix: Whisk together the sugar and lemon zest. Add the salt and cornstarch, whisk to distribute evenly. Set aside.
  2. Heat: Melt butter in a saucepan over medium heat. Add water, lemon juice, and the sugar/cornstarch mixture, stir to make sure the cornstarch dissolves. Add the egg yolks and cook the mixture, whisking constantly, until it thickens and some bubbles burst at the surface, about 5 mins. 
  3. Make it Smooth: Strain the filling through a fine mesh sieve into a clean bowl.
  4. Fill: Transfer cool lemon filling into the cool pie crust, cover with plastic wrap and refrigerate until the filling sets completely, about 4 hours.

Make the Meringue

  1. Double Boiler: Whisk together egg whites and sugar in a heatproof bowl over a pot of simmering water. Continue whisking until the egg white mixture reaches 160°F. 
  2. Beat: Transfer egg white mixture into a stand mixer bowl and add cream of tartar. Beat with the wire whisk attachment on medium speed until it is fluffy and reaches soft peaks.
  3. Flavoring: Sprinkle in the salt and stream in the vanilla extract. Then continue beating until the meringue is shiny and stiff peaks form.

Assemble the Pie

  1. Combine:Add the meringue on top of the lemon filling.With a spatula push the meringue out to the edges leaving a dome in the middle. Then use the back of a spoon to make little peaks all around.
  2. Brown: Use a kitchen torch to brown the meringue in places.
  3. Serve: Serve immediately

Pouring the lemon filling in the pie crust.

Making Perfect Lemon Filling

When eat your lemon meringue pie, you want the lemon filling to be silky smooth and that perfect combination of tartness and a bit of sweet. Here is how we do that.

  • Heat Slowly: After you seperate the egg yolks from the whites you want to add them to the pot before they get hot. The mixture should be warm, but not hot. If the mixture is to hot you’ll curdle the eggs or basically scramble them.
  • Stir: The secret to luscious lemon filling is to stir constantly and stir well. Do not walk away from your pot.
  • Strain: Pushing the filling through a fine mesh strainer will guarantee you will have silky smooth lemon filling. Do not skip this step.

Making designs with a spoon in the meringue.

Tips For The Fluffiest Meringue

Don’t let the meringue part of this lemon meringue pie intimidate you. This dessert is going to become the best you ever made with these tips, perfection is just a few minutes away.

  • Egg Whites: Separating the egg yolks from the egg whites is super important. If you get even a smidge of egg yolk in your egg whites, your meringue will be ruined. To help you avoid that separate the eggs while they are are still cold. Cold eggs separate better than room temperature.
  • Room Temperature: However, room temperature egg whites will whip up easier and better so after you separate them, let your egg whites come to room temperature.
  • Create The Peaks: It might take some patience but you will want to make sure your peaks are good and stiff. Don’t worry it will come
  • Design: This is the most fun part. With the back of a spoon gently create swirls and whirls for your meringue, they will look awesome when you’ve browned them.
  • To Brown the Meringue:  I used a kitchen torch to get that golden brown look you want. But you can get the same look by moving the oven rack close to the top and turning on your broiler. place the lemon meringue pie in the oven and watch it carefully turning as needed to brown it evenly.

Baked Lemon Meringue pie with a golden top.

How to Store French Lemon Meringue Pie

Lemon Meringue pie is best eaten the same day it is made and as soon as the meringue is put on. To store leftovers cover in such a way that the plastic or foil does not touch the meringue if possible. I use toothpicks in the pie, to prop up the plastic wrap away from the pie.

Keep in the fridge for up to 3 days. There may be some “weeping” of the meringue and it will separate as it is stored. This is normal of meringue that is stored for a few days. It will not change the taste, but it might the texture. It will still be amazing!

A side view of the layers of lemon and meringue in the slice of pie.

More Lemony Recipes You Have to Try

Lemon is one of my all time favorite ingredients to cook and bake with. It adds so much zip and zing to recipes. The tartness balances out the sweet in the best desserts. Lemon’s zing brings out the best in chicken and fish especially. You can make a simple dish absolutely delicious just by adding a fresh squeeze of lemon. When you go searching for lemon recipes on here, you will find quite a few, and they are all amazing, but here are a few to get your started.

Print

Lemon Meringue Pie

Lemon Meringue Pie is literally a slice of sunshine! Tart and tangy, bright lemon filling is topped with clouds of fluffy meringue that is going to blow your taste buds.
Course Dessert
Cuisine American
Keyword lemon meringue pie
Prep Time 25 minutes
Cook Time 35 minutes
Total Time 1 hour
Servings 10 Slices
Calories 374kcal
Author Alyssa Rivers

Ingredients

Crust

  • 14 (full sheets) of Graham crackers
  • 3 ounces unsalted butter melted

Lemon filling

  • 1 1/4 cups granulated sugar
  • 1 Tablespoons lemon zest
  • 1/4 teaspoons kosher salt
  • 1/4 cup corn starch
  • 2 ounces unsalted butter
  • 3/4 cup lemon juice
  • 1 1/4 cup water
  • 5 egg yolks save the egg whites for the meringue

Meringue topping

  • 5 large egg whites
  • ½ cup granulated sugar
  • ½ teaspoon cream of tartar
  • A pinch of kosher salt
  • ½ teaspoon of vanilla extract

Instructions

Make the pie crust:

  • Ground Graham crackers in a food processor, mix in melted butter until the crumbs hold in a clump when pressed together.
  • Press the crust into the bottom and up the side of a pie pan using the flat bottom of a small glass or measuring cup. Place in the refrigerator to set for about 15 minutes while the oven is preheating.
  • Preheat the oven to 375°F and bake the crust for 10 minutes.
  • Turn off the oven and remove the pie crust. Set it on a wire rack to cool.

Make the lemon filling:

  • Whisk together the sugar and lemon zest. Add the salt and cornstarch, whisk to distribute evenly. Set aside.
  • Melt butter in a saucepan over medium heat. Add water, lemon juice, and the sugar/cornstarch mixture, stir to make sure the cornstarch dissolves. Add the egg yolks and cook the mixture, whisking constantly, until it thickens and some bubbles burst at the surface, about 5 mins.
  • Strain the filling through a fine mesh sieve into a clean bowl. Set aside to cool.
  • Transfer cool lemon filling into the cool pie crust, cover with plastic wrap and refrigerate until the filling sets completely, about 4 hours.

Make the meringue:

  • Whisk together egg whites and sugar in a heatproof bowl over a pot of simmering water. Continue whisking until the egg white mixture reaches 160°F.
  • Transfer egg white mixture into a stand mixer bowl and add cream of tartar. Beat with the wire whisk attachment on medium speed until it is fluffy and reaches soft peaks.
  • Sprinkle in the salt and stream in the vanilla extract. Then continue beating until the meringue is shiny and stiff peaks form.

Assemble the pie:

  • Add the meringue on top of the lemon filling. Use a spatula to push the meringue out to the edges leaving a dome in the middle. Use the back of a spoon to make little peaks all around.
  • Use a kitchen torch to brown the meringue in places.
  • Serve immediately.

Nutrition

Calories: 374kcal | Carbohydrates: 55g | Protein: 5g | Fat: 16g | Saturated Fat: 8g | Trans Fat: 1g | Cholesterol: 128mg | Sodium: 220mg | Potassium: 118mg | Fiber: 1g | Sugar: 40g | Vitamin A: 485IU | Vitamin C: 8mg | Calcium: 35mg | Iron: 1mg


from The Recipe Critic https://ift.tt/3wd07g3
https://ift.tt/31BnX7c