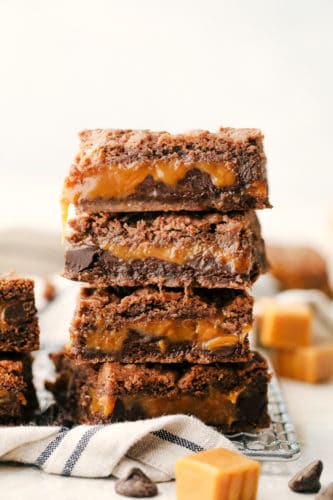
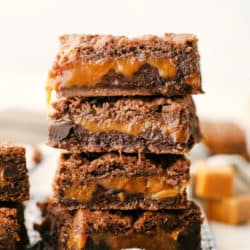
Caramel Brownies are the perfect way to satisfy your sweet cravings. Rich chocolate, sandwiches ooey gooey sweet caramel for the best brownies EVER!
Brownies are hands down one of the best treats, they are rich, luscious and perfectly proportioned. You have to try these other tried and true favorites like this Red Velvet, Oreo or Cream Cheese Brownies!

Caramel Brownie Recipe
The first time I made these caramel brownies they were gone in 2 minutes flat! It might have helped that I was feeding a bunch of boys, but still! These are just so good! When baking with caramel the hardest part is letting it completely cool. It usually takes a few hours, and even helps putting them in the fridge right before cutting. So I had my little five year old following me around all day asking me every 5 minutes if they were ready. I guess I don’t blame him. The smell of fresh baked brownies filled the house and the caramel looked so amazing just oozing on top. I think I secretly heard them whispering, eat me!
These caramel brownies are to die for. They are the best brownies I think that I have ever had. They are rich, chewy, and the caramel and chocolate chips inside make them absolutely perfect. I have made these so much I have the recipe memorized and I can’t believe that I haven’t made them for my blog until now. I usually mix some pecans in the brownie batter, but I know my kids prefer them without. Either way, you will not be disappointed by making these.
What You Will Need For Chocolate Caramel Brownies
Rich and decadent, I’ve made this simple by using a cake mix to speed it up, and make it taste amazing!
- German Chocolate Cake Mix: Any boxed german chocolate mix will do.
- Kraft Caramels: You will need one package, about 14 oz worth or 45 caramels.
- Evaporated Milk: This will help the caramels melt into a silky smooth layer.
- Butter: Because everything is better with butter, and you will need to melt it.
- Flour: This will act as a thickener.
- Semi Sweet Chocolate Chips: I used jumbo chips but regular are fine.
- Pecans: Finely chopped. These are optional, but I love the crunchy texture they give.
How to Make Caramel Brownies from Scratch
The hardest part of making these exquisite brownies is unwrapping the caramels and not eating them all.
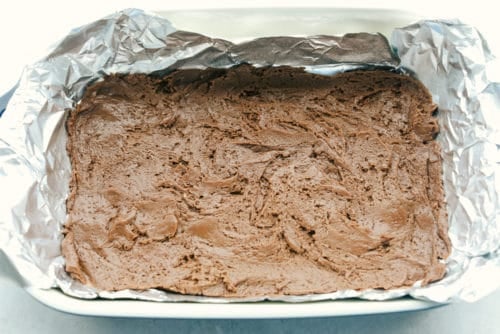
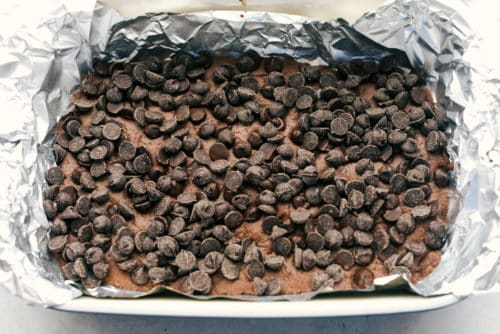
- Prepare: Preheat the oven to 350 degrees and grease a 9 x 13 pan and set aside.
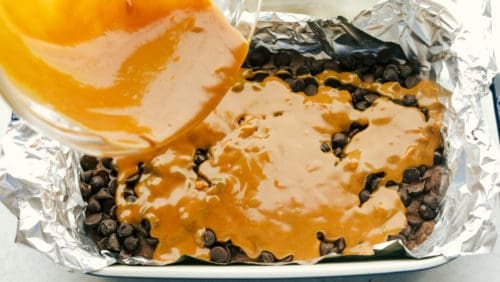
- Caramel: Melt the caramel and ⅓ cup evaporated milk and stir in a small saucepan over low heat until melted and fully incorporated.
- Cake: In a mixing bowl combine cake mix ⅓ cup evaporated milk, melted butter and flour. Press half of the mix into the 9×13 inch dish and bake for 6 minutes.
- Chocolate Chips: Remove from the oven and sprinkle chocolate chips
- Layer: Pour the caramel on top of the chocolate chips.
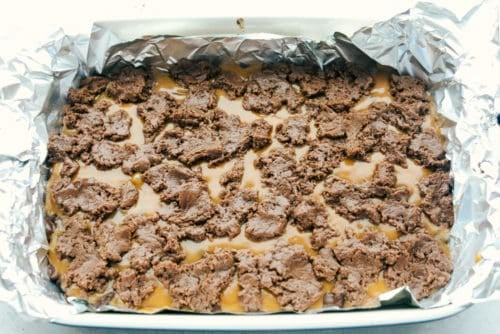
- Top it: Top with the remaining brownie batter on the top of the caramel and bake for an additional 15-18 minutes.
- Cool: Remove from oven and let cool completely so that the caramel can set. I also find that if you let it cool and place in the fridge it helps to set up right before cutting.

Tips For The Best Caramel Brownies
With gooey caramel and decadent chocolate, you cannot go wrong. These are simply the best, super easy and super delicious.
- Cake Mix: Everyone has their favorite cake mix brand, so use what you love. But if you have no idea, Betty Crocker is the way to go.
- Can I use a different Chocolate Cake Mix? Yes, you can. German chocolate is mild flavored chocolate. If you want a darker richer chocolate flavor opt for a devil foods or dark chocolate cake mix.
- Chocolate Chips: You can also use dark chocolate chips instead of semi sweet for a deeper flavor. I do not however recommend milk chocolate. I feel it makes the brownies too sweet with the caramel.
- Caramel: You may be groaning at the fact that you need to make your own caramel sauce, but truly it is the only way to go. Using a jarred caramel sauce will not set up as well and can make the brownies not just ooey and gooey, but down right drippy.
- Line Your Pan: To make it super easy to remove the brownies from the pan I highly recommend lining it with foil. An extra step that will save you a lot time and heartache in the end.
- Topping the Brownies: When you put the rest of the brownie batter on top, you will not be able to smooth it out over the caramel. I will sometimes just plop it on, other times I take blobs and flatten them a bit with my hand. I then create a puzzle like pattern on top like below. If you really want to cover it, place the brownie mixture between two pieces of plastic wrap and roll it out with a rolling pin.

Storing Homemade Caramel Brownies
Leftovers will not last long, I promise!
- Storing Leftover Brownies: These will keep on the counter in cool place, tightly wrapped. If your home is a bit warmer or you just like them a bit firmer you can keep these tightly covered in the fridge. They will keep for up to a week.
- Freeze: Wrap tightly with foil and then place in a freezer safe bag for up to 4 months!

More Bar Desserts To Try!
Making treats in a 9×13 pan are referred to often as bar desserts, or bar cookies. They are one of the easiest ways to cook amazing desserts, quickly and get a lot of them too. When I’m short on time, but need a good dessert I often reach for one of these perfected bar desserts. They are also easy to cut and serve.
- Neiman Marcus Bars
- The Best Carmelitas Cookie Bars
- Soft and Chewy Millionaire Shortbread
- Nutella Blondies
- Glazed Lemon Brownies
Caramel Brownies
Ingredients
- 1 box german chocolate cake mix
- 1 package Kraft caramels about 45, 14 oz.
- 1 can evaporated milk 10 oz., divided
- 3/4 cup butter melted
- 2 tablespoons flour
- 12 ounces semi sweet chocolate chips I use jumbo
- 1/2 cup chopped pecans optional
Instructions
-
Preheat the oven to 350. Grease a 9x13 pan and set aside.
-
Melt the caramel and ⅓ cup evaporated milk and stir in a small saucepan over low heat until melted and incorporated.
-
In a mixing bowl combine cake mix, ⅓ cup evaporated milk, melted butter and flour. Press half of the mix into the 9x13 inch dish and bake for 6 minutes.
-
Remove pan from oven and sprinkle chocolate chips.
-
Pour the caramel on top of the chocolate chips.
-
Top with the remaining brownie batter on the top of the caramel and bake for an additional 15-18 minutes.
-
Remove from oven and let cool completely so that the caramel can set. I also find that if you let it cool and place in the fridge it helps to set up right before cutting.
Notes
Nutrition
from The Recipe Critic https://ift.tt/3sRYvpW
https://ift.tt/3dCyWCD