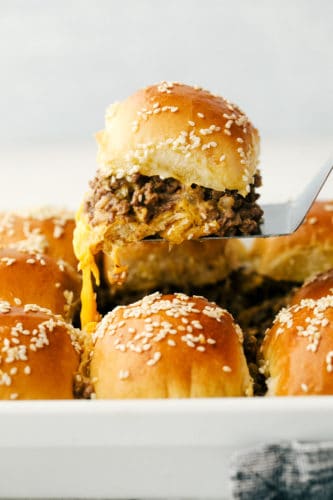
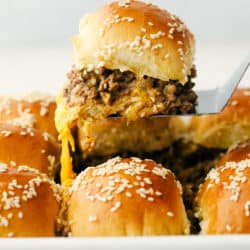
Cheeseburger Sliders are the best thing to happen to rolls since butter! These are fast, easy, and absolutely delicious.
Sliders super easy to make and fun to eat! You have to try these other slider favorites, Ham and Cheddar, Pastrami and Italian Meatball Sliders!

Homemade Cheeseburger Sliders
Sliders are one of the best inventions ever, especially for little hands. My kids love it when I make sliders and cheeseburgers are one of their favorites. They are the perfect size for little hands and mouths and there are plenty for the adults to get their fill too! These cheeseburger sliders are extra cheesy and gooey with two slices of cheese. You will want both slices of cheese to sandwich in the savory hamburger mixture. Super easy it’s the perfect way to have cheeseburgers when it’s too hot to fire up the grill.
These sliders are perfect as appetizers for a party or a fun family dinner too. And if you need an idea to serve alongside other game day foods, these are for sure going to hit the spot! And of course they make a great dinner. Serve them with your favorite potato dish. If you need ideas I have them. Try Homemade French Fries, Air Fried Pickles, Parmesan Garlic Potatoes Wedges, or Crispy Onion Rings. Also serve with one of these amazing salads. Easy 7 Layer Salad, Classic Wedge Salad, Creamy Grape Salad or this Incredible Bacon Ranch Pasta Salad.
What You Need For Mini Cheeseburger Sliders
This seems like a lot of ingredients, but it’s not really. If you don’t know what kind of steak sauce to use, go with A-1. It is a classic favorite.
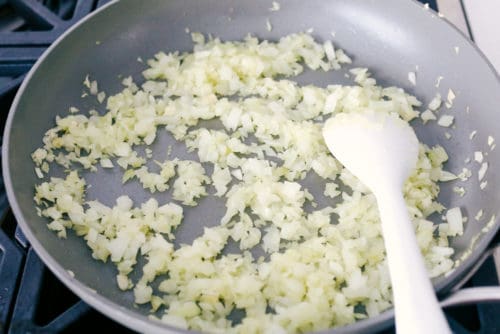
- Olive Oil: This is for sauteing your onions in.
- Onion: Finely diced, this will bring intense flavor to the beef.
- Ground Beef: Use lean ground beef for this recipe, it will have less fat and grease that way.
- Salt and Pepper: Add to taste
- Garlic: Finely minced for the best flavor.
- Steak Sauce: Such as A-1 or your favorite brand.
- American Cheese Slices: This cheese was made for melting, it is the best.
- Dinner Rolls: You can also use slider buns, or Hawaiian slider rolls.
- Butter: Melted, this will add incredible flavor and stick the seeds to the rolls.
- Sesame Seeds: These will give your mini cheeseburgers their iconic sesame seed top.
How to Make Easy Cheeseburger Sliders
So simple to put together and the butter and sesame seeds adds the perfect touch.
- Prep: Preheat the oven to 350 degrees.
- Saute: In a large skillet add the olive oil and onion. Saute until tender.
- Beef: Add the ground beef to the pan and cook and crumble until no longer pink.
- Season: Flavor the beef with salt, pepper, garlic and steak sauce.
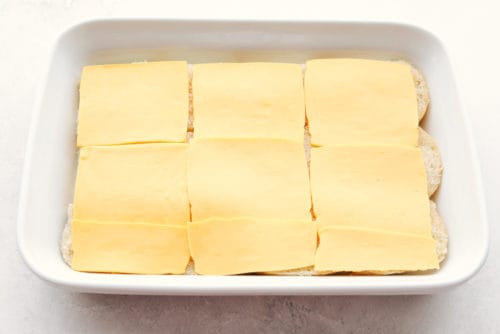
- Bottom of Sliders: Slice the dinner rolls in half and lay in a 9×13 inch dish. Lay a single layer of cheese on top of the rolls.
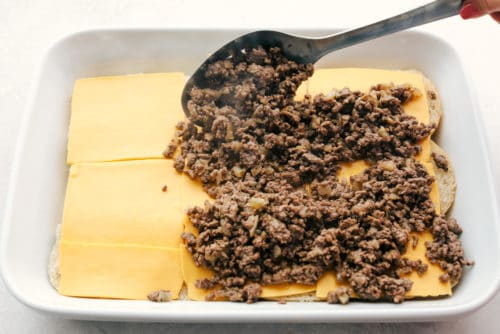
- Add Beef: Spoon the beef mixture on top of the cheese.
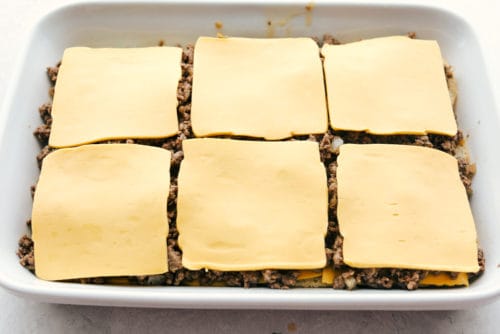
- More Cheese: Add another layer of cheese and top with the rolls.
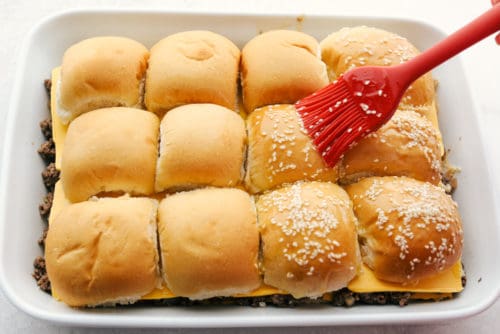
- Top: Melt the butter and stir in the sesame seeds. Spread the melted butter and sesame seeds on top of the rolls.
- Cook: Bake for 20-25 minutes or until golden brown.

Tips For The Best Cheeseburger Sliders
These cheeseburger sliders are going to become a new favorite. They are almost like a sloppy joe, but better.
- Cheese on the bottom: Putting cheese on the bottom of the buns before the hamburger will help prevent getting a soggy bottom when you bake them.
- Drain Your Beef: Even if you use lean ground beef, you will have grease that cooks out, you will want to drain it. Remove the pan from the heat and tilt it so that the grease gathers in one area. Using a spatula separate the beef from the fat. Using a spoon, scoop out the fat and place in a tin can you have saved. I put the can in the fridge, let the grease harden and then throw the whole thing away. Do not put grease down your sink. It will clog your pipes, and cause all sorts of headaches.
- Double the Recipe: If you are cooking for a crowd or are using them as appetizers double the recipe and use a cookie sheet bake more at a time.
- Butter the top: You want to coat the buns, but not drench them. Over buttering can cause the buns to get soggy on the bottom and or the top.
- Store Leftovers: Tightly wrap in foil and keep in the fridge for up to 3 days.
- Freeze: These can be frozen too! They work best if they are wrapped individually. Wrap tightly in plastic wrap and foil and then place in a freezer bag and keep for up to 3 months.
- Reheat: To reheat your cheeseburger sliders, completely thaw and wrap in foil. Bake in a 350 degree oven for 10-12 minutes.

Variations of Sliders
You are going to love how easy it is customize your cheeseburger slider. How ever you serve it, do not forget to serve it with a nice dill pickle slice!
- Cheese: American cheese definitely melts the best, but there are lots of other cheeses you can use. Pepper Jack, colby jack, swiss, and havarti are yummy too. Try using crumbled blue cheese on top or shredded cheddar instead of another slice of American. Mix and match your cheese to fit your tastes.
- Toppings: Saute mushrooms and stir in with the hamburger or place on top. Mix in crumbled bacon for a mini bacon cheeseburger to die for.
- Pickles: There are two ways to add your pickles. Place a pickle slice on top of each bun after the second slice of cheese. Or you can chop dill pickles and stir them into the hamburger mixture. Both work awesome!
- Condiments: If you want some ketchup and mustard stir some up and spread on one side of the bun or stir into the hamburger to flavor it through out. Want an easy way to do this, whip up some incredible fry sauce and stir that into the hamburger.
- Buns: We love the sweet and savory combination that comes from using hawaiian sliders, but you do not have to use them. There are many companies that make slider buns now and sell them at your local grocery store. Use whichever you wish.

More Ground Beef Recipes To Whip Up
Ground beef is one of the most versatile proteins to cook with. You can combine it with so many flavors and it is relatively quick to cook. I always keep ground beef in the freezer for quick meals like tacos or spaghetti on a busy weeknight or lazy weekend. Look for specials and sales and buy in bulk. Then you can separate into 1 or 2 pound sections for recipes. Also buying lean ground beef is usually cheaper and you can drain the fat off once cooked and it will become lean! Try one of these favorites the next time you need a fantastic ground beef recipe.
- Korean Ground Beef and Rice Bowls
- Greek Meatballs
- Foolproof Glazed Meatloaf
- Stuffed Cabbage Soup
- Easy One Pot Ground Beef Stroganoff
Cheeseburger Sliders
Ingredients
- 1 Tablespoon olive oil
- 1 small onion diced
- 2 pounds lean ground beef
- 1 teaspoon salt
- 1/4 teaspoon pepper
- 1/2 teaspoon garlic
- 1/4 cup steak sauce
- 13 slices of American cheese
- 12 dinner rolls or Hawaiian slider rolls
- 3 Tablespoons butter melted
- 1 tablespoon sesame seeds
Instructions
-
Preheat the oven to 350 degrees. In a large skillet add the olive oil and onion. Sauté until tender. Add in the ground beef and cook and crumble until no longer pink.
-
Add in the salt, pepper, garlic, and steak sauce.

-
Slice the dinner rolls in half and lay in a 9x13 inch dish. Lay a single layer of cheese on top of the rolls.
-
Spread the beef mixture on top of the cheese.
-
Add another layer of cheese and top with the rolls.
-
Spread the melted butter and sesame seeds on top of the rolls. Bake for 20-25 minutes or until golden brown.
Nutrition
from The Recipe Critic https://ift.tt/3fLYU9O
https://ift.tt/31POFcd