गुरुवार, 8 अप्रैल 2021

The Best Homemade Lemonade

There isn’t anything quite as refreshing as this Homemade Lemonade recipe, it’s the BEST!  Summer is going to be so cool, with a glass of this by your side.

Anything with lemons in it is just fresh and energizing, it adds so much zing and flavor. Here are more lemon loving favorites, like these Scallops, Chicken Piccata and Brownies.

A pitcher of homemade lemonade with lemons.

Easy Homemade Lemonade

Just thinking about this recipe makes my mouth water. Imagine a hot day and you are parched. Now reach into the fridge and pull out this pitcher of ice cold lemonade. It’s perfectly balanced between the sweet and the tart. You take a gulp and the world is all better. Seriously, it’s that good! And the reason it’s so good is because it’s so easy! You may never buy lemonade from the store again. Make a double batch, I promise it will not go to waste!

Nothing artificial, no preservatives, it is a lemonade you can serve to your friends and family in confidence. And as with all things homemade, you can control the sweet and tangy to your liking. Add more sugar syrup or more lemon juice. It’s up to you! Serve this at your next big BBQ alongside Grilled Hawaiian Teriyaki Chicken Skewers, Grilled Mexican Street Corn and Grilled Coconut Lime Pineapple for a meal sure to impress.

What You Need To Make Perfect Lemonade

Making Homemade lemonade from scratch is simple, and delicious!

  • Sugar: You will dissolve this in the water to create a simple syrup.
  • Water: This separate from the rest of the water as it will be used to make the sugar syrup.
  • Lemon Juice: Depending on the size of your lemons will depend on how many you will need to get a cup of juice. Anywhere from 6-10 lemons
  • Water: This is to add it to the syrup and lemon juice to mix it all together.
  • Mint and Lemons: Optional for garnish. I’d give it a try if I were you. It’s very yummy.

When Life Give you Lemons, Let’s Make Lemonade!

Getting the best results from your lemonade will be making the sugar syrup. Do not skip this step.

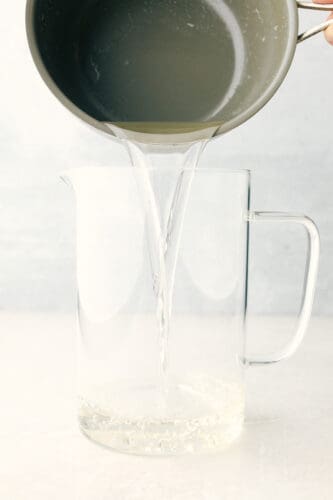
  1. Sugar Syrup: In a medium saucepan over medium high heat add the sugar and water. Let simmer until the sugar has dissolved about 4-5 minutes.
  2. Pour: Add the syrup to the pitcher.
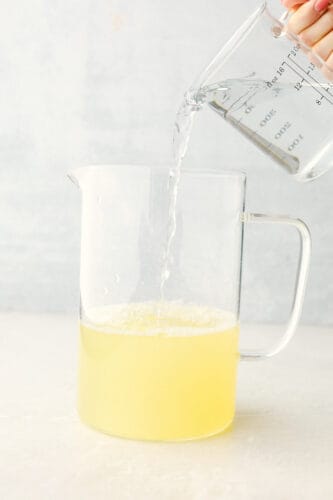
  3. Lemon Juice: Add in the lemon juice.
  4. Water: Add in 6-8 cups of water and stir.
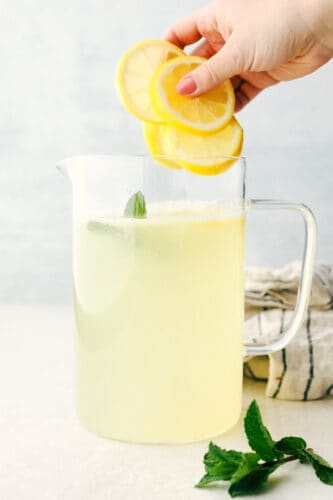
  5. Extra: Garnish with mint and lemon slices if desired.

Pouring in the sugar water and lemon juice in a pitcher.

Getting the Most Juice From Your Lemons

You want to get the most from your lemons when you juice them. You don’t want to leave anything behind but the pulp, especially since you want a whole cup of juice. To get the most juice out of your lemons you will want to warm them. I do this in the microwave.

Cut your lemons in half and make slits along the peel all the way down to the bottom, about four of them. The cuts should go all the way through the peel and just barely into the flesh. Place the lemons on a microwave safe plate. Microwave for 30-45 seconds or till the lemons are good and warm. Then juice your lemons in your preferred method.

Tips For Fresh Homemade Lemonade

So invigorating and exhilarating, fresh homemade lemonade just hits the spot.

  • Picking Lemons: Getting good lemonade, all starts with the lemons. Look for lemons that are firm but yield to gentle pressure. The skin should be free from any green spots and not be overly thick. Avoid hard lemons as well. Also lemons should feel heavy for their size. The heavier the lemon the more juice they will contain. If you can find them Meyer lemons have the best flavor. They are large, so you will need less, and have a naturally sweeter flavor.
  • Avoid The Bottle: The ultimate lemonade is going to come from using fresh lemons. Bottled lemon juice or juice from concentrate just is not the same.
  • Intensify the Flavor: Add the zest of one lemon to the sugar syrup for even more of that citrus flavor without adding too much more zing.
  • Store It:  Since ice cubes will dilute the lemon, keep in the fridge without ice cubes and when ready to serve add the ice cubes to the glass, not the pitcher. It will keep for 4 days.

Adding water and lemons and mint for garnish.

Why Do I Need to Make a Sugar Syrup?

Because it is the one of the best ways to mix sugar and lemons successfully. This way your homemade lemonade will taste amazing and mix up beautifully.

Making the sugar syrup is the key to making your homemade lemonade balanced. When you just throw the water, sugar and lemon juice together the sugar will often sink to the bottom and almost be impossible to dissolve. Most of it will, but some of it won’t. This makes it very difficult to that right balance of sweet and tart. By heating the sugar with water and dissolving it into a syrup allows the sugar and lemon juice to meld together and be perfectly balanced from the first drink to the last.

Variations For Simple Homemade Lemonade

Why stop and just lemonade, when we can add lots of flavors and fun to your summer drink! Homemade lemonade is far from boring, get creative and enjoy!

  • Fruit: Lemons and fruit were made for each other. Try Strawberry Lemonade, Pomegranate, Blueberry, Raspberry and Watermelon Lemonades. Add lime juice for a lemon lime twist.
  • Fizzy:  Instead of plain water add your favorite sparkling water for a bit of bubbly. This makes a great substitute for soda in the summer. You still get that fizzy texture, but it is healthier for you.
  • Freeze it:  Use this to make your own Lemonade pops or a refreshing slushy drink like this Frozen Strawberry Lemonade!

Pouring lemonade in glass mason serving jars.

More Lemon Loving Recipes

Lemons are truly a wonderful fruit. When mixed with other ingredients it can add so much flavor and brightness to a dish. Simply squeezing a bit of lemon over a finished dish can really liven the dish and bring out the best in the flavors. Here are some more of my tried and true lemon recipes you have to try!

Print

Homemade Lemonade

There isn't anything quite as refreshing as this Homemade Lemonade recipe, it's the BEST!  Summer is going to be so cool, with a glass of this by your side.
Course Beverage
Cuisine American
Keyword homemade lemonade
Prep Time 5 minutes
Cook Time 5 minutes
Total Time 10 minutes
Servings 12 cups
Calories 67kcal
Author Alyssa Rivers

Ingredients

  • 1 cup sugar
  • 1 cup water
  • 1/2 cup lemon juice
  • 6-8 cups water
  • mint and lemon slices for garnish

Instructions

  • In a medium saucepan over medium high heat add the sugar and water. Let simmer until the sugar has dissolved about 4-5 minutes.
  • Add the syrup to the pitcher.
  • Add in the lemon juice.
  • Add in 6-8 cups of water and stir.
  • Garnish with mint and lemon slices if desired.

Nutrition

Calories: 67kcal | Carbohydrates: 17g | Protein: 1g | Fat: 1g | Saturated Fat: 1g | Sodium: 7mg | Potassium: 11mg | Fiber: 1g | Sugar: 17g | Vitamin A: 1IU | Vitamin C: 4mg | Calcium: 5mg | Iron: 1mg


from The Recipe Critic https://ift.tt/3uq13Mm
https://ift.tt/2PKyx9w

बुधवार, 7 अप्रैल 2021

Amazing Homemade Chicken Enchiladas

Chicken Enchiladas are saucy, cheesy and super scrumptious. These are made with my Enchilada sauce, which makes them even better than store bought!

Combine these enchiladas withCorn, Rice and of course Horchata. It will be the perfect Mexican Style Restaurant meal at home!

A pan of cheesy chicken enchiladas.

Homemade Chicken Enchiladas

When I start making my enchilada sauce, my family gets excited because they know what’s for dinner! The quick and easy sauce takes minutes to make so I love taking that extra step. The sauce is super rich and velvety smooth. You are going to love it! Chicken enchiladas are a classic hit. They are cheesy, smothered in a rich sauce and then topped with more cheese. These are so yummy.

I love making big batches so we have plenty of leftovers. They make great lunches served with chips and salsa or pico de gallo. Since this is easy to double, it’s perfect for a big crowd or a large family gathering. Serve some ultimate Skillet Queso with chips, Hominy Casserole and Mouth Watering Cowboy Caviar for appetizers.

What You Need For Enchiladas

Whether you use corn or flour tortillas, these are going to be incredible. Especially with the homemade sauce. It hardly takes any time and the ingredients are super simple.

  • Olive Oil: This will help roast the flour and chili powder.
  • Flour: This will thicken the sauce and bring texture.
  • Chili Powder: The must have spice for enchilada sauce.
  • Tomato Sauce: This is the base of the sauce, bringing flavor and color.
  • Vegetable Stock: Vegetable stock has more neutral flavor than beef, chicken will also work.
  • Garlic Powder and Onion Powder: Incredible flavor enhancers.
  • Cumin: A classic mexican spice used in most dishes.
  • Salt and Pepper: Add to taste.
  • Chicken: Cooked and diced chicken.
  • Tortillas: Corn or flour tortillas will work.
  • Colby Jack Cheese: Use a block and shred your own.

How to Make Easy Chicken Enchiladas

Making enchiladas can feel like it’s time consuming, but it’s not and it’s totally worth it! These are so dang delicious!

  1. Prep: Preheat oven to 350 degrees.
  2. Toast: In a medium sized skillet add the olive oil, flour and chili powder. Whisk until it starts to brown and becomes fragrant.
  3. Add: Slowly whisk in the tomato sauce, vegetable stock, garlic powder, onion powder and cumin. Whisk until it starts to thicken.
  4. Save: Reserve 1 ½ cups of the sauce.
  5. Add: To the rest of the sauce add in the diced chicken.
  6. Assembly: Warm tortillas as desired. Add about 2 Tablespoons of cheese to the center of the tortilla.
  7. Scoop: Add about the same amount of the chicken in the sauce mixture.
  8. Fold: Roll up and place seam side down in a 9×13 inch baking dish. Repeat.
  9. Top it: Top with the reserved sauce and sprinkle the top with remaining cheese.
  10. Bake: Place in the oven for 20-25 minutes or until heated through and bubbly.

Mixing chicken in the enchilada sauce, making the enchiladas and topping them.

Tips For Making Homemade Enchilada Sauce

This is the basic recipe for Enchilada sauce from my blog. Here are some of the tips and tricks to make it absolutely perfect.

  • Roux: Make sure to cook the flour and chili powder a good full 2 minutes at least. Wait till it’s brown and fragrant before adding the broth. This will make sure the flour is good and toasted and you won’t have any raw flour taste. It also allows the chili powder to bloom enhancing its flavor.
  • Slow:  Be sure to add the chicken or vegetable broth slowly, whisking constantly. Add it before you add the tomato sauce too. If you need to stop pouring to give yourself more time to work out the lumps do it. It’ll be ten times easier to dissolve any lumps before you add the tomato sauce.
  • Reduce Heat: Speaking of lumps, it is a lot easier to work them out when the temperature isn’t too hot. You may need to reduce the temperature while you add the chicken or vegetable broth. Once everything is fully incorporated turn the heat up to a good simmer.
  • Spice: This recipe is easy to manage how much heat you want in your homemade enchilada sauce. Pay attention to what kind of chili powder you are using. There are hot, medium and mild chili powders. Choose the one that best suits you and your family. You can dial it back or dial it up depending on your tastes. If you love a good smokey flavor try using chipotle chili powder for a nice smokey spicy twist.
  • Simmer: Simmer to your desired consistency. Some like it thinner and some like it thicker. The longer you leave it to simmer the thicker it will get. If it gets too thick thin it with some water or broth.

Scooping saucy chicken filled tortillas out of the pan.

Making Sure These are Scrumptious!

The hardest part of making these enchiladas is waiting for them to bake and then cool. The aroma is going to make you super hungry, sorry about that.

  • Chicken: Any chicken will do really, it just needs to be chopped, diced or shredded. I like to use rotisserie chicken, or you can cook chicken breasts, and thighs and then cut them up too. Using thigh meat is a little bit more tender and juicy.
  • Cheese: We love using colby jack, but cheddar, or Monterey jack work just as well. For a bit of a kick try pepper jack cheese. Whichever cheese you use, buy a block and shred your own. It will be guaranteed to melt better and taste better. Pre-shredded often have additives that keep it from melting or hiding the flavor.
  • Tortillas: Whether you use corn or flour, make sure you heat them up a bit so that they are easy to roll and won’t split when you do. Place the rolled tortillas seam side down in the pan.
  • Spray Your Pan: Make sure you spray your pan, you do not want them to stick to the bottom.
  • Toppings: We love to serve our enchiladas with a bit of chopped cilantro and a dollop of sour cream. Serve with this amazing guacamole for additional yumminess.

Enchiladas on a plate with sour cream and sliced avocados.

Variations and How to Store Chicken Enchiladas

Mix it up and customize it anyway you want. They will still be some of the best enchiladas you have ever had. It’s all in the sauce.

  • Meat: Chicken is a go to for our household, but beef, pork and chorizo all make great substitutes.
  • Add Ins: Add in black beans, sautéed onions, and rice to give it bulk and flavor. I like to add these in especially when I need to make the filling stretch a bit.
  • Storing leftovers: Leftovers keep really well in a tightly sealed container in the fridge for up to 4 days. Reheat in the oven or microwave.
  • Freezing: I will sometimes make a double batch and after they have completely cooled I’ll freeze it for a quick meal down the road. Freeze tightly wrapped in plastic then foil and place in a freezer safe bag. It will keep for up to 3 months. Thaw in the fridge overnight and then reheat in the oven or microwave.

Showing a close up with a bite out one of them with a fork.

More Mexican Food Fun!

We love mexican food at our house. It is so easy to make, customize and devour! Mexican food is always full of incredible flavors and is super colorful, making it a delight to eat. When you need a good Mexican dish for dinner, a side dish, appetizer or even dessert, I’ve got you covered. These are just a sampling of the list I have for you when you are craving something a little south of border.

Print

Chicken Enchiladas

Chicken Enchiladas are saucy, cheesy and super scrumptious. These are made with my Enchilada sauce, which makes them even better than store bought!
Course Dinner, Main Course
Cuisine Mexican
Keyword chicken enchiladas, enchiladas
Prep Time 15 minutes
Cook Time 25 minutes
Total Time 40 minutes
Servings 8 enchiladas
Calories 332kcal
Author Alyssa Rivers

Ingredients

  • 1/4 cup olive oil
  • 2 Tablespoons Flour
  • 3 Tablespoons Chili Powder
  • 1 (15 ounce) can tomato sauce
  • 1 1/2 cups vegetable stock
  • 1/2 teaspoon garlic powder
  • 1/2 teaspoon onion powder
  • 1/4 teaspoon cumin
  • salt and pepper
  • 2 cups cooked chicken diced
  • 8-10 flour or corn tortillas
  • 3 cups Colby Jack Cheese shredded

Instructions

  • Preheat oven to 350 degrees. In a medium sized skillet add the olive oil, flour and chili powder. Whisk until it starts to brown and is fragrant.
  • Slowly whisk in the tomato sauce, vegetable stock, garlic powder, onion powder and cumin. Whisk until it starts to thicken.
  • Reserve 1 ½ cups of the sauce.
  • Add in the diced chicken to the sauce.
  • To Assemble: Add about 2 Tablespoons of cheese to the center of the tortilla.
  • Add the chicken in the sauce.
  • Roll up and place seam side down in a 9x13 inch baking dish. Repeat.
  • Top with the reserved sauce and sprinkle the top with remaining cheese.
  • Bake for 20-25 minutes or until heated through and bubbly.

Nutrition

Calories: 332kcal | Carbohydrates: 5g | Protein: 21g | Fat: 25g | Saturated Fat: 12g | Cholesterol: 73mg | Sodium: 552mg | Potassium: 209mg | Fiber: 1g | Sugar: 1g | Vitamin A: 1491IU | Vitamin C: 1mg | Calcium: 355mg | Iron: 2mg


from The Recipe Critic https://ift.tt/3fNj9DZ
https://ift.tt/3rYuvqY

मंगलवार, 6 अप्रैल 2021

Cheeseburger Sliders

Cheeseburger Sliders are the best thing to happen to rolls since butter! These are fast, easy, and absolutely delicious.

Sliders super easy to make and fun to eat! You have to try these other slider favorites, Ham and CheddarPastrami and Italian Meatball Sliders!

Lifting a cheeseburger slider out of a pan!

Homemade Cheeseburger Sliders

Sliders are one of the best inventions ever, especially for little hands. My kids love it when I make sliders and cheeseburgers are one of their favorites. They are the perfect size for little hands and mouths and there are plenty for the adults to get their fill too! These cheeseburger sliders are extra cheesy and gooey with two slices of cheese. You will want both slices of cheese to sandwich in the savory hamburger mixture. Super easy it’s the perfect way to have cheeseburgers when it’s too hot to fire up the grill.

These sliders are perfect as appetizers for a party or a fun family dinner too. And if you need an idea to serve alongside other game day foods, these are for sure going to hit the spot!  And of course they make a great dinner. Serve them with your favorite potato dish. If you need ideas I have them. Try Homemade French Fries, Air Fried Pickles, Parmesan Garlic Potatoes Wedges, or Crispy Onion Rings. Also serve with one of these amazing salads. Easy 7 Layer Salad, Classic Wedge Salad, Creamy Grape Salad or this Incredible Bacon Ranch Pasta Salad. 

What You Need For Mini Cheeseburger Sliders

This seems like a lot of ingredients, but it’s not really. If you don’t know what kind of steak sauce to use, go with A-1. It is a classic favorite.

  • Olive Oil: This is for sauteing your onions in.
  • Onion: Finely diced, this will bring intense flavor to the beef.
  • Ground Beef: Use lean ground beef for this recipe, it will have less fat and grease that way.
  • Salt and Pepper: Add to taste
  • Garlic: Finely minced for the best flavor.
  • Steak Sauce: Such as A-1 or your favorite brand.
  • American Cheese Slices: This cheese was made for melting, it is the best.
  • Dinner Rolls: You can also use slider buns, or Hawaiian slider rolls.
  • Butter: Melted, this will add incredible flavor and stick the seeds to the rolls.
  • Sesame Seeds: These will give your mini cheeseburgers their iconic sesame seed top.

How to Make Easy Cheeseburger Sliders

So simple to put together and the butter and sesame seeds adds the perfect touch.

  1. Prep: Preheat the oven to 350 degrees.
  2. Saute: In a large skillet add the olive oil and onion. Saute until tender.
  3. Beef:  Add the ground beef to the pan and cook and crumble until no longer pink.
  4. Season: Flavor the beef with salt, pepper, garlic and steak sauce.
  5. Bottom of Sliders: Slice the dinner rolls in half and lay in a 9×13 inch dish. Lay a single layer of cheese on top of the rolls.
  6. Add Beef: Spoon the beef mixture on top of the cheese.
  7. More Cheese: Add another layer of cheese and top with the rolls.
  8. Top: Melt the butter and stir in the sesame seeds. Spread the melted butter and sesame seeds on top of the rolls.
  9. Cook: Bake for 20-25 minutes or until golden brown.

A sheet pan with sliced rolls and cheese on top, placing the hamburger and more cheese, then brushing the tops with sesame seeds.

Tips For The Best Cheeseburger Sliders

These cheeseburger sliders are going to become a new favorite. They are almost like a sloppy joe, but better.

  • Cheese on the bottom: Putting cheese on the bottom of the buns before the hamburger will help prevent getting a soggy bottom when you bake them.
  • Drain Your Beef:  Even if you use lean ground beef, you will have grease that cooks out, you will want to drain it. Remove the pan from the heat and tilt it so that the grease gathers in one area. Using a spatula separate the beef from the fat. Using a spoon, scoop out the fat and place in a tin can you have saved. I put the can in the fridge, let the grease harden and then throw the whole thing away. Do not put grease down your sink. It will clog your pipes, and cause all sorts of headaches.
  • Double the Recipe: If you are cooking for a crowd or are using them as appetizers double the recipe and use a cookie sheet bake more at a time.
  • Butter the top: You want to coat the buns, but not drench them. Over buttering can cause the buns to get soggy on the bottom and or the top.
  • Store Leftovers: Tightly wrap in foil and keep in the fridge for up to 3 days.
  • Freeze: These can be frozen too! They work best if they are wrapped individually. Wrap tightly in plastic wrap and foil and then place in a freezer bag and keep for up to 3 months.
  • Reheat:  To reheat your cheeseburger sliders, completely thaw and wrap in foil. Bake in a 350 degree oven for 10-12 minutes.

Grabbing a cheeseburger slider out of the pan.

Variations of Sliders

You are going to love how easy it is customize your cheeseburger slider. How ever you serve it, do not forget to serve it with a nice dill pickle slice!

  • Cheese: American cheese definitely melts the best, but there are lots of other cheeses you can use. Pepper Jack, colby jack, swiss, and havarti are yummy too. Try using crumbled blue cheese on top or shredded cheddar instead of another slice of American. Mix and match your cheese to fit your tastes.
  • Toppings:  Saute mushrooms and stir in with the hamburger or place on top. Mix in crumbled bacon for a mini bacon cheeseburger to die for.
  • Pickles: There are two ways to add your pickles. Place a pickle slice on top of each bun after the second slice of cheese. Or you can chop dill pickles and stir them into the hamburger mixture. Both work awesome!
  • Condiments: If you want some ketchup and mustard stir some up and spread on one side of the bun or stir into the hamburger to flavor it through out. Want an easy way to do this, whip up some incredible fry sauce and stir that into the hamburger.
  • Buns: We love the sweet and savory combination that comes from using hawaiian sliders, but you do not have to use them. There are many companies that make slider buns now and sell them at your local grocery store. Use whichever you wish.

A single slider on a spatula with cheese dripping off.

More Ground Beef Recipes To Whip Up

Ground beef is one of the most versatile proteins to cook with. You can combine it with so many flavors and it is relatively quick to cook. I always keep ground beef in the freezer for quick meals like tacos or spaghetti on a busy weeknight or lazy weekend. Look for specials and sales and buy in bulk. Then you can separate into 1 or 2 pound sections for recipes. Also buying lean ground beef is usually cheaper and you can drain the fat off once cooked and it will become lean! Try one of these favorites the next time you need a fantastic ground beef recipe.

Print

Cheeseburger Sliders

Cheeseburger Sliders are the best thing to happen to rolls since butter! These are fast, easy, and absolutely delicious.
Course Dinner, Main Course
Cuisine American
Keyword cheeseburger sliders
Prep Time 10 minutes
Cook Time 25 minutes
Total Time 35 minutes
Servings 12 cheeseburgers
Calories 269kcal
Author Alyssa Rivers

Ingredients

  • 1 Tablespoon olive oil
  • 1 small onion diced
  • 2 pounds lean ground beef
  • 1 teaspoon salt
  • 1/4 teaspoon pepper
  • 1/2 teaspoon garlic
  • 1/4 cup steak sauce
  • 13 slices of American cheese
  • 12 dinner rolls or Hawaiian slider rolls
  • 3 Tablespoons butter melted
  • 1 tablespoon sesame seeds

Instructions

  • Preheat the oven to 350 degrees. In a large skillet add the olive oil and onion. Sauté until tender. Add in the ground beef and cook and crumble until no longer pink.
  • Add in the salt, pepper, garlic, and steak sauce.
  • Slice the dinner rolls in half and lay in a 9x13 inch dish. Lay a single layer of cheese on top of the rolls.
  • Spread the beef mixture on top of the cheese.
  • Add another layer of cheese and top with the rolls.
  • Spread the melted butter and sesame seeds on top of the rolls. Bake for 20-25 minutes or until golden brown.

Nutrition

Calories: 269kcal | Carbohydrates: 22g | Protein: 20g | Fat: 11g | Saturated Fat: 4g | Trans Fat: 1g | Cholesterol: 54mg | Sodium: 575mg | Potassium: 345mg | Fiber: 2g | Sugar: 2g | Vitamin A: 102IU | Vitamin C: 1mg | Calcium: 93mg | Iron: 4mg


from The Recipe Critic https://ift.tt/3fLYU9O
https://ift.tt/31POFcd

सोमवार, 5 अप्रैल 2021

Easy Caramel Brownies

Caramel Brownies are the perfect way to satisfy your sweet cravings. Rich chocolate, sandwiches ooey gooey sweet caramel for the best brownies EVER!

Brownies are hands down one of the best treats, they are rich, luscious and perfectly proportioned. You have to try these other tried and true favorites like this Red Velvet, Oreo or Cream Cheese Brownies!

Caramel Brownies stacked on top of each other.

Caramel Brownie Recipe

The first time I made these caramel brownies they were gone in 2 minutes flat! It might have helped that I was feeding a bunch of boys, but still! These are just so good! When baking with caramel the hardest part is letting it completely cool. It usually takes a few hours, and even helps putting them in the fridge right before cutting. So I had my little five year old following me around all day asking me every 5 minutes if they were ready. I guess I don’t blame him. The smell of fresh baked brownies filled the house and the caramel looked so amazing just oozing on top. I think I secretly heard them whispering, eat me!

These caramel brownies are to die for. They are the best brownies I think that I have ever had. They are rich, chewy, and the caramel and chocolate chips inside make them absolutely perfect. I have made these so much I have the recipe memorized and I can’t believe that I haven’t made them for my blog until now. I usually mix some pecans in the brownie batter, but I know my kids prefer them without. Either way, you will not be disappointed by making these.

What You Will Need For Chocolate Caramel Brownies

Rich and decadent, I’ve made this simple by using a cake mix to speed it up, and make it taste amazing!

  • German Chocolate Cake Mix: Any boxed german chocolate mix will do.
  • Kraft Caramels: You will need one package, about 14 oz worth or 45 caramels.
  • Evaporated Milk: This will help the caramels melt into a silky smooth layer.
  • Butter: Because everything is better with butter, and you will need to melt it.
  • Flour: This will act as a thickener.
  • Semi Sweet Chocolate Chips: I used jumbo chips but regular are fine.
  • Pecans: Finely chopped. These are optional, but I love the crunchy texture they give.

How to Make Caramel Brownies from Scratch

The hardest part of making these exquisite brownies is unwrapping the caramels and not eating them all.

  1. Prepare: Preheat the oven to 350 degrees and grease a 9 x 13 pan and set aside.
  2. Caramel: Melt the caramel and ⅓ cup evaporated milk and stir in a small saucepan over low heat until melted and fully incorporated.
  3. Cake: In a mixing bowl combine cake mix ⅓ cup evaporated milk, melted butter and flour. Press half of the mix into the 9×13 inch dish and bake for 6 minutes.
  4. Chocolate Chips: Remove from the oven and sprinkle chocolate chips
  5. Layer: Pour the caramel on top of the chocolate chips.
  6. Top it: Top with the remaining brownie batter on the top of the caramel and bake for an additional 15-18 minutes.
  7. Cool: Remove from oven and let cool completely so that the caramel can set. I also find that if you let it cool and place in the fridge it helps to set up right before cutting.

Cooling caramel brownies on a cooling rack.

Tips For The Best Caramel Brownies

With gooey caramel and decadent chocolate, you cannot go wrong. These are simply the best, super easy and super delicious.

  • Cake Mix: Everyone has their favorite cake mix brand, so use what you love. But if you have no idea, Betty Crocker is the way to go.
  • Can I use a different Chocolate Cake Mix? Yes, you can. German chocolate is mild flavored chocolate. If you want a darker richer chocolate flavor opt for a devil foods or dark chocolate cake mix.
  • Chocolate Chips:  You can also use dark chocolate chips instead of semi sweet for a deeper flavor. I do not however recommend milk chocolate. I feel it makes the brownies too sweet with the caramel.
  • Caramel: You may be groaning at the fact that you need to make your own caramel sauce, but truly it is the only way to go. Using a jarred caramel sauce will not set up as well and can make the brownies not just ooey and gooey, but down right drippy.
  • Line Your Pan: To make it super easy to remove the brownies from the pan I highly recommend lining it with foil. An extra step that will save you a lot time and heartache in the end.
  • Topping the Brownies: When you put the rest of the brownie batter on top, you will not be able to smooth it out over the caramel. I will sometimes just plop it on, other times I take blobs and flatten them a bit with my hand. I then create a puzzle like pattern on top like below. If you really want to cover it, place the brownie mixture between two pieces of plastic wrap and roll it out with a rolling pin.

A 9x13 pan with the cake mix, chocolate chips, carmels and then baked.

Storing Homemade Caramel Brownies

Leftovers will not last long, I promise!

  • Storing Leftover Brownies: These will keep on the counter in cool place, tightly wrapped. If your home is a bit warmer or you just like them a bit firmer you can keep these tightly covered in the fridge. They will keep for up to a week.
  • Freeze: Wrap tightly with foil and then place in a freezer safe bag for up to 4 months!

Holding two ooey gooey caramel brownies.

More Bar Desserts To Try!

Making treats in a 9×13 pan are referred to often as bar desserts, or bar cookies. They are one of the easiest ways to cook amazing desserts, quickly and get a lot of them too. When I’m short on time, but need a good dessert I often reach for one of these perfected bar desserts. They are also easy to cut and serve.

Print

Caramel Brownies

Caramel Brownies are the perfect way to satisfy your sweet cravings. Rich chocolate, sandwiches ooey gooey sweet caramel for the best brownies EVER!
Course Dessert
Cuisine American
Keyword brownie recipes, brownies, caramel brownies, chocolate caramel brownies
Prep Time 20 minutes
Cook Time 25 minutes
Total Time 45 minutes
Servings 12 Brownies
Calories 365kcal
Author Alyssa Rivers

Ingredients

  • 1 box german chocolate cake mix
  • 1 package Kraft caramels about 45, 14 oz.
  • 1 can evaporated milk 10 oz., divided
  • 3/4 cup butter melted
  • 2 tablespoons flour
  • 12 ounces semi sweet chocolate chips I use jumbo
  • 1/2 cup chopped pecans optional

Instructions

  • Preheat the oven to 350. Grease a 9x13 pan and set aside.
  • Melt the caramel and ⅓ cup evaporated milk and stir in a small saucepan over low heat until melted and incorporated.
  • In a mixing bowl combine cake mix, ⅓ cup evaporated milk, melted butter and flour. Press half of the mix into the 9x13 inch dish and bake for 6 minutes.
  • Remove pan from oven and sprinkle chocolate chips.
  • Pour the caramel on top of the chocolate chips.
  • Top with the remaining brownie batter on the top of the caramel and bake for an additional 15-18 minutes.
  • Remove from oven and let cool completely so that the caramel can set. I also find that if you let it cool and place in the fridge it helps to set up right before cutting.

Notes

Updated on April 5, 2021
Originally Posted on August 2, 2013

Nutrition

Calories: 365kcal | Carbohydrates: 24g | Protein: 5g | Fat: 28g | Saturated Fat: 15g | Cholesterol: 41mg | Sodium: 150mg | Potassium: 285mg | Fiber: 3g | Sugar: 17g | Vitamin A: 439IU | Vitamin C: 1mg | Calcium: 109mg | Iron: 2mg


from The Recipe Critic https://ift.tt/3sRYvpW
https://ift.tt/3dCyWCD