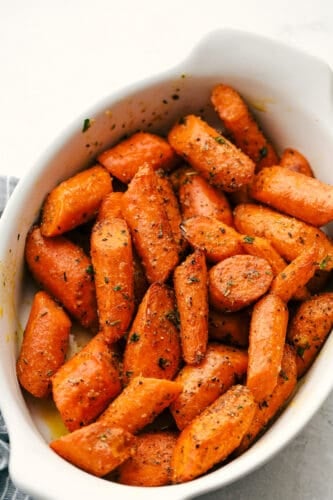
Air Fryer Carrots are perfectly seasoned and absolutely delicious! This side dish is perfectly crisp on the outside, tender on the inside and so full flavor.
Similar to these Carrots, and Honey Carrots, these are going to become a favorite. Carrots are just plain tasty, especially in this Cake!

Parmesan Garlic Air Fryer Carrots
An amazing side dish goes a long way to making the perfect dinner just right! Side dishes play just as much of a role as the main dish in making the meal spectacular. You want to pick one that will compliment it in both color, flavor, and texture. A great dinner usually has a bit of everything. Of course mixing and matching as dietary needs vary. That is where these air fryer parmesan garlic carrots comes in. These are literally one of the best side dishes you can make!
These carrots are fast, easy and the perfect texture! Their sweet savory flavor compliments almost any dish. Carrots are packed with good for you vitamins and minerals and cooking them in the air fryer keeps most of them in tact. These parmesan air fryer carrots are some of our favorites to munch on. They are so dang good, you have to try them.
What You Need For Easy Air Fryer Carrots
I love cooking with my air fryer. It literally seems to have no limits to what it can do. These carrots are no exception.
- Carrots: I used 6 large carrots that are peeled and sliced.
- Olive Oil: The base of the seasoning and will help to give the carrots that incredible outside crisp.
- Parmesan: Finely grated parmesan.
- Italian Seasoning: This is a classic combination of herbs and spices that are divine.
- Garlic Powder: Gives the garlic flavor without chunks of minced garlic.
- Salt and Pepper: Add to taste.
Making Garlic Carrots in the Air Fryer
These are going to cook fast which is perfect when you need a scrumptious side dish fast.
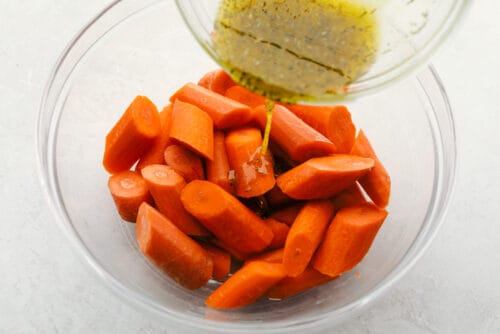
- Dressing: In a medium sized bowl add the olive oil, parmesan Italian seasoning, garlic powder, and salt and pepper.
- Coat: Toss the dressing with the carrots making sure they get nicely coated.
- Cook: Place the carrots in the basket in a single layer of the air fryer. Cook at 360 degrees for 10-12 minutes or till tender and crispy.

Tips For Tasty Air Fryer Carrots
These air fryer carrots almost taste as good as french fries, they actually make a great substitute if you want.
- Air Fryer: Make sure you know your air fryer, it may take less or more time to cook your carrots depending on how your air fryer cooks. Check them at about 7 minutes, then about every 2 minutes after till desired doneness. The size of the carrots will also make a difference in cooking times. If you have thin carrots or use baby carrots it may take less time.
- Carrots: I like to use big carrots that I peel and cut myself. They have way more flavor than baby carrots, in my opinion. Feel free to use baby carrots though, they totally work. If your baby carrots are super wet, which sometimes happens, pat them dry with a paper towel before coating. This way the coating sticks to the carrots and will crisp up the carrots better and prevent steaming them instead of air frying them.
Variations
There are a few ways you can change these up!
- Different Carrots: Try using different colored carrots. Carrots come in purple, red, white, and yellow. This will make your side dish that much more colorful and still yummy!
- How to Cut carrots: Instead of chunking the carrots, try slicing them lengthwise for a french fry like shape. My kids love to eat them with their fingers this way. I just love that they eat them.
- Different Spices: There are so many different way to season these air fryer carrots. Try dill, chili powder, turmeric, onion powder or ranch mix.
What To Serve These Roasted Carrots With
Carrots are nutritious and good for you so you will want to serve these up as much as you can. Using an air fryer makes them super yummy! Because they are a sweet and savory flavor they pair well with so much. Here are a few ideas.
- Garlic Butter Herb Prime Rib
- Lemon Garlic Parmesan Shrimp Pasta
- Easy London Broil
- The Best Lobster Tail Ever
- Brown Sugar Garlic Salmon
Storing the Best Air Fryer Carrots
These carrots store beautifully in the fridge in a tightly sealed container for up to 4 days. Reheat them in the air fryer at 360 degrees for 1-2 minutes. You can also warm them up in the microwave.

More Side Dishes To Make Your Meals Amazing
Side dishes compliment the main dish, round it out and make sure you have a bit from every food group on the table. Next time you need a killer side dish, start with one of these tried and true and go from there. I have a whole list of great ones.
- Creamy Parmesan Garlic Brussel Sprouts
- The Best Funeral Potatoes
- Jiffy Corn Casserole
- Strawberry Pretzel Salad
- Homemade Parker House Dinner Rolls

Air Fryer Carrots
Ingredients
- 6 large carrots peeled and sliced
- 1/4 cup olive oil
- 2 Tablespoons parmesan
- 1 teaspoon italian seasoning
- 1/2 teaspoon garlic powder
- salt and pepper to taste
Instructions
-
In a medium sized bowl add the olive oil, parmesan, italian seasoning, garlic powder, and salt and pepper.
-
Toss with the carrots and place into the basket in a single layer in the air fryer.
-
Cook at 360 for 10-12 minutes or until tender and crispy.
Nutrition
from The Recipe Critic https://ift.tt/31VxUwe
https://ift.tt/2OwbHBM