रविवार, 11 अप्रैल 2021

Sweet and Sour Pork

This sensational Sweet and Sour Pork is everything you want in take out, only better!  You are going to love the succulent chicken combined with the most incredible sauce!

This recipe will take your take out game to a whole new level of yumminess. Pair with Wontons, Egg Rolls and Rice for a restaurant worthy night!

A Bowl of Sweet and Sour Pork.

Skillet Sweet and Sour Pork Recipe

Hands down, this is one of my family’s favorite Chinese meals to make at home. It is the most perfect combination of sweet and sour. By using two different vinegars instead of just one you get a complex flavor that combines with the sweet of the sugar and ketchup that is divine. The soy sauce gives it that savory touch it needs to balance it all out. Then you toss the sauce with tender juicy pork, crisp tender vegetables and sweet tart pineapple that is so heavenly. This might be a bit of work, but it is totally worth it!

I love being able to make my own take out. You can control what goes in and what doesn’t go in your food. I know exactly what I’m feeding my family. You can also  customize homemade take out to your liking as well, making it absolutely perfect.  This Sweet and Sour Pork, is no exception. It is scrumptious and It won’t sit heavy in your stomach like some take out can. Give this sweet and sour a try, you will not be disappointed!

What You Need For Chinese Pork

This seems like a lot of ingredients but most you probably have on hand. They combine to make the BEST sweet and Sour Pork EVER!

  • Oil: This is the oil you will use for frying so use a high smoke oil, such as canola or peanut.
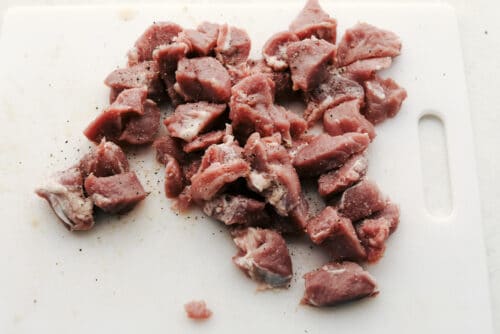
  • Pork: I used a pork tenderloin cut into one inch pieces.
  • Salt and Pepper: Add to taste
  • Cornstarch: You will use this coat the pork to help create a nice crust.
  • Red Bell Pepper: Cut the pepper into one inch pieces.
  • Green Bell Pepper: Dice the pepper into the same size as each other.
  • Onion: Cut the onion to be like the pepper so it will get done at the same time.
  • Pineapple Chunks: Use a 15 ounce can drained.

Homemade Sweet and Sour Sauce

  • Sugar: This provides the sweet, good old white sugar.
  • Ketchup: Ketchup also adds sweet and a bit of tang.
  • White Vinegar: White vinegar has the intense sour taste you want.
  • Apple Cider Vinegar: Apple cider vinegar is milder in the sour taste so it isn’t over powering.
  • Soy Sauce: Classic flavor for sweet and sour, use low sodium if you wish.
  • Garlic Salt: Adds flavor and the salt helps flavor everything else out too.
  • Cornstarch: This will help thicken the sauce.
  • Sesame Seeds and Green Onions: These are optional, but I highly recommend them.

How to Make Sweet and Sour Pork

These ingredients combine in the most amazing way to create a dish your family is going to ask for again and again.

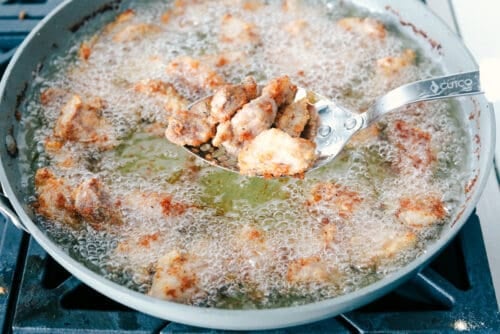
  1. Prep: In a large skillet add the oil about one inch high in the pan and heat to 350 degrees.
  2. Coat: Salt and pepper the pork and toss in the cornstarch to coat completely.
  3. Fry: Add the pork to the oil and cook until golden and crispy about 3-4 minutes. Remove and set aside on a plate.
  4. Sauté: In a large skillet add the olive oil, bell pepper and onion and sauté until tender.
  5. Sauce: In a small bowl whisk the sugar, ketchup, vinegar, soy sauce, salt and cornstarch.
  6. Combine:  Add the pork and pineapple back to the skillet with the peppers and pour the sauce on top. Let simmer until heated through. Garnish with sesame seeds and green onions.

Cutting the pork, frying it and adding the sauce.

Tips For The Best Sweet and Sour Pork

Sweet and sour pork is a classic Cantonese dish that Americans have fallen in love with, and put our own little spin on. Either way this recipe hits the flavors right on!

  • Pork: I used a pork tenderloin, but you can use a pork butt or shoulder roast as well. You do not want super lean pork as it will result in tough chewy pieces of pork. You want a bit of fat for tender yummy bites of pork. Cut them evenly so they cook evenly.
  • Vegetables: I love using the red and green peppers for the different flavors and colors. You can substitute for yellow and or orange peppers as well.
  • Pineapple: I like to cut the pineapple chunks in half to make them a bit more bite size friendly and so that there are more to go around. You can use fresh pineapple too, just cook the pineapple towards the end of the peppers and onion sauté so that they can cook for 3-5 minutes. This will reduce their acidity.
  • Cornstarch: Using cornstarch instead of flour will give you a crispier crunch to your pork. Do not substitute it for flour.
  • How to know when my pork is done: Pork internal temperature should be 145 degrees. Note that pork can be 145 degrees and still have a bit of pink. It is still done.
  • Want more crisp to your pork? Double fry your pork nuggets. Fry the first time for 3-4 minutes or till cooked through and golden brown. Let drain on a wire rack. Heat the oil up to about 390 degrees and fry again for 1-1 ½ minutes or till a deep golden. This actually keeps the pork from getting greasy, it’s just extra crunchy.

How to Serve Your Pork and Some Variations

You could probably eat this sweet and sour right from the pan and it would be amazing, but I often like to serve it with a bit more.

  • Serve: The classic way to serve this is on top of a bed of white fluffy rice. You can also serve it over brown rice, quinoa, or stir fried noodles.
  • Variations:  Add more vegetables to your sweet and sour pork for extra umph. Zucchini, mushrooms, broccoli and sugar snap peas are all delicious.
  • Saucy: If you like your sweet and sour pork a bit on the saucy side, double the recipe of sauce before adding in all the extras.

How to Store Sweet and Sour Pork

This is a great make ahead meal or reheat for lunch the next day. It is the perfect family meal for all!

  • Storing: Leftovers keep in the fridge tightly sealed for up to 3 days. For best results reheat on the stove top. Microwave will work too, but the vegetables my get a tad soggy.
  • Freeze:  You can freeze leftovers too. Place cooled sweet and sour pork in a freezer safe bag and freeze for up to 3 months. Let them thaw overnight in the fridge and reheat on the stovetop.

A pan of sweet and sour pork with seeds ready to be served.

More Take Out Favorites

There isn’t anything better than making my favorite take out at home. Not only does it ALWAYS taste better from scratch, but I know exactly what it is in my food. No extras or things I cannot pronounce. Plus when you make your favorite takeout recipes at home you can customize them to your liking. For example you can leave something out, or add more of an ingredient, or even add extras. You can make your take out your own. Here are some tried and true recipes to get you started.

Print

Sweet and Sour Pork

This sensational Sweet and Sour Pork is everything you want in take out, only better!  You are going to love the succulent chicken combined with the most incredible sauce!
Course Dinner
Cuisine Asian American
Keyword chinese pork, sweet and sour, sweet and sour pork
Prep Time 10 minutes
Cook Time 20 minutes
Total Time 30 minutes
Servings 4 people
Calories 381kcal
Author Alyssa Rivers

Ingredients

  • oil for frying
  • 1 pound pork tenderloin cut into one inch pieces
  • salt and pepper
  • 1/2 cup cornstarch
  • 1 red bell pepper cut into one inch pieces
  • 1 green bell pepper cut into one inch pieces
  • 1 small onion cut into one inch pieces
  • 1 {15 ounce can} pineapple chunks, drained

Sweet and Sour Sauce

  • 2/3 cup granulated sugar
  • 4 tablespoons ketchup
  • 1/4 cup white vinegar
  • 1/4 cup apple cider vinegar
  • 1 tablespoon low sodium soy sauce
  • 1 teaspoon garlic salt
  • 1 Tablespoon Cornstarch
  • sesame seeds and chopped green onions for garnish.

Instructions

  • In a large skillet add the oil about one inch high in the pan and heat to 350 degrees.
  • Salt and Pepper the pork and toss in the cornstarch.
  • Add the pork to the oil and cook until golden and crispy about 3-4 minutes. Remove and set aside on a plate.
  • In a large skillet add the olive oil, bell pepper and onion and sauté until tender.
  • In a small bowl whisk the sugar, ketchup, vinegar, soy sauce, salt and cornstarch.
  • Add the pork and pineapple back to the skillet with the peppers and pour the sauce on top. Let simmer until heated through. Garnish with sesame seeds and green onions.

Nutrition

Calories: 381kcal | Carbohydrates: 59g | Protein: 25g | Fat: 4g | Saturated Fat: 1g | Trans Fat: 1g | Cholesterol: 74mg | Sodium: 916mg | Potassium: 653mg | Fiber: 2g | Sugar: 39g | Vitamin A: 1121IU | Vitamin C: 64mg | Calcium: 22mg | Iron: 2mg


from The Recipe Critic https://ift.tt/2OEDIY5
https://ift.tt/3e8E3Lt

शनिवार, 10 अप्रैल 2021

The BEST Oatmeal Raisin Cookies

These are the Best Oatmeal Raisin Cookies you will ever make! These cookies are chewy, sweet and the perfect treat.

Oatmeal is a wonderful ingredient to bake with, it adds nutrition and flavor. We love these glorious oat recipes, No Bake Cookies, Chocolate Chip and Granola!

A stack of oatmeal cookies ready to eat.

Easy Oatmeal Raisin Cookies

I know, oatmeal raisin cookies can sometimes get a bad rap. They are often the last ones to get eaten out of a combo pack, but that needs to change. With this homemade cookie recipe, oatmeal raisin cookies are going to get the credit they deserve. These cookies are soft, buttery and heavenly. With a crisp chewy outside and tender outside, the texture is perfect for all cookie lovers. The raisins give the cookie a touch of extra sweetness and a bit of bite that is perfectly balanced with the oats. They are sublime.

Oats are super good for you. They are heart healthy, full of fiber, protein, vitamins and minerals. I like to think that adding oatmeal to a cookie actually makes them healthy. While that may not be exactly the case, it makes me feel better as I eat three of them in one sitting. These cookies are simple to make and really do taste delightful.  So if you weren’t a fan of oatmeal raisin, I dare you to try them again for the first time. You won’t regret it!

Ingredients for Oatmeal Cookies

Classic cookie ingredients come together to make these intensely delicious cookies.

  • Flour: Use All purpose or unbleached flour.
  • Cinnamon: A beautiful aromatic spice that goes perfectly with oatmeal.
  • Baking Soda: This is your leavening agent that will help the cookies rise.
  • Salt: Balances the sweet and makes the oatmeal cookies scrumptious.
  • Butter: Soften the butter for easier mixing or make sure it is at room temperature.
  • Brown Sugar: Use either light or dark brown sugar in your cookies. Dark brown will give a stronger flavor and be a tad bit more moist.
  • Sugar: Having white sugar in the cookies also adds moisture and helps them brown beautifully.
  • Eggs: Bring your eggs to room temperature so they can mix optimally.
  • Vanilla: A classic flavor you do not want to skip out on.
  • Honey: Sweet and delicious the honey pairs beautifully with the oats and helps them hang on to the moisture.
  • Old Fashioned Oats: Old fashioned oats are also known as rolled oats.
  • Raisins: Make sure your raisins are fresh, chewy and soft. Not hard and tough.

How To Make Chewy Oatmeal Raisin Cookies

Super easy to make, you can these ready to eat in no time. The hardest part is letting them cool before digging in!

  1. Dry Ingredients: In a medium size bowl combine the flour, cinnamon, baking soda and salt.
  2. Wet Ingredients: In another bowl cream the butter, brown sugar, sugar, eggs, vanilla and honey.
  3. Combine: Slowly combine the flour mixture with the wet ingredients.
  4. Add: Stir in the oats and raisins till just combined.
  5. Get it cold: Chill for 30 minutes.
  6. Bake: Preheat the oven to 350 degrees. Scoop out a tablespoon of cookie dough and place on a parchment lined baking sheet. Bake for 8-10 minutes or until golden brown.

Mixing the dry ingredients, then the butter and sugars and adding it all together with the raisins.

Tips For The Best Oatmeal Raisin Cookies Ever

Truly there is something magical about the oatmeal, raisins and butter that makes these cookies so tempting. The edges are crispy, the raisins plump and there is very distinct buttery flavor that is irresistible.

  • Oats: For the best flavor and texture use rolled oats or old fashioned oats. You can use quick oats too, use the same amount. The oatmeal cookies may not have the same chew, but they will still taste amazing.
  • Fresh Raisins: Make sure your raisins are fresh, soft and chewy. If they are hard, dry and lumped together you cookies will be the same way. You can soak your raisins in warm water for 10 minutes to plump them up extra if you desire. Blot them till they are really dry before adding to the cookie dough.
  • Cookie Dough: Speaking of cookie dough, do not be surprised if the dough is sticky. It is a good thing. Do not be tempted to add more flour. Also do not over mix the dough once you combine the wet and dry ingredients, it will toughen up your cookies.
  • Chill it: Do not chill for longer than 30 minutes as it will prevent the oatmeal cookies from spreading. Also if it is longer than 30 minutes the oatmeal starts to absorb too much of the moisture in the dough which can dry them out.
  • Room Temperature Eggs and Butter: Make sure your butter and eggs are at room temperature so they mix optimally.
  • Cookie Sheet: Use parchment paper on your cookie sheet to insure easy release of your cookies. Spraying a cookie sheet can cause the oatmeal raisin cookies to spread too much and make them flat.

Baked oatmeal cookies on a cooling rack.

Variations for Healthy Oatmeal Raisin Cookies

Not everyone loves oatmeal raisin cookies, I am sure that with this recipe it will change their minds, but if it does not, here are some other ideas for cookies.

  • Raisins: If you are not a fan of raisins substitute them out for cranraisins, dried cherries, currants or golden raisins.
  • Get nutty: For extra texture and flavor add 1/2-¾ cup chopped pecans or walnuts. Yum!
  • Toast the Oatmeal: For a fun twist in flavor toast the oatmeal briefly in a dry hot pan on the stove till slightly browned and fragrant.
  • Add-ins: Stir in about half a cup of flaked coconut or chocolate chips for a nice flavor mix.

How to Properly Store and Freeze Cookies Dough

  • Storing your Cookies: Oatmeal raisin cookies will not dry out as fast as other cookies because the raisins provide moisture and the oatmeal holds on to it. These will keep at room temperature in a tightly sealed container or tightly sealed plastic bag for up to 2 weeks. Freeze the cookies by placing them in a freezer safe bag for up to 3 months.
  • Freeze the Dough: This is a trick I like to use often. Double the batch of cookies, bake half and freeze the other half. Drop the cookie dough into cookie shape on a cookie sheet and freeze for about 2 hours. Transfer the cookie dough into a freezer safe bag and keep for 3 months. Cook straight from the freezer to the oven, just add 2-3 min more to your cook time.

Holding a stack of three cookies.

More Tried and True Cookie Recipes

Let’s face it, cookies are one of the best treats out there. They are already portioned out, hand held and come in such huge varieties, everyone can find one or two to satisfy. Whether you are making cookies for lunches, cookie exchanges or a nice dessert, there is a cookie recipe for it. Holidays are not the same without their classic cookies. They make the best portable dessert for picnics and potlucks too. When you need a cookie recipe I’ve got you covered with my tried and true.

Print

Oatmeal Raisin Cookies

These are the Best Oatmeal Raisin Cookies you will ever make! These cookies are chewy, sweet and the perfect treat.
Course Dessert
Cuisine American
Keyword oatmeal raisin cookies
Prep Time 15 minutes
Cook Time 10 minutes
Total Time 25 minutes
Servings 24 Cookies
Calories 208kcal
Author Alyssa Rivers

Ingredients

  • 2 cups flour
  • 1 teaspoon cinnamon
  • 1 teaspoon baking soda
  • 1/2 teaspoon salt
  • 1 cup butter softened
  • 1 cup brown sugar
  • 1/2 cup sugar
  • 2 large eggs
  • 1 Tablespoon Vanilla
  • 2 Tablespoons honey
  • 3 cups old fashioned oats
  • 1 heaping cup raisins

Instructions

  • In a medium size bowl combine the flour, cinnamon, baking soda, and salt.
  • In another bowl cream the butter, brown sugar, sugar, eggs, vanilla and honey.
  • Slowly combine the flour mixture.
  • Add in the oats and raisins and mix until combined. Chill for 30 minutes.
  • Preheat the oven to 350 degrees. Scoop out a tablespoon of cookie dough and place on a parchment lined baking sheet. Bake for 8-10 minutes or until golden brown.

Nutrition

Calories: 208kcal | Carbohydrates: 30g | Protein: 3g | Fat: 9g | Saturated Fat: 5g | Trans Fat: 1g | Cholesterol: 36mg | Sodium: 171mg | Potassium: 70mg | Fiber: 1g | Sugar: 15g | Vitamin A: 259IU | Vitamin C: 1mg | Calcium: 20mg | Iron: 1mg


from The Recipe Critic https://ift.tt/39VSX6g
https://ift.tt/3uL5p0R

शुक्रवार, 9 अप्रैल 2021

Chicken Cordon Bleu

Closeup of the inside of chicken cordon blue with cheese oozing out.

Chicken Cordon Bleu has layers of ham and cheese wrapped inside succulent crumbed chicken breast and with a crunchy breadcrumb crust. This one is oven-baked making it healthier too.

Chicken is an easy and favorite dish! For more succulent chicken, try this Chicken and these Chicken Nuggets too.

Closeup of the inside of chicken cordon blue with cheese oozing out.

Homemade Chicken Cordon Bleu

This crunchy breadcrumb coated chicken cordon blue has it all. Flavor, juicy chicken and gooey cheese, it’s all topped with a rich and creamy mustard sauce that’s so simple to make.

After loads of testing with different filling and cooking methods, I can now share all the tips for the perfect cordon bleu recipe.

What is Cordon Bleu?

Traditionally, cordon bleu is some form of schnitzel filled with ham and cheese, then rolled and pan fried.

This one is oven baked making it a little healthier and also easier to make. Once they’re ready to cook, then go straight into a hot oven and bake for around 30 minutes. No babysitting necessary.

Chicken cordon bleu on an oven rack.

Ingredients in Classic Chicken Cordon Bleu

One of the greatest things about this recipe is it uses minimal ingredients and they’re all very common.

  • Chicken breast: use cutlets / schnitzel or cut them yourself from scratch.
  • Ham: Use very thinly sliced or shaved ham and ham cut off the bone has the best flavor.
  • Cheese: Gouda is wonderful, if you can get it, but Swiss or Provolone work well too. Even cheddar. You want a creamy semi-hard cheese in either slice or block form – not shredded.
  • Plain flour, salt, onion powder and pepper: This makes up the first of the 3 dredging / breading stages, perfectly seasoning the chicken at the same time.
  • Egg: Just one egg for this recipe will coat 4 cordon bleus.
  • Panko bread crumbs: I like panko as they’re light and super crispy but other types will work too.
  • Olive oil: Just a touch is mixed with the breadcrumbs, which helps them to get crunchy and get a touch of color too.

Ingredients for the Sauce

This cordon bleu recipe comes with it’s own super simple creamy mustard sauce too. Don’t feel like creamy mustard sauce? Try this Homemade Cheese Sauce or even this Easy Homemade Tomato Sauce.

  • Chicken stock / broth: Use a low sodium, good-quality stock. Qualities vary greatly but a good one will be flavorful before you add anything else.
  • Dried thyme: You can use other dried herbs too – sage, basil, oregano will all work well.
  • Single / Light Cream: You can also use heavy cream if that’s what you have on hand.
  • Dijon mustard: Dijon is definitely best here – it gives a light tang and good mustard hit. You can use the same quantity of mustard powder, or use wholegrain mustard for something different.
  • Cornstarch and water: This simple mix will thicken your sauce without the need to make a roux. You only need a little and it doesn’t alter the texture or flavor of the sauce in any way.

How to Make Chicken Cordon Bleu

Here’s the quick step by step details for making chicken cordon blue but make sure to check out my tips below this section for all the tips to make them perfect.

  1. Pound the chicken out to an even thickness all over (about ¼ to ⅓ of an inch).
  2. Place ham then cheese on top of the chicken.
  3. Roll it up tightly pulling in the sides as you go.
  4. Wrap in plastic wrap and freeze for 40-60 minutes.
  5. Unwrap and coat first in a flour mixture, then egg, then breadcrumbs.
  6. Bake for 30-35 minutes – cooking time will depend on the size of your chicken breasts.

6 images showing how to fill and coat chicken cordon bleu.

Cordon Bleu Tips and Tricks

  • Pound the chicken: This does three things – it tenderizes the meat, makes it larger (easier to fit in filling and roll) and it makes the meat even thickness all over (so it cooks evenly too). Don’t be too rough though.
  • Cover the chicken: Cover the meat with plastic wrap before pounding to stop any bits spraying off all over your kitchen.
  • Ham first: Place a thin layer of ham all over the chicken first.
  • Cheese second: Cut the cheese so that it sits at least 1 inch from both sides of the chicken. The ham is then folded over it creating a little parcel. This locks the gooey cheese in so there’s less chance of it escaping.
  • Roll it up tightly: Using a piece of plastic wrap under the chicken will help you roll it. Pull in the sides as you go. Make sure not to roll the plastic wrap inside the chicken. Once rolled up, wrap it tightly in plastic wrap.
  • Bread quickly: Remove the plastic wrap and work quickly when you bread the parcels. The heat from your hands can heat them up too much which may cause them to unroll.
  • Use a rack: Place the chicken on a rack, on top of a baking tray to bake. This will allow the air to circulate around the whole chicken parcel meaning crispy breadcrumbs all over. No soggy bits and no need to turn them.

Mustard sauce being poured over baked chicken.

What to Serve with Chicken Cordon Bleu

Chicken cordon bleu is a rich dish with bold flavors so simple sides work best. Try this Perfect “Roasted” Air Fryer Asparagus or Panzanella Salad.

This Amazing Pear and Beet Salad is a lovely side in addition to some Amazing Air Fryer French Fries.

How to Freeze it

Freezing the chicken parcels for 40-60 minutes before cooking will assist in the chicken holding it’s shape making it easier to handle and again making sure that cheese can’t escape once it starts baking.

Chicken cordon bleu on a fork showing the inside layers.

More Amazing Chicken Recipes

Closeup of the inside of chicken cordon blue with cheese oozing out.
Print

Chicken Cordon Bleu

Classic Chicken Cordon Bleu has layers of ham and cheese wrapped inside succulent crumbed chicken breast and with a crunchy breadcrumb crust. This one is oven-baked making it healthier too.
Course Dinner
Cuisine French
Keyword chicken cordon bleu, cordon bleu recipe
Prep Time 20 minutes
Cook Time 30 minutes
Chilling time 40 minutes
Total Time 1 hour 30 minutes
Servings 6 serves
Calories 363kcal
Author Marie Roffey

Ingredients

FOR THE CHICKEN

  • 4 chicken cutlets / un-crumbed schnitzels (notes)
  • 5 ounce thinly sliced or shaved ham
  • 4 ounce sliced or block cheese (Gouda, Swiss or Provolone)
  • 2 ½ tablespoons all purpose flour
  • 1 teaspoon salt
  • ½ teaspoons onion powder
  • ½ teaspoon cracked black pepper
  • 1 large egg
  • 1 cup panko bread crumbs (notes)
  • 1 teaspoon olive oil

FOR THE MUSTARD SAUCE

  • 1 cup low sodium chicken stock
  • 1 teaspoon dried thyme
  • cup cream
  • 2 tablespoons dijon mustard
  • 4 teaspoons cornstarch
  • 4 teaspoons water

Instructions

FOR THE CHICKEN

  • One at a time, place a chicken cutlet on a chopping board, cover with plastic wrap, then gently bash out to about ¼ inch thick with the flat side of a meat mallet (or bottom of a heavy based pan).
  • Sit one cutlet on a clean piece of plastic wrap. Cover all over with ¼ of the ham. Place ¼ of the cheese in the centre, making sure it's at least 1 inch from the edges. Fold the ham over the cheese on the sides and the part closest to you.
  • Roll the chicken up tightly away from you, pulling in the edges as you go. Use the plastic wrap to help but don't let the plastic wrap end up inside the chicken.
  • Wrap the chicken tightly in the plastic wrap, then place on a plate. Repeat with the other 3 cutlets.
  • Freeze for 40-60 minutes - just until a little firmer, not frozen (this will help them keep their shape) as you coat and bake them.
  • Preheat the oven to 400F. Line a large baking tray with baking paper then sit an oven proof rack on top. Set aside.
  • In a medium bowl, combine the flour, salt, onion powder and pepper. Beat the egg in a second bowl. To a third bowl, add the crumbs and oil, then mix well so the crumbs are evenly coated.
  • Unwrap the chicken then roll in the flour mix, making sure it's well coated all over. Repeat with the rest, placing them back on the plate.
  • Coat 1 piece of chicken in the egg then let the excess drip off, before coating well in crumbs, making sure to press them on. Place on the prepared rack and repeat with remaining chicken parcels.
  • Bake for around 30 minutes, until starting to turn golden and cooked through.

FOR THE MUSTARD SAUCE

  • While the chicken bakes, heat the stock and thyme together in a small saucepan over medium heat. Bring to a simmer and cook until reduced by half.
  • Add the cream and dijon and stir to combine. Bring back to a simmer.
  • Combine the corn starch and water then pour half into the sauce while constantly whisking. Add more until its the consistency you like. If it gets too thick, just add a little water or stock.
  • Season with salt and pepper.

Notes

  1. Chicken cutlets are chicken breasts that have been sliced in half through the thickness making 2 thinner breasts. You can do this yourself using large chicken breasts.
    • Place the chicken breast on a chopping board and place one hand on top to press down lightly.
    • Use a sharp knife to slice through the centre, starting at the thickest end and working towards the thin tip.
  2. Panko bread crumbs are light and very crispy Japanese bread crumbs. They're available in most grocery stores.

Nutrition

Calories: 363kcal | Carbohydrates: 13g | Protein: 33g | Fat: 19g | Saturated Fat: 9g | Trans Fat: 1g | Cholesterol: 154mg | Sodium: 964mg | Potassium: 587mg | Fiber: 1g | Sugar: 1g | Vitamin A: 479IU | Vitamin C: 2mg | Calcium: 57mg | Iron: 2mg


from The Recipe Critic https://ift.tt/3t8bP9J
https://ift.tt/2Rn0V1Z

Parmesan Garlic Air Fryer Carrots

Air Fryer Carrots are perfectly seasoned and absolutely delicious!  This side dish is perfectly crisp on the outside, tender on the inside and so full flavor.

Similar to these Carrots, and Honey Carrots, these are going to become a favorite. Carrots are just plain tasty, especially in this Cake!

Air fryer carrots seasoned in air fryer basket.

Parmesan Garlic Air Fryer Carrots

An amazing side dish goes a long way to making the perfect dinner just right! Side dishes play just as much of a role as the main dish in making the meal spectacular. You want to pick one that will compliment it in both color, flavor, and texture.  A great dinner usually has a bit of everything. Of course mixing and matching as dietary needs vary. That is where these air fryer parmesan garlic carrots comes in. These are literally one of the best side dishes you can make!

These carrots are fast, easy and the perfect texture! Their sweet savory flavor compliments almost any dish. Carrots are packed with good for you vitamins and minerals and cooking them in the air fryer keeps most of them in tact. These parmesan air fryer carrots are some of our favorites to munch on. They are so dang good, you have to try them.

What You Need For Easy Air Fryer Carrots

I love cooking with my air fryer. It literally seems to have no limits to what it can do. These carrots are no exception.

  • Carrots: I used 6 large carrots that are peeled and sliced.
  • Olive Oil: The base of the seasoning and will help to give the carrots that incredible outside crisp.
  • Parmesan: Finely grated parmesan.
  • Italian Seasoning: This is a classic combination of herbs and spices that are divine.
  • Garlic Powder: Gives the garlic flavor without chunks of minced garlic.
  • Salt and Pepper: Add to taste.

Making Garlic Carrots in the Air Fryer

These are going to cook fast which is perfect when you need a scrumptious side dish fast.

  • Dressing: In a medium sized bowl add the olive oil, parmesan Italian seasoning, garlic powder, and salt and pepper.
  • Coat: Toss the dressing with the carrots making sure they get nicely coated.
  • Cook: Place the carrots in the basket in a single layer of the air fryer. Cook at 360 degrees for 10-12 minutes or till tender and crispy.

Pouring the seasoning on cut sliced carrots.

Tips For Tasty Air Fryer Carrots

These air fryer carrots almost taste as good as french fries, they actually make a great substitute if you want.

  • Air Fryer: Make sure you know your air fryer, it may take less or more time to cook your carrots depending on how your air fryer cooks. Check them at about 7 minutes, then about every 2 minutes after till desired doneness. The size of the carrots will also make a difference in cooking times. If you have thin carrots or use baby carrots it may take less time.
  • Carrots: I like to use big carrots that I peel and cut myself. They have way more flavor than baby carrots, in my opinion. Feel free to use baby carrots though, they totally work. If your baby carrots are super wet, which sometimes happens, pat them dry with a paper towel before coating. This way the coating sticks to the carrots and will crisp up the carrots better and prevent steaming them instead of air frying them.

Variations

There are a few ways you can change these up!

  • Different Carrots: Try using different colored carrots. Carrots come in purple, red, white, and yellow. This will make your side dish that much more colorful and still yummy!
  • How to Cut carrots: Instead of chunking the carrots, try slicing them lengthwise for a french fry like shape. My kids love to eat them with their fingers this way. I just love that they eat them.
  • Different Spices: There are so many different way to season these air fryer carrots.  Try dill, chili powder, turmeric, onion powder or ranch mix.

What To Serve These Roasted Carrots With

Carrots are nutritious and good for you so you will want to serve these up as much as you can. Using an air fryer makes them super yummy! Because they are a sweet and savory flavor they pair well with so much. Here are a few ideas.

Storing the Best Air Fryer Carrots

These carrots store beautifully in the fridge in a tightly sealed container for up to 4 days. Reheat them in the air fryer at 360 degrees for 1-2 minutes. You can also warm them up in the microwave.

Cooked carrots in a white dish.

More Side Dishes To Make Your Meals Amazing

Side dishes compliment the main dish, round it out and make sure you have a bit from every food group on the table. Next time you need a killer side dish, start with one of these tried and true and go from there. I have a whole list of great ones.

Print

Air Fryer Carrots

Parmesan Garlic Air Fryer Carrots are perfectly seasoned and absolutely delicious!  This side dish is perfectly crisp on the outside, tender on the inside and so full flavor.
Course Side Dish
Cuisine American
Keyword air fryer carrots
Prep Time 5 minutes
Cook Time 10 minutes
Total Time 15 minutes
Servings 4 people
Calories 176kcal
Author Alyssa Rivers

Ingredients

  • 6 large carrots peeled and sliced
  • 1/4 cup olive oil
  • 2 Tablespoons parmesan
  • 1 teaspoon italian seasoning
  • 1/2 teaspoon garlic powder
  • salt and pepper to taste

Instructions

  • In a medium sized bowl add the olive oil, parmesan, italian seasoning, garlic powder, and salt and pepper.
  • Toss with the carrots and place into the basket in a single layer in the air fryer.
  • Cook at 360 for 10-12 minutes or until tender and crispy.

Nutrition

Calories: 176kcal | Carbohydrates: 11g | Protein: 2g | Fat: 14g | Saturated Fat: 2g | Cholesterol: 2mg | Sodium: 115mg | Potassium: 359mg | Fiber: 3g | Sugar: 5g | Vitamin A: 18071IU | Vitamin C: 6mg | Calcium: 74mg | Iron: 1mg


from The Recipe Critic https://ift.tt/31VxUwe
https://ift.tt/2OwbHBM