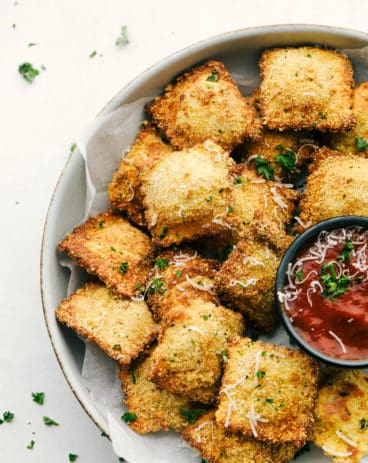
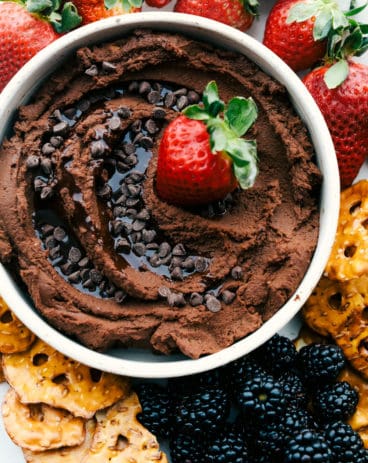
BLT Dip is an appetizer that is delightfully light and oh so good! A creamy seasoned base is topped with all the flavors of the classic BLT, you are going to love it!
Whether you are feeding a crowd or your little family, appetizers are a wonderful addition. Next time you need a meal teaser that is sure to please try Philly Cheese Steak Cheesy Bread, Cheese Sauce, or Crab Dip!
BLT Dip
This unique BLT dip is the perfect party pleaser. It is going to be the unique appetizer that everyone is going to fall in love with. It is easy, simple and full of incredible loved flavors. Everyone loves bacon and cheese. And tomatoes and lettuce just go together. The creamy base combines tangy sour cream with smooth cream cheese, that you will season to perfection. Creamy BLT dip is the one that you bring to a party that everyone will love!
BLT is a classic combination that has found its way into other recipes. Such as this BLT pasta salad. It is a combination so many love. I love how light and fresh this dip seems to be. The lettuce and tomatoes really freshen it up and the bacon adds a nice salty bite. This is a dip you don’t see all the time at parties, so when you show up with it, watch out, it is going to be devoured. The simplicity of it is makes it a dream dish too. The next time you’re headed to a party, or throwing one yourself, be sure this BLT dip is on the menu!
What You Need To Make Creamy BLT Dip
This recipe comes together fast and is full of classic flavors.
Sour Cream: You can use either full fat or low fat sour cream. I will say I like the full fat for this dip, it is so creamy!
Cream Cheese: Again light or regular cream cheese can be used. Make sure your cream cheese is good and softened.
Onion Powder: This give the creamy dip a wonderful flavor without the bulk of chopped onion.
Garlic Powder: Another classic flavor that helps give the BLT dip some zing.
Parsley: Use dried parsley so it doesn’t wilt or turn brown on you.
Tomatoes: Finely chopped for easy dipping.
Bacon Crumbled bacon, again smaller is better.
Cheddar Cheese: Use shredded cheddar that you grate yourself.
Lettuce: You will want to use very finely shredded lettuce.
Tortilla Chips, Pita Chips, Ruffled Potato Chips: For dipping of course.
How To Make BLT Chip Dip
This is so easy to assemble, it is a great one to make when you need an appetizer in a hurry.
Combine: In a medium mixing bowl, combine sour cream, cream cheese, onion powder, garlic powder and dried parsley.
Spread: Once mixed transfer to a bowl or 9 inch pie plate.
Layer: Once the creamy part is in the bottom, layer with lettuce, tomatoes, bacon and cheese. Garnish with additional tomatoes.
Serve: Serve with desired dippers.
Tips For The Best Creamy BLT Dip
This unique dip is going to steal the show. Light and refreshing, it is crowd pleaser!
Cheese: Shred your own cheese for better quality taste. Preshreded cheese often has additives or preservatives that can keep it from tasting the best. If you do not have cheddar you can use colby jack, or monterey jack. You can go strong cheese too like blue cheese or pepper jack for a fun twist.
Bacon: Make sure your bacon is good and crispy before you crumble it. It makes for a more tasty dip and it won’t go soggy. I like to cook it in the air fryer or oven.
Lettuce: When I shred my lettuce I also cut it so it isn’t long and stringy. About an inch long is all. That way it is easier to dip and eat.
Tomatoes: If you use a large tomato be sure to seed it and remove all the pulp. Otherwise the tomato will be too juicy and cause a watery dip. You can also use grape or cherry tomatoes finely chopped.
Seasoning: If you want even more flavor season the cream cheese and sour cream with 2 or more teaspoons of ranch dressing mix, or Italian seasoning It is yummy!
What To Serve with Your Creamy BLT Dip
You can serve a variety of dippers with this creamy BLT dip, it is a fun one to eat!
Crackers: Ritz, Wheat Thins, Pita Chips, Potato chips, Tortilla chips, Crositni, sourdough rounds, or any type of cracker you desire.
Vegetables: Vegetables too work great with this dip. I like to use carrots, celery, cauliflower, broccoli, and sugar snap peas.
Spread it: If you have leftovers this dip also makes a great spread. Use on top of potatoes, toss with pasta or use as a spread on sandwiches and wraps.
Store Your Dip
Keep your extra BLT dip in the fridge tightly covered for up to 4 days. The lettuce will wilt after about 2 days. I like to try to take off as much as the lettuce as possible before storing. It will look and taste more pleasant to add fresh lettuce the next time you serve it.
More Appetizers to Love
Appetizers are so fun to make and even more fun to eat. You can usually create a whole meal out of appetizers!
Often appetizers are the star of the show, out shining the main dishes. If you need an incredible appetizer I have many tried and true favorites here to try. These are just a few.
BLT Dip is an appetizer that is delightfully light and oh so good! A creamy seasoned base is topped with all the flavors of the classic BLT, you are going to love it!
CourseAppetizer
CuisineAmerican
KeywordBLT Dip, creamy BLT Dip, Dip Recipe
Prep Time20minutes
Total Time20minutes
Servings8Servings
Calories143kcal
AuthorAlyssa Rivers
Ingredients
1containerSour Cream16 oz.
8 ouncescream cheesesoftened
1/2teaspoononion powder
1/2teaspoongarlic powder
1/4teaspoondried parsley
2tomatoeschopped
8slicesbaconcooked and crumbled
3/4cupcheddar cheeseshredded
1cuplettuceshredded
tortilla chipspita chips, or ruffled potato chips for serving
Instructions
In a medium mixing bowl, combine sour cream, cream cheese, onion powder, garlic powder, dried parsley. Once mixed transfer to a bowl or 9 inch pie plate.
Spread evenly on the bottom. Layer with bacon, cheese, tomatoes, shredded lettuce, and garnish with additional tomatoes.
Serve with chips.
Notes
Updated on April 19, 2021Originally Posted on December 30, 2013
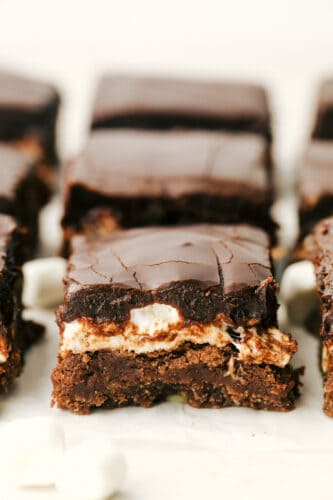
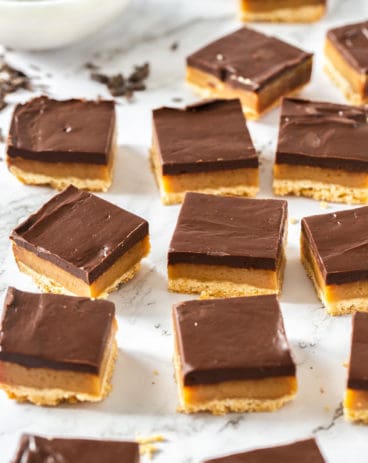
Mississippi Mudslide Bars are a chewy brownie base, topped with a fluffy marshmallow layer, and finished off with a rich and silky chocolate frosting. They are so addictive!
Brownies are a decadent dessert that everyone loves! I have tried and true brownies that come in all flavors, like Lemon, Red Velvet, and Cream Cheese Brownies!
The Best Mississippi Mudslide Brownies
These Mississippi Mudslide Bars are absolutely, positively addictive. These are aptly named because they mimic the famous Mississippi Pie. It was named this because it was the same color as the banks of the Mississippi River, deep chocolate brown. However it got its name, these brownies are exquisite. These are super simple and really easy to make and the whole family is going to love the chewy marshmallow top covered in rich frosting. Mississippi Mudslide bars are perfect for picnics, parties, and whenever you need a good chocolate fix.
You can serve these at room temperature but there’s something about that frosting that gets a million times better when it’s chilled. If you’re wondering what exactly these bars are, they are a chewy brownie base, topped with a fluffy marshmallow layer, and finished off with a rich and silky chocolate frosting. Like I said, ADDICTIVE!! Don’t wait another day before making these, you will LOVE them!
Ingredients For Mississippi Bars
Fudgy, gooey, and oh so good, these simple ingredients are destined to make greatness.
Butter: Melt your butter first so it isn’t piping hot.
Sugar: White granulated sugar balances out the cocoa and also adds moisture.
Cocoa Powder: This is unsweetened cocoa, not sweetened.
Eggs: Get your eggs out early and allow them to come to room temperature.
Vanilla: Vanilla helps the chocolate taste like chocolate, it’s true.
Salt: Needed to balance out the sweetness.
Flour: All-purpose flour or unbleached flour.
Miniature Marshmallows: Make sure your marshmallows are soft and fresh, not hard.
Mississippi Mud Frosting Ingredients
Chocolate Chips: Use semi-sweet chocolate chips, they are the perfect flavor.
Heavy Whipping Cream: This creates a creamy consistency that won’t harden when refrigerated.
Butter: Butter should be at room temperature, not cold.
Vanilla: Sweet vanilla helps the chocolate taste divine.
Let’s Make Easy Mud Brownies!
The extra step in making your own frosting is absolutely divine in these brownies. You won’t regret the extra time!
Prep: Preheat oven to 350 degrees and grease a 9×13 inch baking pan.
Mix: In a large bowl combine melted butter, sugar, cocoa powder, eggs and vanilla and mix until smooth.
Add: Stir in flour and salt and mix until incorporated.
Bake: Spread evenly in a prepared pan. Bake for 25-30 minutes until a toothpick in the center comes out clean. a few loose crumbs are okay but no wet batter.
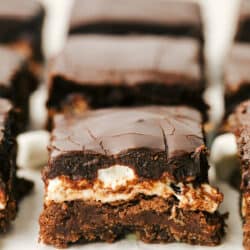
Marshmallows: Spread the marshmallows in an even layer on top of the brownie layer. Return them to the oven and bake for another 3-7 minutes until marshmallows are fluffy and beginning to lightly brown.
Cool: Allow to cool while you prepare the frosting
Frosting: In a microwave-safe glass bowl combine chocolate chips and heavy cream and microwave on half power for 2 minutes at a time, stirring after each until smooth.
Add: Stir in butter and vanilla and mix till smooth.
Cover: Pour mixture over the marshmallows and chill for at least 2-3 hours or until completely cooled before cutting into bars and serving.
Tips and Variations for the Best Mississippi Mud Brownies
These mud brownies are rich and fudgy! You will be tempted to eat them all by yourself. It is ok, I understand.
Eggs: Eggs beat best into recipes when they are at room temperature, so if you have time and remember to remove them from the fridge about 20-30 minutes before using them.
Flour: I like to sift my flour so that it mixes in smoothly and I do not have any lumps.
Cocoa Powder: There are two types of cocoa powder out there, regular and dutch cocoa. Regular cocoa has a lighter color and more intense chocolate flavor. Dutch cocoa has been treated to reduce some of the acidity, it creates a smooth more mellow flavor and darker color. Either one will work in this recipe, but regular will have a more intense chocolate flavor. Use dutch if you want a lighter flavor.
Add: If you like a bit of a crunch, toast chopped pecans and add with the marshmallows. It is so delicious. You could use peanuts too if you wanted.
Double It: If you are having a party and need to feed a crowd, double the recipe and bake in a sheet pan.
Cutting Mudslide Bars: For best results let the bars cool completely. Using a good serrated knife or plastic knife use a sawing motion to cut the brownies.
Storing and Keeping Marshmallow Brownies
This is if you have leftovers of Mississippi Mudslide Bars, you may not, and do not be surprised by that!
Storing: These will keep either in the fridge tightly covered for up to a week. Or you can keep them tightly covered for up to 4 days at room temperature. Either way, they are delicious!
Freezing: You can also keep these in the freezer. Wrap tightly with plastic and then with foil. Keep for up to 3 months.
More Chocolate Desserts To LOVE
Chocolate is one of those ultimate comfort foods, that just hits the spot. It can be gooey, rich, and sweet in so many forms. Here are some tried and true recipes when life calls for a bit of chocolate.
Mississippi Mudslide Bars are a chewy brownie base, topped with a fluffy marshmallow layer, and finished off with a rich and silky chocolate frosting. They are so addictive!
In a large bowl combine melted butter, sugar, cocoa powder, eggs, and vanilla and mix until smooth. Add flour and salt and mix until incorporated. Spread batter evenly in prepared pan. Bake for 25-30 minutes until an inserted toothpick in the center comes out clean (a few loose crumbs are okay but no wet batter).
Spread marshmallows in an even layer on top of the brownie layer. Return to oven and bake another 5-7 minutes until marshmallows are fluffy and beginning to lightly brown. Allow to cool while you prepare the frosting.
In a microwave-safe glass bowl combine chocolate chips and heavy cream and microwave on half power for 2 minutes at a time, stirring after each, until smooth. Stir in butter and vanilla til smooth. Pour mixture over marshmallows. Chill at least 2-3 hours or until completely cooled before cutting into bars and serving.
Notes
Updated on April 18, 2021Originally Posted on April 29, 2016
Challah Bread is a rich and fluffy loaf full of flavor. A Jewish traditional loaf, this incredible bread is going to be a favorite in your family baking!
Challah bread is a traditional bread that originates in the Jewish religion. This sweet enriched dough is often served on the Shabbat table and for major Jewish Holidays such as Rosh Hashanah. Although it is not served during the Passover when leavened bread is not served. But you do not have to be of the Jewish religion to enjoy this incredibly moist tender bread. Once you try this delicate bread, you will find it belongs on every table.
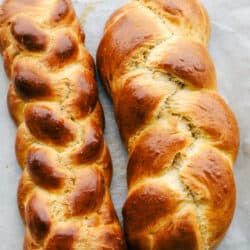
Part of the enchantment of the Challah bread (pronounced “haa·luh”)is the spectacular shiny loaf in it’s braided form. Do not worry, it is easier than it looks. The braids have significant meanings in Jewish religion and are a significant part of making Challah. You have to give the braiding a try when you make this bread. Alone the loaf is perfectly rich, tender and exquisite, but with the braiding it’s divine. You place a challah loaf in all it’s glory on the table and there will be ooh’s and aahh’s at the table for sure. I love the symbolism behind the Challah bread and importance it brings to Jewish ceremonies. When you make this bread, whether you understand it all or not, you will know you are making something special.
Ingredients For Challah
Have your eggs at room temperature for best mixing results. All of these ingredients are easy to find at your local store, or possibly in your pantry already to go!
All purpose flour: Unbleached or bread flour will also work perfectly here, giving your challah a good structure.
Brown sugar: This gives the bread it’s sweetness and helps the bread retain moisture.
Salt: For bread to taste amazing, it needs salt, otherwise it will be bland and lifeless.
Dry active yeast: Instant yeast will also work with success here. I will explain the difference below.
Eggs: This creates the enriched dough along with the oil. It give the dough more depth than regular dough.
Warm water: Watch the temperature of your water, you do not want it too hot or it will kill the yeast.
Vegetable oil: This is another ingredient that creates that rich flavor and moist tender bread.
Egg yolk, for egg wash: Thin with a bit of water if needed. It will create a great shiny crust for your challah.
Poppy Seeds orSesame Seeds (optional): This is to sprinkle on the loaves after you have put the egg wash on. They are decorative and optional.
Making the Perfect Challah
Challah bread is meant to be made taking great care and effort with the dough. In some traditions if made rushed and while in a bad mood, your challah will fall flat and not turn out. So put some love into your challah and enjoy the process and the incredible aroma that will fill your kitchen.
Dry Ingredients: Mix 4 cups of flour with the other dry ingredients together in bowl of stand mixer.
Wet:Add the wet ingredients (make sure the water is just barely warm—don’t kill the yeast!) and mix at medium low speed with dough hook until combined. If the dough is still sticky, add the additional ¼ cup of flour. Scrape the bowl to make sure all the flour is incorporated.
Kneading: Mix at low speed for 5 minutes or until smooth
1st Rise: Once smooth, dump dough on a lightly floured counter and form into a ball. Place dough into an oiled bowl, metal or glass, cover with a towel or plastic wrap and set in a warm place to rise.Let rise for 1 hour or until doubled in size.
Oven: Preheat the oven to 350.
Remove: Once the dough has doubled in size, remove from the bowl onto a lightly floured surface.
Preparingthe dough for braiding: Cut the dough into two equal sections and using your hands, roll into a large log about 12 inches long. From here you can cut each log into either 6 strands or 3, depending on your preference, but keep them attached at one end.
Braid: Braid strands together in a traditional 3 strand braid or a 6 strand braid [insert photos showing how to do a 6 strand braid]. Once the strands are too short to continue braiding, tuck under to form the end of the loaf.
Rest: Place the loaf on a greased baking sheet and let it rise for 30 minutes.
Egg Wash: Mix a little water with the egg yolk and use a pastry brush to coat the dough evenly. Sprinkle on optional sesame seeds or poppy seeds.
Bake: Bake at 350 for 30-40 minutes.
Cool: Allow to cool completely before cutting.
How To Braid A Three Strand Challah
If you can braid your daughter, sister, aunt or uncle’s hair you can braid a three strand loaf of challah bread. If you are new to braiding three strand is great place to start. Take care to keep the dough taunt but not tight. Otherwise it will form large gaps.
Three Strand: Starting on the right side, cross the right strand over the middle strand so it now sits in the middle. Then take the left strand and cross it over the middle strand, to now become the middle strand. Repeat alternating right, then left till you reach the end of the dough. Pinch the ends together and fold them under and tuck under the loaf. Gently place on prepared baking sheet.
Tips For Soft Tender Challah Bread
Bread is a work of art, and in many ways like art, bread can be very forgiving. But there are few things you want to make sure you do so that you at least end up with a tasty loaf, no matter what it looks like.
Yeast: For this recipe I used dry active yeast, which means you need to activate it. Which means you will definitely want to mix it with the warm water first to feed it and to get it going. Instant yeast will also work with this recipe and you do not have to activate with warm water before mixing it into your bread dough.
Warm Water: Make sure your water is below 110 degrees F before you add the yeast or you’ll kill it. But also make sure it’s above 80 degrees F or it won’t activate it, it’ll be too cool. If you have a thermometer use it for best results.
Oil: Unlike a Brioche bread which calls for butter, a Challah uses oil to create moisture and richness.
Kneading: Be sure to knead the bread for a good 5 minutes with the mixer or 10 minutes by hand. It’s a good arm work out by the way. This develops the gluten which is essential for a good bread.
Egg Wash: Brush with egg wash before the second rise, it will add moisture to the bread and give it a nice glossy shine when baked. You can re-apply the egg wash if you desire right before baking.
How to Know Your Bread Is Done: Insert an instant read thermometer into the center of your bread in the middle of the loaf. The internal temperature of a properly cooked loaf will be between 190 and 210 degrees. This will ensure your dough is not raw when you cut into it.
Variations For Your Challah Bread
When it comes to baking Challah bread the tradition keeps it pretty basic but also pretty delicious.
Add ins: During Rosh Hashanah the dough will be filled with raisins golden or regular and rolled into a crown. This is a great sweet addition. You can also mix in mini chocolate chips into your loaf.
Toppings: After you use the egg wash sprinkle on sesame seeds, poppy seeds or even pumpkin seeds for bit of crunch to the crumb. Cinnamon and sugar also make a great sweet topping.
Richer: If you want an even richer loaf, add another egg to the dough.
Sweet: Use ⅓ cup of honey instead of brown sugar as your sweetener.
How To Braid A Six Strand Challah Bread
This isn’t as scary as it sounds or looks, and the result is absolutely beautiful. Don’t stress it too much and have fun with it. Your Challah bread will taste amazing however it looks.
Six Strand Braid: For starters it is important to remember that you always start with the strand that is furthest to the right. Now memorize this saying to repeat as you briad, “over 2, under 1, over 2” Take the strand furthest to the right and weave it towards the left through the other strands using this pattern: over 2 strands, under 1 strand, over 2 strands.Take the strand furthest to the right and repeat the weaving pattern again: over 2 strands, under 1 strand, over 2 strands. Repeat this pattern, always starting with the strand furthest to the right, until the whole loaf is braided. Tuck the ends under the loaf and place on prepared baking sheet.
Storing Leftover Challah Bread
We all know that leftover Challah bread makes the best french toast, or stuffed french toast, so it is totally ok to save a loaf for later.
Store: Keep Challah bread tightly wrapped at room temperature for 4 days. Use for french toast, and sandwiches.
Freeze: Tightly wrap the loaf in plastic wrap and then place in a freezer safe bag for up to 3 months. Thaw on the counter before using.
Bread Recipes to Try
Making bread is almost as therapeutic as eating it can be. There is something about the kneading and mixing that just helps melt the world away. And then that smell! The rich aroma of fresh baked bread that fills the house is pure heaven. It is almost torture to have to wait for it to cool so you can slice it up and slather it with whatever tempts you. Whether you are beginner or pro, I have a tried and true recipe for you to try.
Challah Bread is a rich and fluffy loaf full of flavor. A Jewish traditional loaf, this incredible bread is going to be a favorite in your family baking!
CourseBread
Keywordchallah bread
Prep Time2hours
Cook Time30minutes
Total Time2hours30minutes
Servings12slices
Calories214kcal
AuthorAlyssa Rivers
Ingredients
4-4 1/4cupsall purpose flour
½cupbrown sugar
1teaspoonsalt
1Tablespoondry active yeast
2largeeggs
1cupwarm water
½cupVegetable oil
1egg yolkfor egg wash
Poppy Seedsoptional
Sesame Seedsoptional
Instructions
Making the dough
Mix 4 cups of flour with the other dry ingredients together in bowl of stand mixer.
Add the wet ingredients (make sure the water is just barely warm—don’t kill the yeast!) and mix at medium low speed with dough hook until combined. If the dough is still sticky, add the additional ¼ cup of flour. Scrape the bowl to make sure all the flour is incorporated.
Mix at low speed until smooth, about five minutes.
Once smooth, dump dough on a lightly floured counter and gently form into a ball. Place dough into an oiled bowl, cover with a towel or plastic wrap and set in a warm place to rise.
Let rise for 1 hour or until doubled in size.
Forming the braid
Pre-heat the oven to 350 degrees.
Once the dough has doubled in size, remove from the bowl onto a lightly floured surface.
Using a sharp knife or pizza roller, cut the dough into two equal sections and using your hands, very gently roll into a large log about 12 inches long. From here you can cut each log into either 6 strands or 3, depending on your preference, but keep them attached at one end (see photo for example).
Being careful to handle the dough gently and not stretch out the strands of dough, braid the strands together in a traditional 3 strand braid or a 6 strand braid (see photo for step-by-step example). Once the strands are too short to continue braiding, pinch together and tuck under to form the end of the loaf. The top of the loaf can be pinched and tucked to match.
Place the loaf on a greased baking sheet or parchment lined baking sheet.
Mix a little water (about a teaspoon) with the egg yolk and use a pastry brush to coat the dough evenly. Sprinkle on optional sesame seeds or poppy seeds.
Bake at 350 for 30-40 minutes, until golden brown.