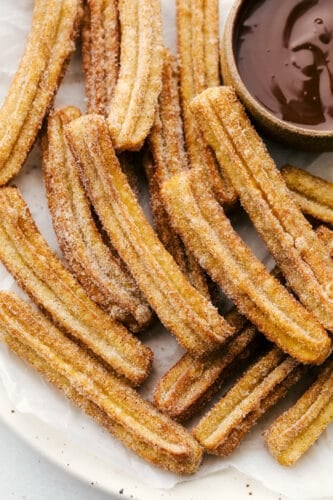
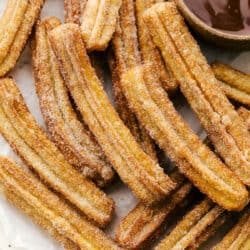
All I have to hear is the word, Churros, and my mouth starts to water. Light fluffy dough is fried and then covered in cinnamon and sugar, totally heavenly!
That cinnamon and sugar flavor is a complete classic that makes for fantastic treats! Try my Waffles, Cheesecake, or Cupcakes to see what I mean!

Homemade Churros Recipe
Whether your love for churros began at your local fair or from the well-known Disneyland favorite, with this churro recipe, you can now make them at home. When you place these golden, sweet crisp-tender bites on the table, be prepared to receive oohs and ahhs! Then watch them disappear faster than you can fry them. You could probably bribe your kids to do just about any chore with the promise of these homemade churros at the end of the day!
Churros are way easier than you think and they always taste way better from scratch! They might seem tricky, but churros just take time and a bit of attention to detail. Then you will have crispy sweet outside, soft and chewy inside, and the best tasting churros you have ever had!
Ingredients for Easy Churros
You probably have all the ingredients you need in your pantry right now to make these churros. Simple ingredients, but big on flavor!
- Water: You will bring this to a boil with other wet ingredients.
- Butter: Adds flavor and helps to build texture.
- Sugar: Adds just a bit of sweetness.
- Salt: Just a pinch to balance things out.
- Flour: All-purpose flour works here.
- Egg: Chilled large egg.
- Vanilla: Vanilla is one of the best flavors, mild and perfect.
- Oil: This is for frying, use peanut or canola oil.
How to Make Churros at Home
These homemade churros are not as hard as you may think, you can be munching on these delectable treats in no time.
- Oil: Heat oil in a heavy-bottomed pot. Use a candy or oil thermometer to bring it to 350 degrees. Turn down the heat to maintain 330-350 during frying. It may need time between batches to come back up in temp.
- Prep your frying station with your sugar and cinnamon mixture in a shallow dish, and a plate with paper towels to drain the hot churros.
- Boil: In a medium saucepan, heat water, butter, sugar, and salt over medium heat until it boils.
- Add Flour: Once boiling, remove from heat and stir in the flour until it is fully incorporated with the water mixture. It will form a stiff ball of dough.
- Stir like mad: Add the egg and vanilla, either stirring vigorously by hand or using a hand mixer to blend. The egg won’t incorporate right away but keep mixing and it will eventually incorporate into the dough. Be sure to keep stirring so the egg doesn’t cook in the hot pan.
- Pipe: Using a large star tip (I used Ateco 852) and a sturdy pastry bag, fill the bag with the finished dough and twist tightly.
- Fry: When the oil has reached 350, pipe a few 4-6 inch long strips of dough into the oil. Fry for 1 minute 30 seconds on one side, and 1 minute on the other side. Remove from the oil to the paper towel-lined plate. Allow cooling for 15-30 seconds before tossing in the cinnamon sugar.
- Serve: Best served immediately.

The Best Churro Dough Tips
When you are craving something sweet but light and tasty, these churros are just the dessert you will love. The dough will resemble an eclair pastry. The stiffness helps the churros retain their ridges when frying.
- The Dough: If you have never made churros or eclairs before, this dough will seem weird to you. But trust the recipe. It will work and it will taste amazing. When you boil the ingredients and stir it should form a ball. You should not have a bunch of dough at the bottom of the pan. It should come together nicely. If it hasn’t keep cooking and stirring for a minute longer.
- Cool Slightly: Before adding the egg, stir the dough off of the heat to help release some of the heat. You do not want scrambled eggs. Make sure your egg is good and cold as well. After about 5 minutes of rest or stirring, beat in the egg.
- The Egg will Mix in I promise: At first it will seem like the egg is not incorporating into the dough. Keep stirring and it will slowly work together.

Frying Tips for your Favorite Churros
This is the most delicate part when making churros. You do not want them burnt on the outside and raw in the middle. Take your time and make sure that your oil and churro dough is ready when you are.
- Temperature: It is important that you keep the oil at the right temperature to ensure the churros cook at the right rate. Use a candy thermometer to keep the oil at 350 degrees. It is ok if it goes up some like to 365, but you do not want it to go lower.
- Piping: Pipe your churros about 4-6 inches long is all. If they get much longer they will curl and be hard to turn. If you do not have pipping tip, you can either pipe them without one or droop by small dough balls for churro donuts.
- Pipe right into the Oil: For easiness, pipe the churros right into the oil, using scissors to cut the dough. Oil the scissors before using them so that the dough does not stick to the blade.
- Only a few at a time: Only fry 3-4 at a time. This will prevent the oil temperature from dropping too low.
- Roll Immediately: To get the best cinnamon and sugar coverage, roll the churros while they are still warm.

How To Serve Your Churros
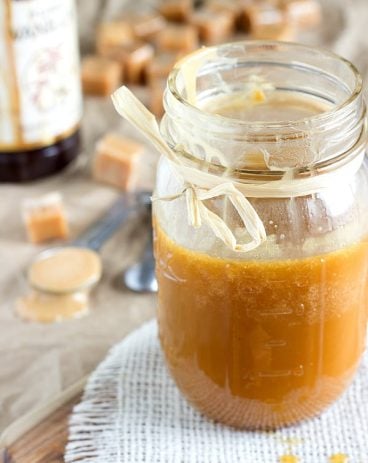
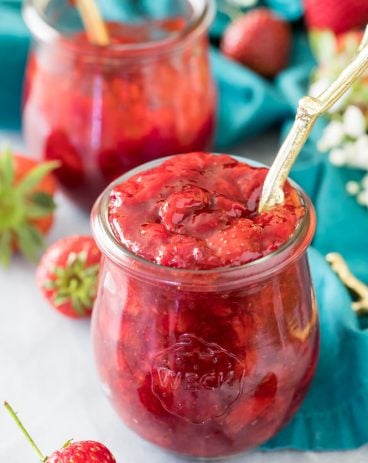
Serve churros plain or serve them with sauce, however you serve them though, they will be everyone’s favorite. There are other options besides chocolate like strawberry or caramel sauce that you can try with homemade churros.
Desserts
Homemade Salted Caramel Sauce
Dressings, Sauces, and Dips
Homemade Strawberry Sauce

Make-Ahead and Storing Fried Churros
Another great thing about churros is you can make the dough ahead of time. And then all you have left to do is fry them. And even though these are best served immediately, you can store these for a treat later on.
- Storing: Keep cooled and coated churros in an air-tight container with a paper towel for up to two days. Reheat in the oven at 400 degrees for 8-12 minutes.
- Freeze: Place the done churros on a baking sheet and freeze for 1 hour. Transfer to a freezer-safe bag and freeze for up to 2 months. Thaw at room temperature.
- Make-Ahead and Refrigerate: After you have made the dough, place it in an air-tight container. I like to wrap the dough as well in plastic wrap to keep it moist. Keep in the fridge for 2 days. Place in a piping bag and fry according to directions.
- Make-Ahead and Freeze: Form the churros on a parchment-lined cookie sheet. Freeze for 1 hour and then transfer the frozen dough to a freezer-safe bag. Freeze for up to 1 month. When ready to cook, no need to thaw. Just fry according to directions.

More Mexican Favorite Dishes

Churros
Ingredients
Churros
- 1 cup water
- 3 tbsp butter
- 1 tablespoon sugar
- Dash salt
- 1 cup flour
- 1 large egg
- 1 teaspoon vanilla
- 2 quarts canola oil
Cinnamon sugar
- 1 ½ teaspoon cinnamon
- ½ cup sugar
Instructions
-
Heat oil in heavy bottomed pot. Use a candy or oil thermometer to bring it to 350 degrees. Turn down the heat to maintain 330-350 during frying. It may need time between batches to come back up in temp.
-
Prep your frying station with your sugar and cinnamon mixture in a shallow dish, and a plate with paper towels to drain the hot churros.
-
In a medium sauce pan, heat water, butter, sugar, and salt over medium heat until it boils.
-
Once boiling, remove from heat and stir in the flour until it is fully incorporated with the water mixture. It will form a stiff ball of dough.
-
Add the egg and vanilla, either stirring vigorously by hand or using a hand mixer to blend. The egg won’t incorporate right away, but keep mixing and it will eventually incorporate into the dough. Be sure to keep stirring so the egg doesn’t cook in the hot pan.
-
Using a large star tip (I used Ateco 852) and a sturdy pastry bag, fill the bag with the finished dough and twist tightly.
-
When the oil has reached 350, pipe a few 4-6 inch long strips of dough into the oil. Fry for 1 minute 30 seconds on one side, and 1 minute on the other side. Remove from the oil to the paper towel lined plate. Allow to cool for 15-30 seconds before tossing in the cinnamon sugar.
-
Best served immediately.
Notes
Make sure to fry in small batches as the churros with brown more evenly and the oil will maintain it’s temperature better.
Instead of mixing the cinnamon sugar in a shallow dish, it can be mixed in a paper bag and the hot churros can be dropped in, the bag closed, and shaken to coat with sugar.
Nutrition
from The Recipe Critic https://ift.tt/3xIwsfe
https://ift.tt/33bzESw