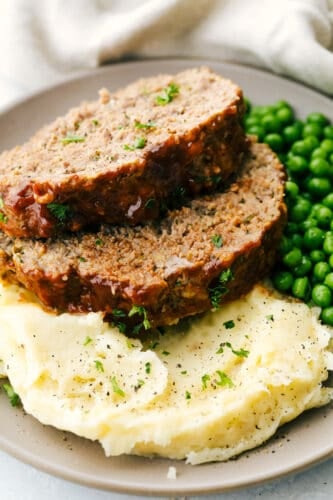
Instant Pot Meatloaf is the best meatloaf I have ever had! Full of vegetables and flavor, it comes out perfectly cooked, tender and moist every time!
Serve this incredible meatloaf with Carrots, a nice Salad, and Rolls. This will be a dinner your loved ones will beg to have again!

Instant Pot Meatloaf
After I tried this all-in-one meatloaf dinner in an Instant pot, I have never made it a different way since. You are going to love the way the potatoes and meatloaf cook all together, cutting down on pots and pans. It also frees up your oven and stovetop for other things if needed. It also eliminates heating up your kitchen to have this classic favorite meal. The family is going to love the taste and you are going to love how easy it is.
Using the instant pot infuses moisture and flavor into the meat, no more dry meatloaf! The flavor is customizable too. Add parmesan and more Italian seasoning and top with marinara for an Italian twist on this favorite. I used to avoid meatloaf because it was such a mess, but cooking it in the instant pot wipes that out. And being able to do the potatoes at the same time is such a plus. Perfect for a lazy Sunday dinner or even a quick weekday hearty meal. Enjoy!
Ingredients for Instant Pot Meatloaf
The ingredients in this instant pot meatloaf will keep it moist, tender and absolutely delicious!
- Potatoes: I used russet potatoes, peeled and quartered
- Water: This will create the steam to pressurize the instant pot.
- Ground Beef: You want to use lean ground beef for this recipe.
- Onion: Finely chopped.
- Parsley: Use fresh parsley.
- Italian Bread Crumbs: Adds flavor as well as moisture.
- Milk: More moisture helps to bind the meatloaf.
- Worcestershire sauce: This is a classic flavor that is perfect in this dish.
- Eggs: These are your binders that hold the meatloaf altogether.
- Garlic powder: Have to have garlic!
- Salt and pepper: Add to taste.
Glaze Topping
- Ketchup: This will create your base.
- Balsamic Vinegar: Adds tang and flavor.
- Brown Sugar: Brings the sweetness and helps the glaze stick.
For the Potatoes
- Milk: Allows the potatoes to be mashed to the perfect consistency.
- Butter: Adds flavor and helps the potatoes be creamy.
- Salt: Add to taste.
How Long to Cook Meatloaf in an Instant Pot
You will probably never make meatloaf any other way after you have tried this! It’s perfect every single time!
- Potatoes: Add the potatoes to the bottom of your instant pot. Pour the water on top.
- Making the Loaf: In a large bowl combine beef, onion, parsley, Italian breadcrumbs, milk, Worcestershire sauce, eggs, garlic powder, salt, and pepper. Use your hands to mix until combined being careful not to overmix.
- Prep for the Instant Pot: Place a sheet of aluminum foil on the counter. Shape the meatloaf into a loaf and shape the sides of the aluminum foil around the meatloaf. Place on top of the potatoes in the instant pot.
- Glaze: In a small bowl whisk together ketchup, vinegar, and brown sugar. Brush half of the mixture on the top of the meatloaf.
- Cook: Cover and turn the instant pot to the sealing position. Pressure cook on manual high for 25 minutes. Release the pressure with the quick release. Check the meatloaf to see if it has reached an internal temperature of 155 degrees.
- Let it Rest: Remove the meatloaf from the pan and let it rest.
- Mashing the Pototes: Add the milk and butter to the potatoes and mash with a beater or hand masher until they reach the desired consistency. Salt to taste.
Tips for the Best Instant Pot Meatloaf
It might seem complicated to make meatloaf in an instant pot, but it’s not, it’s just amazing!
- Ground Beef: Lean and even extra lean ground beef will work in the instant pot beautifully. The instant pot infuses the meat with steam and moisture. You can use beef from 85/15- 97/3 with success.
- Potatoes: You can also use baby potatoes in this recipe and toss them in butter before serving, instead of mashing them.
- No Potatoes: If you want to skip the potatoes, place the meatloaf on top of an instant pot trivet to keep it out of the water.
- Don’t over mix: When mixing your ingredients mix until just blended. Overmixing will cause a tough meatloaf.
- Broil: This step is optional but I highly recommend it. Once the meatloaf is done place under the broiler for 5-8 minutes until the glaze is nicely browned. So good!
- Let it rest: This is super important! It allows the meatloaf to reabsorb the juices and redistribute them. Let it sit for at least 10-15 minutes. Cover gently with foil while the meatloaf is resting.

How to Store Leftover Meatloaf
Meatloaf is one of those dishes that is almost better the next day. And it is great favorite for meatloaf sandwiches.
- Refrigerate: Tightly cover and keep in the fridge for up to 4 days.
- Freeze: Wrap leftover meatloaf in plastic wrap or foil and place in a freezer-safe bag and freeze for up to 3 months. Thaw overnight in the fridge.
- Reheat: Put in a 350-degree oven and cover. Bake for 15 min or till the internal temperature is 165 degrees, which is safe for reheated food.
More Ground Beef Recipes To Love


Instant Pot Meatloaf
Ingredients
- 3 pounds russet potatoes peeled and quartered
- 1 cup water
- 2 pounds lean ground beef
- 1 small onion chopped
- 3 Tablespoons fresh parsley chopped
- 3/4 cup Italian Bread Crumbs
- 1/2 cup milk
- 1 Tablespoon Worcestershire sauce
- 2 large eggs
- 1 teaspoon garlic powder
- salt and pepper
- Glaze:
- 1/4 cup ketchup
- 1 Tablespoon balsamic vinegar
- 1 Tablespoon brown sugar
For the potatoes:
- ½ cup milk
- ¼ cup butter
- salt to taste
Instructions
-
Add the potatoes to the bottom of your instant pot. Pour the water on top.
-
In a large bowl combine beef, onion, parsley, Italian breadcrumbs, milk, Worcestershire sauce, eggs, garlic powder, salt and pepper. Use your hands to mix until combined being careful not to overmix.
-
Place a sheet of aluminum foil on the counter. Shape the meatloaf into a loaf and shape the sides of the aluminum foil around the meatloaf. Place on top of the potatoes in the instant pot.
-
In a small bowl whisk together ketchup, vinegar and brown sugar. Brush half of the mixture on the top of the meatloaf.
-
Cover and turn the instant pot to the sealing position. Pressure cook on manual high for 25 minutes. Release the pressure with the quick release. Check the meatloaf to see if it has reached an internal temperature of 155 degrees.
-
Remove the meatloaf from the pan and let it rest.
-
Add the milk and butter to the potatoes and mash with a beater or hand masher until they reach the desired consistency. Salt to taste.
Nutrition
from The Recipe Critic https://ift.tt/2QVcUE3
https://ift.tt/3tcwgSh