रविवार, 9 मई 2021

Sugar Cookie Bars

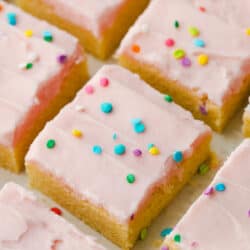
These sugar cookie bars are soft and sweet with a smooth layer of icing that is sprinkled on top. Perfect for your next party!

Cookies are a favorite at our house and always on demand. Some that we love are No-Bake, Pecan, and Snickerdoodles Cookies.

Sugar cookie bars cut into squares with sprinkles on top.

I have made these sugar cookie bars over a dozen times! They are so easy to whip up a batch and have a delicious sugar cookie in a bar! A soft and chewy sugar cookie with delicious frosting on top. And it makes enough to feed a crowd! You are going to love these and they will become a major hit wherever you take them!

 A sugar cookie bar is everything a good sugar cookie is: soft, chewy, and sweet but not too sweet! Traditional sugar cookies take a little more time. But these sugar cookie bars are easy and bake in under 20 minutes. If you love sugar cookies these Lofthouse cookies have the sweetest touch that everyone loves! Anyway a sugar cookie is made is my favorite!

These are basic pantry staple ingredients that makes these sugar cookie bars easy to make any day of the week. It is quick and easy to mix together and bake within 30 minutes.

  • Butter: Use unsalted butter softened at room temperature and not melted.
  • Sugar: This is the main attraction and sweetness to any sugar cookie.
  • Egg and Egg Whites: The egg and egg whites are a special way to bond the cookie bars together while baking.
  • Sour Cream: Keeps the cookies moist and also helps give the sugar cookie bars that signature cake-like texture.
  • Vanilla Extract: Adds flavor to the dough.
  • Flour: Creates a thick batter that bakes up evenly.
  • Baking Powder: Make sure it is fresh and this will help keep the sugar cookie soft and puff up in the oven.
  • Salt: Just a pinch!

Colored Frosting

Frosting can be fun and easy to layer on top of these sugar cookie bars. Make sure the sugar cookie bars are cooled before applying the frosting.

  • Unsalted Butter: Cut up into tablespoons for a quicker way of mixing together.
  • Powdered Sugar: For a thicker frosting add more powder sugar.
  • Half and Half: For a thinner frosting add more half and half.
  • Vanilla Extract: Added for flavor in the sugar cookie frosting.
  • Food Coloring of Choice: I went with pink because of my girls but mix it up and have a fun time with the colors depending on the holiday or celebration!

 After mixing the dough together, press it into a 9 x 13 pan and bake, cool and then frost! It is that simple and will come together quick and easy!

  1. Set Temperature: Preheat the oven to 375 degrees. (best if done 30min before baking so it’s truly the right temperature.)
  2. Prepare Pan: Grease a 9 x 13-inch pan. (use parchment paper for easy removal)
  3. Dry Ingredients: Combine all the flour, baking powder, and salt in a separate bowl and set aside.
  4. Mix Together: Cream butter and sugar using a stand or electric hand mixer. (about 3 min)
  5. Add in: Then add egg, and egg white, sour cream, and vanilla extract mix until fully combined.
  6. Combine: Slowly add the dry ingredients mix until just combined.
  7. Fill Pan: Lightly press dough into a greased pan.
  8. Bake: Bake for 17-20 minutes. They are done when the edges are slightly golden and the toothpick comes out clean.
  9. Frosting: While the cookies are baking make the frosting by combining the butter, powdered sugar, and half and half until fluffy.
  10. Color and Flavor: Add in vanilla extract and optional food coloring. 
  11. Checking: When the toothpick comes out clean and edges are slightly golden take it out of the oven 
  12. Wait to Frost: Let cool completely. Frost and slice to enjoy.
The process of making sugar cookie bar batter and baking in a pan.

Tips for Making the Best Sugar Cookie Bars

These tips will help ensure that your sugar cookie bars are thick, sweet and fluffy! Every bite will be soft and chewy!

  • Baking Powder: Make sure it’s fresh and replace it every 6 months.
  • Flour: Fluff your flour before you measure. This will avoid having dense or dry cookies. Use a whisk or spoon it in the measuring cup.
  • Sour Cream: Use full fat for more rich and tender cookies.
  • Powdered Sugar: Sift if you want the frosting to be smooth.
  • Sticky Dough: Refrigerate until your butter hardens up making it easier to place in the pan.
  • Do not over bake: Take the pan out of the oven as soon as the edges are slightly golden and the toothpick comes out clean.
  • Let them cool completely before frosting: hardest part in my opinion. 

What Can you Serve with Sugar Cookie Bars?

You can serve just about anything with these sugar cookie bars, They are perfect for a potluck, birthday parties or special occasions. Serve these sugar cookie bars after a delicious dinner, after a lunch salad with friends or serve an afternoon snack after school. 

Sugar cookie bars cut into squares.

Add to your Sugar Cookie Bars with these Quick and Easy Variations

The sugar cookie bar recipe is easy to customize for holidays, birthdays, family parties, and barbecues. You can add different colors to the frosting, festive sprinkles.

  • Chocolate: Drizzle melted white chocolate. Sprinkle with chopped nuts or shredded coconut.
  • Flavoring: Try adding lemon extract or almond extract to the cookie dough or the frosting. You can add fresh fruit just before serving for a version of fruit pizza. 
  • Slice: You can cut these up easily in squares, rectangles, diamonds, and even triangles.
  • Diamond-Cut: For diamonds cut lengthwise lines 1 ½ inch apart. Then cut straight lines 1 ½ inch apart diagonally across the pan. 
  • Triangle Cut: For triangles cut the cookies into 2 ½ inch squares then in half diagonally.

How to Store Cookie Bars

Storing is simple with these cookies bars. It is easy to freeze, refrigerate or leave on the countertop for everyone to snack on. Enjoy these soft and chewy sugar cookie bars year round!

  • How to freeze your sugar cookie bars? You should slice into squares or rectangles and place into a gallon freezer bag in a single layer. Squeeze as much air out as possible and seal.  Do not layer multiple bags on top of each other as the frosting will stick. When the cookie bars are completely frozen the bags may be stacked. To serve, allow them to come to room temperature for at least 20 minutes.
  • How long can I store sugar cookie bars? In an airtight container, they can be stored for 2 weeks on the counter, my personal preference to eat them within the first week. In the freezer, they can be stored for up to 3 months.
  • What if the dough is too sticky to put in the greased pan? You can chill the dough for 20 minutes in the refrigerator. If it is still hard to manage add a tablespoon of flour dusting it across the dough and gently pat it in.
Three sugar cookie bars stacked on top of each other.
Print

Sugar Cookie Bars

These are so simple! They are so easy to whip up a batch and have a delicious sugar cookie in a bar!
Course Dessert
Cuisine American
Keyword bar recipes, cookie bars, sugar cookie bars
Prep Time 15 minutes
Cook Time 17 minutes
Total Time 32 minutes
Servings 12 Bars
Calories 353kcal
Author Alyssa Rivers

Ingredients

  • 1/2 cup butter softened
  • 1 cup granulated sugar
  • 1 large egg
  • 1 egg white
  • 1 1/2 Tablespoon sour cream
  • 1 teaspoon vanilla extract
  • 2 1/2 cups all purpose flour
  • 1/2 teaspoon baking powder
  • 1/2 teaspoon salt

Vanilla Frosting:

  • 1/4 cup unsalted butter softened
  • 2 cups powdered sugar
  • 2-3 Tablespoon half and half
  • 1/2 teaspoon vanilla
  • Any color of food coloring optional

Instructions

  • Preheat oven to 375 degrees. Grease a 9×13 inch pan and set it aside. In a large mixing bowl combine flour, baking powder and salt then set it aside.
  • In a stand mixer or with beaters, cream together butter and sugar until fluffy. About 3 minutes. Combine egg, egg white, sour cream, and vanilla. Mix together until fully incorporated. Add the dry ingredients until all is fully combined.
  • Gently press the dough into the bottom of your 9×13 inch pan. Bake for 17-20 minutes until the edges are lightly golden and toothpick entered in the center is clean. Let completely cool and frost.
  • To make the frosting, Whip together butter, powdered sugar, and half and half until fluffy. Add vanilla. Add food coloring if using. Spread on the top of the cooled bars.

Video

Notes

Updated on May 9, 2021
Originally Posted on May 18, 2014

Nutrition

Calories: 353kcal | Carbohydrates: 57g | Protein: 4g | Fat: 13g | Saturated Fat: 8g | Cholesterol: 46mg | Sodium: 178mg | Potassium: 61mg | Fiber: 1g | Sugar: 36g | Vitamin A: 393IU | Calcium: 23mg | Iron: 1mg


from The Recipe Critic https://ift.tt/33qHPL9
https://ift.tt/3vTG5Gl

शनिवार, 8 मई 2021

Coconut Cream Cake with Coconut Cream Cheese Frosting

Coconut Cream Cake with Coconut Cream Cheese Frosting is super moist and delicious with the best coconut cream cheese frosting! This cake will be devoured and loved by all!

I love the sweet nutty flavor of coconut, it can transport me somewhere tropical in minutes! We love coconut in these tried and true recipes, Bread Pudding, Lemon Bars, and Pie!

A slice of coconut cake with frosting and toasted coconut on a plate.

Coconut Cream Cake with Coconut Cream Cheese Frosting

This coconut cake is a deliciously decadent dessert! One bite and you are going to think you’ve died and gone to tropical heaven. The cake is light and moist, just like a cake should be. Buttermilk adds the unique moisture and texture that is absolutely divine. The flavor of the coconut cream cake is sweet and nutty, with a touch of a rich butter flavor. It will be hard to not just eat the cake by itself. But you will want to wait for the creamy luscious cream cheese frosting that goes with it.

Rich, thick, and creamy this frosting is the perfect combination to go with the cake. Cream cheese combines with butter, powdered sugar and then you’ll add coconut extract to really help that coconut flavor pop. Then you will toast coconut which creates a deeper flavor with a hint of vanilla to the coconut and coat the cake. Giving it a natural decoration and flavor.

What you Need to Make Coconut Cream Cake and Frosting

There are a few steps and ingredients that go into this coconut cream cake, but it will be so worth it! The recipe card has all the measurements for you but here is a list of all ingredients and why they are so important to make this perfect coconut cake.

  • Butter: Soften the butter or use room temperature.
  • White sugar: White sugar actually helps the cake not only be sweet but moist.
  • Cream of coconut: Coco Lopez is the one I used. It can be found by the drink mixers at your grocery store
  • Eggs: The eggs should be at room temperature.

Dry Ingredients

  • Flour: All-purpose flour or unbleached flour.
  • Baking powder: Rising agent to help the cake be nice and fluffy.
  • Baking soda: Another rising agent that is important to use.
  • Salt: Provides balance to the sweet and helps the coconut taste like coconut.

Additional Ingredients

  • Buttermilk: This creates tang and moisture that is impeccable.
  • Coconut extract: Adds an extra bit of coconut pizazz!

Coconut Cream Cheese Frosting

  • Butter: The butter needs to be softened or at room temperature.
  • Cream cheese: Soften your cream cheese, or have it at room temperature.
  • Coconut extract: Because the more coconut extract, the better!
  • Powdered sugar: The base of sweetness for this frosting.
  • Milk: Add as needed to create the right consistency.
  • Toasted Coconut* see below
Coconut cake on a pedestal ready to cut.

How do you Make Coconut Cream Cake?

This coconut cream cake takes time but it is worth every single minute! Take your time and follow the steps for the best cake EVER!

  1. For the Cake: Separate eggs, set whites aside. Beat wet ingredients together including egg yolks until fluffy. Sift dry ingredients together and stir well. Add dry ingredients to wet using a mixer on low speed alternating with buttermilk/extract mixture.
  2. Beat and Bake: In a clean bowl, beat egg whites with a pinch of salt until stiff. Fold egg whites into batter. Bake at 275-degrees in two 9-inch pans (sprayed with baking spray and floured or what works BEST is lining the bottom and sides of the pan with parchment paper) for about 90 minutes (it seems they finish much nicer in the lower heat). After about 60 minutes, do the “toothpick test”, repeating every 5-10 min or so until the toothpick comes out clean.
  3. Baked and ready: After the cake is out of the oven and transfer to parchment paper or a cooling rack, poke each cake with a few holes (making sure not to poke all the way through) and drizzle the remaining coconut cream over (about ½ cup total). This is optional and just keeps the cake extra moist. After the cake cools, transfer to the freezer and freeze overnight.
  4. Frosting: Frost immediately (see frosting recipe below) after removing from the freezer. Allow thawing for about an hour before serving. If you want to do a layered cake, put a layer of frosting in between the two cakes and then continue to frost the remainder of the cake. Sprinkle with lightly toasted, shredded coconut (see below).

All About the Coconut Cream Cheese Frosting

This frosting is light, sweet and a tropical deliciousness! The flavors all blend together creating one coconut cream cake dream!

  1. Making the Frosting: Beat butter, cream cheese, and coconut extract together, adding powdered sugar little by little until reaching desired consistency. If it seems to get too stiff, add about 1 tsp of milk at a time until you get the consistency you want. (add milk to thin it out, add powdered sugar to thicken it up).
  2. Toasted Coconut: Place contents of about ½ bag of sweetened, shredded coconut on a cookie sheet. Spread it out so it takes just a single layer. Bake for appx. 8-10 minutes in a 325-degree oven. Some pieces will still be white and soft, some browned slightly with a little crunch

Tips For the Best Coconut Cake

This tropical coconut cake is super moist, super delicious and a total showstopper!

  • Plan Accordingly: This cake takes two days to make because of the freezing. Make sure you plan ahead and leave yourself enough time.
  • What if you do not have time to freeze overnight? Freezing the cake makes it easier to frost. You can make the cake in the morning and freeze it for as long as possible or chill for as long as possible. It may be harder to frost, but it will still be amazing.
  • Room Temperature Ingredients: I cannot stress this enough, it will make a difference in your bake. Take out your cold ingredients an hour or two before using them. Measure out exactly what you need and leave out, putting the rest back in the fridge. This is extremely important for butter, eggs, and cream cheese to be at room temperature and softened.
  • Can I Use Cake Flour: No, you should not. This recipe is for regular flour, cake flour is different consistency, and components so your cake will not turn out the same. It is a good idea not to substitute flours in baked goods unless it tells you otherwise.
  • Prep your pans: The last thing you want is your beautiful cake to stick to your pans. Grease and flour generously. You can also grease and then cut parchment to fit your pan and grease again.
Sliced coconut cake, you can see all the layers.

More Ways to Bake a Coconut Cake with Frosting

Not everyone has time to make a two or three-layer cake every time, you can make this without the fancy layers and still have an out-of-this-world cake on your table!

  • 9×13: Bake for 40 minutes or until a toothpick comes out clean. If you have extra batter use it in a small pan or make as cupcakes.
  • Bundt: This will fit into a large 10 cup or bigger bundt pan. Bake for about an hour.
  • Cupcakes: The oven should be at 350 degrees and bake for 20 minutes or until done.
  • Decorate as Desired: I highly recommend using cream cheese frosting and toasted coconut, but you can decorate your cake with extras anyway you want. Make it your own.

How to Store Your Coconut Cake

Cake can be tricky to keep moist when storing, and a dry cake is no fun. Here are some tips to store your coconut cream cake in the fridge or even freezer.

  • Fridge: Because it does have a cream cheese frosting you will want to store it in the fridge. To prevent the frosting from coming off in your plastic wrap, let the frosting and toasted coconut set and cool before covering. Use toothpicks to also prevent the plastic wrap from sitting right on the frosting. This will keep in the fridge for up to 2 days.
  • Freeze: I like to freeze my cakes with frosting on them to ensure they stay good and moist. Set your cake in the freezer without any wrap and let the frosting freeze. Then tightly wrap in a layer of plastic wrap and then another of foil. It should keep for up to 3 months. Thaw in the refrigerator.
A bite taken by a fork from a slice of cake.
Print

Coconut Cream Cake with Coconut Cream Cheese Frosting

Coconut Cream Cake with Coconut Cream Cheese Frosting is super moist and delicious with the best coconut cream cheese frosting! This cake will be devoured and loved by all!
Course Dessert
Cuisine American
Keyword coconut cream cake, coconut cream cake recipe
Prep Time 30 minutes
Cook Time 1 hour
Total Time 1 hour 30 minutes
Servings 8 slices
Calories 870kcal
Author Alyssa Rivers

Ingredients

COCONUT CREAM CAKE:

    Wet Ingredients:

    • 1 cup butter softened
    • 1 3/4 cup white sugar
    • 1 cup cream of coconut Coco Lopez is the one I used.. it can be found by the drink mixers at your grocery store
    • 4 large eggs

    Dry Ingredients:

    • 2 1/2 cup flour
    • 1 teaspoon baking powder
    • 1/2 teaspoon baking soda
    • 1/2 teaspoon salt

    Additional ingredients:

    Coconut Cream Cheese Frosting

    • 1/2 cup butter softened
    • 8 ounces block cream cheese softened
    • 1 teaspoon coconut extract
    • 2 pounds powdered sugar one bag
    • milk as needed
    • Toasted Coconut* see below

    Instructions

    Cake Instructions

    • Preheat oven to 315 degrees. Prepare two 8 inch cake pans by spraying with cooking spray and dusting with flour. You can add a parchment round as well for easier release from the pan.
    • On medium speed, beat together butter, sugar, cream of coconut, and egg yolks until fluffy.
    • In another bowl, sift together flour, baking powder, baking soda, and salt.
    • In a liquid measuring cup, measure out the buttermilk and add the coconut extract.
    • Add the dry ingredients and the buttermilk to the butter and sugar mixture, alternating between the buttermilk and dry ingredients. Scrape down the bowl and mix again briefly.
    • In a clean bowl, beat the egg whites until stiff peaks form. Gently fold egg whites into the cake batter.
    • Separate the batter equally into the two pans.
    • Bake for 50 minutes. Test the center for doneness. This can be done with a toothpick inserted into the center to see if it comes out clean, or you can gently press your fingertips against the center of the cake. If it is done, the top will spring back. If it needs more time, add 10 minutes and check again until done.
    • Remove from oven and place on a cooling rack.
    • OPTIONAL: If you would like to add extra moistness to your cake, while the cake is still hot use a pastry brush to brush the remaining cream of coconut (should be about ½ a cup) over the tops of the cake.
    • Once cooled, wrap the cakes in plastic wrap and store them in the fridge overnight, or at least 4 hours.

    Frosting Instructions

    • Beat together butter, cream cheese, and coconut extract until smooth and fluffy.
    • Add half of the powdered sugar and mix at low speed for 1 minute. Add the rest of the powdered sugar and mix on low until all the sugar has been incorporated. Bring the speed up to medium and beat for 3 minutes until smooth. If the icing seems too stiff, add milk one tablespoon at a time until it has reached the desired consistency. Don’t let it get soupy! You will want the icing fairly stiff to still be able to frost the cake.
    • Frost your cake, using icing between the one or two layers (depending on how many layers you make).

    Toasted Coconut

    • Preheat oven to 350 degrees. Spread about 1-1 ½ cups of sweetened coconut flakes on a parchment-lined baking sheet.
    • Bake for about 8-10 minutes, stirring every couple of minutes.
    • Allow cooling. Press the toasted flakes around the entire freshly iced cake.
    • Serve and enjoy!

    Video

    Notes

    Updated on May 8, 2021
    Originally Posted on August 30, 2013

    Nutrition

    Calories: 870kcal | Carbohydrates: 104g | Protein: 13g | Fat: 45g | Saturated Fat: 29g | Cholesterol: 204mg | Sodium: 809mg | Potassium: 258mg | Fiber: 2g | Sugar: 72g | Vitamin A: 1281IU | Calcium: 188mg | Iron: 2mg


    from The Recipe Critic https://ift.tt/3y6S1Xk
    https://ift.tt/3uriTyS

    शुक्रवार, 7 मई 2021

    Peanut Butter Smoothie Bowl

    Peanut Butter Smoothie Bowl is one of the best ways to get your protein in for the day! It tastes like you are eating luscious ice cream, only it’s so much better for you!

    Any smoothie can serve as a base for a smoothie bowl. Try these smoothies as a customizable base, Pina Colada, Raspberry Peach and Mixed Berry Smoothies.

    Peanut butter smoothie bowl, topped with bananas, chocolate granola and nuts.

    Peanut Butter Smoothie Bowl

    Smoothie bowls are an incredible way to eat a smoothie. It makes it feel like a bowl of ice cream, except it’s not! It’s so much better. Full of healthy ingredients it is more of a meal than a snack. Smoothie bowls are customizable and insanely delicious! Topped with your favorite toppings and blended with your choice of add-ins, this peanut butter smoothie bowl is going to become a fast favorite in your house.

    This peanut butter smoothie bowl are great for a quick breakfast, a mid-day snack, or even an after-workout meal. With summer coming this makes is a great way to keep your health goals but have a cold bowl of deliciousness. When I get an ice cream craving or when my kids want something sweet and cold, I whip up one of these special smoothie bowls and all are satisfied. If you have not tried one yet, the time is now!

    What You Need For Peanut Butter Banana Smoothie Bowls

    With just 5 ingredients you will be scooping decadent peanut butter banana smoothie in no time. Peanut butter smoothie bowls are so easy to make, you will be creating your favorite smoothie bowls each day!

    • Frozen Bananas: Using frozen creates that thick smoothie consistency.
    • Peanut Butter: Rich and thick, this not only adds protein and flavor but texture too.
    • Honey: Because you need a little bit of sweetness and honey and peanut butter just go together.
    • Greek Yogurt: This helps add thickness, creaminess, and protein without the fat of ice cream.
    • Milk: To thin as needed.

    Let’s Whip Up a Peanut Butter Smoothie!

    Literally so simple and easy! Your children will be able to make this peanut butter smoothie bowl with you!

    1. Blend It: In a blender add the bananas, peanut butter, honey, greek yogurt, and milk. Blend until smooth.
    2. Top it: Place smoothie in a bowl and top with desired toppings.
    Blending all the ingredients in a blender.

    Tips for your Smoothie Bowl

    With a smoothie bowl, there is not much that can go wrong. Create your delicious master piece with this smoothie bowl recipe!

    • Keep it Healthy: The wonderful thing about smoothie bowls is that they can be good for you. But if you load them down with extra sugars and fats they can be a calorie nightmare. Keep it simple, measure it out, and enjoy!
    • Blender: Having a good quality blender will make a huge difference in the consistency of your smoothie. Make sure your blender can handle the thickness of it. If you have an older blender or one that is not very powerful, no worries. Your smoothie may not have the same consistency but it will still be indulgent tasting.
    • Add Milk for Consistency: You want your smoothie bowl to be thick, like soft ice cream. You should need a spoon to eat it with. Add the milk slowly so you can control how thick or thin your peanut butter smoothie ends up.
    • Freeze your Bananas: Use frozen bananas for flavor, texture and to help create a cold smoothie. Peel overripe bananas and place them in a freezer-safe bag. They will keep for up to 2 months.
    • Leave the Ice Out: Ice will add water, and water will make it runny and watery instead of thick and smooth.
    Smoothie in a bowl topped with bananas.

    Topping Ideas and Variations for Peanut Butter Smoothie Bowl

    One of the best things about smoothie bowls is how customizable they are. That is why you are going to love this peanut butter bowl! You can start by adding in mix ins.

    • Protein Powder: Use vanilla flavored, peanut butter, or chocolate-flavored protein powders.
    • Cocoa Powder (Chocolate and peanut butter are a match made in Heaven)
    • Berries or Apples: It will taste like peanut butter and jam smoothie!
    • Flaxseed Meal: Adds fiber and thickens the bowl as well.
    • Substitute out the milk for coconut milk or Almond milk.
    • Add in some greens. Spinach adds iron and nutrients without adding flavor. It will change the color, however.

    Then finish with the toppings, which are endless with possibilities! Create the best peanut butter smoothie bowl just the way you like it!

    • Chocolate Granola
    • Chia Seeds
    • Peanut Butter
    • Honey
    • Sliced Almonds
    • Coconut Flakes
    • Mini Chocolate Chips
    • Sliced bananas
    • Berries
    Scooping a bite of peanut butter smoothie with a spoon.
    Print

    Peanut Butter Smoothie Bowl

    Peanut Butter Smoothie Bowl is one of the best ways to get your protein in for the day! It tastes like you are eating luscious ice cream, only it's so much better for you!
    Course Breakfast
    Cuisine American
    Keyword peanut butter smoothie bowl, smoothie bowl
    Prep Time 10 minutes
    Total Time 10 minutes
    Servings 4 smoothie bowls
    Calories 268kcal
    Author Alyssa Rivers

    Ingredients

    • 3 cups frozen bananas
    • 1/3 cup peanut butter
    • 1 Tablespoon Honey
    • 1/4 cup greek yogurt
    • 1/2-1 cup milk

    Optional Toppings:

    • Chocolate Granola
    • Chia Seeds
    • Peanut Butter
    • Honey
    • Sliced Almonds
    • Coconut Flakes

    Instructions

    • In a blender add the bananas, peanut butter, honey, greek yogurt, and milk. Blend until smooth.
    • Place smoothie in a bowl and top with desired toppings.

    Nutrition

    Calories: 268kcal | Carbohydrates: 36g | Protein: 9g | Fat: 12g | Saturated Fat: 3g | Cholesterol: 4mg | Sodium: 118mg | Potassium: 603mg | Fiber: 4g | Sugar: 22g | Vitamin A: 122IU | Vitamin C: 10mg | Calcium: 63mg | Iron: 1mg


    from The Recipe Critic https://ift.tt/3f4r4uq
    https://ift.tt/3haKYXA