शुक्रवार, 27 नवंबर 2020

The Best Royal Icing Recipe

Royal icing in a glass bowl with a spreader.

This classic and simple royal icing recipe is a cookie decorating staple with a smooth consistency that sets quickly without hardening too much. Made with meringue powder it has a delicious taste and a smooth texture that’s perfect for flooding and piping cookies.

Slather this icing over sugar cookies or use it to decorate your gingerbread cookies to perfection. It is simple to make and tastes delicious!

Royal icing in a glass bowl with a spreader.

Royal Icing Recipe

There are some recipes I make so often I have them memorized because they’re either classics or ones I truly can’t live without and this royal icing is one of those recipes. Hello, everyone, this is Aimee Mars and I’m excited to celebrate the holidays with as much food as possible and plan on never running out of cookies to decorate.

I absolutely love this royal icing recipe because it’s easy to make and it makes cooking decorating fun for myself as well as my kids. Whether you plan on making beautifully decorated cookies or just want a fun project for your kids this royal icing recipe is for you. I also have a sugar cookie recipe too and I always use this royal icing.

Ingredients in Easy Royal Icing

There are only 3 main ingredients in this royal icing recipe making it extremely easy to prepare. These are also ingredients you can always have on hand too.

  • Powdered Sugar
  • Meringue Powder
  • Water
  • Food Coloring (optional)

How to Make Royal Icing

  1. Sift the Powdered Sugar: using a sifter or by pouring the powdered sugar through a fine-mesh sieve, sift the powdered sugar.
  2. Beat Ingredients: beat all the ingredients using a handheld mixer or an electric mixer fitted with the paddle attachment. Check the consistency of the icing and add more water or more powdered sugar if needed.

Royal icing in an electric mixing bowl.

Do I have to use Meringue Powder?

No. Traditional royal icing contains raw egg whites, which you can use instead of the meringue powder. Though meringue powder still contains egg whites, it’s a little easier to work with. It also creates the same smooth consistency that hardens easily as using egg whites.

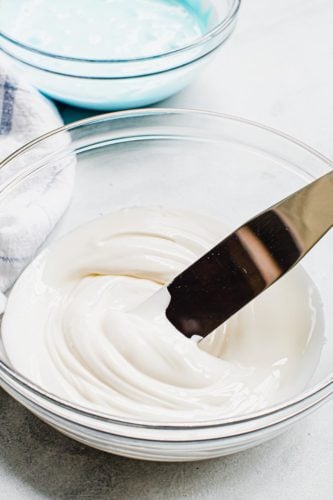
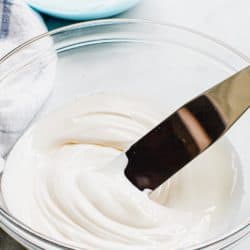
What Should the Consistency for royal icing be?

With just 3 main ingredients, powdered sugar, meringue powder, and water, you can easily manipulate this recipe to get a perfect consistency. Sometimes you need to add water and sometimes you need to add powdered sugar. To know if your royal icing is the perfect consistency use the whisk attachment or a spoon to lift or scoop icing out of the bowl. Let it drip back in and if it melts or mixes evenly back in you have the right consistency. If the mixture is too thick and more water 1 tablespoon at a time. If the icing is too thin add more powdered sugar also at 1 tablespoon a time until the correct consistency is reached.

Can this icing be used for flooding and piping?

Yes. This royal icing recipe is extremely easy and can be used for both piping, which is the outlining of the cookie, and flooding, filling it in. The consistency of the icing is just thin enough to easily spread and just thick enough to outline (pipe) the edge of the cookies.

Should I use gel food coloring or liquid food coloring?

For this recipe, I recommend using gel food coloring because you end up with much more vivid coloring and you don’t need to use as much. The liquid food coloring will still work, however, I recommend decreasing the water by about 1 to 2 tablespoons if you choose to use it.

Can this icing be made ahead of time?

Yes! You can make this icing about 2 days ahead of when you plan on using it. Store it in an air-tight container and keep it in the fridge to keep it fresh. Just before using it stir the mixture.

Can I add flavoring or extracts to this icing?

Yes. If you’d like to add a flavor such as vanilla extract to this royal icing you can. Make sure the flavoring isn’t oil-based though. I recommend using about 2 teaspoons of flavor and then decreasing the water by 1 tablespoon.

Iced sugar cookies using royal icing.

More Delicious Cookie Recipes

Royal icing in a glass bowl with a spreader.
Print

Royal Icing

This classic and simple royal icing recipe is a cookie decorating staple with a smooth consistency that sets quickly without hardening too much. Made with meringue powder it has a delicious taste and a smooth texture that's perfect for flooding and piping cookies.
Course Dessert
Cuisine American
Keyword royal icing
Prep Time 10 minutes
Total Time 10 minutes
Servings 3 cups
Calories 638kcal
Author Aimee Mars

Ingredients

  • 4 cups Powdered Sugar sifted
  • 3 tablespoons Meringue Powder
  • 9 - 10 tablespoons Water at room temperature
  • Gel Food Coloring optional

Instructions

  • Sift the powdered sugar first by measuring it out and pouring it through a sifter or by pouring it into a fine-mesh sieve and shaking it through.
  • Using an electric mixer fitted with the whisk attachment or a handheld mixer beat all of the icing ingredients together on a high speed for about 2 minutes. Check the icing by lifting the whisk to see if the icing drips back down and smooths easily back into the icing in the bowl. If it does the icing is ready. If the icing is too thick add more water 1 tablespoon at a time. If it's too thin add more powdered sugar 1 tablespoon at a time.

Notes

This royal icing sets or hardens on the iced cookies in about 2 hours' time when sitting on the counter. To speed this up place the iced cookies in the refrigerator.
To keep the icing from hardening while you're decorating a bunch of cookies lay a damp paper towel over the top of the bowl until you're ready to use the remainder.

Nutrition

Serving: 1cup | Calories: 638kcal | Carbohydrates: 160g | Protein: 3g | Sodium: 59mg | Potassium: 45mg | Sugar: 157g | Iron: 1mg


Collage of royal icing being made.


from The Recipe Critic https://ift.tt/2V7Llpp
https://ift.tt/3fH5FYc

गुरुवार, 26 नवंबर 2020

Perfect 10 minute Air Fryer Shrimp

This Perfect 10 minute Air Fryer Shrimp is succulent, amazingly seasoned and tender. Get ready because dinner is about to be served!

Serve these Shrimp on a bed of Perfect Instant Pot Rice, or with Easy Fried Rice and some Vegetable Stir Fry for a splendid dinner.

Tender succulent 10 minute Air Fryer Shrimp

Air Fryer Shrimp

Air Frying is taking the cooking world by storm, and there’s good reason too. It’s quick. Easy clean up, and creates amazing dishes that more healthy for you. If you haven’t tried an air fryer, it’s time to get on the bandwagon! And this shrimp recipe is a golden ticket winner when it comes to flavor and ease.

Marinating the shrimp infuses the flavor into the shrimp. Air frying allows the flavor to remain on the shrimp without burning it too, giving it a nice outer coating. The inside is tender and perfectly seasoned. You don’t need to add anything else. It’s absolutely divine.

Easy Air Fryer Shrimp Ingredients

Quick and easy, but oh so yummy! With this super easy, yet glorious dish, shrimp can be served any day of the week. No more is it reserved for weekends or special events.

  • Shrimp: Large or Jumbo Shrimp
  • Salt and Pepper: Just to taste
  • Olive Oil: Adds a nice mild flavor
  • Red Wine Vinegar:  Helps the marinate the flavors into the shrimp
  • Garlic: Minced garlic, can used jarred garlic
  • Italian Seasoning: A perfect blend of spices.
  • Lemon Juice: Lemons and shrimp just go together
  • Soy Sauce: Adds the perfect amount of flavor
  • Dijon Mustard: A nice kick
  • Worcestershire Sauce: Adds a nice umami tang.

Making Perfect Shrimp

Just a nice marinade to seep the flavor into the shrimp.

  1. Season: Salt and Pepper the shrimp to your liking
  2. Mix: In a medium sized bowl combine olive oil, red wine vinegar, garlic, italian seasoning, lemon juice, soy sauce, dijon mustard and worcestershire sauce. whisk to combine.
  3. Marinate: Add in the Shrimp and marinate for at least one hour up to overnight.
  4. Drain: Remove the marinade and place in the air fryer basket
  5. Cook: Fry at 400 degrees for 8 min or till pink and cooked throughout.


Shrimp in marinade.

Tips for the Best Shrimp

A few tips and tricks will help you have those perfect shrimp every time.

  • Frozen: You can definitely use frozen shrimp, make sure they are thawed before you marinate them.
  • Overcrowd: Don’t put too many in the air fryer basket. It needs to be able to circulate the hot air around the shrimp to cook them. If you have to cook in batches.
  • Flip it: You can flip the shrimp half way through although you don’t have too, it’s a preference
  • Tails: Removing the tails is also a preference thing. I left them on.

How do you Know Shrimp is Done?

  • Sight: When shrimp turns to that beautiful pink color all over with red tells and the flesh has a nice opaque whiteness to it. It’s done.
  • Temp: The internal temp of cooked shrimp is 120 degrees F.
  • Over Cook: You don’t want to over cook shrimp. It becomes rubbery so check it before you think it might be done. And remove promptly once it is as it will keep cooking in the fryer if left.
  • Storing: Keep leftovers in an airtight container in the fridge for up to 3 days.
  • Reheat: Reheat leftovers in the air fryer, the microwave will make them soggy.

Shrimp with lemons in air fryer.

More Shrimp Recipes to Love

Shrimp is really an easy dish and you can make it so many different ways!

Print

Air Fryer Shrimp

This Perfect 10 minute Air Fryer Shrimp is succulent, amazingly seasoned and tender. Get ready because dinner is about to be served! 
Course Dinner
Cuisine American, Seafood
Keyword air fryer shrimp, air fryer shrimp recipe
Prep Time 2 minutes
Cook Time 8 minutes
Total Time 10 minutes
Servings 4 People
Calories 372kcal
Author Alyssa Rivers

Ingredients

  • 1 pound large or jump shrimp
  • salt and pepper
  • 1/2 cup olive oil
  • 1/4 cup red wine vinegar
  • 3 garlic cloves minced
  • 1 Tablespoon Italian seasoning
  • 1 Tablespoon lemon juice
  • 2 Tablespoons soy sauce
  • 1 teaspoon dijon mustard
  • 1 Tablespoon Worcestershire sauce

Instructions

  • Salt and pepper the shrimp. In a medium sized bowl combine olive oil, red wine vinegar, garlic, Italian seasoning, lemon juice, soy sauce, Dijon Mustard and Worcestershire sauce. Add the shrimp and let marinate for at least one hour or overnight.
  • Remove the shrimp from the marinade and place in the air fryer basket. Cook at 400 degrees for 8 minutes or until pink and cooked throughout.

Nutrition

Calories: 372kcal | Carbohydrates: 3g | Protein: 24g | Fat: 29g | Saturated Fat: 4g | Cholesterol: 286mg | Sodium: 1442mg | Potassium: 169mg | Fiber: 1g | Sugar: 1g | Vitamin A: 21IU | Vitamin C: 7mg | Calcium: 193mg | Iron: 4mg


from The Recipe Critic https://ift.tt/37q1HzJ
https://ift.tt/2J9eKx2

बुधवार, 25 नवंबर 2020

Homemade Milano Cookies

Homemade Milano Cookies have tender cookies with a nice crunch sandwiched around a layer of rich dark chocolate in the center! They taste even better than the store bought version!

When it comes to holiday baking, nothing says love like homemade. Some of our other favorite cookies are Homemade Butter Cookies and Chocolate Peppermint Dipped Shortbread Cookies.Milano cookies staked together on a white dish.

Milano Cookies from Scratch

When it comes to store bought, packaged cookies, Pepperidge Farms makes some of my favorites. Like their wonderful milano cookies that have a light, buttery crunch and a snap from a good amount of dark chocolate in the center. But although it’s easy to pick up a bag at the store, I wanted to recreate them at home since I almost always prefer homemade over store bought anyway. Not only did these cookies turn out absolutely fabulous, they were fun to make too!An overhead shot of an milano cookie.

Milano Cookie Ingredients

  • Butter: I used salted butter.
  • Sugar: a combination of both regular granulated and powdered sugar does the trick for helping recreate the classic texture of the milanos we know and love.
  • Vanilla extra: you could even go the extra mile and use vanilla bean paste or vanilla bean seeds so you get that gorgeous little black speckles.
  • Eggs plus an extra egg white: adding an extract egg white along with the whole eggs helps given the airy structure to these crunchy cookies.
  • All purpose flour: of course you need some sort of flour to create cookies and these ones just need the regular all purpose variety.
  • Baking soda: Just a bit helps the cookies rise slightly in the oven.
  • Salt: a little salt helps bring out all the other flavors and keep the cookies from tasting bland.
  • Dark Chocolate: Use high quality chocolate that you chop yourself rather than trying to melt some chocolate chips. Trader Joe’s sells really excellent dark chocolate for a great price and it’s what I used here.

How to Make Homemade Milano Cookies

  1. Prep work: Preheat the oven to 325 degrees F and line two baking sheets with parchment paper.
  2. Combine wet ingredients: Beat butter, powdered sugar, and granulated sugar in the bowl of a stand mixer for 2-3 minutes until creamy and light. Add the eggs, egg white, and vanilla extract and beat again.
  3. Add dry ingredients: Add the flour, salt, and baking soda, mixing on low speed just until combined. Try not to overwork the dough or these cookies might turn out tough instead of light.
  4. Pipe the cookies onto parchment paper: Transfer the sticky dough to a piping bag fitted with a 1/2-inch round piping tip. Pipe 2-inch lines a couple inches apart on the parchment paper-lined baking sheets. The cookies will spread a bit, so leave enough space that they won’t touch while the bake.
  5. Bake: These cookies take 13-15 minutes per batch to bake just until the edges are barely turning golden brown. Cool completely.
  6. Melt chocolate: You can melt it in a glass bowl over a double boiler, or if you are careful, in the microwave using short 20 second bursts of heat, stirring between each burst of heat until melted and smooth. Continue to stir the melted chocolate as it cools to help temper the chocolate for a better snap between the cookies and so the sandwiched halves don’t slide apart.
  7. Fill the cookies: Spread melted, tempered chocolate onto the bottom of one of the cookies. You want a generous amount of chocolate, but not so much that it’s spilling off the sides. Gently press another cookie on top. Repeat with the remaining cookies, then let them sit until the chocolate has set completely.

Tips and Variations

  • Piping: I find that a piping bag with a tip is the easiest for me when working with this soft dough, but a large, heavy-duty zip-tight bag with the corner cut off would also work.
  • Filling the bag: It helps to use a tall cup and place your piping bag down into it with the upper part of the bag folded over the top. Then you can just use a rubber spatula to transfer the dough to the bag.
  • Mint milanos: If you want to make mint milanos, try adding 1/2 teaspoon of peppermint extract to the melted chocolate. If you want the mint flavor to be even stronger, just add more of the mint extract!
  • Other milano flavors: Pepperidge Farms makes quite a few other milano flavors and often has seasonal varieties like candy cane or pumpkin spice. Some of our favorites are coconut, raspberry, orange, and milk chocolate milanos, although there are others that we still haven’t tried. You can try using flavored oils or extracts to achieve some of these other flavors like orange or lemon.Milano cookies stacked together on a white dish.

How Long Will These Cookies Keep?

These homemade milano cookies won’t keep as long as the store bought variety because they are made with only real ingredients and lacking preservatives. Store them in an airtight container on the counter for 5-7 days.

You could also freeze them for up to 2 months in an airtight, freezer-safe bag. Just thaw on the counter before enjoying.Milano cookies in a paper dish.

More Amazing Cookie Recipes

  • Snickerdoodle Cookies
  • Brown Butter Chocolate Chip Cookies
  • White Chocolate Oreo Cookies
  • Peanut Butter Cornflake Cookies (No Bake)
  • Chocolate Crinkle Cookies
  • Buttery Lemon Shortbread Cookies with a Glaze
    Print

    Homemade Milano Cookies

    Homemade Milano Cookies have tender cookies with a nice crunch sandwiched around a layer of rich dark chocolate in the center! They taste even better than the store bought version!
    Course Dessert
    Cuisine American
    Keyword homemade milano cookies, milano cookies
    Prep Time 15 minutes
    Cook Time 14 minutes
    Total Time 29 minutes
    Servings 24 milanos
    Calories 228kcal
    Author Amy Nash

    Ingredients

    • 1 cup salted butter, at room temperature
    • 1 and 1/4 cups powdered sugar
    • 3/4 cup granulated sugar
    • 2 large eggs, room temperature
    • 1 egg white, room temperature
    • 2 teaspoons vanilla extract
    • 2 and 1/2 cups all-purpose flour
    • 3/4 teaspoon salt
    • 1/2 teaspoon baking soda
    • 8 ounces dark chocolate, chopped

    Instructions

    • Preheat the oven to 325 degrees F. Line two baking sheets with parchment paper.
    • Beat the butter, powdered sugar, and granulated sugar in the bowl of a stand mixer for 2-3 minutes until creamy and light. Add the eggs, egg white, and vanilla extract, then beat again, scraping the bottom and sides of the bowl.
    • Add the flour and salt, mixing just until combined.
    • Transfer the dough to a piping bag fitted with a 1/2-inch round piping tip. Pipe 2-inch lines a couple inches apart on the parchment paper-lined baking sheets, leaving enough room for the cookies to spread a bit in the oven. Bake for 13-15 minutes just until the edges are golden brown. Remove the cookies and cool completely.
    • Meanwhile, melt the chopped chocolate in a glass bowl set over, but not touching, simmering water in a pan, or in the microwave using short 20 second bursts of heat until melted and smooth.
    • Gently spread some of the melted chocolate onto the bottom side of half of the cookies, then sandwich with another cookie on top. The melted chocolate will firm up and set as it cools.
    • Store in an airtight container on the counter for up to 5 days.

    Nutrition

    Calories: 228kcal | Carbohydrates: 27g | Protein: 3g | Fat: 12g | Saturated Fat: 7g | Cholesterol: 36mg | Sodium: 173mg | Potassium: 92mg | Fiber: 1g | Sugar: 15g | Vitamin A: 263IU | Calcium: 13mg | Iron: 2mg


from The Recipe Critic https://ift.tt/3l23zDj
https://ift.tt/2JbdQQP

मंगलवार, 24 नवंबर 2020

The Absolute BEST Slow Cooker Turkey Breast

Slow Cooker Turkey Breast is the perfect way to get tender juicy turkey with a fraction of the prep, but all the flavor. Let the slow cooker do ALL the work!

Using the slow cooker for your turkey frees up the stove and oven for all the amazing sides. Combine this succulent Turkey with Roasted Autumn Vegetable Stuffing, Famous Mashed Potatoes, The Best Sweet Potato Casserole, The World’s Best Green Bean Casserole and some Parker House Rolls and you’ve got Thanksgiving, or any special occasion covered.

Turkey cut up on a white plate.

Turkey Breast in the Slow Cooker

I always make my turkeys in the oven. Why have I never made them in the slow cooker before? I love my slow cooker! It took me a total of 5 minutes to throw this into the slow cooker. In just a few hours, I had the most delicious, moist, and tender turkey that I have ever had in my life!

I have always wanted to try making turkey in the slow cooker. This was the perfect opportunity! It was a smaller turkey and just right for our family. This was the most moist and tender turkey I have had. Which makes sense because it seals in the moisture and cooks in the juices all day. I couldn’t believe how delicious this turned out! And the sauce that it cooked in all day gave it the perfect flavor. This will not just be a seasonal meal made at our house. We will be making this year round!

Turkey Breast Ingredients

This will take 5 min to put together and then let the slow cooker do the rest. Super simple and tastes amazing!

  • Turkey Breast: 5-6 pounds, make sure it fits in your slow cooker.
  • Orange Juice: Adds a nice zing
  • Whole Cranberry Sauce: Cranberries were made for turkey
  • Onion Soup Mix: One of the best flavors you can add to anything
  • Salt and Pepper: Add to taste

Turkey in a slow cooker.

Making Slow Cooker Turkey Breast

Sometimes you just don’t want or need to cook an entire turkey. Maybe it’s just a smaller crowd this year, or maybe your family made the turkey this year but you still want leftovers. Slow cooker Turkey Breast is the perfect way to satisfy your turkey cravings, whatever they maybe.

  1. Prep: Either use a slow cooker liner or spray your cooker with cooking spray. Make sure your Turkey Breast is thawed and place inside.
  2. Mix: In a separate bowl mix the cranberry sauce, onion soup, orange juice together and pour over the top. Sprinkle with salt and pepper.
  3. Cook: Cove and cook on low for about 8-9 hours or until a meat thermometer reads 165 degrees F. Remove and cover with foil and let it rest for at least 5-15 minute.

Preparing a turkey in the slow cooker.

Tips for Tender Turkey Breast

I love the flavor this imparts, it’s perfect, but you can always use a few tips right?!

  • Turkey: Can’t stress enough to make sure your turkey fits in the crock pot.
  • Bone-In: Having a bone in and skin on turkey imparts more flavor and moisture into your turkey. You can remove the skin before carving.
  • Rest:  Allowing the turkey to rest before carving gives the juices time to distribute evenly through the meat. It sounds weird but it’s totally true. Let it rest before cutting.
  • Veggies: You can add carrots, celery, onion chunked to the bottom of your slow cooker before you add the turkey if you’d like.
  • Crisp it: If you want a classic crispy top, place under the broiler for 5-8 minutes, basting as necessary.
  • How much to buy: Aim for buying 3/4 of a pound of turkey per a person. If you want leftovers, plan on a 1lb per person.
  • Thaw: Be sure to thoroughly thaw your turkey breast in the fridge for at least 24 hours. Do not thaw at room temperature.
  • Gravy: Make gravy to go with it!

Leftovers

  • Fridge: If you have any leftovers store them in the fridge in a tightly sealed container or even a freezer bag for up to 4-5 days.
  • Freeze in a freezer safe container or bag for up to 3 months,
  • Bone: Save and freeze the bone to throw in soup another time.

Turkey in a slow cooker.

More Turkey Loving Recipes

Print

Slow Cooker Turkey Breast

Amazing juicy and perfectly tender turkey breast that slow cooks all day in the crockpot!
Course Dinner, Main Course
Cuisine American
Keyword slow cooker turkey breast, turkey breast
Prep Time 10 minutes
Cook Time 8 hours
Total Time 8 hours 10 minutes
Servings 6 Servings
Calories 575kcal
Author Alyssa Rivers

Ingredients

  • 1 5 to 6 pound turkey breast make sure it will fit into your slow cooker
  • 1/2 cup orange juice
  • 1 14 ounce can whole cranberry sauce
  • 1 package Onion Soup Mix
  • salt and pepper to taste

Instructions

  • Line your slow cooker with a liner or spray with cooking spray. I like using a liner so that the clean up is easy. Place the thawed turkey into the crockpot.
  • Mix together the cranberry sauce, onion soup mix, and orange juice. Pour over the top of the turkey. Sprinkle the top with salt and pepper. I love using the Lawry's coarse seasoned pepper.
  • Cover and cook on low for about 8-9 hours or until your thermometer reads 180. Carefully remove your turkey and place it on a plate. Let it rest for 5 minutes before carving and enjoy!

Notes

I did not crisp the skin after it was done in the slow cooker.  If you want a crispy skin, then broil the turkey for 5 minutes.

Nutrition

Calories: 575kcal | Carbohydrates: 30g | Protein: 98g | Fat: 8g | Saturated Fat: 1g | Cholesterol: 245mg | Sodium: 969mg | Potassium: 1157mg | Fiber: 1g | Sugar: 29g | Vitamin A: 162IU | Vitamin C: 12mg | Calcium: 69mg | Iron: 3mg


Collage of slow cooker turkey breast photos.


from The Recipe Critic https://ift.tt/37aIKkq
https://ift.tt/360tPd2