गुरुवार, 28 जनवरी 2021

Baked Cream Cheese Salsa Dip (In a Bread Bowl)

I’m excited to partner with Reynolds Wrap® for this sponsored recipe.

This Cream Cheese Salsa Dip is thick, rich and creamy from the inside, out! It is the perfect appetizer for game days!

Dips are my favorite and are always so quick and easy to make! Our family loves this Hot Spinach Artichoke Dip, Insanely Delicious Hot Crab Dip and my famous 5 Minute Million Dollar Dip Recipe.

Cream Cheese and Salsa Dip

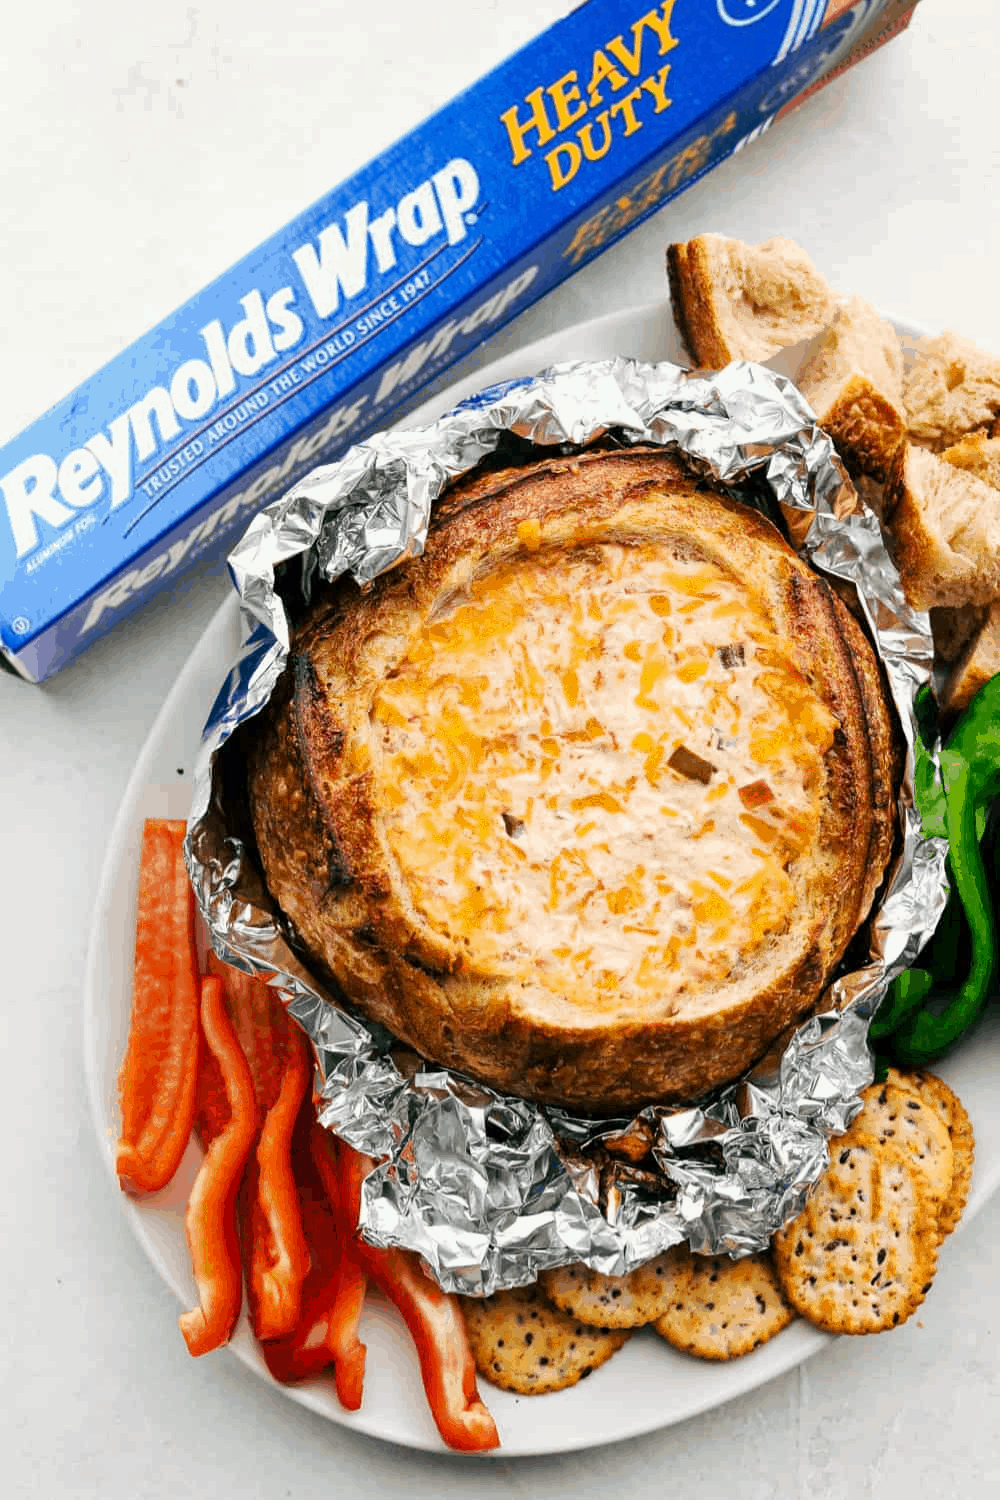
This is one of those recipes that is always a hit! Thanks for my friend Amy, who showed me the recipe years ago, I still can’t stop thinking about it. It is the best dip while watching the football game or playing games around the table. With simple ingredients, this recipe is ready in no time! I love the added bread bowl for extra taste and texture to hold with the cheese dip. As the dip starts running out, it is always fun to peel apart and start dipping the bread in the remaining cheese sauce. It is thick, rich and creamy with a hard outer shell to hold it all together!

I love using Reynolds Wrap® Heavy Duty Foil in this recipe because it creates a strong and tight wrap around the bowl. While this is bread bowl dip is baking, the foil also helps the bread bowl bake evenly, creating a crispy outside while maintaining a creamy, rich salsa dip on the inside. It is the perfect combination! Cream cheese and salsa dip is one of those dips that will be around for years to come. Dip with vegetables, chips, crackers and bread slices. It is always a family favorite and something that is easy to make even with the help of little hands!

Ingredients for Baked Cream Cheese Bread Bowl

This delicious bread bowl is loaded with cream cheese, sour cream, cheddar cheese, and salsa for a little extra kick. Together, these ingredients create the most delicious baked cream cheese bread bowl dip.

  • Cream Cheese: Soften the cream cheese the best that you can. Leaving it out on the countertop works great.
  • Sour Cream: Cools down the spice, but adds to the creamy part of this dip.
  • Salsa: Adds a little bit of spice and heat but not enough to make you sweat! It’s the perfect balance!
  • Cheddar Cheese: Freshly shredded cheese off the block is best for baking, but a bag of shredded cheese will work and can save on time.
  • Sourdough Loaf: Cut the top off the loaf and scoop out the inside of the bread to make a bread bowl.
  • Reynolds Wrap® Heavy Duty Foil: This thick and durable foil helps bake the bread bowl evenly and contains all the flavor wrapped up perfectly.

How to Make Cream Cheese Salsa Dip

It is quick and simple to make! Add all the ingredients together, place in a cut out bread bowl and wrap it up tightly using Reynolds Wrap® Heavy Duty Foil making sure the entire bread bowl is wrapped in foil for baking. All together this is the best dip and a family favorite!

  1. Mix Together: Preheat the oven to 350 degrees in a medium-sized bowl combine the cream cheese, sour cream, salsa, and cheese.
  2. Prepare the Bread Bowl: Cut the top off of the loaf and hollow out the loaf leaving a hole in the bread. Cut the remaining bread into cubes.
  3. Add Ingredients: Scoop the dip into the bread bowl. Using the foil, wrap the bread and seal. Place on a baking sheet and bake for 25-30 minutes or until it’s warm throughout. Place the remaining bread cubes on the baking sheet for the last 10 minutes of cooking.
  4. Enjoy! Serve with bread cubes, vegetables, and crackers.

Carving a Bread Bowl

Make your bread bowl from scratch using this No Knead Bread Recipe or pick your favorite kind of bread at your local grocery store. I love a good sourdough bread bowl or a Whole wheat one. The best size is a medium-sized bread bowl that is little enough to bake, but big enough to house all of the cream cheese dip. Once you have that ready it is an easy task to get started.

  1. Cut a large round out of the top of your bread bowl. This cut will be straight across.
  2. Using a spoon and knife carefully scoop out the center. Save all the extra bread pieces for dipping!
  3. Then fill with all the dip ingredients!

Why Use Reynolds Wrap® Heavy Duty Foil?

Reynolds Wrap® Heavy Duty Foil is thick and durable which holds things together and results in less mess. The rolls come in a wider 18-inch box making it easier for covering or lining larger roasting pans or foil packets like these Butter Garlic Herb Steak Foil Packets. Using something a little stronger is best to get the job done without worrying about tearing! Reynolds Wrap® is perfect for bigger and tougher recipes like this cream cheese salsa dip.

  • Lining Pans for use in the oven
  • Freezing meals ahead or storing leftovers
  • Making foil packets or lock in moisture and flavor when you grill, bake or cook.
  • Protects against both heat and freezing cold.

How to Wrap a Salsa Bread Bowl

Place the bread bowl filled with the cream cheese salsa dip in the middle of a piece of Reynolds Wrap® Heavy Duty Foil. Slowly and gently without the ingredients falling out, fold up each side of the foil and cover all around the bread bowl until you no longer see the bread bowl. Place in the oven and bake!

Tips and Variations for Making the Best Cream Cheese Salsa Dip

This cream cheese salsa dip is so fun to make. It is quick and easy and will be a family favorite for years and game days to come! With these tips and variations, you will be able to customize your appetizer just the way you like it.

  • Food Processor: Make this dip easily by mixing it using a food processor. Mix it until it’s smooth and creamy or more on the thick side. It is all in how you like it!
  • Add Ins: Any vegetables, spinach, corn or garbanzo beans even add in refried beans for a smooth texture.
  • Cheese: Add a little more spice with jalapeño jack cheese or a Mexican blend.
  • Salsa: Use any of your favorite salsas, chunky salsa, thin fresh salsa or my homemade garden salsa.
  • Protein: Add in shredded chicken or ground beef to create a more filling salsa dip. Even create a dinner with it!
  • Taco seasoning: Upgrade the cream cheese salsa dip with some taco seasoning to create a delicious Mexican style dip.
  • Add Toppings over top! Once cooked, sprinkle extra cheese, olives, tomatoes, or lettuce or sour cream to enhance the cream cheese salsa dip a little more.

Make Ahead!

I always love dips and appetizers that you can make ahead of time. This baked cream cheese salsa dip is just that! This simple recipe is quick to put together and will allow you to spend more time with your family. Simply mix the ingredients together and place in the bread bowl. Seal the bread bowl tightly with Reynolds Wrap® Heavy Duty Foil and place in the refrigerator until you are ready to bake it.This can be prepared one day in advance.

Make it the night before or throw it together before the game when the cravings hit! Grab chips, vegetables and crackers to start dipping. Watch it disappear quickly!

More Delicious Appetizers to Try

Print

Cream Cheese Salsa dip in a Bread Bowl

This Cream Cheese Salsa Dip is thick, rich and creamy from the inside, out! It is the perfect appetizer for game days and get togethers!
Course Appetizer
Cuisine American
Keyword cream cheese salsa dip
Prep Time 5 minutes
Cook Time 30 minutes
Total Time 35 minutes
Servings 12 People
Calories 267kcal
Author Alyssa Rivers

Ingredients

  • 1 8 ounce package cream cheese, softened
  • 1 cup sour cream
  • 1 cup salsa
  • 3 cups cheddar cheese shredded
  • 1 sourdough loaf or French bread loaf
  • Reynolds Wrap® Heavy Duty Foil

Instructions

  • Preheat oven to 350 degrees. In a medium sized bowl combine the cream cheese, sour cream, salsa, and cheese.
  • Cut the top off of the loaf and hollow out the loaf leaving a hole in the bread. Cut the remaining bread into cubes.
  • Scoop the dip into the bread bowl. Using the Reynolds Wrap® foil the bread and seal. Place on a baking sheet and bake for 25-30 minutes or until heated throughout. Place the remaining bread cubes on the baking sheet the last 10 minutes of cooking.
  • Serve with bread cubes, veggies, and crackers.

Nutrition

Calories: 267kcal | Carbohydrates: 24g | Protein: 12g | Fat: 14g | Saturated Fat: 8g | Cholesterol: 40mg | Sodium: 537mg | Potassium: 165mg | Fiber: 1g | Sugar: 3g | Vitamin A: 506IU | Vitamin C: 1mg | Calcium: 248mg | Iron: 2mg


from The Recipe Critic https://ift.tt/3afJdDa
https://ift.tt/3aaZwBk

Air Fryer Fried Pickles

Air Fryer Fried Pickles are the ultimate appetizer! They are tangy, zippy and perfectly seasoned!

Nothing beats an incredible appetizer, and these air fryer pickles are one of the best. Serve them up my other air fryer wonders like chicken wings, egg rolls and of course fries, for a scrumptious array.

Air Fryer fried pickles with sauce on a platter.

Air Fryer Fried Pickles

This air fryer recipe is going to rock your pickle loving world. The tasty seasoned breading combines magically with the briny zippy pickle. And air frying gives it a crispy crunch, free from all the extra fat from frying. It’s a guiltless, super easy and quick way to have an amazing appetizer in no time. The air fryer works by circulating hot air to give that golden crunch on the outside while keeping that crunchy pickle on the inside too. It’s going to be a family favorite.

This air fryer recipe takes my crispy fried pickle recipe to a whole new level. One of the best things about this fried pickle recipe is that all the mess is contained in the air fryer. I don’t have to clean up oil splatters from all over the kitchen from frying my pickles. And its hands off, meaning I can get more things done besides babysitting the fryer. It’s the best of everything. Insanely delicious, super easy and healthier than frying. You have to try these!

Ingredients for the Best Air Fried Pickles

This incredible air fryer pickle recipe takes only a few ingredients. It’s sure to be a hit at your next gathering. Simple and easy, it can’t get much better than this. Air fried to golden perfection, it’s a must try!

  • Dill Pickles: Try to find uniform in size sliced pickles.
  • Egg: This is the binder for the flour and seasoning.
  • Flour: Helps create a nice crust.
  • Water: Just a bit of extra binding to make sure it all sticks together.
  • Bread Crumbs: You can use seasoned bread crumbs if you desire. Panko will also work.
  • Parmesan: Use finely grated parmesan, it’ll adhere to the pickles the best.
  • Italian Seasoning: This is an excellent combination of winning seasonings.

Making Air Fryer Fried Pickles

Super easy and quick, you can have air fryer fried pickles in no time. It’s perfect for when you need a good appetizer fast or you just need a good snack. Since you don’t have to use extra oil, these are actually pretty good for you. A cup of pickles is only 17 calories but it does have a lot of sodium. I say eat away.

  1. Dry: Lay the pickles on a paper towel and pat dry.
  2. Bowls: You’ll need 3 small bowls. In the first small bowl add the flour.  The next, add the egg and whisk with the water. And in the third bowl add the breadcrumbs, parmesan, and Italian seasoning.
  3. Dipping Time: Dip each pickle in the flour, then the egg and lastly in the bread crumb mixture.
  4. Cook: Lay the pickles in a single layer in the air fryer basket.  Cook at 400 degrees for 8-10 minutes.  Serve with your favorite dipping sauce.


Battered pickles perfectly air fried.

What to Serve Fried Pickles With

Air fried pickles are incredible on their own, but every now and then you’re going to want to dunk them into something amazing. Here are a few ideas.

  • Fry Sauce: This amazing sauce was solely invented to go with french fries, but has quickly become a favorite dipping sauce for all sorts of things. Use it on these air fried pickles as well as on your favorite hamburgers. It is a grown up version of ketchup and it is divine.
  • Yum Yum Sauce: This popular sauce is light, sweet and tangy! An excellent choice for anything fried!
  • Cheese Sauce: Fried pickles will go perfectly with a rich thick cheesy sauce that’s going to knock your socks off.
  • Ranch Dressing:  This Air Fryer recipe was made to go with ranch dressing!
  • Make it Spicy: Make a spicy sauce of mayo, and sriracha mixed to taste. It is so good!

Tips and Variations for Air Fryer Fried Pickles

  • Pat them dry: You want your pickles to be as dry as possible. This will help them keep their crispy outsides as well as allow the incredible coating to stick.
  • Know Your Air Fryer: Every air fryer is a little different, so it’s important to know how yours cooks. If you’re still getting familiar with how your air fryer bakes, check your pickles often to make sure they don’t burn or if you need to add time.
  • Don’t over crowd: Make sure your pickles don’t overlap. If they do they’ll be soggy in those spots. You want the air fryer to be able to circulate all around the air fryer pickles. Cook them in batches if you need to.
  • Use Spears: You can totally use dill pickle spears with this air fryer recipe. You will just need to add on a few more minutes to the cook time.
  • Tongs:  I like to use tongs to dip the pickles to keep my fingers clean.
  • Same Size: Whether you use dill pickle chips or spears try to keep them the same size in the basket. The fried pickles will be able to cook evenly that way.

Storing Air Fried Pickles

Air fryer fried pickles are best eaten immediately from the air fryer. They will go soggy when stored. That being said leftovers are always a wonderful thing.

  • Store: Keep air fryer pickles in an airtight container in the fridge for up to 3 days.
  • Reheat:  To get the maximum crispiness out of your leftover air fried pickles, cook them in the air fryer at 400 for 2-3 minutes. You can also reheat them in the oven, but it will take longer.

More Fried Appetizer Goodness

Everyone loves fried food now and then. And when you’re going to have something fried, it better be worth the work and the calories. These “fried” appetizers are tried and true winners. Try them the next time you need a fried food fix.

Print

Air Fryer Fried Pickles

Air Fryer Fried Pickles are the ultimate appetizer! They are tangy, zippy and perfectly seasoned! 
Course Appetizer, Side Dish
Cuisine American
Keyword air fryer fried pickle, air fryer pickles, fried pickles
Prep Time 5 minutes
Cook Time 10 minutes
Total Time 15 minutes
Servings 4 People
Calories 167kcal
Author Alyssa Rivers

Ingredients

  • 2 cups dill pickle slices
  • 1/2 cup flour
  • 1 large egg
  • 1 Tablespoon water
  • 1/2 cup bread crumbs
  • 1/4 cup grated Parmesan
  • 1 Tablespoon Italian seasoning

Instructions

  • Lay the pickles on a paper towel and pat dry. In the first small bowl add the flour. In the second small bowl add the egg and whisk with the water. In the last bowl add the bread crumbs, parmesan, and italian seasoning.
  • Dip each pickle in the flour, then the egg and lastly in the bread crumb mixture.
  • Lay the pickles in a single layer in the air fryer basket. Cook at 400 degrees for 8-10 minutes. Serve with your favorite dipping sauce.

Nutrition

Calories: 167kcal | Carbohydrates: 25g | Protein: 8g | Fat: 4g | Saturated Fat: 2g | Trans Fat: 1g | Cholesterol: 52mg | Sodium: 839mg | Potassium: 150mg | Fiber: 2g | Sugar: 2g | Vitamin A: 274IU | Vitamin C: 1mg | Calcium: 153mg | Iron: 2mg


from The Recipe Critic https://ift.tt/3qYwoUB
https://ift.tt/3taLzMz

बुधवार, 27 जनवरी 2021

Air Fryer Frozen French Fries

These Air Fryer Frozen French Fries come out exactly like your favorite fast food fries! They are crispy, golden on the outside and perfectly soft on the inside. So much better than frying or baking!

Try these homemade, sweet potato and the baked fries in the air fryer. They are truly the best way to make potatoes!


Frozen French Fries cooked in the air fryer.

Air Fryer French Fries

Say goodbye to the guilt of indulging in french fries! When you are craving that salty, crispy hot fresh french fry, air frying is the only way to go. They taste just like they’ve been fried in oil, but they are not! They are so much healthier for you, and the taste is amazing. I used to bake my frozen french fries so I wouldn’t have to fry them and I’d feel better about serving them to my family. But the taste and texture always fell a little short. You have to try this air fryer recipe. It will change the way you eat your french fries forever.

Air Frying has changed the way I cook so many things. From steak, to chicken, to even pizza, the air fryer makes them faster, healthier and so much better. With this air fryer frozen fry recipe you get all the taste and texture of fried french fries but without all the oil and fat and so much faster than in the oven. It’s a total winner in my book.

Ingredients for Air Fryer Fries

As you can guess, there are not too many ingredients to this simple recipe. Pick your favorite brand and type of frozen french fries. These are so good, you’ll want to keep a few bags in the freezer so you always have them on hand.

  • Frozen French Fries:  16 oz bag is all you need. If you have a bigger bag you’ll need to cook them in batches.
  • Salt to Taste:  I really like to use season salt here.
  • Olive Oil Spray:  Just to help the salt stick to the fires.

Let’s Make some French Fries!

These frozen fries become transformed by the air fryer! In a matter of minutes you have incredible fries ready to be devoured. It’s a total meal saver when you need a side dish to go with your ultimate tuna melt or toasted cheese. Or just when you need a salty good snack.

  • Place:  Place your frozen fries in the air fryer basket.
  • Season:  Spray with olive oil lightly and sprinkle with desired salt.
  • Bake: Air fry at 400 degrees for 10 minutes. Give the basket a good shake and cook for 5-8 minutes more or till done as you like them.


Up close picture of french fries in air fryer basket.

Tips for the Best Air Fryer Frozen Fries

  • Shake it up: To make sure your fires all get crispy and cooked evenly be sure to toss them gently half way through. You’ll want to rotate the bottom to the top and move them around. You can shake them up more than once, if you’d like. Some air fryers rotate, but you’ll still want to check and see how they’re doing half way through.
  • Don’t Overfill:  For frozen fries you don’t want to fill your air fryer more than half to 3/4 full. You do not have to put frozen fries in a single layer, but you for do not want to over crowd the basket. You may end up with undercooked fries.
  • Crispier:  Depending on the thickness and type of fry you use, you might need to increase or decrease the cooking time. The longer you cook the fries, the crispier they will become.

Different types of Fries

There are several types of fries and so they will cook a bit differently. These are good suggestions for starting times.

  • Crinkle-Cut/Waffle Fries: 10-11 minute
  • Sweet Potato Fries: 16 minute
  • Lattice Cut Fries:  10-11 minute
  • Shoestring Fries: 8-10 minute

How to Serve Air Fryer Frozen French Fries

These french fries are going to be so tempting you may not need to worry about serving them with sauces. They’ll be gone before you can get them out of the basket. But if you can keep the fingers out of the air fryer, there are many ways to serve these frozen french fries. Ketchup is the original sauce that was made for french fries, but there are other sauces to dunk these air fryer fries in.

  • Fry Sauce: This amazing sauce was solely invented to go with french fries. It’s a grown up version of ketchup and it is divine. In my home it has replaced ketchup and mayo on hamburgers even. It’s so good!
  • Yum Yum Sauce: This popular sauce is light, sweet and tangy! An excellent choice!
  • Cheese Sauce: Cover the golden fries in a rich thick cheesy sauce that’s going to knock your socks off.
  • Ranch Dressing:  As my kids would say, everything’s better with ranch dressing!
  • Make your Own Sauce: Mix your favorite spices with a bit of mayo and ketchup to create a unique sauce of your own. Add chipotle chili powder, garlic powder, and onion powder with mayo and ketchup for a spicy western sauce that’s awesome. There are lots of possibilities.

French fries on a plate with ketchup.

More Air Fryer Recipes to Try

I love using my air fryer for as much as possible these days. It makes the best main dishes, side dishes and even desserts. If you are new to the air fryer world here are some tried and true air fryer recipes to get you started. You are going to love these.

Print

Air Fryer Frozen French Fries

These Air Fryer Frozen French Fries come out exactly like your favorite fast food fries! They are crispy, golden on the outside and perfectly soft on the inside. So much better than frying or baking!
Course Side Dish
Cuisine American
Keyword air fryer french fries, air fryer fries, air fryer frozen french fries
Prep Time 5 minutes
Cook Time 15 minutes
Total Time 20 minutes
Servings 4 People
Calories 295kcal
Author Alyssa Rivers

Ingredients

  • 16 ounce bag frozen French fries
  • salt to taste I like to use seasoning salt
  • olive oil spray

Instructions

  • Place the frozen fries in the basket of your air fryer. Sprinkle with salt and spray lightly with olive oil spray.
  • Cook for 400 degrees for 10 minutes. Shake the fries and cook for an additional 5-10 minutes until crispy.

Nutrition

Calories: 295kcal | Carbohydrates: 34g | Protein: 3g | Fat: 17g | Saturated Fat: 5g | Sodium: 556mg | Potassium: 488mg | Fiber: 5g | Vitamin C: 7mg | Calcium: 10mg | Iron: 1mg


from The Recipe Critic https://ift.tt/36eZ7wk
https://ift.tt/3t2sps4

मंगलवार, 26 जनवरी 2021

Slow Cooker Italian Beef

Tender and juicy, this Slow Cooker Italian Beef is mouthwateringly amazing! This recipe is fork tender with a tangy zippy broth. You are going to love it!

Beef Bourguignon, Crack Chicken and Jambalaya are all slow cooker favorites that you have to add to your rotations. The slow cook just intensifies the flavors like no other!

Slow cooker Italian beef with pepperoncini.

Delicious Italian Beef

You may be thinking as you look at this insanely delicious Italian beef that it looks a lot like my Mississippi Pork Roast, but these are truly different. And I’m here to tell you, that you need both in your life. This slow cooker beef is zesty, and infused with intense Italian flavor. This slow cooker Italian beef makes the best sandwiches! But don’t take my word for it, you have to try it!

Slow cooker recipes are the best. I love being able to through this together and then let the slow cooker do all the work. The aroma that fills your house will be incredible. This recipe is so easy, it comes together quickly after searing the beef to a crusty perfection.  Just combine the rest of the ingredients and let it cook till it falls apart. The hardest part of this recipe will be having to wait till it’s done.

Ingredients for Italian Beef Sandwiches

Look for roasts in the meat section of your grocery store. Be sure to get a chuck roast. They are the queen of roasts. The dressing mix and seasonings combine with the zippy, and tangy pepperoncini for a must try taste. You and your family will LOVE this slow cooker recipe!

  • Chuck Roast: 3-4 pounds.
  • Salt and Pepper: To taste, rubbing it all over the roast.
  • Oil: Canola or another high smoke oil.
  • Beef consommé: Beef broth will work here too.
  • Dry Italian Salad Dressing: Intensifies the flavoring.
  • Garlic Powder: Everything’s better with garlic.
  • Italian Seasoning: The perfect combination of spices for this roast.
  • Jar Sliced Pepperoncini: Don’t drain the pepperoncini.
  • Butter: Creates a deep richness to the roast.
  • Hoagie Rolls: Any type of bun will do.
  • Provolone Cheese: Sliced.

How to Cook Italian Beef in a Slow Cooker

Searing the roast is the only hands on part to this Italian beef recipe. Then you dump the rest in the slow cooker and let the magic happen. You can remove the roast to shred it, return it to the juices to absorb even more flavor before serving.

  1. Roast: Salt and pepper the beef roast.
  2. Sear: Heat a large skillet over high heat with the canola oil. Add the roast and sear each side for 2-3 minutes until it forms a golden seared crust. Place the roast in a 5 quart slow cooker.
  3. Combine: Add the beef consommé, Italian seasoning, garlic powder, Italian dressing and pepperoncini to the slow cooker. Top roast with butter slices.
  4. Cook: Cook on low for 8-10 hours or high for 5-6 hours. Shred the roast with a fork.
  5. Sandwiches: Serve on hoagies topped with provolone cheese and additional pepperoncini if desired.

Forks shredding tender Italian Beef.

Slow Cooker Tips and Variations

Slow cooker recipes are super easy to make. It takes just a little bit of effort to put it all together and then you get to leave it alone for hours! You can go about your day knowing you’re have dinner practically already done. It’s such a satisfying feeling.

  • Sear: Searing meat is a must for slow cooking roasts. It caramelizes the natural sugars in the meat and browns the proteins. It creates this awesome brown crust on the surface of the meat amplifying the flavor.
  • Shredding: For the best flavor shred the beef and then return the Italian beef to the slow cooker and the savory juice. Let it heat for another 30 minutes to really allow all that flavor seep into the nooks and crannies.
  • Drain:  Use a slotted spoon to remove the beef from the slow cooker once ready to serve, so it doesn’t make your hoagies soggy.
  • Toast: I prefer to toast the hoagie buns for optimal flavor and to help them from getting too soggy. Place on a cookie sheet and broil till desired doneness.
  • Cheese: Provolone is a mild flavored wonderful melty cheese that goes perfectly with the Italian beef. But you can use cheddar, mozzarella, colby jack or even pepper jack for a bit of spice.
  • Top it: Besides the cheese, feel free to add more pepperoncini, roasted red peppers, or sautéed onions for extra flavor and variety.
  • Serve it differently:  This slow cooker Italian beef is awesome all by itself, you don’t have to serve it on a bun. Serve it on top of rice or mashed potatoes. Stir it into pastas like mac and cheese or these garlic mushroom noodles.

What Kind of Roast Should I Use

There are many roasts out there to choose from and it can be confusing if you are not familiar with them.

  • Kinds of Roasts to use: In this slow cooker recipe you can use top round, bottom round, shoulder or chuck roast. The roast that cooks best, however, is the boneless chuck roast. The marbling helps the meat fibers to break down into that iconic melt in your mouth texture, just like in this Melt in Your Mouth Pot Roast.
  • What if my Roast isn’t tender?  If you notice your roast isn’t falling apart at the touch of a fork, then it needs more time to cook. Every slow cooker is different and no two roasts are the same size. Your roast could take up to two hours longer to get to that perfect sweet spot. Your Italian beef may only need 30 minutes too. Just check it and be a bit patient. It’ll be worth it I promise.

Storing and Reheating Italian Beef

Slow cookers are still hands down one of the best ways to cook insanely delicious meals. The beautiful thing about slow cooker Italian beef is that it gets better with time. The flavors just keep infusing more and more the longer it sits. It’s so yummy!

  • Storing: Make sure to store leftover Italian beef in its juices. You can drain what you don’t need but make sure there is some. Store in a covered container for up to 4-5 days.
  • Freezing: Store the beef in some of its juices in a sealable heavy duty freezer bag. Squeeze out any extra air to prevent freezer burn. Keep for up to 3 months.
  • Reheat: You can reheat thawed meat in the microwave, stove top or even back in the slow cooker.

Italian Beef on a hoagie with cheese.

More Slow Cooker Sandwich Recipes to Try

Like I’ve said before the slow cooker method of cooking is just one of the best ways to cook. It allows meat to soak up all the flavors and for the meat to break down into melt in your mouth tenderness. Slow cooker sandwiches are juicy, flavorful and fabulous!

Print

Slow Cooker Italian Beef

Tender and juicy, this Slow Cooker Italian Beef is mouthwateringly amazing! This recipe is fork tender with a tangy zippy broth. You are going to love it!
Course Dinner, Main Course
Cuisine American, Italian American
Keyword italian beef, slow cooker italian beef
Prep Time 20 minutes
Cook Time 8 hours
Total Time 8 hours 20 minutes
Servings 4 Hoagie Rolls
Author Alyssa Rivers

Ingredients

  • 3-4 pounds beef chuck roast
  • salt and pepper
  • 2 tablespoons canola oil
  • 2 cups beef consommé or Beef broth
  • 1 package dry Italian salad dressing
  • 1 teaspoon garlic powder
  • 1 Tablespoon italian seasoning
  • 12 oz jar sliced pepperoncini drained
  • 1/4 cup butter sliced
  • 4 hoagie rolls
  • 8 slices provolone cheese

Instructions

  • Salt and pepper the beef roast. Heat a large skillet over high heat with the canola oil. Add the roast and sear each side for 2-3 minutes until it forms a golden seared crust. Place the roast in a 5 quart slow cooker.
  • Add the beef consommé, italian seasoning, garlic powder, italian seasoning and pepperoncini to the slow cooker. Top roast with butter slices.
  • Cook on low for 8-10 hours or high for 5-6 hours. Shred the roast with a fork. Serve on hoagies topped with provolone cheese and additional pepperoncinis if desired.


from The Recipe Critic https://ift.tt/3a8OuMG
https://ift.tt/2KPIwId