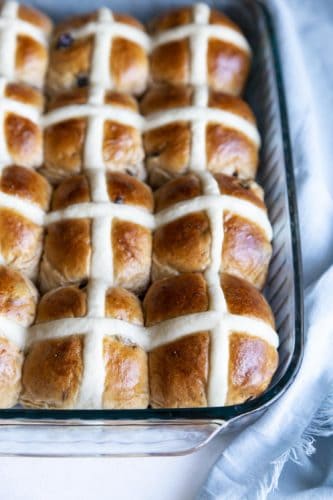
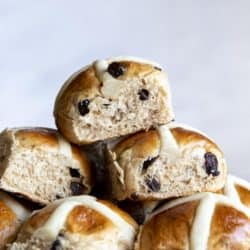
These Hot Cross Buns are an Easter tradition you are going to want to make all year long. Soft, spiced and full of flavor, this is the perfect recipe for your Holiday.
Hot Cross Buns are a traditional Easter bread that graces tables either on Good Friday or on Easter. Other Easter favorites of mine includes Ham, Lamb and Cheesy Potatoes.

Homemade Hot Cross Buns
Hot Cross Buns are an Easter tradition that everyone will love, whether you celebrate Easter or not. Bread is one of the ultimate comfort foods and these buns bring just that to the table. There are so many tasty creations when it comes to bread, hot cross buns is just one of them. This recipe is simple and perfect for beginners to experts. It is super delicious and easy to master. You have to try these for your next complete dinner!
Even if you do not celebrate Easter, you can enjoy these enriched buns filled with spices and dried fruit. They are tender, soft and have wonderful flavor. These would make a great breakfast or brunch roll served with a Breakfast Casserole or Yogurt Parfait. A favorite way to eat Hot Cross Buns is to toast them with a bunch of butter. So yummy! You have to include delightful buns at your next spring occasion.
Easy Hot Cross Buns Ingredients
Making Hot cross buns is just as easy as making bread. The butter, milk and sugar will create a rich dense dough that will need all the time you can give for rising. All of these ingredients are simple to find and use.
- Whole Milk: Yes, whole milk will work best. 2% is ok but your buns will not be as rich.
- Granulated Sugar: Adds sweetness and richness.
- Unsalted Butter: Make sure it is at room temperature.
- Instant Yeast: (Or Active Dry Yeast)
- All-Purpose Flour: Unbleached flour will work too.
- Kosher Salt: Needed for flavor and balance.
- Cinnamon: Adds intense flavor.
- A Pinch Of Nutmeg: Just a pinch will do it.
- Dried Fruits: (Raisins, Currants, Craisins, Figs, Or A Mixture)
- Extra Flour For Rolling: No one wants their dough to stick.
- Oil Or Butter For Bowl And Baking Pan: Either will work perfectly.
- Flour And Water: This creates the cross over top the dough before baking.
- Egg and Whole Milk: this will make the egg wash that will be over the hot cross buns.
Preparing the Dough
To get the best results you will need to allow lots of time for your dough to rise. The milk, sugar and butter create a rich soft texture that will take longer to proof than regular non-enriched dough.
- Scald: In a medium saucepan, heat milk and sugar over medium heat, stirring frequently until simmering. Turn off the heat and add butter to the hot milk, stir until completely dissolved. Allow the mixture to cool to at least 110°F.
- Add Yeast: Sprinkle the yeast over the warm milk mixture, stir and allow it to bloom for 5 – 10 minutes.
- Flour Mixture: Add flour, salt, cinnamon and nutmeg to the stand mixer bowl and stir to distribute evenly. Toss in the dried fruits. I used a mixture of craisins and chopped dried figs.
- Create Dough: When the yeast is bubbly, add the yeast/milk mixture to the flour mixture. Knead with the dough hook on speed 2 for about 10 minutes. The dough should start pulling away from the side of the bowl.
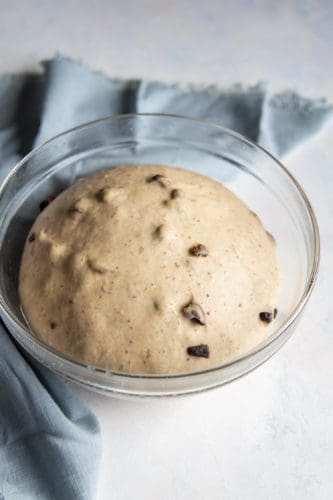
- First Rise: Oil a glass bowl and your hands. Scrape the dough out of the mixing bowl and shape it into a ball on a lightly floured surface and place it in the oiled bowl. Cover, and let rise in a warm place for 1 – 2 hours until at least double in size.
- Prep Pan: Oil or butter a 9×13” baking dish and set aside.
Second Rise on Your Buns
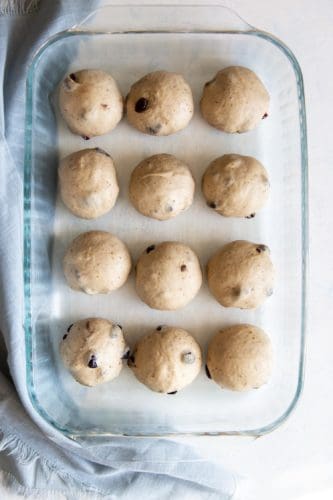
- Shaping: When the dough is ready, dump it out onto a floured countertop and divide it into 12 equal portions. Knead and shape each portion into a small ball, place dough balls into the prepared baking pan, and allow to rise the second time for 30 minutes to an hour.
- Oven: Preheat the oven to 400°F.
- Egg Wash: Beat an egg with a tablespoon of whole milk to make egg wash. Brush egg wash on top of the risen buns generously.
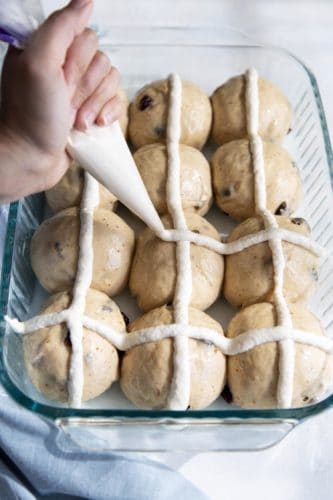
- Cross: To make the cross, mix flour and 5 tablespoons of water in a small bowl until a soft pipe-able paste forms, add more water if the paste seems too thick. Transfer the paste to a piping bag or a zip top bag and snip the corner to create a small hole. Pipe the flour paste on top of the buns in a cross pattern.
- Bake: Bake for 20 – 25 minutes until the top is golden brown. Allow to cool to the touch on a wire rack. Best served slightly warm.

Tips and Variations for Perfect Hot Cross Buns
Everyone loves a good bun. They are soft and scrumptious. Warmed or toasted with a bit of butter, they practically melt in your mouth. Spiced with cinnamon and nutmeg and sweetened with dried fruit, they are a bit of heaven.
- Yeast: When working with yeast there are a few things to remember. First you need to feed it, usually this is done with some type of sugar. The second thing to remember is that it needs warm water to grow, but if you get it too hot, you’ll kill it. That is why you need to make sure you do not add the hot milk mixture till it reaches 110 degrees, an ideal temperature to grow, but not kill yeast.
- Be Patient: One of the biggest mistakes when working with yeasted breads is not allowing it enough time to rise. The hot cross bun dough should double in size each time. The fat in the milk and butter that make taste so good also slows the rise of the yeast. Check it often, and once it has doubled in size or is close move on to the next step. If you gently push on the dough it should spring back. Do not let it over rise though, that will create flat rolls.
- Make it Sweet: For a variation for the cross, omit the paste. Cook as normal and add the cross decoration with frosting. Mix ¾ cup powdered sugar, 1 teaspoon vanilla and 2-3 Tablespoons of milk. Pipe the cross on completely cooled buns.
- Spices: If you like a bit more spice to your hot cross buns trying adding in allspice, cardamom, and or more nutmeg, all to taste.
- Fruit: Dried fruit of some sort is tradition. If you are not a fan of them in your buns, you can omit them. Take note that the dried fruit adds sweetness and flavor, however.
- Sticky: Keep in mind the hot cross bun dough is meant to be a bit sticky. Use parchment on the bottom of your pan if you don’t want to spray it.

Storing your Hot Cross Buns
If you are like me, I love to have buns or roll leftovers. They give me something to look forward to the next day. So making sure these hot cross buns are as good on the second day as the first is important.
- Store: Make sure the hot buns are no longer hot, but cooled completely before storing. Place buns in an airtight container or plastic air tight bag. I prefer the bags as I can get all the air out of them and keep them from drying out as fast. Keep at room temperature for 2-3 days. If you use a frosting cross, note that they might get messy to try to store in a single layer.
- Freezer: These buns can be frozen for up to 3 months in an airtight freezer safe bag.
- Reheat: Hot cross buns are luscious either toasted or warmed for about 8-10 seconds in the microwave with a bit of butter.

More Bread Dishes
- Easy Homemade Naan
- Miracle No Knead Bread
- Award Winning Banana Bread
- Grandma’s Perfect Homemade Bread
- Quick 45 min Cinnamon Rolls
Hot Cross Buns
Ingredients
Bread
- 1 ¼ cup whole milk
- ¼ cup granulated sugar
- 3 oz unsalted butter
- 1 packet instant yeast or active dry yeast
- 3 cup all-purpose flour
- 1 teaspoon kosher salt
- 1 teaspoon cinnamon
- A pinch of nutmeg
- 1 cup dried fruits raisins, currants, craisins, figs, or a mixture
- Extra flour for rolling
- Oil or butter for bowl and baking pan
Cross
- ½ cup all-purpose flour
- 5 - 6 tablespoon water
- Egg wash
- 1 large egg
- 1 tablespoon whole milk
Instructions
-
In a medium saucepan, heat milk and sugar over medium heat, stirring frequently until simmering. Turn off the heat and add butter to the hot milk, stir until completely dissolved. Allow the mixture to cool to at least 110°F.
-
Sprinkle the yeast over the warm milk mixture, stir and allow it to bloom for 5 - 10 minutes.
-
Add flour, salt, cinnamon and nutmeg to the stand mixer bowl and stir to distribute evenly. Toss in the dried fruits. I used a mixture of craisins and chopped dried figs.
-
When the yeast is bubbly, add the yeast/milk mixture to the flour mixture. Knead with the dough hook on speed 2 for about 10 minutes. The dough should start pulling away from the side of the bowl.
-
Oil a glass bowl and your hands. Scrape the dough out of the mixing bowl and shape it into a ball on a lightly floured surface and place it in the oiled bowl. Cover, and let rise in a warm place for 1 - 2 hours until at least double in size.
-
Oil or butter a 9”x13” baking dish and set aside.
-
When the dough is ready, dump it out onto a floured countertop and divide it into 12 equal portions. Knead and shape each portion into a small ball, place dough balls into the prepared baking pan, and allow to rise the second time for 30 minutes to an hour.
-
Preheat the oven to 400°F.
-
Beat an egg with a tablespoon of whole milk to make egg wash. Brush egg wash on top of the risen buns generously.
-
To make the cross, mix flour and 5 tablespoons of water in a small bowl until a soft pipeable paste forms, add more water if the paste seems too thick. Transfer the paste to a piping bag or a zip top bag and snip the corner to create a small hole. Pipe the flour paste on top of the buns in a cross pattern.
-
Bake for 20 - 25 minutes until the top is golden brown. Allow to cool to the touch on a wire rack. Best served slightly warm.
Nutrition
from The Recipe Critic https://ift.tt/3uuHovq
https://ift.tt/3aOtbli