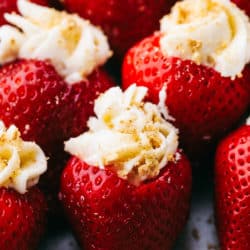
Cheesecake Stuffed Strawberries are juicy fruit bites filled with the perfect cream cheese filling and sprinkled with a graham cracker crumb. This easy and quick dessert is unbelievably delicious and impossible to resist!!
Simple additions to fresh fruit can make such a big impact. Try Chocolate Covered Strawberries or Red, White, and Blue Stuffed Cream Cheese Strawberries for more ideas on how to liven up this beautiful red fruit in time for the 4th!

Cheesecake Stuffed Strawberries
With the 4th of July coming up, strawberry recipes are on my mind because of their beautiful red color. Fresh strawberries are irresistible even without adding a thing to them! But, these cheesecake stuffed strawberries have taken the already amazing strawberry and made it so good! They are super simple and easy to make and the freshness of the strawberry really shines.
These stuffed strawberries turned out so soft and sweet! The creamy filling has a hint of tanginess from the cream cheese that balances out the sweetness from the strawberry and powdered sugar. The graham cracker crumb on the outside creates the perfect crunch to balance out the textures. An entire batch of these was gone in minutes at my house. These are a MUST try for a festive and vibrant dessert everyone will go crazy over!
Ingredients for Stuffed Strawberries:
This short list of ingredients includes staples for most great dessert recipes. The most important ingredient you will see is the strawberries. They are the star of the recipe so pick bright red, healthy looking strawberries. Get a ton, because you will want to make a ton of these delicious stuffed strawberries!
- Cream Cheese: Adds a mild sweet and tangy flavor and a smooth creamy filling in the strawberry.
- Powdered sugar: Sweetness!
- Vanilla: The vanilla brings out all the other flavors and adds a rich flavor of its own as well.
- Strawberries: Fresh and juicy and beautifully red!
- Crushed Graham Cracker: The perfect crispy crumb to add a small crunch to each bite.
Let’s Get Started!
You really can’t go wrong with this recipe! It starts with the freshest juicy strawberries, then they get filled with a sweet creamy filling. Finally, they get sprinkled with a graham cracker crumb. So easy and so delicious!
- Mix together cheesecake filling: In a stand mixer or using a hand mixer combine cream cheese, powdered sugar, and vanilla and beat until smooth and creamy. Fill mixture in a piping bag.
- Prepare strawberries: Core out each strawberry and fill with cream cheese mixture.
- Add topping: Top with crushed graham cracker.
- Enjoy!

The Most Amazing Cheesecake Stuffed Strawberries:
This crowd favorite recipe is so quick and easy and impossible to mess up! Also, it is highly unlikely to leave you with any leftovers to store. However, things do happen, so here are a few tips just in case.
- Cutting: Use a small pairing knife or melon baller to easily core out the strawberries.
- Filling: If you do not have a piping bag you can put the filling in a ziploc bag and cut off the corner instead.
- Graham Cracker Crumb: Crush about 4 rectangular graham crackers by placing them in a resealable bag and rolling over them with a rolling pin.
- Patriotic Theme: Add a blueberry on top or drizzle with a blue white chocolate for the full red, white, and blue color scheme.
- Storing: Place in an airtight container for up to 3 days in the refrigerator. If you are making these ahead, store the graham cracker crumb separately and sprinkle on at the last minute since it will get less crisp as it sits.

More Strawberry Dessert Recipes:
- Strawberry Tart
- Strawberry Swirl Cheesecake Oatmeal Cookie Bars
- Very Berry Cheesecake Salad
- Strawberry Cobbler
- The Easiest Strawberry Pie
Cheesecake Stuffed Strawberries
Ingredients
- 1 8 ounce cream cheese softened
- 1/2 cup powdered sugar
- 1 teaspoon vanilla
- 1 pound strawberries
- 1/4 cup crushed graham cracker for topping
Instructions
-
In a stand mixer or using a hand mixer combine cream cheese, powdered sugar, and vanilla and beat until smooth and creamy. Fill mixture in a piping bag.
-
Core out each strawberry and fill with cream cheese mixture. Top with crushed graham cracker.
Nutrition
from The Recipe Critic https://ift.tt/2BOwaLE
https://ift.tt/2NIodtX