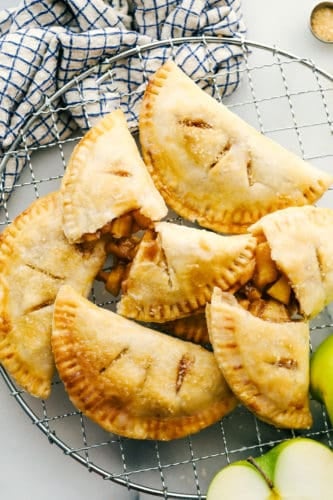
Seriously Amazing Air Fryer Hand Pies are an easy way to have dessert! Tender sweet spiced apples in a flakey crust you can hold in your hand!
Plan a whole dinner using the air fryer. Start with Brown Sugar Garlic Air Fryer Salmon, Air Fryer Crispy Parmesan Brussel Sprouts and Homemade Air Fryer French Fries. End it with these pies for a dinner to remember!

Sweet and Savory Hand Pies
The title says it all! These are seriously amazing! Sweet, tart filling surrounded a sugary flakey crust. Brings back memories of those pies you could get at the store or your favorite drive thru, only better. These will be perfect for a party, family gathering or just because. The options are endless. Dip these luscious vittles in caramel or drizzle with frosting. Warm and delicious they’re the perfect after dinner treat.
Get the whole family involved. Kids especially love to help fill these with their favorite fillings and fold them and of course eat them. You could use this as an activity for a family gathering or children’s party. It’ll be the hit of the day. I love the fact that I can hand them a pie and shew them outside to play. They take the mess with them and I don’t have to worry about it. They’ll love that they can eat a pie with their hands and not get in trouble or super messy! It is the perfect dessert!
Ingredients for Apple Hand Pies
These are as simple as apple pie, truly! If you have the ingredients for apple pie on hand you can make these. Make sure to use tart apples for the best flavor.
- Butter: Don’t sub out the butter for something else
- Granny Smith Apples: These make the best apple pies
- Cinnamon: Best flavor with apples
- Brown Sugar: Brown sugar combines incredibly with the cinnamon
- Cornstarch with Water: This is the thickener for the pie filling
- Refrigerated Pie Crusts: Makes this the easiest thing ever.
- Egg mixed with Water: Creates the shine on the pies.
- Powdered Sugar: Sweet powdered sugar
- Milk: To mix with the sugar
- Course Sugar for topping: This is optional but makes a fun crunchy topping.
Making Hand Pies in an Air Fryer
These really are quite simple to make. Using pre-made pie crusts make it even easier. You can use homemade pie crust with just as much success. Using the air fryer makes them a little bit healthier then frying them. And it gives them a crispy crust all the way around. No soggy bottoms here! Enjoy these beautiful pies today!
- Pie Filling: In a medium sized saucepan melt the butter over medium high heat. Add in the apples, cinnamon and brown sugar and sauté until tender. In a small bowl mix the cornstarch and water and add it to the saucepan. Continue to cook until it starts to thicken. Remove from heat.
- Roll: Roll out the pie crusts and cut 4 inch circles using a small round bowl.
- Fill: Place a tablespoon of apple filling to one half of the circle leaving a 1/2 inch edge. Wet the edges of the circle and fold and seal the edges with a fork. Cut three slits into the top of the pies.
- Top: In a small bowl whisk the egg and water and brush the top of the hand pies.
- Fry: Place the hand pies into the basket of your air fryer. Cook at 350 degrees for 8-10 minutes or until golden brown.
- Glaze: While the hand pies are cooking in a small bowl add the powdered sugar and milk. Once you remove the hand pies form the air fryer brush with the glaze and sprinkle with sugar.

Why Are Mini Hand Pies So Amazing?
I honestly can’t think of any down sides to this these little hand held desserts. So, why not make them today! Here are all the good reasons you need to make these as soon as possible!
- Individual Servings: No more worrying about eating too much since these are perfectly proportioned. This serves two purposes. One you won’t have a tendency to overeat, like I do sometimes. And second you can make sure you have enough servings for everyone there.
- Less Mess: With hand held pies you don’t have to serve them on plates or use forks. Just hand them out with a napkin and our set. None of the goodness gets left on the plate. It goes all in the tummy.
- Easy: It doesn’t take any more time to make these than a pie and it’s faster.
- Variations: These are so easy to vary. You can stuff them with whatever you want, see below!

Tips for Hand Held Pies
These might just be the best thing to ever happen to pie!
- Chop: Make the apples slices small. It’ll be easier to fit the filling in the pies.
- Crust: Don’t let the scraps go to waste. Gather them up and re-roll out the crust for more pies. These are too good to let anything not go unused.
- Shape: You can keep these in a circle, simply place another on top and seal with a fork. Cut into rectangles and fold in half, or squares and fold corner to corner for triangles.
- Double: Double the pie filling and make extras. You’ll need them. I promise.
- Can I bake these: Of course! Just because you don’t have an air fryer doesn’t mean you can’t get in on the goodness. Bake 375 for 24-30 min.
Freezing and Storing The Perfect Hand Pie
- Freeze: You can freeze these two ways. Make a batch and before frying them freeze them. Wrap individually in plastic wrap and place in a large freezer safe plastic bag. They’ll keep for up to 3 months. Or bake as directed and freeze individually wrapped. When ready to use fry the unbaked pies the same as directed, just add a few more minutes to the cooking time. For cooked pies simply thaw overnight in the fridge and reheat in the microwave or air fryer for a few minutes till heated through.
- Store: Baked pies will keep in the fridge for up to a week. Reheat as desired, microwave, oven or air fryer.

Variations for Homemade Hand Pies
The wonderful thing about these hand pies is that they are so easy to vary. If you have a favorite pie filling you can probably make it in these pies. Try these sweet or savory variations and more!
- Cherry
- Blackberry
- Peach
- Raspberry
- Pumpkin
- Coconut and Chocolate
- Blueberry
- S’mores
- Make them savory too, try chicken pot pie, ham and cheese, or chicken and mushroom.

More Air Fryer Recipes to Love
If you have an air fryer you’ve got to try these recipes! If you don’t have an air fryer then it’s probably time. These are the perfect starters if you are new to it. And if you’re a veteran then add these to your repertoire!
- Perfect Air Fryer Steak with Garlic Herb Butter
- Air Fryer Baked Sweet Potatoes
- The Best Air Fryer Chicken Breast
- Perfect 10 Min. Air Fryer Shrimp
- The Best Crispy Parmesan Chicken Tenders

Air Fryer Hand Pies
Ingredients
- 4 tablespoons butter
- 2 Granny Smith apples diced
- 1 teaspoon cinnamon
- 1/4 cup brown sugar
- 1 teaspoon cornstarch
- 1 tablespoon water
- 2 refrigerated pie crusts
- 1 large egg
- 1 Tablespoon water
- 1/2 cup powdered sugar
- 2 Tablespoons milk
- coarse sugar
Instructions
-
In a medium sized saucepan melt the butter over medium high heat. Add in the apples, cinnamon and brown sugar and sauté until tender. In a small bowl mix the cornstarch and water and add it to the sauce pan. Continue to cook until it starts to thicken. Remove from heat.
-
Roll out the pie crusts and cut 4 inch circles using a small round bowl. Place a tablespoon of apple filling to one half of the circle leaving a 1/2 inch edge. Wet the edges of the circle and fold and seal the edges with a fork. Cut three slits into the top of the pies. This tool is amazing too!
-
While the hand pies are cooking in a small bowl add the powdered sugar and milk. Once you remove the hand pies from the air fryer brush with the glaze and sprinkle with sugar.
Notes
Nutrition
from The Recipe Critic https://ift.tt/3mWENFJ
https://ift.tt/3hrrFap