Alyssa Rivers August 05 लेबलों वाले संदेश दिखाए जा रहे हैं. सभी संदेश दिखाएं

गुरुवार, 5 अगस्त 2021

Insanely Delicious Air Fryer Coconut Shrimp

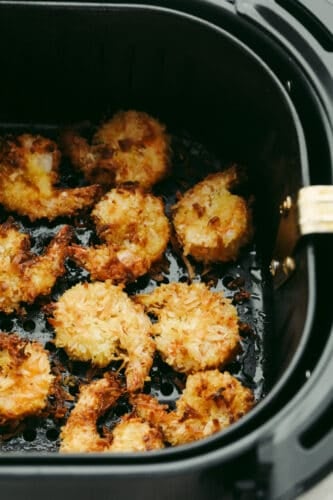
Coconut shrimp is insanely delicious! One of the best appetizers out there, these mouthwatering air-fried coconut shrimp are crispy, lightweight, and completely delightful! This appetizer is one that is sure to have your guests coming back for more!

Cooking coconut shrimp in the air fryer is a quick and easy way to have your favorite dish without all of the added oil. It’s healthier but somehow just as tasty! Try some of these other amazing air fryer recipes such as air fryer fried pickles, these 5-minute air fryer biscuit pizzas or these delicious air fryer corn dogs!

Shrimp in the air fryer.

Why Cook Coconut Shrimp With an Air Fryer?

Cooking with an air fryer is a great way to get that traditional taste of fried foods without all of the extra oil! I love using my air fryer for that reason! It’s such a simple and easy way to maintain the delicious taste. Plus, because I don’t have to deal with any oil splatters, it makes clean-up a breeze! Did you know that by using just 1 tablespoon of cooking oil rather than a couple of cups of it to deep fry your recipe, you get the same great results but at a fraction of the fat? It’s a win, win situation!

I also love that when I use the air fryer that I don’t have to compromise on taste! These air-fried coconut shrimp provide that same golden, crispy texture on the outside and the delicious, juicy shrimp on the inside. Using the air fryer also allows me to focus on other tasks in the kitchen while these are cooking. It eliminates my need to stand next to the stove monitoring them the entire time. That way, I can have delicious coconut shrimp AND be focused on cooking other dishes because these are so easy once you pop them in and wait for them to be finished!

Ingredients for Air Fryer Coconut Shrimp

Simple yet satisfying, these air fryer shrimp will be sure to deliver on taste and texture! See the full recipe below for exact ingredient measurements!

  • Large shrimp: Make sure that the shrimp is peeled with the tails left on and deveined.
  • Eggs: Eggs create a sticky base for the breadcrumbs and coconut.
  • Flaked coconut: Make sure that the coconut flakes are unsweetened.
  • Panko breadcrumbs: These breadcrumbs will be the key ingredient in getting that crispy texture!
  • All-purpose flour: This creates a base for all of the ingredients used to cover the shrimp. 
  • Garlic powder: This will give you a hint of garlic flavor that compliments the coconut! 
  • Paprika: Garnishing with paprika is optional but it will add a slight sweet pepper flavor, without any added heat.
  • Salt: Adding the salt to the dish will help to bring out all of the other flavors. 
  • Black pepper: Freshly ground black pepper will give a slight hint of heat to the taste without making it too spicy or hot

Instructions for Air Fryer Coconut Shrimp

This recipe is SOO delicious that you will think that you ordered it from a restaurant! This air fryer shrimp brings a delicious flavor and crispy golden texture without being drenched in oil!

  1. Beat and combine: Beat eggs in a small bowl and set aside. Combine breadcrumbs and coconut in another bowl and set aside. Lastly, combine flour and spices in a 3rd bowl.
  2. Dip and coat: Dip shrimp in small batches in the flour mixture then the egg mixture. Next, let the excess drip off the shrimp and then coat in the coconut/breadcrumb mixture, pressing to adhere.
  3. Cook and flip: Place the shrimp in the basket of the air fryer. Cook at 360 degrees for 10 minutes flipping halfway through or until shrimp is cooked throughout.
4 pictures of step by step instructions on how to add breaded coating to shrimp.

Tips for Cooking Coconut Shrimp

Shrimp seems like it should be a complicated dish since it’s available at every restaurant, but it’s not! Follow these quick tips and in return, you will come out with an amazing dish and wondering why you haven’t tried them before!!

  • Dry your shrimp: Make sure that you pat your shrimp dry with a paper towel. This will help the flour stick to the shrimp.
  • Preheat the air fryer: If you preheat your fryer beforehand, it will create a good sear on food and have a crispy outside texture.
  • Keep the tails on: Make sure to leave the tails on your shrimp. It makes them easier to eat! 
  • Use fresh shrimp (or make sure yours is fully thawed): The breading won’t stick to frozen shrimp so make sure the shrimp is fresh and fully thawed.
  • Don’t layer the shrimp: Make sure that you only lay a single layer of shrimp in the basket at once so that you ensure even cooking.
  • Don’t forget to flip: Remember to flip your shrimp halfway through. This will give each side of your shrimp to obtain that crispy, golden texture on the outside!  
  • Parchment liners: If you are using parchment liners with holes in your air fryer, do not place liners in the air fryer during preheating. 
Air fried shrimp on a platter with some dipping sauce.

How to Store and Reheat Leftover Air Fryer Coconut Shrimp

These shrimp are so delicious that you might want to save some for tomorrow’s meal too! Here are a few tips on how you can store and reheat these delicious shrimp!

  • Refrigerator: Once they are cooled completely, place the leftover shrimp in a ziplock bag or an airtight container and store in the refrigerator for 1-2 days.
  • Reheat: To reheat your shrimp the next day, follow these simple instructions: Turn your air fryer to 350°F degrees. Put your leftover fried shrimp in (one layer at a time). Reheat them for 3 to 4 minutes until they are golden and crispy.
Air fried shrimp being dipped into sauce.
Print

Insanely Delicious Air Fryer Coconut Shrimp

Coconut shrimp are insanely delicious! One of the best appetizers out there, these mouthwatering air fried coconut shrimp are crispy, lightweight and completely delightful! This appetizer is one that is sure to have your guests coming back for more!
Course Dinner, Main Course
Cuisine American
Keyword air fryer coconut shrimp, coconut shrimp
Prep Time 5 minutes
Cook Time 10 minutes
Total Time 15 minutes
Servings 4 people
Calories 344kcal
Author Alyssa Rivers

Ingredients

  • 1 pound large shrimp about 25 peeled (tails left on), deveined
  • 2 large eggs
  • 1 cup flaked unsweetened coconut
  • 1/2 cup panko breadcrumbs
  • 1/2 cup all-purpose flour
  • 1/2 teaspoon garlic powder
  • 1/2 teaspoon paprika optional
  • Salt and freshly ground black pepper

Instructions

  • Beat eggs in a small bowl and set aside. Combine breadcrumbs and coconut in another bowl and set aside. Lastly, combine flour and spices in a 3rd bowl.
  • Dip shrimp in small batches in the flour mixture then the egg mixture (letting the excess drip off the shrimp and then coat in the coconut/breadcrumb mixture, pressing to adhere.
  • Place the shrimp in the basket of the air fryer. Cook at 360 degrees for 10 minutes flipping half way through or until shrimp is cooked throughout.

Nutrition

Calories: 344kcal | Carbohydrates: 24g | Protein: 23g | Fat: 18g | Saturated Fat: 13g | Polyunsaturated Fat: 1g | Monounsaturated Fat: 2g | Trans Fat: 1g | Cholesterol: 236mg | Sodium: 741mg | Potassium: 314mg | Fiber: 4g | Sugar: 2g | Vitamin A: 339IU | Vitamin C: 1mg | Calcium: 97mg | Iron: 2mg


from The Recipe Critic https://ift.tt/3AruhO3
https://ift.tt/37nvrxq

Crispy Parmesan Garlic Chicken With Zucchini

Crispy parmesan garlic chicken with zucchini is a fantastic one-pan meal that the family will love. Crispy chicken is breaded with an amazing parmesan garlic crust paired with tender zucchini sautéed to perfection!

With easy prep, no mess, and big flavor, one-pan meals are the best! Vegetable curry, chili lime chicken, and fajitas are some of my other favorites to add to the dinner lineup this week!

Cooked parmesan garlic chicken and zucchini in a white bowl.

One-Pan Parmesan Garlic Chicken With Zucchini Recipe

Zucchini is my favorite vegetable, so as you can imagine, I get pretty excited when it is actually in season! My favorite way to eat zucchini is to sauté it until tender. I decided to put my favorite textures together in this dish- fresh and tender zucchini with flavorful, crispy chicken. Enhancing these tasty foods with the amazing flavors of parmesan and garlic seemed like the best course of action from there, and boy did it create a mouthwatering dish! It coats the chicken perfectly and gives the whole dish an incredible crispy texture. The awesome thing about this recipe is that I had all of the ingredients on hand. So, for those times when you are staring into the depths of your pantry, wondering what you can make that is tasty, healthy, and not overly time-consuming, this crispy chicken with zucchini recipe is the answer.

My entire family devours it. We cannot get enough of the crispy flavorful crust on the chicken. And the best part of it all? It is packed with protein while also being low in fats and carbs! Honestly, this is like the healthy, KFC-Esque dinner of my dreams. As if you needed more reasons to make this, it all goes in one pan, leaving you with fewer dishes to do! Just 30 minutes will create a nutritious, keto-friendly meal loaded with savory and crispy goodness. Your wallet, diet, and stomach will thank you.

Chicken With Zucchini Ingredients

This is the perfect recipe for using leftover zucchini and chicken breasts! Just a few additional pantry staples with leave you with the most flavorful, delicious result. You can find each individual measurement in the recipe card below.

  • Chicken Breasts: For this recipe, I use boneless and skinless chicken breasts. You can either slice 2 large breasts in half or use 4 thin chicken breasts.
  • Butter: This will be used for sauteing. Also, it gives your chicken and zucchini a tasty rich flavor and helps them to cook up perfectly.
  • Italian Bread Crumbs: I like using Italian bread crumbs for a touch of flavor, but you can also opt for whole wheat bread crumbs to keep it health-conscious.
  • Grated Parmesan: Parmesan is what is going to give your dish its perfect, cheesy flavor. It also crisps up perfectly to help you achieve the best texture!
  • Flour: I use all-purpose flour in this recipe to give structure to the breading. You can also use whole wheat flour as an alternative.
  • Zucchini: I use medium-sized zucchini in this recipe, sliced.
  • Garlic: Fresh garlic makes all the difference in getting the perfect, savory flavor. Minced cloves work best.

How To Make Crispy Parmesan Garlic Chicken and Zucchini

You are going to love how easily this recipe comes together for those quick weeknight dinners! You get restaurant-quality flavors without all the effort.

  1. Prepare Skillet: In a large skillet, over medium heat melt 2 Tablespoons of butter.
  2. Bread Chicken: Melt remaining 4 tablespoons of butter in a shallow dish. In another shallow dish combine bread crumbs, parmesan cheese, and flour. Dip the chicken in the butter and then coat in the bread crumb mixture and place in skillet.
  3. Cook: Cook on each side for about 3-4 minutes until the outside is crispy and the chicken is cooked throughout. Set aside on plate.
  4. Saute Zucchini: Add 2 Tablespoons of butter back to the skillet and saute the minced garlic for a minute. Add the zucchini to the skillet and saute until tender. Salt and pepper to taste and add 1 Tablespoon parmesan. Add the chicken back to the skillet and heat for a minute or so. Serve immediately.
The process of making chicken and zucchini in a skillet.

Parmesan Garlic Chicken and Zucchini Quick Tips

This dish is super easy and super delicious, but try out some of these simple tips to get the best result every time!

  • Season Chicken: You can season your chicken with salt and pepper or Italian seasoning before breading for an extra pop of flavor.
  • Breading Will Not Stick: If you are having trouble getting your breading to stick, make sure your skillet is hot and butter is melted. Then, once you add your chicken to the pan, try not to move it until that side has cooked completely. Moving it prematurely can pull off all the crispy goodness.
  • Use a Thermometer: To avoid overcooking your chicken, I always recommend using a thermometer. Stop cooking once your internal temperatures reach 165 degrees Fahrenheit. Otherwise, you could end up with chicken that is too dry.
  • Zucchini: You will want any zucchini you use to be slightly firm. If it is too soft, it won’t get that perfect tender sautéed texture. Also, keep the skin on! It isn’t hard to bite through and actually has a lot of nutritional benefits like stimulating collagen production and boosting your immune system!
  • Uniform Slices: It is important to try and keep zucchini slices roughly the same size so they cook at the same rate.

Storing Leftover Parmesan Garlic Chicken and Zucchini

Not only is this recipe easy to make, but it also stores like a champ! Kids can easily heat it up for a tasty, nutritious lunch.

  • In the Refrigerator: Chicken and zucchini will keep in an airtight container for 3-4 days.
  • In the Freezer: In an airtight container, store your chicken and zucchini in the freezer for up to 2 months. Thaw overnight before reheating.
  • Reheating: The best way to retain moisture in your chicken while also keeping it crispy is to reheat it in a skillet. Cook over medium until internal temperatures reach 165 degrees Fahrenheit. Stir zucchini pieces often to ensure they cook through completely.
Close-up of crispy parmesan garlic chicken and zucchini.

What to Serve With Crispy Parmesan Garlic Chicken

Parmesan garlic chicken and zucchini is a dish that can easily be served on its own. But for more healthy carbs, you could serve this up with a scoop of brown rice. It also tastes amazing alongside other crispy foods like fries or chips. Have an overload of zucchini at home? You could even make baked zucchini fries as a healthier side.

Slice cut out of parmesan garlic chicken with zucchini.


Print

Crispy Parmesan Garlic Chicken with Zucchini

Crispy parmesan garlic chicken with zucchini is a fantastic one-pan meal that the family will love. Crispy chicken is breaded with an amazing parmesan garlic crust paired with tender zucchini sautéed to perfection!
Course Dinner, Main Course
Cuisine American
Keyword chicken and zucchini, crispy chicken and zucchini
Prep Time 5 minutes
Cook Time 20 minutes
Total Time 25 minutes
Servings 4 Servings
Calories 418kcal
Author Alyssa Rivers

Ingredients

  • 2 Chicken Breasts sliced in half, or 4 thin chicken breasts
  • 8 Tablespoons butter divided
  • ½ cup Italian Bread Crumbs
  • ½ cup plus 1 Tablespoon grated parmesan divided
  • ¼ cup flour
  • 2 medium zucchini sliced
  • 2 garlic cloves minced

Instructions

  • In a large skillet over medium heat melt 2 Tablespoons butter. To make the chicken: Melt the remaining 4 tablespoons of butter in a shallow dish. In another shallow dish combine bread crumbs, parmesan cheese, and flour. Dip the chicken in the butter and then coat in the bread crumb mixture and place in skillet.
  • Cook on each side for about 3-4 minutes until the outside is crispy and the chicken is cooked throughout. Set aside on plate.
  • Add 2 Tablespoons of butter back to the skillet and saute the minced garlic for a minute. Add the zucchini to the skillet and saute until tender. Salt and pepper to taste and add 1 Tablespoon parmesan. Add the chicken back to the skillet and heat for a minute or so. Serve immediately.

Notes

Updated on August 4, 2021 
Originally Posted on July 24, 2016

Nutrition

Calories: 418kcal | Carbohydrates: 17g | Protein: 27g | Fat: 27g | Saturated Fat: 15g | Cholesterol: 133mg | Sodium: 532mg | Potassium: 453mg | Fiber: 1g | Sugar: 1g | Vitamin A: 763IU | Vitamin C: 2mg | Calcium: 42mg | Iron: 2mg

Save


from The Recipe Critic https://ift.tt/2KNenUb
https://ift.tt/2VnsSch