Alyssa Rivers September 07 लेबलों वाले संदेश दिखाए जा रहे हैं. सभी संदेश दिखाएं

मंगलवार, 7 सितंबर 2021

Rye Bread

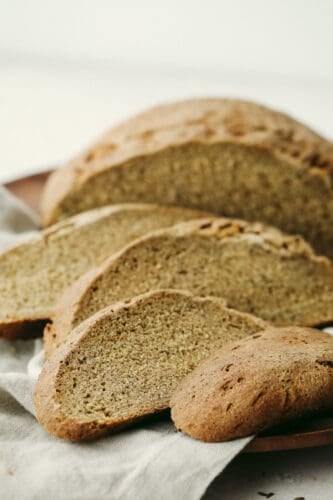
Rye Bread is a soft light loaf of heavenly flavor and a crust that’s to die for! Super easy and wholesome, you and your loved ones are going to love this homemade bread!

Rye is rich deep slightly sour flavored bread perfect for slicing and toasting. Try this full-bodied bread as Avocado Toast, Grilled Cheese, or make the BEST Corned Beef Sandwich Ever!
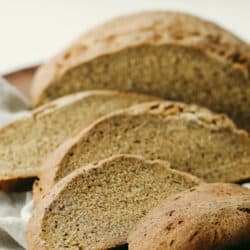
Slices of rye bread ready to eat.

Delicious Rye Bread

Rye bread gets a bad rap sometimes, people either love it or they hate it. If you have been on the fence about rye bread then you have to try this recipe. It will change the way you feel about rye! This delicate loaf is light with a tender crumb and crusty crust. The combination of caraway, molasses, and flours creates the perfect balance of flavors so it’s not overwhelming or too powerful. It’ll be just perfect! This recipe couldn’t be any easier too. Just mix, knead and rise. The slashes on the loaf will help the loaf keep its shape and forms a fun design.

I love using this homey bread to make Reuben sandwiches or slice it and toast it to have with a steamy bowl of Stuffed Cabbage or Cheese Soup. If you are new to rye bread then use medium rye flour which is lighter than dark rye flour. The dark rye flour has a slightly natural molasses flavor that when combined with the molasses in the recipe is rich and deep in flavor. The medium rye flavor will give a more balanced flavor, but both are absolutely amazing. Either way you have to try this recipe. You are going to love it!

Ingredients Needed For Rye Bread

The sweetness and deep full flavor of molasses, combined with rye and caraway create the classic rye flavor. Making it from scratch is way easier than you think. Rediscover the beauty of rye bread again.

  • Packet Active Dry Yeast: This is the same as 2 ¼ tsp or ¼ ounce of yeast.
  • Molasses: Use a good quality molassess, but avoid black strap, as it isn’t as sweet.
  • Whole milk room temperature: If you need to bring it to room temperature quickly you can microwave it on 50% power in 1 minute intervals till slightly warm.
  • Salt: This is probably one of the most important ingredients in bread. It helps bring out and enhance the flavor of bread, do not skip it.
  • Vegetable oil: I like to use canola oil, it has a mild flavor so I know it won’t adjust the flavor at all.
  • Bread flour: This has a higher content of protein which will create more gluten, and more gluten is what will give the bread its structure and rise.
  • Whole wheat flour: If you can find Whole Wheat Bread flour, use that, otherwise regular whole wheat flour will be just fine.
  • Rye flour: This is essential for creating the flavor and color.
  • Caraway seeds: This is the traditional seed in rye bread that gives the rye bread it’s classic flavor.

How to Make Rye Bread

If you can make bread, you can make rye bread. This loaf can take longer to rise than some other loaves, so be patient. The wait will be worth it, I promise.

  1. Dissolve: In the bowl of a mixer combine the warm water (about 105°), molasses, and yeast. Let sit for about 5 minutes until the yeast is nice and frothy.
  2. Combine and Knead: Add in the milk, salt, vegetable oil, bread flour, whole wheat flour, rye flour and caraway seeds. Use the hook attachment to mix on low until combined and then bring the speed up to medium and knead for about 8-10 minutes until the dough is smooth.
  3. Let it rise: Oil a large bowl and transfer the dough into it. Cover it with a kitchen towel and set the bowl aside in a warm place for about 1 ½-2 hours, or until the dough has doubled in size.
  4. Shape: When the dough has doubled, punch it down and turn out onto a clean counter. Allow it to rest for about 5 minutes before using your hands to gently pull the dough on the counter to shape it into a round loaf. Place the loaf carefully on a parchment lined baking sheet. Cover and allow to rise for another hour.
  5. Bake: About 40 minutes into the second rise, preheat the oven to 425°. Slash the bread with a sharp knife or a bread lame. Place in the oven and bake for about 30-35 minutes, until golden brown.
  6. Cool: Allow the loaf to cool for at least 20 minutes before slicing.
Dissolving the yeast, adding the rest of the ingredients and letting it rise.

Tips for Making Homemade Rye Bread

Rye Bread is dense, aromatic dark bread that is perfect for sandwiches or toasting and enjoying with butter or a schmear of cream cheese. It requires a few special ingredients but they make all the difference in the best rye bread!

  • Rye Flour: Most grocery stores will have dark rye flour available, sometimes just called rye flour. This is the one you want. If you happen to buy light rye flour, it will yield a lighter bread with a less intense flavor.
  • Bread Flour AND Whole Wheat Flour: You certainly could use just rye flour and bread flour in this recipe, but the addition of whole wheat flour gives this loaf a much heartier texture. If you want to have a higher rising loaf, I would suggest replacing the whole wheat flour with all-purpose flour.
  • Caraway Seeds: Don’t skip these! The caraway seeds are what give this loaf that distinct rye bread flavor. They’re rich and earthy and absolutely a necessity in this recipe!
  • Slow Rise: Rye bread takes longer to rise, so it may take a bit of patience to wait for the loaf to double in size. The second rise typically goes slower than the first.
  • Shaping The Loaf: Rye dough is not as elastic as bread dough made with wheat flour, so it can take some work to ge it shaped. I’ve found it’s best to shape it well before the first proof and then gently pull it back into the ball shape after punching it down.
Formed round loaf of rye bread with cuts on a lined cookie sheet.

Storing Homemade Rye Bread

Homemade Rye Bread doesn’t have any preservatives in it, so the shelf life is just a few days at room temperature but can be extended an extra day or two if kept in the fridge.

Room Temp: Store the bread in an airtight container or a large ziplock bag for 2-3 days.

Fridge: Extend your bread’s shelf life to 4-5 days when stored in an airtight container or large ziplock bag in the fridge. It’s best to let it come to room temperature before slicing.

Freshly baked rye bread.
Print

Rye Bread

Rye Bread is a soft light loaf of heavenly flavor and a crust that's to die for! Super easy and wholesome, you and your loved ones are going to love this homemade bread!
Course Bread
Cuisine American
Keyword rye bread recipe, rye read
Prep Time 20 minutes
Cook Time 30 minutes
Rise 3 hours
Total Time 3 hours 50 minutes
Servings 12 slices
Calories 156kcal
Author Alyssa Rivers

Ingredients

  • ½ Cup Warm Water
  • 1 packet Active Dry Yeast
  • 2 Tablespoons Molasses
  • 1 cup Whole milk room temperature
  • 1 ½ teaspoons salt
  • 2 tablespoons vegetable oil
  • 1 ¼ cup bread flour
  • ½ cup whole wheat flour
  • 1 ½ cup rye flour
  • 2 tablespoons caraway seeds

Instructions

  • In the bowl of a mixer combine the warm water (about 105°), molasses, and yeast. Let sit for about 5 minutes until the yeast is nice and frothy.
  • Add in the milk, salt, vegetable oil, bread flour, whole wheat flour, rye flour and caraway seeds. Use the hook attachment to mix on low until combined and then bring the speed up to medium and knead for about 8-10 minutes until the dough is smooth.
  • Oil a large bowl and transfer the dough into it. Cover it with a kitchen towel and set the bowl aside in a warm place for about 1 ½-2 hours, or until the dough has doubled in size.
  • When the dough has doubled, punch it down and turn out onto a clean counter. Allow it to rest for about 5 minutes before using your hands to gently pull the dough on the counter to shape it into a round loaf. Place the loaf carefully on a parchment lined baking sheet. Cover and allow to rise for another hour.
  • About 40 minutes into the second rise, preheat the oven to 425°. Slash the bread with a sharp knife or a bread lame. Place in the oven and bake for about 30-35 minutes, until golden brown.
  • Allow the loaf to cool for at least 20 minutes before slicing.

Nutrition

Calories: 156kcal | Carbohydrates: 27g | Protein: 5g | Fat: 4g | Saturated Fat: 2g | Polyunsaturated Fat: 1g | Monounsaturated Fat: 1g | Cholesterol: 2mg | Sodium: 302mg | Potassium: 174mg | Fiber: 3g | Sugar: 4g | Vitamin A: 37IU | Vitamin C: 1mg | Calcium: 44mg | Iron: 1mg


from The Recipe Critic https://ift.tt/3jN7gPQ
https://ift.tt/3h9ATJC

Halloween Charcuterie Board

This Halloween charcuterie board is a ghoulish treat for any party! A spooky twist on your classic cheese board, it’s filled with fruit, crackers, and meat and sure to be everyone’s favorite!

The snack tray that just keeps on giving is definitely a charcuterie board! This has something for everyone and it’s a snack that is meant to please! If you want a few more Halloween food ideas, try out these Mummy Hot Dogs, Crazy Good Roasted Pumpkin Seeds, and Mummy Mini Pizzas! They are all so delicious, you will love them!

Halloween charcuterie board.

Charcuterie Boards

For those of you around here that are new to charcuterie boards, let me explain them to you! Charcuterie (pronounced shar-koo-tuh-ree) boards are also called cheese boards or snack boards! Made up of typically meats and cheeses, a charcuterie board is a fantastic way to serve an appetizer that has a variety of foods to keep everyone happy! They are always beautifully displayed and look so appetizing!

The best part about a charcuterie board is that you can make it whatever you want! If you love a specific type of food or meat or cheese and want them to be included, then you add those! There is no “right way” to make one. I love that about them because it makes them different every time! You just need a serving board to start with and you will be well on your way to serving a spooky and delicious board at your next Halloween party!

What Cheese Should I Use for my Charcuterie Board?

The first step to making your Halloween charcuterie board is going to be to add your cheeses. When you are doing this, make sure to pick out cheeses that have different textures as well as colors! I went to my local grocery store and they had a large selection of cheese to choose from. You want to have a good variety! For this recipe, I used the following cheeses:

  • Double Cream Brie
  • Green Goddess Gouda
  • Blueberry Vanilla Chèvre
  • Merlot Bellavitano
  • Smoked Gouda (I used this for the “Boo” pictured above)

If those cheeses aren’t available or you would like to add more, I would suggest a cheddar, a Gruyere, or another hard cheese like Parmigiano Reggiano! As I said, make this your own and you can’t go wrong! Cheese is delicious and something that everyone loves!

Adding cheese to a board.

Spreads for a Halloween Charcuterie Board

To add a little bit of variety in taste and texture, I like to add a few things that my guests can use to go with the foods on the board. Depending on your board you can change up the spread! Try using different flavors of jam, hummus, olive oil, ranch dip, or even salsa! They are simple and really take this up a notch. For this charcuterie board I used:

  • Pesto
  • Apricot jam
  • Honey
Spreads being added to a black board.

Meats to Use on a Charcuterie Board

The savory meats are my favorite part to add to a Halloween charcuterie board! They add in some extra color and dimension because you can shape them however you want! For this board, I used the following meats:

  • Prosciutto di parma
  • Italian Dry Salami

Again, these are just the meats that I grabbed! Feel free to try some other ones or use more in addition to these! A few other delicious types of meats that I would suggest are ham, pepperoni, calabrese salami, and genoa salami.

Meat on a charcuterie board.

What Fruit Should I Use?

Because this is a Halloween charcuterie board, I wanted to pick out fruit that was darker in color to add to the “spooky” vibe that I was going for and make it work for this season! So keep color in mind when you are picking this out. Depending on your holiday or occasion, the fruit is an especially easy part to switch up to make things look different! Here are the fruits that I used in this Halloween one!

  • Strawberries
  • Black Grapes
  • Blackberries
  • Blueberries
  • Dried Apricots

A few other fruits that you could use are kiwi, raspberries, or purple grapes! Just consider your season and make sure that you have a variety in shape and color!

A charcuterie board with fruit being added.

Choosing Crackers and Nuts

For this part, you will want to pick out some tasty crackers that complement all of the other ingredients! I like to choose crackers and nuts of various shapes and sizes and you could even do some gluten-free options in case you have guests that have food restrictions! The crackers and nuts that I used for this board were:

  • Pistachios
  • Red Crackers

I also love to use walnuts and almonds and any type of crackers that I have on hand! This part is easy because no matter which ones you choose, crackers and nuts tend to go with everything!

Zoomed in picture of a charcuterie board.

Let’s Put it ALL Together!

Now that you have all of the perfect ingredients, it’s time to put it all together!! Charcuterie boards are the absolute best way to make something completely unique for any season! Change it up and add exactly what you like and it will be a huge hit with your family and friends!!

  1. Add the cheese: Start Assembling your board by adding the cheeses. Cut a pumpkin shape into the brie and fill with jam.
  2. Put in the spreads: Next add the honey, green olives, and pesto. 
  3. Meat: Add in the meats and fruit.
  4. Nuts and crackers: Fill the board in with crackers and pistachios.
  5. Decorate: Use a skelaton hand, some candy eyeballs and some black netting to make this fit just perfectly at your Halloween party!
A Halloween charcuterie board.

Charcuterie Board Tips

Being creative with a charcuterie board is going to be the key to its success! Here are a few tips to make simple variations and make them your own!

  • Shapes and colors: Keep in mind the season or holiday you are making this for when you are choosing things for your board! You can pick colors and shapes and tastes that go along with each particular time and event!
  • Change up the menu: A charcuterie board doesn’t HAVE to be meat and cheese. Make one for a kids party using fruits, candy and crackers. All things that your kids will love!
  • Add decorations: An easy way to spot exactly what event a charcuterie board is for is to decorate it for the season! Cut things out of the fruit or cheese and add in hearts for valentines or fireworks decorations for the fourth of July! Get creative and you will be able to use these all year long!
Print

Halloween Charcuterie Board

This Halloween charcuterie board is a ghoulish treat for any party! A spooky twist on your classic cheese board, it's filled with fruit, crackers, and meat and sure to be everyone's favorite!
Course Appetizer
Cuisine American
Keyword charcuterie board, halloween charcuterie board
Prep Time 30 minutes
Total Time 30 minutes
Servings 6 people
Calories 933kcal
Author Alyssa Rivers

Ingredients

  • 6 ounces Prosciutto di parma
  • 15 ounces Italian Dry Salami
  • 1/2 cup Green Olives

Cheese:

  • 12 ounces Double Cream Brie
  • 12 ounces Green Goddess Gouda
  • 12 ounces Blueberry Vanilla Chèvre
  • 14 ounces Merlot Bellavitano
  • Smoked Gouda for “Boo”
  • 1/4 cup pesto
  • 1/4 cup apricot jam
  • honey

Fruit:

  • Strawberries
  • Black Grapes
  • Blackberries
  • Blueberries
  • Dried Apricots

Nuts:

  • Pistachios

Instructions

  • Start assembling your board by adding the cheeses. Cut a pumpkin shape into the brie and fill it with jam.
  • Next add the honey, green olives, and pesto.
  • Add in the meats and fruit.
  • Fill the board in with crackers and pistachios.

Nutrition

Calories: 933kcal | Carbohydrates: 12g | Protein: 46g | Fat: 72g | Saturated Fat: 33g | Polyunsaturated Fat: 5g | Monounsaturated Fat: 26g | Trans Fat: 1g | Cholesterol: 197mg | Sodium: 2889mg | Potassium: 575mg | Fiber: 1g | Sugar: 7g | Vitamin A: 938IU | Vitamin C: 1mg | Calcium: 542mg | Iron: 2mg


from The Recipe Critic https://ift.tt/3hb0eCK
https://ift.tt/3tlUWth