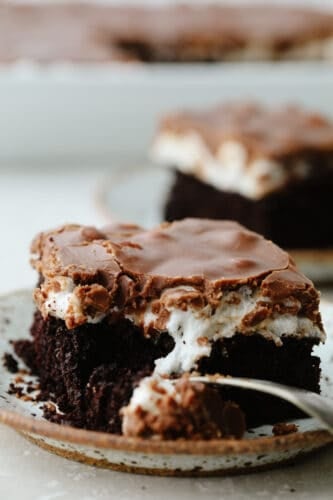
Mississippi mud cake is a delicious, ooey-gooey cake that is perfectly moist. It is absolutely amazing! And let me warn you now… you won’t be able to stop after just one piece!
If you love chocolate then you definitely need to try this cake! It is so yummy and easy to make! You will be bringing this to every event and holiday party because you won’t be able to get enough of it. For more chocolate cake recipes, try out this Lasagna Cake, the one and only AMAZING Texas Sheet Cake, and my favorite Chocolate Cupcakes!

What is Mississippi Mud Cake?
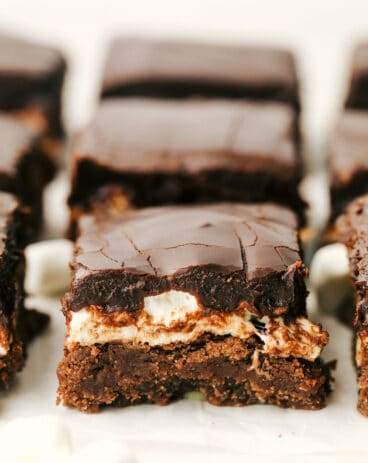
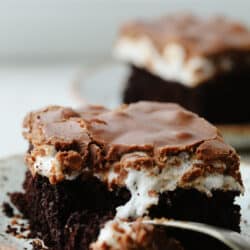
This is an excellent question! And one that you definitely will want to know the answer to. Mississippi mud cake is layers of chocolate and soft, fluffy marshmallows! To be honest, you will be able to see just how tender and moist this cake is when you take your first bite! And if you are a chocolate lover then this recipe is definitely for you! It reminds me a little bit of Texas Sheet Cake with marshmallows or Classic Chocolate Cake with a twist! And not only is this delicious to eat up but it is so simple and easy to make!
Even though this cake is mostly chocolate and marshmallows, it’s an easy one to add to and make your own! In fact, try adding in some walnuts or pecans to the batter or the frosting if you love nuts! I love it when I can do this to cakes because it makes them different every time! Once you mix in that crunch with that yummy moist cake, you will be in absolute heaven! This cake is absolutely sensational! It’s one of those recipes that gets requested often at our house. It’s definitely a recipe that your family will go crazy for!
Ingredients in Mississippi Mud Cake
This ingredients list is simple and you will most likely have all of these ingredients already in your kitchen! This delicious cake is a home run for just about everyone! See the recipe card below for a list of exact measurements.
- Vegetable oil: Using this instead of butter is what makes this a tender, moist cake.
- Coffee: This does’t make the cake taste like coffee! But if you would rather, you can use buttermilk or warm water instead!
- Eggs: Used to keep all of the ingredients together.
- Vanilla: Adds a sweet flavor
- Flour: neccessary for a base to your batter!
- Sugar: You can’t bake a good cake without sugar!
- Unsweetened cocoa powder: Make sure that you are NOT using Dutch process cocoa powder.
- Baking soda: This will help the cake to rise.
- Salt: Salt enhances all of the other ingredients.
- Mini Marshmallows: These are the best part about this cake! toasted to perfection, you won’t want to miss these!
Frosting
- Butter: Use unsalted butter for the best results.
- Milk: You can use 1% or 2% milk.
- Unsweetened cocoa powder: The same cocoa powder you used in the batter will be great!
- Powdered sugar: Frosting uses powdered sugar instead of granulated sugar because it dissolve quickly and makes your frosting smooth!
- Vanilla extract: This adds in the perfect, sweet flavor to the frosting.
- Salt: Use a dash of salt to enhance the other ingredients.
- Pecans or walnuts: These are totally optional
How to Make Mississippi Mud Cake
This cake only takes a few minutes to mix together! The rest of the time will be a test to see if you can wait patiently while it bakes in the oven! Your mouth will be watering the whole time… Good luck!
- Prep: Preheat the oven to 325°. Spray a 9×13 pan with cooking spray and set aside.
- Whisk wet ingredients: In a large bowl whisk together the vegetable oil, warm coffee, eggs, and vanilla until combined.
- Mix in dry ingredients: In a medium bowl sift together the flour, sugar, unsweetened cocoa powder, baking soda and salt. Add the dry ingredients to the wet ingredients and gently whisk together until fully combined.
- Bake and add marshmallows: Fill the pan and bake for 40-45 minutes, until the center of the cake springs back lightly when pressed on, or a toothpick comes out clean. Immediately add the whole bag of marshmallows over the top of the hot cake and return to the oven. Bake for 2-3 minutes, just until the marshmallows are starting to puff and melt.
- Cool and frost: Remove the cake from the oven and allow it to cool completely. Drizzle the frosting over the cake while the frosting is still warm. Allow to chill in the fridge for about 20-30 minutes until the frosting has set before serving.
How to Make Frosting
- Simmer: In a medium sauce over medium heat combine the butter, milk and cocoa powder. Cook until simmering and simmer for 2-3 minutes, being sure to stir constantly.
- Add more ingredients and whisk: Remove from the heat and whisk in the vanilla and powdered sugar. You can use a hand mixer to get the frosting nice and smooth if you would like.
- Drizzle: Drizzle the warm frosting over the cake and allow to chill in the fridge for 20-30 minutes before serving.

Tips for Making This Cake
Mississippi mud cake is a classic southern cake! It’s quick and easy to make and will be sure to WOW a crowd! Here are a few tips to help you make the best cake!
- Vegetable oil: Use vegetable oil instead of butter in this recipe. This will give make your cake tender and very moist. If you’d like to substitute the oil for butter you can, but know that it will change the texture.
- Use room temperature ingredients: You have to prepare ahead for this! But it will make your batter so smooth. If you do this, then the ingredients will blend better and make a lighter, fluffier cake!
- Coffee: There won’t be any coffee flavor in your cake! This just enhances it and makes for a deeper, richer chocolate flavor. If you don’t want to use coffee you can substitute it for buttermilk or even hot water!
- Cocoa powder: This cake HAS to use regular cocoa powder. It activates the baking soda in the recipe. If you use Dutch process cocoa powder instead, the cake won’t rise! Dutch process cocoa powder won’t have the proper reaction with the baking soda.
- Baked marshmallows: Don’t leave the cake in the oven too long after you’ve added the marshmallows! If you leave them in the oven for longer than 2-3 minutes you run the risk of the marshmallows getting too big and then they will deflate.

Storing Leftovers
If you are lucky enough to have any of this leftover for later, you want to make sure you know what to do with the extras! Here are some tips on how you can store it!
- Don’t refrigerate or freeze: The marshmallows from getting too cold and hard.
- Store at room temperature: Wrap the cake pan with aluminum foil or plastic wrap. You can store it at room temperature for up to 5 days!
More Recipes for Chocolate Lovers
Cheesecake
Chocolate Brownie Cheesecake
Desserts
The MOST Perfect Brownies Ever!
Desserts
Mississippi Mudslide Bars
Desserts
No-Bake Chocolate Pie
Mississippi Mud Cake
Ingredients
- ¾ cup vegetable oil
- 1 and 1/4 cup warm coffee
- 2 large eggs
- 2 and 1/4 teaspoons vanilla
- 2 cups all purpose flour
- 1 and 1/2 cup granulated sugar
- ¾ cup unsweetened cocoa powder (NOT Dutch process)
- 2 teaspoons baking soda
- 1 teaspoon salt
- 1 (10.5 ounces) bag of Mini Marshmallows
Frosting
- ½ cup unsalted Butter
- 5 Tablespoons milk
- 3 Tablespoons unsweetened Cocoa Powder
- 3 cups powdered sugar
- 1 teaspoon vanilla extract
- 1 dash salt
- 1 cup chopped pecans or walnuts optional
Instructions
-
Preheat the oven to 325°. Spray a 9×13 pan with cooking spray and set aside.
-
In a large bowl whisk together the vegetable oil, warm coffee, eggs, and vanilla until combined.
-
In a medium bowl sift together the flour, sugar, unsweetened cocoa powder, baking soda, and salt. Add the dry ingredients to the wet ingredients and gently whisk together until fully combined.
-
Fill the pan and bake for 40-45 minutes, until the center of the cake springs back lightly when pressed on, or a toothpick comes out clean. Immediately add the whole bag of marshmallows over the top of the hot cake and return to the oven. Bake for 2-3 minutes, just until the marshmallows are starting to puff and melt.
-
Remove the cake from the oven and allow it to cool completely. Drizzle the frosting over the cake while the frosting is still warm. Allow to chill in the fridge for about 20-30 minutes until the frosting has set before serving.
Frosting
-
In a medium saucepan over medium heat combine the butter, milk, and cocoa powder. Cook until simmering and simmer for 2-3 minutes, being sure to stir constantly.
-
Remove from the heat and whisk in the vanilla and powdered sugar. You can use a hand mixer to get the frosting nice and smooth if you would like.
-
Drizzle the warm frosting over the cake and allow to chill in the fridge for 20-30 minutes before serving.
Nutrition
from The Recipe Critic https://ift.tt/3AgbZ2k
https://ift.tt/3Ac8z0B