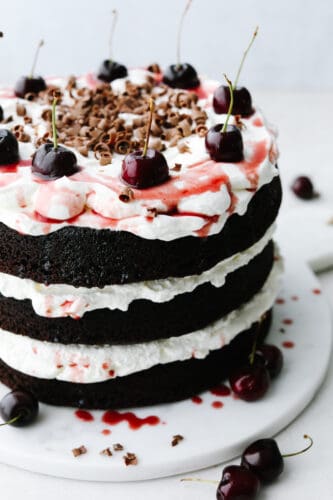
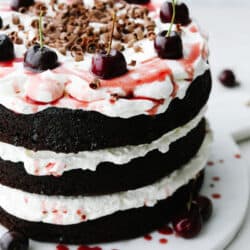
Black forest cake is just as beautiful as it is delicious! Topped with cream, cherries, and beautifully curled chocolate, this cake is a total show stopper! It will definitely get a “WOW!” out of your guests!
This cake offers the perfect mixture of a rich, chocolatey taste with the sweetness of black cherries. It is absolutely delightful! If you love chocolate desserts, try out this Cake, this amazing Pie, and my tried and true Chocolate Lasagna!

Delicious Black Forest Cake
I don’t know about you but I LOOOOVE layered cakes. They look gorgeous but I can’t get over how you get all the flavors in every single bit. I don’t have to scrap the cream off of the top for the bottom of the slice. It’s all there the whole time! This moist and chocolatey cake is perfect for that! It is homemade to absolute perfection and you don’t want to miss a thing! In fact, I’ll explain at the bottom of the post how you can store this! So that if you don’t finish it all at once, you can know JUST how to save it for later and it will taste amazing every time!
Although this black forest cake looks pretty, it’s not hard to make! I have included step-by-step instructions that will help you every step of the way. So if you’ve been afraid to try it because you thought it was complicated… Don’t be! And once you finish it, you will be licking your lips in satisfaction wondering exactly when and what you can make it for again! I love a good chocolate cake or cupcake but this black forest cake well… It’s the next level and something that every chocolate lover will love!
Ingredients in Black Forest Cake
Black forest cake is simple. It’s a moist, chocolate cake that has layers of cream topped with cherry syrup! Once you gather all of the ingredients together and get going, you will be so happy that you made it! See the recipe card below for a list of exact ingredient measurements.
- Vegetable oil: You can use canola oil if you have that instead!
- Coffee: The warm coffee brings out the chocolate flavor in this recipe and won’t taste like coffee at all! But you can use warm water instead if you would rather!
- Eggs: Use room temperature eggs if you can.
- Vanilla: The vanilla adds a flavor to the sweetness.
- Flour: I used all purpose flour in this recipe.
- Sugar: This, of course, makes your cake taste delicious and sweet!
- Unsweetened cocoa powder: Make sure that you don’t use Dutch process as this won’t give you cake the same texture.
- Baking soda: This helps the cake to rise and be moist and fluffy!
- Salt: Salt will enhance all of the other flavors of the ingredients.
Cherry Syrup
- Water: This creates a base for the syrup.
- Sugar: Adds a sweetness to the tart cherry taste.
- Cherry liqueur: You can use this or cherry juice!
Whipped Cream
- Heavy Whipping Cream: Whipping cream makes it fluffy and light!
- Powdered Sugar: This dissolves better than granulated sugar! So it’s perfect when you need a smooth and creamy finish to top off this black forest cake!
- Vanilla extract: Adds in a little bit of flavor to the sweet taste.
- Fresh sweet cherries: You cherries should be pitted and quartered.
Let’s Bake a Cake!
Set aside a little over an hour to make and bake this black forest cake. It is worth every second and you will love it so much when you are done! The dark cherries add such an unexpected, sweet flavor!
Cake
- Prep: Preheat the oven to 325°. Spray three 8 inch round cake pans with cooking spray. Add parchment rounds to the bottom of the pans and spray the parchment with cooking spray and set aside.
- Whisk wet ingredients: In a large bowl whisk together the vegetable oil, warm coffee, eggs, and vanilla until combined.
- Sift dry ingredients, mix and combine with wet ingredients: In a medium bowl sift together the flour, sugar, unsweetened cocoa powder, baking soda and salt. Add the dry ingredients to the wet ingredients and gently whisk together until fully combined.
- Fill pans and bake: Fill the three pans evenly and bake for 30-35 minutes, until the center of the cake springs back lightly when pressed on, or a toothpick comes out clean. Allow the cake to cool for 10 minutes in the pan before inverting the pan on a cooling rack to finish cooling.
- Cool: Once completely cooled you can either wrap the layers in plastic wrap and store in the fridge overnight before assembling the cake, or you can assemble the cake once they’re cool.
Cherry Syrup
- Mix, simmer and cool: In a medium sauce pan combine the water, sugar and cherry liqueur. Bring to a simmer over medium low heat. Simmer for 2 minutes until the sugar us completely dissolved. Let cool completely.
Whipped Cream
- Mix until fluffy: In the bowl of a stand mixer add the cream, powdered sugar and vanilla. Use the whisk attachment to beat until medium stiff peaks form.
Assemble the Cake
- Soak layers with cherry syrup: Lay the three cakes out on a cooling rack with the bottom side facing up. Brush the cherry syrup over the three layers, letting it really soak in to each one.
- Add whipped cream and cherries: Lay the bottom layer top down on your cake plate or cake stand. Spread a nice thick layer of whipped cream over the layer and generously cover with cherry quarters.
- Stack and repeat: Stack the second layer on top of the cherries and do another layer of whipped cream and cherries. Top with the third layer of cake.
- Add top layer of cream, top with cherries: Add large dollops of whipped cream to the top of the cake and smooth as much as you would like. Decorate with fresh cherries and serve immediately.

Baking Tips
Black forest cake is a decadent dessert that perfectly balances the taste of a rich chocolate cake with sweet cherries and light whipped cream. Here are a few tips that will help this cake to turn out JUST right!
- Vegetable Oil: If you use vegetable oil instead of butter in this recipe, it will give your cake a more tender crumb and keep it very moist. If you’d like to substitute the oil for butter you totally can! Just know that it will change the texture.
- Use room temperature ingredients: Take some time beforehand and get out all of your wet ingredients. Let them sit out until they are at room temperature. It takes a little thought beforehand but as a result, you will have a much smoother batter. The ingredients will blend better and result in a lighter, fluffier cake!
- Why sweet cherries? A black forest cake from the grocery store often use the canned cherry pie filling that is made with sour cherries. But… that’s not the traditional way to make the cake. Using fresh dark sweet cherries will add an extra layer of complexity to your cake and take it to the next level!
- Quartered cherries: Instead of cutting the cherries in half, try quartering your cherries. This will allow you to add more of them to the layers of cream! Not only that but it will really give a bursting cherry flavor throughout the whole cake.
- No cherry pitter? If you don’t have a cherry pitter, don’t worry! You can use a metal straw or even a chopstick to pop the tie off of the cherry. As a result, you can do this without having to cut each one open and pull the pit out with your fingers.

How To Store Leftovers
Because this black forest cake uses both fresh cherries and fresh whipped cream, you don’t want to leave this out on your counter! If you have any leftovers, here is how you can store them safely!
Refrigerator: Place your cake in a sealed, airtight container and put it in the refrigerator. It can last for up to 2 days!

More Cherry Recipes to Try

Beverages
Cherry Limeade (Sonic Copycat)
Desserts
Homemade Cherry Pie
Desserts
Cherry Jello Coke Poke Cake
Black Forest Cake
Ingredients
Cake
- 1 1/4 cup vegetable oil
- 1 3/4 cup warm coffee
- 3 large eggs
- 2 1/2 teaspoons vanilla
- 3 cups all purpose flour
- 2 1/4 cup granulated sugar
- 1 1/4 Cup unsweetened cocoa powder (NOT Dutch process)
- 3 Teaspoons tsp baking soda
- 1 1/2 teaspoon salt
Cherry Syrup
- 1/3 Cup Water
- 1/3 Cup Granulated sugar
- 1/3 Cup Cherry liqueur (or cherry juice)
Whipped Cream
- 3 Cups Heavy whipping cream
- 1/3 Cup Powdered sugar
- 1 Teaspoon Vanilla extract
- 2 1/2 Cups fresh sweet cherries pitted and quartered
Instructions
Cake
-
Preheat the oven to 325°. Spray three 8 inch round cake pans with cooking spray. Add parchment rounds to the bottom of the pans and spray the parchment with cooking spray and set aside.
-
In a large bowl whisk together the vegetable oil, warm coffee, eggs, and vanilla until combined.
-
In a medium bowl sift together the flour, sugar, unsweetened cocoa powder, baking soda and salt. Add the dry ingredients to the wet ingredients and gently whisk together until fully combined.
-
Fill the three pans evenly and bake for 30-35 minutes, until the center of the cake springs back lightly when pressed on, or a toothpick comes out clean. Allow the cake to cool for 10 minutes in the pan before inverting the pan on a cooling rack to finish cooling.
-
Once completely cooled you can either wrap the layers in plastic wrap and store in the fridge overnight before assembling the cake, or you can assemble the cake once they’re cool.
Cherry Syrup
-
In a medium sauce pan combine the water, sugar and cherry liqueur. Bring to a simmer over medium low heat. Simmer for 2 minutes until the sugar us completely dissolved. Let cool completely.
Whipped Cream
-
In the bowl of a stand mixer add the cream, powdered sugar and vanilla. Use the whisk attachment to beat until medium stiff peaks form.
Assemble the Cake
-
Lay the three cakes out on a cooling rack with the bottom side facing up. Brush the cherry syrup over the three layers, letting it really soak in to each one.
-
Lay the bottom layer top down on your cake plate or cake stand. Spread a nice thick layer of whipped cream over the layer and generously cover with cherry quarters.
-
Stack the second layer on top of the cherries and do another layer of whipped cream and cherries. Top with the third layer of cake.
-
Add large dollops of whipped cream to the top of the cake and smooth as much as you would like. Decorate with fresh cherries and serve immediately.
from The Recipe Critic https://ift.tt/3CQ4RL7
https://ift.tt/3ENVQnw