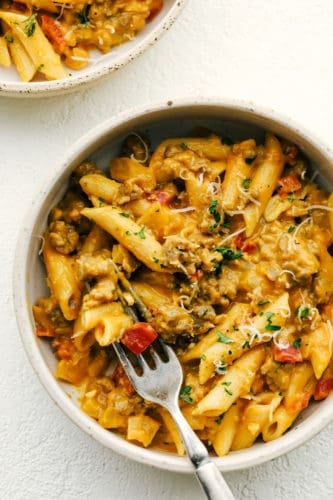
Sausage Pumpkin Pasta is savory, creamy, indulgent and perfectly spiced. This is hearty, delicious and comforting!
Serve this with a fresh green salad with this quick and amazing Ranch Dressing. And pair it with some Homemade Easy Cheesy Garlic Bread, or Italian Bread Twists for a dinner that’s sure to please!

Pumpkin Sausage Pasta
Believe it or not, but pumpkin isn’t just for dessert. If you have pumpkin in your pantry that needs to be used, but if you can’t stomach one more dessert then this is the recipe for you. It’s savory, rich delicious and still uses up your pumpkin.
This sausage pasta recipe with pumpkin sauce is so easy, and will leave your home smelling absolutely wonderful. It’s such a comforting dish for those chilly days. And because it’s so quick you can make it even after a busy crazy day.
Pumpkin Pasta with Sausage Ingredients
Your family is going to love this. And if you don’t tell them, they’ll never know there’s pumpkin in it!
- Pasta: Use a good sturdy pasta like Penne
- Olive Oil: Perfect for pasta dishes
- Sausage: Use extra lean sausage for a healthier dish
- Garlic and Onion: Finely chopped and minced
- Red and Yellow Pepper: Chop into bite sized pieces for easy eating
- Chicken Broth: Could use Beef or Veggie Broth
- Canned Pumpkin: Please don’t use canned pie filling, that would be bad
- Heavy Cream: Can sub out for half and half.
- Ground Nutmeg: Just a little bit add such a rich complex flavor
- Salt and Pepper: Add more or less to taste
- Parmesan Cheese: Freshly grated
How to Make Pumpkin Pasta
It’s a quick and easy and on your dinner table in 30 minutes. Perfect for any day of the week!
- Cook: In a skillet over medium high heat add the olive oil and brown the sausage. Once it’s cooked remove to a paper towel lined plate, drain the fat from the skillet and return to heat.
- Saute: Add more olive oil and saute the garlic, onion and peppers till tender
- Sauce: Add the chicken broth, and pumpkin to the pan and bring to a boil, add the sausage, reduce the heat and then stir in the heavy cream
- Simmer: Simmer the mixture 5-10 minutes
- Cook: Cook the pasta al dente
- Combine: Return the drained pasta to the pot, pour the sauce over the pasta and toss gently to coat. Top with parmesan cheese.

Tips for Making Sausage and Pumpkin Pasta
- Sausage: There are so many varieties out there that you can use, pick what you love. Hot Italian, sweet Italian, pork, turkey or chicken sausage. If you don’t use a ground sausage, however, be sure to remove the casings.
- Vegetarian: Skip the sausage all together for a vegetarian meal.
- Sage: If you love the taste of sage with your pumpkin throw in 2-3 leaves in your sauce while it simmers, then remove.
- Pasta: Use a sturdy pasta to pair with sausage. Things like Orecciette, Rigatoni or any chubby big pasta will work well.
- Al Dente: Don’t over cook your noodles, you don’t want them soggy. They will absorb some of the sauce so keep them firm.
- Vegetables: If you don’t like peppers you can substitute them for zucchini, or other vegetables of your choice.
- Pumpkin: I really like to use the canned pumpkin puree, it makes it so smooth and creamy. Homemade pumpkin will work just as well and give it a nice fresh flavor. I would blitz the homemade puree to make sure it’s super smooth before adding it to the sauce.
Storing Pasta Skillet
This is even better the next day!
- Fridge: This keeps really well in an airtight container for up to 4 days in the fridge. Leftovers taste even better.
- Freeze: You can freeze the sauce before or after you add the noodles. Both will keep in an airtight container for up to 2-3 months. Thaw in fridge and warm in a saucepan on the stove or in the microwave. You may need to add some broth or water to thin the sauce.

More Savory Pumpkin Recipes to Love
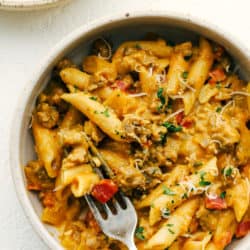
Sausage Pumpkin Pasta
This sausage pasta recipe with pumpkin sauce is an easy dish to make — it takes less than 30 minutes from start to finish.
Servings 6 Servings
Calories 659kcal
Ingredients
- 2 tablespoons olive oil
- 1 pound extra lean sausage
- 2 teaspoons garlic minced
- 1 medium onion finely chopped
- 1 red bell pepper chopped
- 1 yellow bell pepper chopped
- 2 cups chicken broth
- 1 cup canned pumpkin not pumpkin pie filling
- 1/2 cup heavy cream
- 1/2 teaspoon ground nutmeg
- Salt and pepper
- 1 pound penne pasta
- Freshly grated Parmesan cheese
Instructions
-
Heat a skillet over medium-high heat. Add 1 tablespoon of olive oil to the pan and brown the sausage in it. Transfer sausage to paper towel-lined plate. Drain fat from skillet and return pan to the stove.
-
Add the remaining tablespoon oil, and then the garlic, red pepper, yellow pepper and onion. Saute until the vegetables are tender.
-
Add the chicken broth and pumpkin and stir to combine, stirring sauce until it comes to a bubble. Return sausage to pan, reduce heat and stir in the heavy cream.
-
Season the sauce with the nutmeg, salt and pepper, to taste.
-
Simmer mixture 5 to 10 minutes to thicken sauce.
-
Cook the pasta according to the package directions and then drain.
-
Return the pasta to the pot you cooked it in and pour the sausage pumpkin sauce over the pasta.
-
Top the pasta with Parmesan cheese and enjoy.
Notes
Updated on October 25, 2020
Originally Posted on September 17, 2014
Nutrition
Calories: 659kcal | Carbohydrates: 65g | Protein: 23g | Fat: 34g | Saturated Fat: 12g | Cholesterol: 82mg | Sodium: 784mg | Potassium: 628mg | Fiber: 5g | Sugar: 5g | Vitamin A: 7364IU | Vitamin C: 71mg | Calcium: 59mg | Iron: 3mg
from The Recipe Critic https://ift.tt/31Hp7ym
https://ift.tt/3dZCz5t