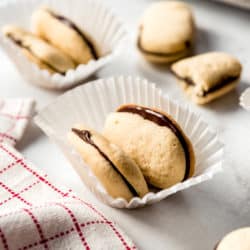
Homemade Milano Cookies have tender cookies with a nice crunch sandwiched around a layer of rich dark chocolate in the center! They taste even better than the store bought version!
When it comes to holiday baking, nothing says love like homemade. Some of our other favorite cookies are Homemade Butter Cookies and Chocolate Peppermint Dipped Shortbread Cookies.
Milano Cookies from Scratch
When it comes to store bought, packaged cookies, Pepperidge Farms makes some of my favorites. Like their wonderful milano cookies that have a light, buttery crunch and a snap from a good amount of dark chocolate in the center. But although it’s easy to pick up a bag at the store, I wanted to recreate them at home since I almost always prefer homemade over store bought anyway. Not only did these cookies turn out absolutely fabulous, they were fun to make too!
Milano Cookie Ingredients
- Butter: I used salted butter.
- Sugar: a combination of both regular granulated and powdered sugar does the trick for helping recreate the classic texture of the milanos we know and love.
- Vanilla extra: you could even go the extra mile and use vanilla bean paste or vanilla bean seeds so you get that gorgeous little black speckles.
- Eggs plus an extra egg white: adding an extract egg white along with the whole eggs helps given the airy structure to these crunchy cookies.
- All purpose flour: of course you need some sort of flour to create cookies and these ones just need the regular all purpose variety.
- Baking soda: Just a bit helps the cookies rise slightly in the oven.
- Salt: a little salt helps bring out all the other flavors and keep the cookies from tasting bland.
- Dark Chocolate: Use high quality chocolate that you chop yourself rather than trying to melt some chocolate chips. Trader Joe’s sells really excellent dark chocolate for a great price and it’s what I used here.
How to Make Homemade Milano Cookies
- Prep work: Preheat the oven to 325 degrees F and line two baking sheets with parchment paper.
- Combine wet ingredients: Beat butter, powdered sugar, and granulated sugar in the bowl of a stand mixer for 2-3 minutes until creamy and light. Add the eggs, egg white, and vanilla extract and beat again.
- Add dry ingredients: Add the flour, salt, and baking soda, mixing on low speed just until combined. Try not to overwork the dough or these cookies might turn out tough instead of light.
- Pipe the cookies onto parchment paper: Transfer the sticky dough to a piping bag fitted with a 1/2-inch round piping tip. Pipe 2-inch lines a couple inches apart on the parchment paper-lined baking sheets. The cookies will spread a bit, so leave enough space that they won’t touch while the bake.
- Bake: These cookies take 13-15 minutes per batch to bake just until the edges are barely turning golden brown. Cool completely.
- Melt chocolate: You can melt it in a glass bowl over a double boiler, or if you are careful, in the microwave using short 20 second bursts of heat, stirring between each burst of heat until melted and smooth. Continue to stir the melted chocolate as it cools to help temper the chocolate for a better snap between the cookies and so the sandwiched halves don’t slide apart.
- Fill the cookies: Spread melted, tempered chocolate onto the bottom of one of the cookies. You want a generous amount of chocolate, but not so much that it’s spilling off the sides. Gently press another cookie on top. Repeat with the remaining cookies, then let them sit until the chocolate has set completely.


Tips and Variations
- Piping: I find that a piping bag with a tip is the easiest for me when working with this soft dough, but a large, heavy-duty zip-tight bag with the corner cut off would also work.
- Filling the bag: It helps to use a tall cup and place your piping bag down into it with the upper part of the bag folded over the top. Then you can just use a rubber spatula to transfer the dough to the bag.
- Mint milanos: If you want to make mint milanos, try adding 1/2 teaspoon of peppermint extract to the melted chocolate. If you want the mint flavor to be even stronger, just add more of the mint extract!
- Other milano flavors: Pepperidge Farms makes quite a few other milano flavors and often has seasonal varieties like candy cane or pumpkin spice. Some of our favorites are coconut, raspberry, orange, and milk chocolate milanos, although there are others that we still haven’t tried. You can try using flavored oils or extracts to achieve some of these other flavors like orange or lemon.

How Long Will These Cookies Keep?
These homemade milano cookies won’t keep as long as the store bought variety because they are made with only real ingredients and lacking preservatives. Store them in an airtight container on the counter for 5-7 days.
You could also freeze them for up to 2 months in an airtight, freezer-safe bag. Just thaw on the counter before enjoying.
More Amazing Cookie Recipes
- Snickerdoodle Cookies
- Brown Butter Chocolate Chip Cookies
- White Chocolate Oreo Cookies
- Peanut Butter Cornflake Cookies (No Bake)
- Chocolate Crinkle Cookies
- Buttery Lemon Shortbread Cookies with a Glaze
Homemade Milano Cookies
Homemade Milano Cookies have tender cookies with a nice crunch sandwiched around a layer of rich dark chocolate in the center! They taste even better than the store bought version!Servings 24 milanosCalories 228kcalIngredients
- 1 cup salted butter, at room temperature
- 1 and 1/4 cups powdered sugar
- 3/4 cup granulated sugar
- 2 large eggs, room temperature
- 1 egg white, room temperature
- 2 teaspoons vanilla extract
- 2 and 1/2 cups all-purpose flour
- 3/4 teaspoon salt
- 1/2 teaspoon baking soda
- 8 ounces dark chocolate, chopped
Instructions
-
Preheat the oven to 325 degrees F. Line two baking sheets with parchment paper.
-
Beat the butter, powdered sugar, and granulated sugar in the bowl of a stand mixer for 2-3 minutes until creamy and light. Add the eggs, egg white, and vanilla extract, then beat again, scraping the bottom and sides of the bowl.
-
Add the flour and salt, mixing just until combined.
-
Transfer the dough to a piping bag fitted with a 1/2-inch round piping tip. Pipe 2-inch lines a couple inches apart on the parchment paper-lined baking sheets, leaving enough room for the cookies to spread a bit in the oven. Bake for 13-15 minutes just until the edges are golden brown. Remove the cookies and cool completely.
-
Meanwhile, melt the chopped chocolate in a glass bowl set over, but not touching, simmering water in a pan, or in the microwave using short 20 second bursts of heat until melted and smooth.
-
Gently spread some of the melted chocolate onto the bottom side of half of the cookies, then sandwich with another cookie on top. The melted chocolate will firm up and set as it cools.
-
Store in an airtight container on the counter for up to 5 days.
Nutrition
Calories: 228kcal | Carbohydrates: 27g | Protein: 3g | Fat: 12g | Saturated Fat: 7g | Cholesterol: 36mg | Sodium: 173mg | Potassium: 92mg | Fiber: 1g | Sugar: 15g | Vitamin A: 263IU | Calcium: 13mg | Iron: 2mg
from The Recipe Critic https://ift.tt/3l23zDj
https://ift.tt/2JbdQQP