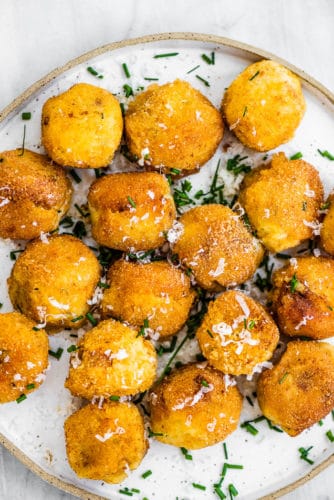
Mashed Potato Balls are an irresistible appetizer or a quick lunch if you’ve got some leftover mashed potatoes on hand. They’re loaded with cheddar cheese, bacon, and chives and then pan-fried until nice and crispy!
These guys are a real treat! Crispy on the outside, soft inside, and bursting with delicious bacon and cheese flavor.
We often serve these as an appetizer. They practically fly off the serving plate and people rave about them.
But this is also a recipe that we’ll make for a quick lunch or dinner when we have some leftover mashed potatoes on hand. Pair them with a simple green salad and you’re set!
How To Make Mashed Potato Balls
If you can make mashed potatoes, you can make mashed potato balls!
Boil and mash some potatoes.
Mix in some crispy bacon, cheese, and chives.
Roll into balls, dip in egg, then roll in panko breadcrumbs.
Pan-fry the balls in a little oil until they’re nice and crispy.
Can I use Leftover Mashed Potatoes?
Yes, this is a great recipe to transform leftovers into something new and fresh.
Keep in mind that if there is too much moisture (butter/cream) in the mashed potatoes, the balls can split open when you fry them. If you’re concerned, roll 1 or 2 balls in panko and fry them. If they split open, add an extra egg to the potatoes.
How Long Will These Last In The Fridge?
Mashed potato balls will keep well for 2-3 days in your fridge in a covered container.
The best way to reheat leftover mashed potato balls is to bake them in a 350-degree oven for about 15 minutes, or until they are warmed through.
Can These Be Frozen?
Yes,! Cooked mashed potato balls freeze very well. Let them cool completely then transfer them to a tray and put them into your freezer. Once they’re frozen, you can store them in a freezer-safe bag.
To reheat frozen mashed potato balls, bake them from frozen in a 420-degree oven for about 20 minutes.
Variations to Try
While we love the classic bacon and cheddar combination, you can flavor these in many different ways.
Buffalo: add some hot sauce and use blue cheese instead of the cheddar.
Jalapeño popper: add a little cube of cream cheese and a pickled jalapeño inside the balls.
Italian: add some minced salami and some Italian seasoning.
Tex-Mex: add some corn, minced red pepper, and use jack cheese.
Mashed potato balls are impossible to resist! They have creamy mashed potatoes, cheddar cheese, and bacon inside and are crispy on the outside.
CourseAppetizer
CuisineAmerican
Keywordmashed potato balls
Prep Time10minutes
Cook Time10minutes
Total Time20minutes
Servings28balls
Calories101kcal
AuthorKristen Stevens
Ingredients
1 ½poundpeeled potatoes
2tablespoonsbutter
1teaspoonsalt
6ouncesbaconcooked crispy then crumbled
1 ½cupsgrated cheddar cheese
2tablespoonsminced chives
3large eggs, divided
1cuppanko breadcrumbs
½cupcooking oil
Instructions
Cut the peeled potatoes into quarters and put them into a pot. Cover them with 1 inch of water then bring the pot to a boil. Continue to boil until the potatoes are soft, about 12-15 minutes. Drain the water then put the potatoes back into the pot.
Add the butter and salt to the potatoes and mash them well with a potato masher. Put them into your fridge, uncovered, and let cool.
When the potatoes are cold, add the crispy bacon, cheddar cheese, chives, and egg to the mashed potatoes and mix well.
In a wide bowl, whisk the remaining eggs with 2 tablespoons of water. Add the panko to another wide bowl.
Use a medium-sized cookie scoop to scoop out 28 balls. Dip the balls first into the egg and then into the panko. Move all the rolled balls to a cookie sheet or a plate.
Heat the oil in a high-sided frying pan. Working in 2-3 batches, fry the mashed potato balls just until they turn golden.
Notes
This is a great recipe to use leftover mashed potatoes, like these Roasted Garlic Mashed Potatoes. You'll need about 3 cups of leftover mashed potatoes to make this recipe.
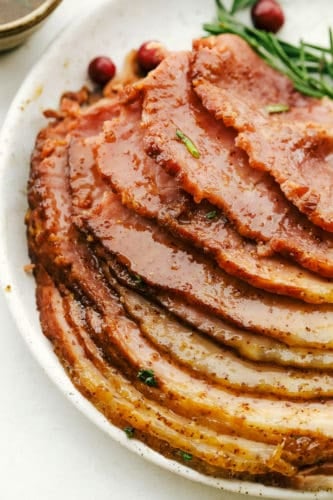
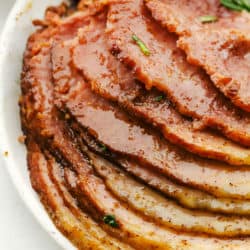
Slow Cooker Honey Garlic Mustard Glazed Ham is the perfect merge of sweet, salty and a touch of spice. This super easy, gorgeously glazed ham will be the talk of the table, with a flavor so divine, it’s sure to impress.
Let’s talk about this ham! I am so excited to share it with you! I especially love an amazing ham at Christmas time, and this ham was the BEST ham that I have ever had. The flavor combination of honey, mustard and garlic is sensational. The sweet and a hint of zing match perfectly with the saltiness of the ham, creating mouthwatering flavor. You are going to love it!
The best part of this recipe is that it cooks right in the slow cooker. It’s so easy. This will be perfect for a big family dinner, a party, a holiday or any special occasion. The fact that you can cook it in the slow cooker means it will free you up to do other things, and still be able to put a spectacular dinner on the table.
Glazed Ham Ingredients
This recipe couldn’t be more simple, these ingredients are all easy to find if you don’t have them in your pantry all ready to go. As a note I used stone ground Dijon mustard, some Dijon mustards can be pretty spicy. Use what you and your family likes best.
Pre-cut Spiral Sliced Ham: You can usually find these anytime of the year, but especially during holidays such as Christmas and Easter.
Honey: Pick your favorite honey, I like honey with a good strong flavor.
Dijon Mustard: This brings the spicy kick to the sauce.
Worcestershire Sauce: This helps with the savory flavor of the sauce.
Minced Garlic: Use fresh for the best flavor, but jarred garlic works in a pinch.
Garlic Salt: This will add an extra punch of garlic and the salt you’ll want to help balance out the sweet.
Making Honey Ham in the Slow Cooker
The slow cooker does the work in this recipe which is perfect. It frees up my oven to make Copycat Texas Roadhouse Rolls to go with it. If you have leftover rolls you can make Ham and Cheese Sliders with the rolls. So yummy! Making this Ham can’t get much easier, but it will taste like you slaved all day. It’s truly mouthwatering.
Blend: In a blender combine the honey, Dijon mustard, Worcestershire sauce, garlic and garlic salt. Pulse till fully combined.
Reserve: Reserve half a cup of the sauce to use after the ham is cooked.
Cook: Place the ham face down in the slow cooker and pour the glaze over the top. Cook on low for 3-4 hours till heated through. Pour the reserved sauce over the top right before serving.
What Kind of Ham Should I Use?
There are many different kinds of cuts of ham out there and it can be confusing on what to buy. Most hams you’ll find are pre-cooked. This means all you need to do is warm them through. There are such things as fresh hams, where they are uncooked and must be fully cooked before serving. They will usually have the word “fresh” in their name and have cooking instructions on them. They are required to have those instructions, so you will know how to cook it if you bought one. Then there are cured or smoked hams. This is a reference to how they are prepared. So with all that said here are a few tips to buying a ham when using this recipe.
Whole spiral cut: I used a whole spiral cut ham with the bone in for this recipe and they are probably the best hams to use. They are pre-cooked and can be found in just about every store. Having the bone in actually contributes to them being moist and tender.
Butt-end: These hams tend to fit in your slow cooker a little easier, but may not come spiral cut.
Spiral Cut: Having it already cut will allow the luscious sauce to seep in between the slices. If your ham isn’t cut, don’t worry. You can score your ham with deep cuts about an inch deep or so. Cut it lengthwise then again in the opposite direction to create a crisscross pattern on top. This will also allow the sauce to penetrate the ham.
Fit: I used an 8 pound ham, this was perfect for my slow cooker. You should think about the size of your slow cooker when buying your ham. You want it to fit.
Cook: No matter what kind of ham you buy, whether it’s fresh or pre-cooked, cook your ham till the internal temperature to reaches 145 degrees F.
Tips and Tricks for The Most Delectable Slow Cooker Glazed Ham
You really can’t go wrong with this recipe. It’s so easy that even beginners can use it and put a nice ham on the table. Here are a few tips to help make sure it’s a show stopper.
Do I need to Baste my Ham during Cooking? No, you don’t have to baste with this recipe, but if you want to you certainly can.
Can I cook it on High? I have found cooking it on high tends to dry out the ham. Cooking it on low will ensure a tender moist ham.
What do I do with the extra sauce in the Slow Cooker? When the ham is done, let it rest on a platter or cutting board covered with foil. Meanwhile turn the slow cooker on high and bring the sauce to a boil, or transfer to a pot and bring to a boil on the stovetop. Let it reduce and thicken and serve along with the ham. YUM!
Can I cook this in the oven? Yes, absolutely! And it will taste just as good. Place the ham in a large roasting pan. Pour the glaze over the top. If the lid doesn’t fit or you don’t have one, simply cover with foil. Bake at 325 degrees F for 15-20 minutes per a pound till the temperature reads 140-145 degrees F. Baste the ham every hour or so if you desire. And for a nice golden crispy top remove the foil for the last 20 min.
How can I store the leftovers: Slow Cooker Honey Garlic Mustard Glazed Ham leftovers are the best, see below for some ideas on how to use up your extras. This ham will keep in the fridge for up to 4-5 days in an airtight container. It also freezes well and can be used at a later date. Freeze in an airtight freezer safe ziplock bag or even use a food-saver bag to seal it tight, and keep in the freezer for up to 3-4 months.
What To Make Out of Leftover Ham
One of the best things about cooking a ham is the leftovers. Ham is so good in so many things, take your pick from these winners.
This ham was the BEST ham that I have ever had. I couldn’t even believe the flavor and how incredible it was.
CourseDinner, Main Course
CuisineAmerican
Keywordham recipes, honey garlic mustard glazed ham, honey glazed ham
Prep Time10minutes
Cook Time4hours
Total Time4hours10minutes
Servings16Servings
Calories625kcal
AuthorAlyssa Rivers
Ingredients
8poundprecooked spiral cut hamprecooked spiral cut bone in
1cuphoney
1/2cupDijon mustardI used stone ground dijon
3TablespoonsWorcestershire sauce
1tablespoonsminced garlic
1teaspoongarlic salt
Instructions
Combine honey, dijon mustard, Worcestershire sauce, minced garlic and garlic salt in a blender and pulse until smooth. Reserve 1/2 cup of the sauce to pour on top at the end.
Place ham face down in the slow cooker and pour glaze on top. Cook on low for 3-4 hours or until heated through. Pour the reserved glaze on top right before serving.
Notes
Updated on December 13, 2020Originally Posted on December 15, 2014
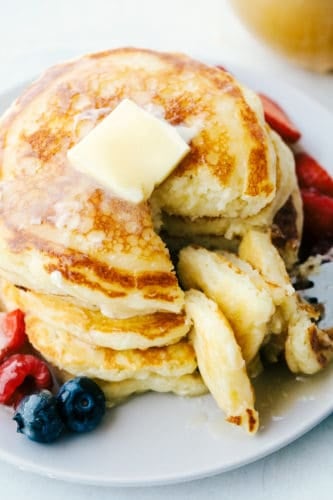
The best and only Buttermilk Pancake recipe that you will ever need! Perfectly fluffy every single time! Soft and pillowy with a tender crumb, these are going to be a hit at the breakfast table.
I have been in search of the perfect buttermilk pancake recipe for my family. After trying several I found the best one. It is from the Martha Stewart Cookbook and they claimed it was the best one too! I had to put it to the test. They said that the secret to fluffy pancakes is to not over mix the batter. Leave small lumps in the pancakes to ensure fluffy and flavorful pancakes every time. They are fluffy thick clouds of joy!
With a golden crisp outside and a fluffy inside these are a welcome sight on the table first thing in the morning! They’ll be worth getting up for! This will be the only buttermilk pancake recipe that you will need! It truly is the best! It is easy to whip up in a matter of minutes and I know that your family is going to love it too!
Homemade Buttermilk Pancake Ingredients
These perfect pancakes are made with ingredients you probably already have on hand, so you will be able to whip them up anytime you want. Don’t have buttermilk? Don’t worry I’ll tell you how to make your own below. Now there is no excuse, you can have these amazing pancakes anytime your heart desires!
Flour: All purpose flour works best
Sugar: Use granulated sugar
Baking Powder: This is the rising agent
Baking Soda: Using baking soda along with the buttermilk is what creates those bubbles for ultimate fluffiness
Salt: Balances out the flavor
Eggs: Make sure to use Large eggs and slightly beat them before adding them in to the batter.
Butter: Use unsalted butter melted
Buttermilk: The star of the pancakes, it adds that classic tang that we all love
Making Fluffy Buttermilk Pancakes
Ok, I’ll say it again the secret to making perfect fluffy pancakes every time is not over mix. Remember it should have small lumps in it. That’s going to be ok. Don’t panic. This is what makes them so yummy.
Whisk: In a large bowl mix together the flour, sugar, salt, baking soda, and baking powder.
Mix: Slightly beat the eggs and add to the mixture along with the buttermilk, and melted butter. Mix until just incorporated.
Cook: On a preheated griddle to 375 degrees spray cooking spray or melt butter. Add about 1/3 cup to 1/2 cup to the griddle. Once the edges harden and the bubbles form on top, about 2 min, flip to cook on the other side. Cook till the bottom is golden brown, about another 2 min. Repeat with remaining batter. Makes about 9 pancakes
Buttermilk Hints
Buttermilk is such an incredible ingredient to cook with. It’s not very good to drink by itself, it’s thick and sour, but add it to a recipe and it becomes magical. It creates the most tender, moist, flavorful breads and cakes. It adds flavor and richness to dressings and marinades. And when mixed with a base such as baking soda, it creates lightness to your baked goods including these pancakes. The other thing I love about buttermilk is that if I don’t have any I can make it in a matter of minutes. That being said, using the real stuff is best, hands down. It will create that thick, rich, creamy batter that equals dynamite pancakes. Only use the substitute in a pinch.
Making Buttermilk: Mix 1 cup of milk (whole or 2%) with 1 Tablespoon vinegar or lemon juice. Let it sit for about 10 min. Once it starts to curdle stir it up and use it as you would buttermilk. This is a 1:1 ratio substitution for buttermilk.
Why Buttermilk Makes Everything so LIght and Fluffy: Buttermilk is very acidic. That’s what creates the tangy sometimes sour and bitter flavor. When you add the baking soda or another base, a wonderful chemical reaction occurs. This reaction creates the byproduct of carbon dioxide which forms air bubbles, these bubbles are what create the light and fluffy baked goods.
Don’t Over-mix and Use Immediately: This is why you don’t want to over mix it. It will kills the bubbles and the reaction. Also you want to wait to add the base to the batter till right before baking, if you allow it to sit too long before baking the bubbles will dissipate on their own before it can help your pancakes, or biscuits or cakes rise.
Variations to Your Perfect Pancakes
Buttermilk pancakes are like a blank slate you can add flavors and textures too. It’s a mild flavor on it’s own so it’ll easily adapt to the variations. You can really get creative with what you add. My only suggestion is that if you add fruit, nuts, or chocolate mix it into the batter before you cook it. By incorporating them into your mix instead of just adding it on top will prevent burning of your add Ins. You may need to put batter in separate bowls to add mix-Ins if you want to make several different kinds at once. Again don’t over-mix, gently fold in your mix-Ins
Fruits: Anything goes here basically. Berries, bananas, apples, peaches, are all good. If you use frozen fruit, let it thaw slightly before adding it so it will finish thawing as it cooks. Zesting citrus adds a nice zing. Don’t forget you can top these pancakes with fresh fruit as well.
Nuts: Chopped nuts add a nice crunch, I recommend not overdoing it, however. A little bit of nuts goes a long way.
Other: If you think it’ll go good in pancakes you can add it. Think chocolate, flaked coconut, and dried fruit.
Flavorings: Add a teaspoon of your favorite flavoring to give your pancakes a different taste. Almond, vanilla and coconut extracts are favorites. Spices also add incredible flavors, cinnamon nutmeg, or even pumpkin spice. The possibilities are endless.
Freezing Leftovers
One of my favorite things to do is make a double or triple batch of pancakes and cook them all at once. I’ll freeze the leftovers for those mornings that I need breakfast on the table fast.
Completely cool the pancakes on a wire rack. Place on a cookie sheet in a single layer and freeze for 1-2 hours. Just long enough to start to freeze them. Transfer them to a freezer safe bag. These will keep for up to 2 months.
When ready to use, remove from the freezer and either pop them into the toaster or microwave. No need to thaw before reheating.
More Delicious Breakfast Recipes to Try
Pancakes are the perfectly morning comfort food. They are filling, tasty and the ability to customize them is endless. There is just something wonderful about pancakes. Try these different recipes to mix up your morning routine.
Preheat the griddle to 375 degrees. In a large mixing bowl, whisk flour, baking powder, baking soda, salt and sugar together. Add the eggs, buttermilk and melted butter. Mix until incorporated but leave small lumps in the batter.
Spray the griddle with non stick cooking spray. Add about 1/2 cup of the batter to the hot griddle. Once the edges start to harden and small bubbles form, about 2 minutes, flip to the other side. Cook until golden at the bottom.
Repeat with the remaining batter. Serve with buttermilk syrup or fresh fruit. Makes about 9 pancakes.
Notes
Updated on December 12, 2020Originally Posted on November 4, 2014
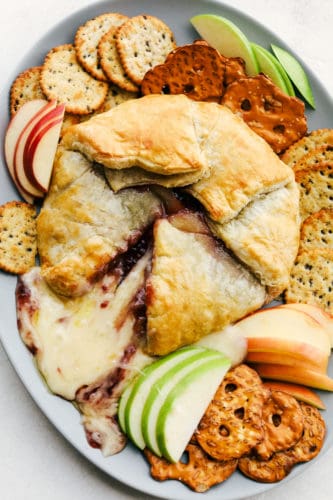
Raspberry Baked Brie is the perfect holiday appetizer with just FOUR ingredients! It is quick and easy to make and a tried and true favorite!
Baked Brie is one of those appetizers that looks and tastes so fancy, but is so easy and quick you almost feel like you cheated. For more brie wonders try Maple Pecan Baked Brie or Cranberry Pecan Brie Bites. They both make amazing mouth watering appetizers.
Baked Brie Recipe
This is a delicious holiday appetizer that will make preparing for holiday parties a breeze! Do you ever take notice about which appetizers get scarfed up versus the ones that sit there hardly touched? Well, this is a recipe that will be get inhaled. It’s so creamy, full of complimentary flavors and it looks like you slaved over it for hours. This is going to be one you’ll want to put in your rotation for sure.
When the brie is baked it gets super soft and melty, but not stringy, almost like a thick sauce. It makes it ideal for dipping, spreading and enjoying. Cooking it in a pastry keeps all that goodness contained till you’re ready to cut into it. Then watch as the marvelousness oozes from the golden flaky crust. It’s absolutely divine.
What type of Appetizer is Brie?
Bakes Brie is the perfect for Christmas and New Year’s Eve! Baked Brie is a classic and often a popular staple at parties and holiday gatherings. Brie is a mild, nutty, buttery cheese with hints of a fruity after tones which makes it ideal to pair with raspberries. You’re going to love this flavor combination and colors of white and red are perfect for the holidays!
Raspberry Brie Ingredients
With just four ingredients you can even assign the task of making the appetizer to your husband or kids. Even though it looks and tastes fancy the ingredients can all be found at your local grocery store. Even Brie is now usually carried at most stores, so you don’t have to drive all over town to find your ingredients.
Puff Pastry: You’ll need 1 sheet which is half a box
Brie: Buy a wheel of brie, not the wedge
Raspberry Preserves: Pick your favorite, or make your own.
Egg: This is for an egg wash.
How to Bake Brie
With only 4 ingredients, this is super simple to put together. It is best served warm to get that oozy warm center. Make sure you plan ahead enough to have time to bake it. Trust me it’ll be worth serving warm.
Roll: On a cutting board open the sheet of puff pastry and with a rolling pin roll it out to 1/4 inch thickness.
Place: Place the wheel of brie in the center of the pastry. Spread the raspberry preserves over the top. Leave a thin edge all the way around the cheese.
Fold: Bring up the pastry carefully and completely cover the top of the cheese.
Transfer and Brush: Move the brie to a cookie sheet. Mix the egg with a Tablespoon of water. Brush over the pastry. Wipe any egg wash that drips onto the pan.
Bake: Bake in a 400 degree oven for 35-40 min or until golden brown. Let cool for 5 min before serving.
Tips for the Perfect Baked Brie
Baking brie for the first time can seem intimidating but it couldn’t be more simple. No need to stress about this appetizer with these tips.
Rolling: Make sure not to roll the pastry too thin or it can split while baking. Also take care to not stretch it too much as you fold it up and over the top.
Show: If you want the preserves to show like above, fold over the dough like a galette that just meets in the middle. This is an easy festive way to have a beautiful baked brie.
Top it: If you want to have a fully wrapped baked brie fold it over to seal it completely like a present. You can garnish the brie by scoring it with shapes or lines or even with raspberries or extra strips of puff pastry.
Wash: When adding the egg wash, wipe away any egg that pools under the brie so it doesn’t cook up like eggs.
Patience: Wait five minutes before cutting into the brie or the cheese will all melt out of the puff pastry quickly. Pictured below is a five minute cool down.
Make Ahead: Puff pastry actually cooks up best if the pastry is cold and the oven is hot. Assemble the brie wheel with the pastry then place in the fridge for at least half an hour before baking to get that crisp puffy texture.
Garnish: This is beautiful all by itself but you can add a bit of garnish if you desire. Garnish your baked brie with fresh raspberries, chopped pecans or walnuts and a drizzle of honey for a festive look.
Leftovers: Leftovers should be tightly wrapped in plastic wrap and be stored in the fridge for up to 3-4 days. Rewarm in the oven at 200 degrees F for about 20 min till the outside is crispy again and the inside warm.
Other Fillings: Raspberry isn’t the only jam that pairs well with brie, try fig, apricot, currant, strawberry, peach and even jalapeño jam instead.
To Trim or Not to Trim!
I’ve discovered there are two ways of thinking out there. People are either on team trim the rind or on team not to trim the rind. There are good reasons to do either, and it’s purely a matter of personal preference.
Team Trim: When wrapping the brie in pastry you can trim the brie without worry since the pastry will contain the warm melty center. It can also be easier to cut without the rind on as it can be tough and you end up smashing it instead of cutting it
Team Not toTrim: You can warm up the brie without a pastry case and the rind will hold it in place. Many enjoy the taste of the rind and prefer to have it on. The rind can also make sure that the melty center doesn’t leak out of your pastry.
The Best Way to Serve Brie Appetizer
Baked brie is a favorite because you can serve it with many different things and it will all taste good. It will go perfectly on a cheese board too. Here are a few suggestions of what to serve it with.
Crackers: Most varieties will work
Bread: Crostini, bread sticks, baguette’s toasted
Baked puff pastry sticks: Yum, more puffed pastry
Pretzels
Fruit: sliced tart apples, grapes, clementines segments or more berries
Everyone loves a great appetizer. They make the party. It’s always fun to bring the showstopper of the table, but it’s even better when it also tastes spectacular as well. They are so fun to make and to eat, that’s probably why so many of us can make an entire meal out of just the appetizer table.