शुक्रवार, 18 दिसंबर 2020

Orange Rolls

12 orange rolls on a gold baking tray covered in orange icing

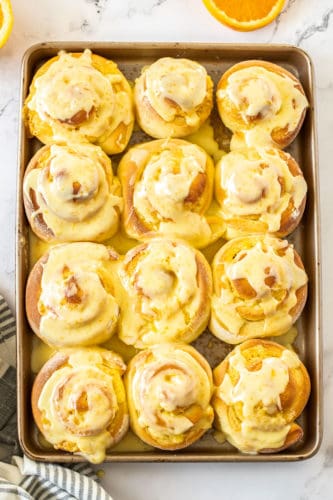
Sticky and soft with a vibrant orange flavor, these orange rolls are the best you’ll find. Simple to make, these are the zesty sister to a cinnamon roll!

Cinnamon rolls are a popular favorite in our home! Try these fun variations like this Cinnabon Cinnamon Roll Cake, Quick 45 Minute Cinnamon Rolls or this Delicious Cinnamon Roll Pancakes Recipe for more delicious ways of enjoying a sweet and savory breakfast.

12 orange rolls on a gold baking tray covered in orange icing

Orange Cinnamon Rolls

These sweet rolls are infused from top to toe in zesty fresh orange flavor and you’ll never want store-bought again.

  • The bread roll is soft and fluffy and the perfect vehicle for the orange flavor.
  • The orange sugar filling is just 3 ingredients, that gets scattered and spread evenly over the rolled out dough.
  • The orange icing is, again, just 3 simple ingredients, mixed together in a bowl, then poured all over the top of your rolls once baked.

Ingredients in Homemade Orange Rolls

You’ll need typical baking ingredients like flour, sugar, eggs and butter but there are a couple of ingredients to elaborate on.

  • Oranges: You’ll need 2 large oranges for this recipe. You’ll use all the zest and most of the juice. Make sure to give them a wash first.
  • Yeast: Instant or active dry yeast are what you’re after here.

Mixing together the dough for orange rolls in a glass bowl

How to Make Orange Sweet Rolls

Making orange rolls from scratch doesn’t require too much hands on time (even if you’re kneading by hand) but it does require planning ahead to allow for rising time.

The steps are all simple though and it’s always so therapeutic making bread from scratch.

  1. Make the dough: Melt together butter and some milk, then add orange juice and add it to the dry ingredients.
  2. Knead the dough: In a stand mixer, this only takes about 6-7 minutes or you can do this by hand. The dough is sticky but see my tips below.
  3. Rest: Place the dough into an oiled bowl, cover with plastic wrap and let it rise until doubled in size.
  4. Make the filling: Combine the sugar and orange zest in a bowl, using your fingertips to press it together. This will release the oils from the zest, intensifying the flavor. Then add butter.
  5. Form the rolls: Roll the dough out, and scatter over the filling. Roll the dough up and cut 12 slices, then place them cut side up on a greased tray. Let them rise again.
  6. Bake the rolls: Bake for around 24 minutes or until nice and golden on top. Let them cool slightly before mixing the icing ingredients and pouring it over the top. Tips and variations

Rolling and filling dough for orange rolls, then placing the cut rolls on a baking tray

Can I Make Them Without a Stand Mixer?

You can knead this dough by hand. It will take a little elbow grease and about 10 minutes but it’s not difficult.

This is a sticky dough which is what keeps it nice and soft once they’re baked so try to resist the urge to add flour. I find the easiest way to knead it is to press down with one hand then use a bench scraper in the other hand to lift and fold it so you can press down again.

It’s ready when the dough is smooth and bounces back when you lightly press your finger into it.

An orange roll with a large chunk cut out showing the texture of the dough

Can I Make These Rolls Ahead?

You can make orange rolls ahead of time, part of the way. You can make the dough and leave that covered in the fridge overnight. The next day, let it come to room temperature (about 2 hours) before rolling it out and proceeding.

You can also make it ahead right up until the second rise. So, once you’ve placed the cut rolls into the baking tray, cover it with plastic wrap and let them sit in the fridge overnight. Let them come to room temperature (about 1 hour) before baking.

Homemade orange rolls are best eaten fresh but if you have any leftover, store them in an airtight container in the fridge for 2-3 days. Give them just a short 8-10 burst in the microwave to fluff up the bread again.

8 orange rolls on a gold baking tray with slices of orange in the background

More Breakfast Recipes You Will Love

12 orange rolls on a gold baking tray covered in orange icing
Print

Orange Rolls

Sticky and soft with a vibrant orange flavour, these orange rolls are the best you’ll find. Simple to make, these are the zesty sister to a cinnamon roll.
Course Breakfast, brunch, Dessert
Cuisine American
Keyword orange rolls, orange rolls recipe
Prep Time 25 minutes
Cook Time 25 minutes
Rising time 1 hour 30 minutes
Total Time 2 hours 20 minutes
Servings 12 rolls
Calories 309kcal
Author Marie Roffey

Ingredients

For The Rolls

  • ¼ cup (½ stick) unsalted butter
  • ½ cup cold milk
  • ½ cup fresh orange juice
  • 1 pound (3 ½ cups) all-purpose flour
  • 2 teaspoons instant or active dry yeast
  • cup white granulated sugar
  • ½ teaspoon salt
  • zest of 1 large orange
  • 1 large egg

For The Filling

  • ½ cup white granulated sugar
  • zest of 1 large orange
  • 2 tablespoons unsalted butter, melted

The Orange Icing

  • 1 ¼ cups powdered sugar
  • 6-8 teaspoons orange juice

Instructions

MAKING THE DOUGH

  • In a small saucepan over low heat, melt together the butter and milk. Stir or swirl to melt without overheating. Add the orange juice and set aside.
  • In the bowl of a stand mixer (or see notes), add the flour, yeast, sugar, salt and orange zest then give it a good mix around.
  • Pour in the warm milk mixture and egg, then give it a quick stir.
  • Attach the dough hook to the stand mixer and mix the dough for 6-7 minutes until smooth and elastic looking.
  • Brush a clean bowl with a little oil then place the dough into it. flip it over so that has a coating of oil all over. Cover with plastic wrap and let it sit in a warm place for 1 hour or until doubled in size.

MAKE THE FILLING

  • Set aside 1 teaspoon of zest for the topping, then add the rest to the sugar. Press together with your fingers to release the oils until fully incorporated.
  • Add the melted butter and stir together.

ASSEMBLING THE ROLLS

  • Preheat the oven to 180C / 350F / 160C fan forced and grease a 9x13 inch baking tray with butter.
  • Roll the dough out on a lightly floured surface to a large rectangle, about 12x14 inches.
  • Evenly spread the filling over the dough leaving 1 inch on the longest side uncovered.
  • Roll up from the longest side nearest you towards the other, as tightly as you can into a long log, then cut into 12 even pieces with a sharp knife.
  • Place the rolls evenly spaced onto the baking tray cut side up. Let them rest and rise for another 30 minutes.

BAKING

  • Bake for 22-24 minutes, turning the tray at the halfway mark, until golden.

FOR THE ORANGE ICING

  • Mix together the icing sugar, set aside zest and half the orange juice. Slowly add more juice until it gets to the desired consistency, then pour it over the rolls

Notes

  • You'll need 2 large oranges for this recipe
  • If you don't have a stand mixer, it will take around 10 minutes to knead by hand. It will be sticky but resist the urge to add flour. The easiest way to knead it is to press down with one hand then use a bench scraper in the other hand to lift and fold it so you can press down again.

Nutrition

Calories: 309kcal | Carbohydrates: 57g | Protein: 5g | Fat: 7g | Saturated Fat: 4g | Cholesterol: 32mg | Sodium: 109mg | Potassium: 87mg | Fiber: 1g | Sugar: 28g | Vitamin A: 243IU | Vitamin C: 7mg | Calcium: 22mg | Iron: 2mg


from The Recipe Critic https://ift.tt/2WtTB3G
https://ift.tt/38ihNeW

बुधवार, 16 दिसंबर 2020

The Best French Onion Dip

The Best French Onion Dip ever begins with caramelized onions, and ends with you eating it all in one sitting! Seasoned cream cheese and sour cream create a dip so addictive and creamy, it’ll be gone before you know it.

Dips are always a favorite at parties.  Make this dip along side my other favorites for a dip smorgasbord of awesomeness. Try Insanely Delicious Hot Crab Dip, Loaded Creamy Ranch Dip and 5 Minute Million Dollar Dip.

The Best French Onion Dip in a bowl with chips for dipping.

French Onion Dip Recipe

At some point in your life, I’m guessing, you’ve had the classic french onion dip made from a packet, am I right? I’ll admit there is something about that dip that is just good. Everyone seems to like a great onion dip. But wait till you taste this, you’ll never reach for another packet again! Made with your own caramelized onions this dip has such a distinct flavor that’ll you’ll fall for immediately. Combined with savory spices and rich creamy sour cream and cream cheese, it’s texture is incomparable. All of that combines to make a dip so addicting you might need to make two batches, just so you have some to take to the party!

One of the best things about this dip, is that it’s homemade. You know exactly what’s in your dip. If you’ve ever read the ingredient list on those packets, or worse the pre-made cartons, it’s a bit of a shocker. You can feel good about serving this dip to your friends and family. Just like Homemade Cheese Sauce or Guacamole, homemade is always best. So go ahead and make this dip, then I dare you to eat just one chip with it! I’ll win guaranteed!

French Onion Ingredients

This creamy savory dip is made with ingredients you probably have on hand. If not a quick trip the local grocery store should get you what you need. No special crazy ingredients here. Just a classic dip made with classic ingredients, that will knock your socks off.

  • Butter: This is to cook the onion in and add flavor.
  • Onion: I used a small onion.
  • Salt: Salt helps the onions release their juices to help them cook.
  • Sugar: This will help caramelize the onions and help give them that golden color.
  • Cream Cheese: Full fat or low fat cream cheese softened.
  • Sour Cream: Use a good quality sour cream, low fat or regular.
  • Worcestershire Sauce: This gives the dip a great savory flavor.
  • Onion and Garlic Powder: These are the all important seasonings that make it taste amazing.
  • Salt and Pepper: Add to taste.

How to Make French Onion Dip

Yes, it might take a little longer to make this because you’ll need to caramelize your own onions, but it’ll be so worth it, I promise. You’ll also need some time to allow the onions to cool before mixing it all together. It takes a little bit of time, but after you taste it, you won’t complain at all. Maybe just about how fast it disappears!

  1. Caramelize: In a medium skillet over medium heat melt the butter. Add the onions, salt and sugar. Sauté for 25-30 min. or until the onions are a deep golden brown. Let cool completely.
  2. Mix: In a medium sized bowl add the onions, cream cheese, sour cream, Worcestershire sauce, onion powder, garlic powder, salt and pepper. Mix until combined. Refrigerate till ready to serve.

sauteing onions, and mixing with the ingredients for French Onion Dip.

What’s The Difference Between Caramelizing and Sautéing Onions?

The rich deep golden color and sweet yet still savory flavor of a caramelized onion is hands down one of the most amazing things ever. It can be tricky to caramelize onions without burning them, the secret is low and slow! It will take patience to caramelize your onions, but the taste will be worth it. I promise.

  • Sauté vs Caramelize: Sautéing onions is done at a higher heat and is meant to just tenderize them and brown the outside. Caramelizing is cooking the onions at a lower heat, slowly coaxing the flavor out of them and allowing the natural sugars to caramelize creating a deep rich flavor.
  • Do I have to stir the onions? The great thing about caramelizing is that you don’t have to babysit the pan too much. Check on the pan every 2-3 min and give it a good stir
  • What is the sticky stuff on the bottom of the pan? As the onions cook you’ll notice a dark fond form on the bottom of the pan. That’s part of the caramelization process. Simply scrape the fond back into the onions as they continue to cook. If it starts to build up, use a little bit of water to help deglaze the pan and watch it carefully for burning. If you feel like they are cooking too fast you can always turn down the heat.
  • How do I know when they are done?  Your onions should be a deep brown and soft but not mushy. Taste the onions when you think they’re ready. If you love the flavor, they’re done.
  • Storing: They will keep in the fridge for about a week, and freeze well too. Now you can make extras and use them in this Easy French Onion Soup or this amazing Skillet French Onion Chicken.

Hints for an Amazing French Onion Dip

Choosing to make this dip for your next event is definitely a step in the right direction. You just can’t go wrong with all the flavor and creaminess. It’s going to be a quick favorite.

  • What Onions Should I Use? Any onion will do for this recipe. Use yellow, white or even a sweet onion. It’s really up to you on this one.
  • How small do I chop the Onion? There are two ways to go about the chopping. You don’t want large stringy onion chunks for a dip, it’ll be hard to eat. I chopped my onion before caramelizing it. This also quickens the cooking time for the caramelization. You can also slice and caramelize the onion then chop them, although it might be tougher to cut them nicely.
  • What do I serve with this dip? The most common and beloved thing to serve this with is a ruffled plain potato chip. But you can also serve it with crackers, pretzels, crusty bread and pita chips. It also goes perfectly with a vegetable tray of carrots, celery, olives, sugar snap peas, peppers or grape tomatoes.

Can I Make this Ahead of Time?

Yes, you can! In fact allowing it to sit overnight in the refrigerator helps the flavors meld together all that much more.

How Long Does Homemade French Onion Dip Last? 

This will keep beautifully in the fridge for up to a week. You can use the leftovers in a variety of ways. Try it as a spread for sandwiches, a topping for baked potatoes, or try smothering baked chicken or beef.

Dipping chips into the Best French Onion Dip.

More Incredible Appetizers

We’ve all probably done it before, we make an entire meal out of just appetizers. They are just so yummy! When you pick the right ones they can really steal the show. It can be hard to leave room for anything else. Try these meal spoiling appetizers the next time you need one!

Print

French Onion Dip

The Best French Onion Dip ever begins with caramelized onions, and ends with you eating it all in one sitting! Seasoned cream cheese and sour cream create a dip so addictive and creamy, it'll be gone before you know it.
Course Appetizer
Cuisine American, French
Keyword french onion dip, french onion dip recipe
Prep Time 10 minutes
Cook Time 30 minutes
Total Time 40 minutes
Servings 4 People
Calories 400kcal
Author Alyssa Rivers

Ingredients

  • 3 Tablespoons Butter
  • 1 small onion coarsely chopped
  • 1/2 teaspoon salt
  • 1 teaspoon sugar
  • 8 ounces cream cheese softened
  • 1 cup sour cream
  • 1 tablespoon worcestershire sauce
  • 1/2 teaspoon onion powder
  • 1/2 teaspoon garlic powder
  • 1/4 teaspoon salt
  • pinch of pepper

Instructions

  • In a medium sized skillet melt the butter over medium heat. Add the onions, salt and sugar. Sauté 25-30 minutes until the onions are a deep golden brown.
  • In a medium sized bowl add the onions, cream cheese, sour cream, worcestershire sauce, onion powder, garlic powder, salt and pepper. Mix until combined.

Nutrition

Calories: 400kcal | Carbohydrates: 9g | Protein: 5g | Fat: 39g | Saturated Fat: 23g | Cholesterol: 115mg | Sodium: 782mg | Potassium: 233mg | Fiber: 1g | Sugar: 6g | Vitamin A: 1382IU | Vitamin C: 3mg | Calcium: 132mg | Iron: 1mg


from The Recipe Critic https://ift.tt/34eR5CE
https://ift.tt/3nou3Ry

मंगलवार, 15 दिसंबर 2020

Star Bread

Star Bread is a visually stunning, decadent tasting sweet bread, that will be the talk of the table. Whether it’s for the holidays or a special occasion this eye pleasing, mouth watering bread is the way to go.

Bread is the ultimate comfort food for me, it’s so luscious and satisfying, especially when it’s homemade with love.  Whether it’s this recipe or Grandma’s Perfect Homemade Bread Recipe, Easy Homemade Naan Bread, or Easy Cheesy Garlic Bread, they will all hit the spot!

Decorative and tasty Star Bread

Christmas Star Bread

I’m not entirely sure on why this is called Star Bread, but I’m guessing it has to do with not only the shape, but the fact that it will quite literally be the star of the meal. This isn’t just bread, it’s art. And it’s art you can eat! And it tastes absolutely divine. Everyone will not only rave about how beautiful and intricate your star bread looks, but the fact that it is simply delicious. Make it for breakfast or brunch. Make it for a holiday or celebration, anyway and anytime you make it, it’ll make you the star baker!

Now before you say to yourself, that looks too hard. Let me tell you it’s super easy. Truly! Anyone who can use a pizza cutter or even a knife can make this bread. If you are worried about your cutting skills you can even use a template, or a big bowl turned upside down to cut around to get it perfect. The mesmerizing swirls and beautiful shape of this star bread all add to its elegance. The sweet filling isn’t just for show, it is just as rich and tasty as it is beautiful.

Bread Dough Ingredients 

This is your basic enriched dough with milk and butter added for increased structure and flavor. Most of these ingredients you might already have on hand. If not, they can all be found easily at your local grocery store.

  • Milk: Use whole or 2% milk if you can, it helps the dough become extra soft when baked.
  • Butter: Adds incredible flavor.
  • Instant Yeast: This can be made with active yeast too.
  • Sugar: This feeds the yeast
  • Salt: This actually retards the yeast from getting too active and adds important flavor to the bread.
  • Flour: I used all purpose flour, unbleached flour also works.

Apple Filling Ingredients 

  • Apple Butter: Make your own for incredible flavor, or you can purchase at your store.
  • Egg Wash: Helps create that deep golden color and stick it all together.
  • Egg
  • Milk
  • Powdered Sugar for Dusting: This is optional, but oh it looks stunning!

Creating This Amazing Pull Apart Bread

Because of the extra richness the star bread will rise slightly slower than usual.  So don’t worry if it isn’t rising as fast as you think it should. This beauty does take a bit of patience, but it’s worth it. It truly is simple to do and the apple butter flavor is to die for. It looks like a lot of instructions, but we’re breaking it down into lots of steps so it’s easier to follow. You got this! Now go make it!

  1. Scald: In a small saucepan add the milk and over medium heat bring to a simmer, stirring occasionally. Turn the heat off and add the cubed unsalted butter. Stir until the butter melts completely. Pour the hot milk mixture into a stand mixer bowl and set aside to cool to below 110 degrees F.
  2. Bloom: When the milk the mixture is cool enough add the yeast and stir. Let it sit for 5 min to bloom.
  3. Mix: In a medium bowl, add the flour, sugar, salt and mix to blend. Transfer the flour mixture to the stand mixer bowl with the warm yeast and mix gently.
  4. Knead: Using a dough hook on speed 2 knead for about 7-10 min. The dough should start pulling away from the side of the bowl.
  5. Rise: Oil a glass bowl and your hands. Scrape the dough out of the mixing bowl and shape it into a ball in your hands and place it in the oiled bowl. Over, and let rise in a warm place for 1-2 hours until at least doubled in size.

Layering and Creating the Beautiful Star Shape

  1. Cut: Turn the dough out onto a lightly floured surface and cut into 4 equal portions. Shape into balls.
  2. Roll: Roll on dough ball  out into a circle about 9″-10″ in diameter. Place it on a piece of parchment paper and spread 2 tablespoons of apple butter over it.
  3. Layer: Roll another dough ball out to the same size as the first one and place it on top, spread another 2 Tablespoons of apple butter over the top. Repeat for the 3rd and 4th dough ball. You should end up with 4 layers of dough and 3 layers of apple butter.
  4. Mark: With the back of a round cookie cutter or a cup, mark a 3″ circle in the middle. Cut the dough into 16 sections leaving the 3″ circle in the middle untouched.
  5. Twist: Take two sections away from each other and press the end together to form the star point. You should end up with 8 star points. Cover and let rise for 20 minutes.
  6. Bake: Beat the egg with a tablespoon of milk and brush it lightly over the star bread. Bake for 30 min until golden brown. Dust with powdered sugar before serving.

Making, layering and cutting Star Bread

Tips and Info for the Best Star Bread Ever

Working with yeasted breads can be intimidating don’t stress it. It’s really simple. If you feel like you need to practice try these favorites, Copycat Texas Roadhouse Rolls, Quick 45 Minute Cinnamon Rolls and Homemade Parker House Rolls. You’ll be an expert in no time, and adding star bread to your rotations will be excellent. It’s such a gorgeous bread!

  • Yeast: For this recipe I used instant yeast, which means you don’t have to mix it with the warm milk first if you don’t want to. Active yeast means you need to activate it. Which means you will definitely want to mix it with the warm milk first to feed it and to get it going.
  • Warm Milk:  Make sure your milk is below 110 degrees F before you add the yeast or you’ll kill it. But also make sure it’s above 80 degrees F or it won’t activate it, it’ll be too cool. If you have a thermometer use it for best results.
  • Shortcut: If you don’t trust your bread making skills you can use frozen bread dough. Use two loaves of frozen bread dough. Once thawed cut each loaf in half to create your 4 circles.
  • Don’t sweat it: Even if your circles aren’t perfect, most of the time mine are not, don’t worry about it. It always seems to come out just as beautiful and tastes just as amazing.
  • Twist: I found that you only need to twist the sections twice.

Dusted with powder sugar, star bread.

Christmas Bread Variations

There are multiple ways to fill this bread. The apple butter is one of my favorites though. Its silky smooth sweetness is the perfect balance of tart, sweet and spice. The variations for this are endless.

  • Cinnamon and Sugar
  • Your favorite Jam (raspberry, strawberry, apricot…)
  • Nutella
  • Orange using butter, orange juice, orange zest and sugar
  • Cinnamon, nuts and raisins
  • Make a glaze with powdered sugar, milk and vanilla to drizzle over the top instead of the powdered sugar.
  • Make it savory with pesto, tomato sauce, herbs, pepperoni, sausage, or cheese , etc.

Storing Baked Star Bread

Store this bread in an airtight container or bag once it’s completely cooled. Keep at room temperature for up to 4 days. Freeze for up to 3 months.

Star bread on serving bread and dusted with powdered sugar.

More Sweet and Savory Breakfasts

Making things that taste amazing is part of the fun of baking, but if they look just as fun and great, that’s even better. Try some of my favorites that not only taste but look spectacular.

Print

Star Bread

Star Bread is a visually stunning, decadent tasting sweet bread, that will be the talk of the table. Whether it's for the holidays or a special occasion this eye pleasing, mouth watering bread is the way to go.
Course Breakfast, Dessert
Cuisine American
Keyword star bread, star bread recipe
Prep Time 45 minutes
Resting time: 1 hour 20 minutes 30 minutes
Total Time 1 hour 15 minutes
Servings 12 People
Calories 170kcal
Author Alyssa Rivers

Ingredients

Dough

  • 1 cup whole milk
  • 2 ounces unsalted butter
  • 2 teaspoon instant yeast
  • ¼ cup granulated sugar
  • 1 teaspoon kosher salt
  • 2 ½ cup all-purpose flour
  • Extra flour for rolling

Filling

  • 6 tablespoon of apple butter
  • Egg wash
  • 1 large egg
  • 1 tablespoon milk
  • Powdered sugar for dusting

Instructions

  • Add milk to a small saucepan and bring to a simmer over medium heat stirring occasionally. Turn off the heat and add cubed unsalted butter to the hot milk, stirring until the butter melts completely. Pour the hot milk mixture into a stand mixer bowl and set aside to cool to below 110°F.
  • When the milk mixture is cool enough, stir in the instant yeast and let it sit for 5 minutes to rehydrate.
  • In a medium mixing bowl, add flour, sugar and salt, stir to distribute evenly. Transfer the flour mixture to the stand mixer bowl with the warm liquid mixture, and knead with the dough hook on speed 2 for about 7 - 10 minutes. The dough should start pulling away from the side of the bowl.
  • Oil a glass bowl and your hands. Scrape the dough out of the mixing bowl and shape it into a ball in your hands and place it in the oiled bowl. Cover, and let rise in a warm place for 1 - 2 hours until at least double in size.
  • Turn the dough out onto a lightly floured surface and cut into 4 equal portions. Shape into balls.
  • Roll one dough ball out into a circle about 9”-10” in diameter. Place it on a piece of parchment paper and spread 2 tablespoons of apple butter over it. Roll another dough ball out to the same size as the first one and place it on top, spread another 2 tablespoons of apple butter over it. Repeat for the 3rd and 4th dough ball. You should end up with 4 layers of dough and 3 layers of apple butter.
  • Mark a 3” circle in the middle with the back of a round cookie cutter or a cup. Cut the dough into 16 sections leaving the 3” circle in the middle untouched.
  • Twist two sections away from each other and press the end together to form the star point. You should end up with 8 star points. Cover and let rise for about 20 minutes.
  • Preheat the oven to 350°F.
  • Beat 1 large egg with a tablespoon of milk to make the egg wash. Lightly brush egg wash over the top of the bread and bake for 30 minutes until golden brown.
  • Remove the bread from the oven and let cool on a wire rack.
  • Dust with powdered sugar before serving.

Nutrition

Calories: 170kcal | Carbohydrates: 26g | Protein: 5g | Fat: 5g | Saturated Fat: 3g | Cholesterol: 28mg | Sodium: 211mg | Potassium: 80mg | Fiber: 1g | Sugar: 5g | Vitamin A: 174IU | Calcium: 32mg | Iron: 1mg


from The Recipe Critic https://ift.tt/3gMELij
https://ift.tt/2K9JTkq