मंगलवार, 29 दिसंबर 2020

Seriously Amazing Air Fryer Hand Pies

Seriously Amazing Air Fryer Hand Pies are an easy way to have dessert! Tender sweet spiced apples in a flakey crust you can hold in your hand!

Plan a whole dinner using the air fryer. Start with Brown Sugar Garlic Air Fryer Salmon, Air Fryer Crispy Parmesan Brussel Sprouts and Homemade Air Fryer French Fries. End it with these pies for a dinner to remember!

Hand held apple pies made in the air fryer.

Sweet and Savory Hand Pies

The title says it all! These are seriously amazing! Sweet, tart filling surrounded a sugary flakey crust. Brings back memories of those pies you could get at the store or your favorite drive thru, only better. These will be perfect for a party, family gathering or just because. The options are endless. Dip these luscious vittles in caramel or drizzle with frosting. Warm and delicious they’re the perfect after dinner treat.

Get the whole family involved. Kids especially love to help fill these with their favorite fillings and fold them and of course eat them. You could use this as an activity for a family gathering or children’s party. It’ll be the hit of the day. I love the fact that I can hand them a pie and shew them outside to play.  They take the mess with them and I don’t have to worry about it. They’ll love that they can eat a pie with their hands and not get in trouble or super messy! It is the perfect dessert!

Ingredients for Apple Hand Pies

These are as simple as apple pie, truly! If you have the ingredients for apple pie on hand you can make these. Make sure to use tart apples for the best flavor.

  • Butter: Don’t sub out the butter for something else
  • Granny Smith Apples: These make the best apple pies
  • Cinnamon: Best flavor with apples
  • Brown Sugar: Brown sugar combines incredibly with the cinnamon
  • Cornstarch with Water: This is the thickener for the pie filling
  • Refrigerated Pie Crusts: Makes this the easiest thing ever.
  • Egg mixed with Water: Creates the shine on the pies.
  • Powdered Sugar: Sweet powdered sugar
  • Milk: To mix with the sugar
  • Course Sugar for topping: This is optional but makes a fun crunchy topping.

Making Hand Pies in an Air Fryer

These really are quite simple to make. Using pre-made pie crusts make it even easier. You can use homemade pie crust with just as much success. Using the air fryer makes them a little bit healthier then frying them. And it gives them a crispy crust all the way around. No soggy bottoms here!  Enjoy these beautiful pies today!

  1. Pie Filling: In a medium sized saucepan melt the butter over medium high heat. Add in the apples, cinnamon and brown sugar and sauté until tender. In a small bowl mix the cornstarch and water and add it to the saucepan. Continue to cook until it starts to thicken. Remove from heat.
  2. Roll:  Roll out the pie crusts and cut 4 inch circles using a small round bowl.
  3. Fill: Place a tablespoon of apple filling to one half of the circle leaving a 1/2 inch edge. Wet the edges of the circle and fold and seal the edges with a fork. Cut three slits into the top of the pies.
  4. Top: In a small bowl whisk the egg and water and brush the top of the hand pies.
  5. Fry: Place the hand pies into the basket of your air fryer. Cook at 350 degrees for 8-10 minutes or until golden brown.
  6. Glaze: While the hand pies are cooking in a small bowl add the powdered sugar and milk. Once you remove the hand pies form the air fryer brush with the glaze and sprinkle with sugar.
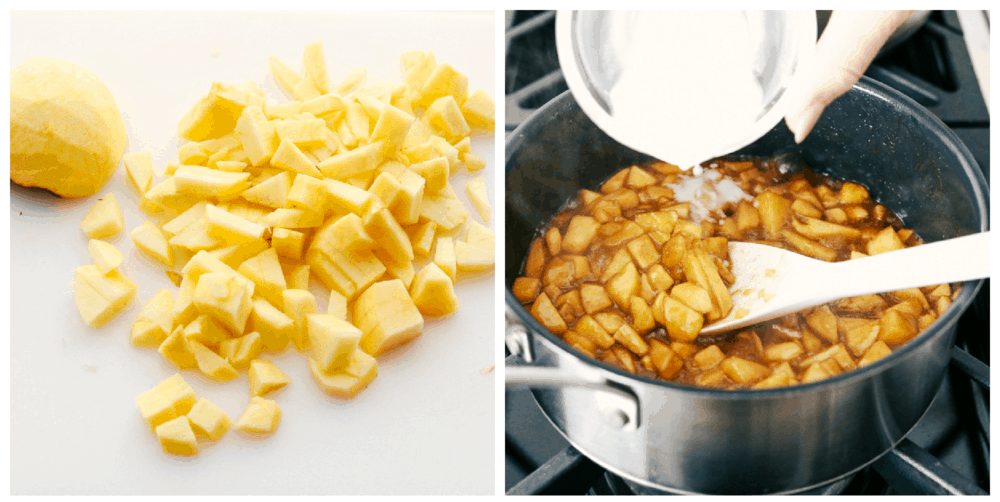
Making the apple pie filling.

Why Are Mini Hand Pies So Amazing?

I honestly can’t think of any down sides to this these little hand held desserts. So, why not make them today! Here are all the good reasons you need to make these as soon as possible!

  • Individual Servings: No more worrying about eating too much since these are perfectly proportioned. This serves two purposes. One you won’t have a tendency to overeat, like I do sometimes. And second you can make sure you have enough servings for everyone there.
  • Less Mess: With hand held pies you don’t have to serve them on plates or use forks. Just hand them out with a napkin and our set. None of the goodness gets left on the plate. It goes all in the tummy.
  • Easy: It doesn’t take any more time to make these than a pie and it’s faster.
  • Variations: These are so easy to vary. You can stuff them with whatever you want, see below!
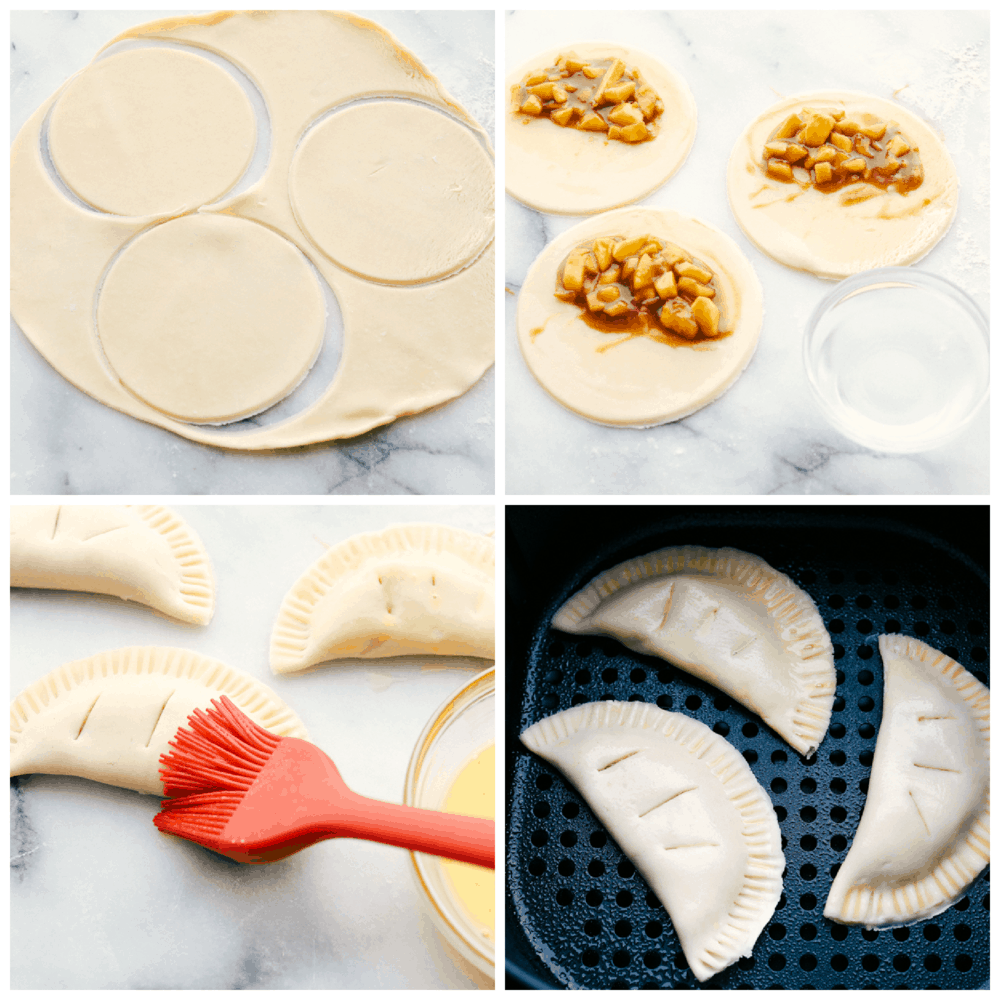
Rolling the pie crust and filling with apple filling and air fried.

Tips for Hand Held Pies

These might just be the best thing to ever happen to pie!

  • Chop: Make the apples slices small. It’ll be easier to fit the filling in the pies.
  • Crust: Don’t let the scraps go to waste. Gather them up and re-roll out the crust for more pies. These are too good to let anything not go unused.
  • Shape: You can keep these in a circle, simply place another on top and seal with a fork. Cut into rectangles and fold in half, or squares and fold corner to corner for triangles.
  • Double: Double the pie filling and make extras. You’ll need them. I promise.
  • Can I bake these:  Of course! Just because you don’t have an air fryer doesn’t mean you can’t get in on the goodness. Bake 375 for 24-30 min.

Freezing and Storing The Perfect Hand Pie

  • Freeze: You can freeze these two ways. Make a batch and before frying them freeze them. Wrap individually in plastic wrap and place in a large freezer safe plastic bag. They’ll keep for up to 3 months. Or bake as directed and freeze individually wrapped. When ready to use fry the unbaked pies the same as directed, just add a few more minutes to the cooking time. For cooked pies simply thaw overnight in the fridge and  reheat in the microwave or air fryer for a few minutes till heated through.
  • Store: Baked pies will keep in the fridge for up to a week. Reheat as desired, microwave, oven or air fryer.

Hand held apple pies made in the air fryer.

Variations for Homemade Hand Pies

The wonderful thing about these hand pies is that they are so easy to vary. If you have a favorite pie filling you can probably make it in these pies. Try these sweet or savory variations and more!

  • Cherry
  • Blackberry
  • Peach
  • Raspberry
  • Pumpkin
  • Coconut and Chocolate
  • Blueberry
  • S’mores
  • Make them savory too, try chicken pot pie, ham and cheese, or chicken and mushroom.

Breaking a hand held pie exposing the amazing filling.

More Air Fryer Recipes to Love

If you have an air fryer you’ve got to try these recipes! If you don’t have an air fryer then it’s probably time. These are the perfect starters if you are new to it.  And if you’re a veteran then add these to your repertoire!

Print

Air Fryer Hand Pies

Seriously Amazing Air Fryer Hand Pies are an easy way to have dessert! Tender sweet spiced apples in a flakey crust you can hold in your hand!
Course Dessert
Cuisine American
Keyword air fryer hand pies, hand pies
Prep Time 10 minutes
Cook Time 10 minutes
Total Time 20 minutes
Servings 6 Hand Pies
Calories 447kcal
Author Alyssa Rivers

Ingredients

  • 4 tablespoons butter
  • 2 Granny Smith apples diced
  • 1 teaspoon cinnamon
  • 1/4 cup brown sugar
  • 1 teaspoon cornstarch
  • 1 tablespoon water
  • 2 refrigerated pie crusts
  • 1 large egg
  • 1 Tablespoon water
  • 1/2 cup powdered sugar
  • 2 Tablespoons milk
  • coarse sugar

Instructions

  • In a medium sized saucepan melt the butter over medium high heat. Add in the apples, cinnamon and brown sugar and sauté until tender. In a small bowl mix the cornstarch and water and add it to the sauce pan. Continue to cook until it starts to thicken. Remove from heat.
  • Roll out the pie crusts and cut 4 inch circles using a small round bowl. Place a tablespoon of apple filling to one half of the circle leaving a 1/2 inch edge. Wet the edges of the circle and fold and seal the edges with a fork. Cut three slits into the top of the pies. This tool is amazing too!
  • In a small bowl whisk the egg and water and brush the top of the hand pies. Place the hand pies into the basket of your air fryer. Cook at 350 degrees for 8-10 minutes or until golden brown.
  • While the hand pies are cooking in a small bowl add the powdered sugar and milk. Once you remove the hand pies from the air fryer brush with the glaze and sprinkle with sugar.

Notes

You can also use your favorite pie filling inside of the hand pies.

Nutrition

Calories: 447kcal | Carbohydrates: 56g | Protein: 5g | Fat: 23g | Saturated Fat: 10g | Cholesterol: 48mg | Sodium: 315mg | Potassium: 149mg | Fiber: 3g | Sugar: 25g | Vitamin A: 306IU | Vitamin C: 3mg | Calcium: 37mg | Iron: 2mg


from The Recipe Critic https://ift.tt/3mWENFJ
https://ift.tt/3hrrFap

सोमवार, 28 दिसंबर 2020

Extra Crispy Crab Rangoon

Crab rangoon served on a grey plate with sweet chilli sauce on the side

Crab Rangoon are a fun, party appetizer that’s filled with real crab meat, cream cheese and seasoning. Wrapped in a wonton wrapper and deep fried, these are irresistible!

My favorite things to order at our local Chinese restaurant are always Egg Rolls, Kung Pao Chicken, Fried Rice and crab rangoon. So when we were stuck at home for months and were craving takeout, I decided to make my own crab rangoon. And it was so much easier than I thought, and dare I say, even better than takeout because you can enjoy them freshly fried!

Crab rangoon served on a grey plate with sweet chilli sauce on the side

What you Need to Make Homemade Crab Rangoon

When I see short ingredient lists like these, I always know it’s going to be a success. Crab meat is so delicious on its own that you don’t really need much else. So the seasoning and cream cheese are there to complement the flavors. If I’m having an appetizer like crab rangoon, I always choose the deep fried version over a baked version because baked just doesn’t cut it. To get that extra crispy wrapper, fried is what works.

To make these crab Rangoon, you’ll need only a few ingredients:

  • Fresh or frozen crab meat
  • Cream Cheese
  • Carrots
  • Celery
  • Garlic Powder
  • Worcestershire Sauce
  • Wonton Wrappers
  • Egg

A bite taken off a crab rangoon to show the filling inside

How to Wrap Crab Rangoon in Rice Paper

Wrapping crab Rangoon is easy, and you can go with any shape you like. I used square wonton wrappers and placed the filling in the center. Brush some egg around the edges to seal the wrappers. Then just bring the opposite edges together on both sides to create a square pocket. Make sure it’s sealed properly or the filling can ooze out while deep frying which creates splatter in the oil. While sealing the wrappers, press gently in such a way that you remove as much air as possible. You can make these in advance, and keep them covered in the fridge for 3-4 hours till you are ready to fry. These take only minutes to fry which makes them the perfect make-ahead appetizer!

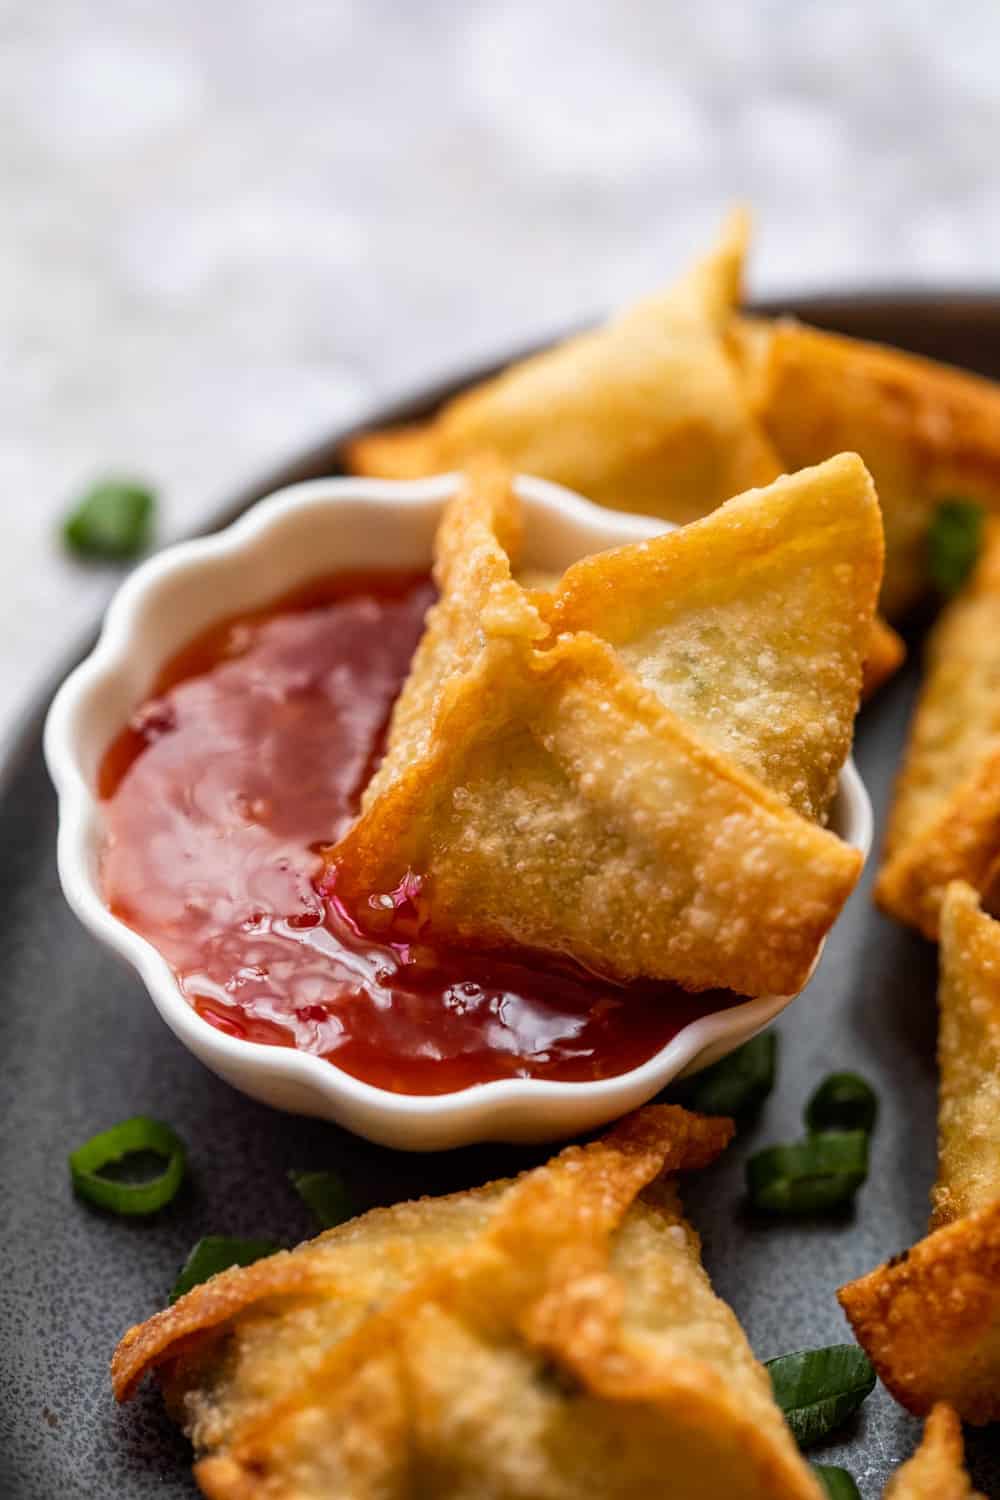
Crab rangoon being dipped in sweet and spicy sauce

Tips to Making the Best Crab Rangoon Recipe

Wonton wrappers are easily available in the freezer section of most supermarkets and Asian grocery stores. For these perfect crab pockets, you can also use frozen crab meat, canned crab meat or even imitation crab sticks. Just make sure to thaw well if using frozen before making the filling to avoid any extra liquid. If using imitation crab meat, make sure to dice it finely before adding it to the filling.

We love serving crab rangoon with some Sweet Chili Sauce. You can also use soy sauce or your favorite Asian dipping sauce. This is one of those appetizers that absolutely everybody loves so make sure to make extras because these disappear fast!

Closeup of a piece of crab rangoon on a plate

Try More Asian Inspired Recipes

Closeup of a piece of crab rangoon on a plate
Print

Crab Rangoon

Crab rangoon is a delicious Chinese appetizer made with a real crab filling, wrapped in wonton wrappers and deep fried till golden brown.
Course Appetizer
Cuisine Asian American
Keyword crab rangoon, crab rangoon recipe
Prep Time 20 minutes
Cook Time 10 minutes
Total Time 30 minutes
Servings 20 pieces
Calories 65kcal
Author Richa Gupta

Ingredients

  • 8 ounces fresh Crab Meat or imitation crab meat
  • 4 ounces Cream Cheese
  • 1/4 cup finely diced Carrots
  • 1/4 cup finely diced Celery
  • 1.5 teaspoon Worcestershire Sauce
  • 1/2 teaspoon Garlic Powder
  • 1/4 teaspoon Salt
  • 20-25 square Wonton Wrappers
  • 2 tablespoons Oil for Frying

Instructions

  • Place the crab meat, cream cheese, carrots, celery, garlic powder, worcestershire sauce and salt in a bowl and mix together to form the filling for crab rangoon.
  • To wrap crab rangoon, take a square wonton wrapper and place two teaspoons filling in the center. Brush the edges with whisked egg and bring opposite ends of both sides together to form a pocket shape. Repeat till all the filling is consumed. While making one piece, make sure the other wrappers are covered with a damp cloth or they'll dry out.
  • Heat a skillet of 4 inches oil to 350 degrees and fry the crab rangoons, a few at a time, till golden brown. This should take 3-4 minutes.
  • Serve hot with a sweet and spicy dipping sauce.

Nutrition

Calories: 65kcal | Carbohydrates: 5g | Protein: 3g | Fat: 4g | Saturated Fat: 1g | Cholesterol: 12mg | Sodium: 192mg | Potassium: 49mg | Fiber: 1g | Sugar: 1g | Vitamin A: 352IU | Vitamin C: 1mg | Calcium: 15mg | Iron: 1mg


from The Recipe Critic https://ift.tt/3hr40XQ
https://ift.tt/2WPYUux

रविवार, 27 दिसंबर 2020

10 Minute Instant Pot Spaghetti

For those nights when you need something fast and easy turn to this 10 minute Instant Pot Spaghetti. Superbly seasoned beef and tender noodles all cook together in a delectable sauce and is ready in no time.

I love Italian food, it’s comfort food. Make a complete Italian inspired meal with Creamy Zuppa Toscana, decadent Panzanella Salad, Homemade Easy Cheesy Garlic Bread and finish off with Traditional Italian Cookies. Buono!

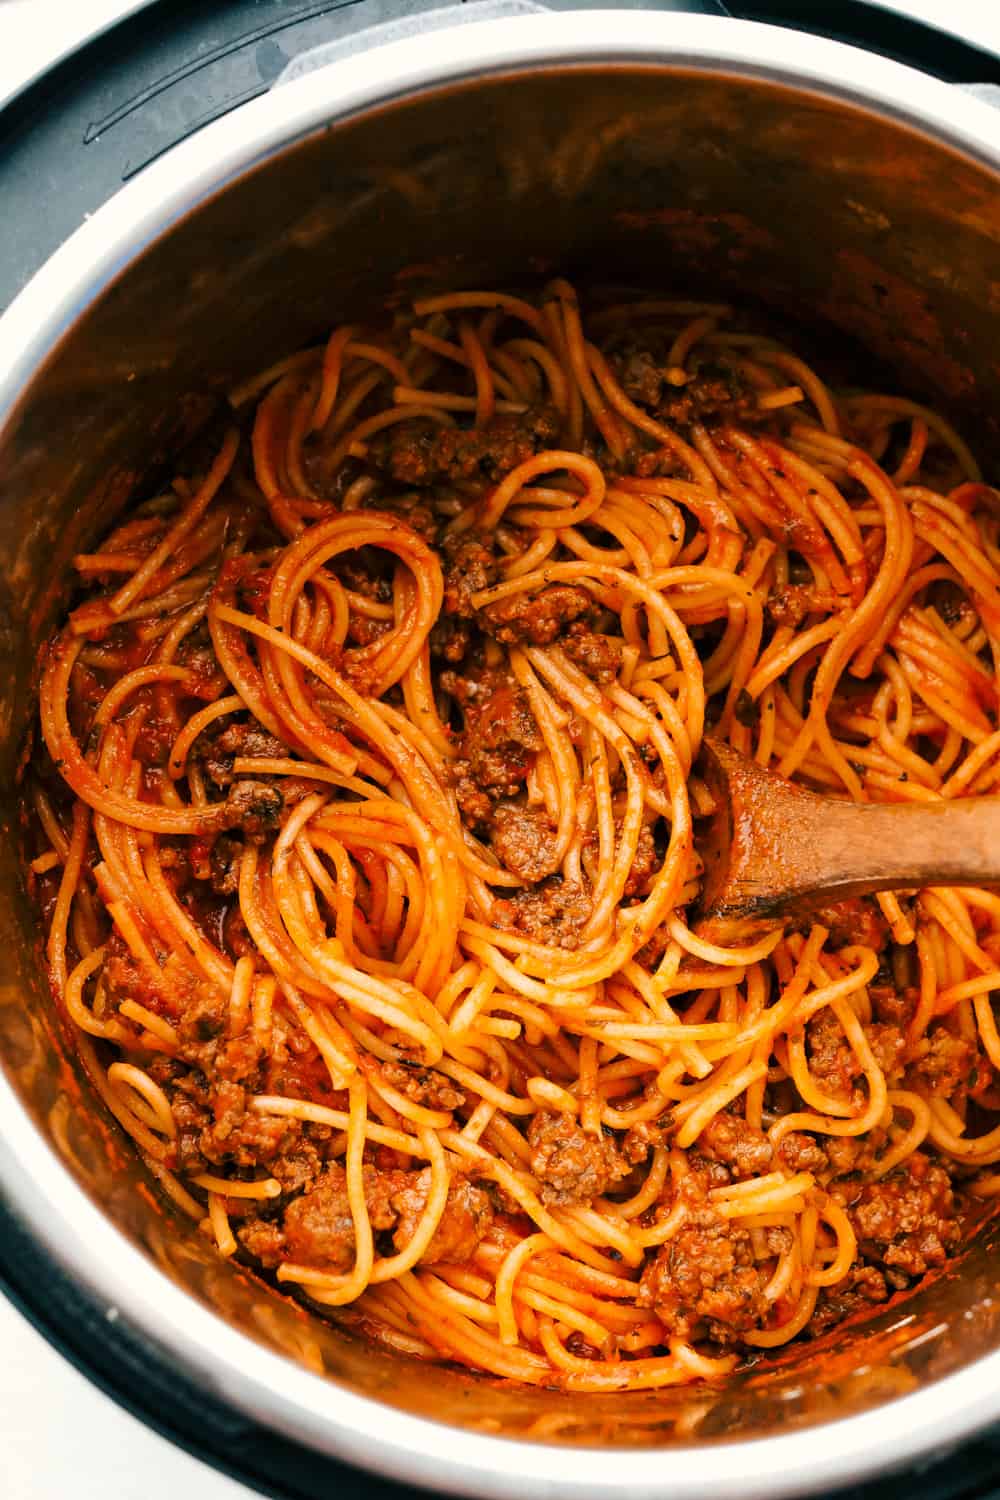
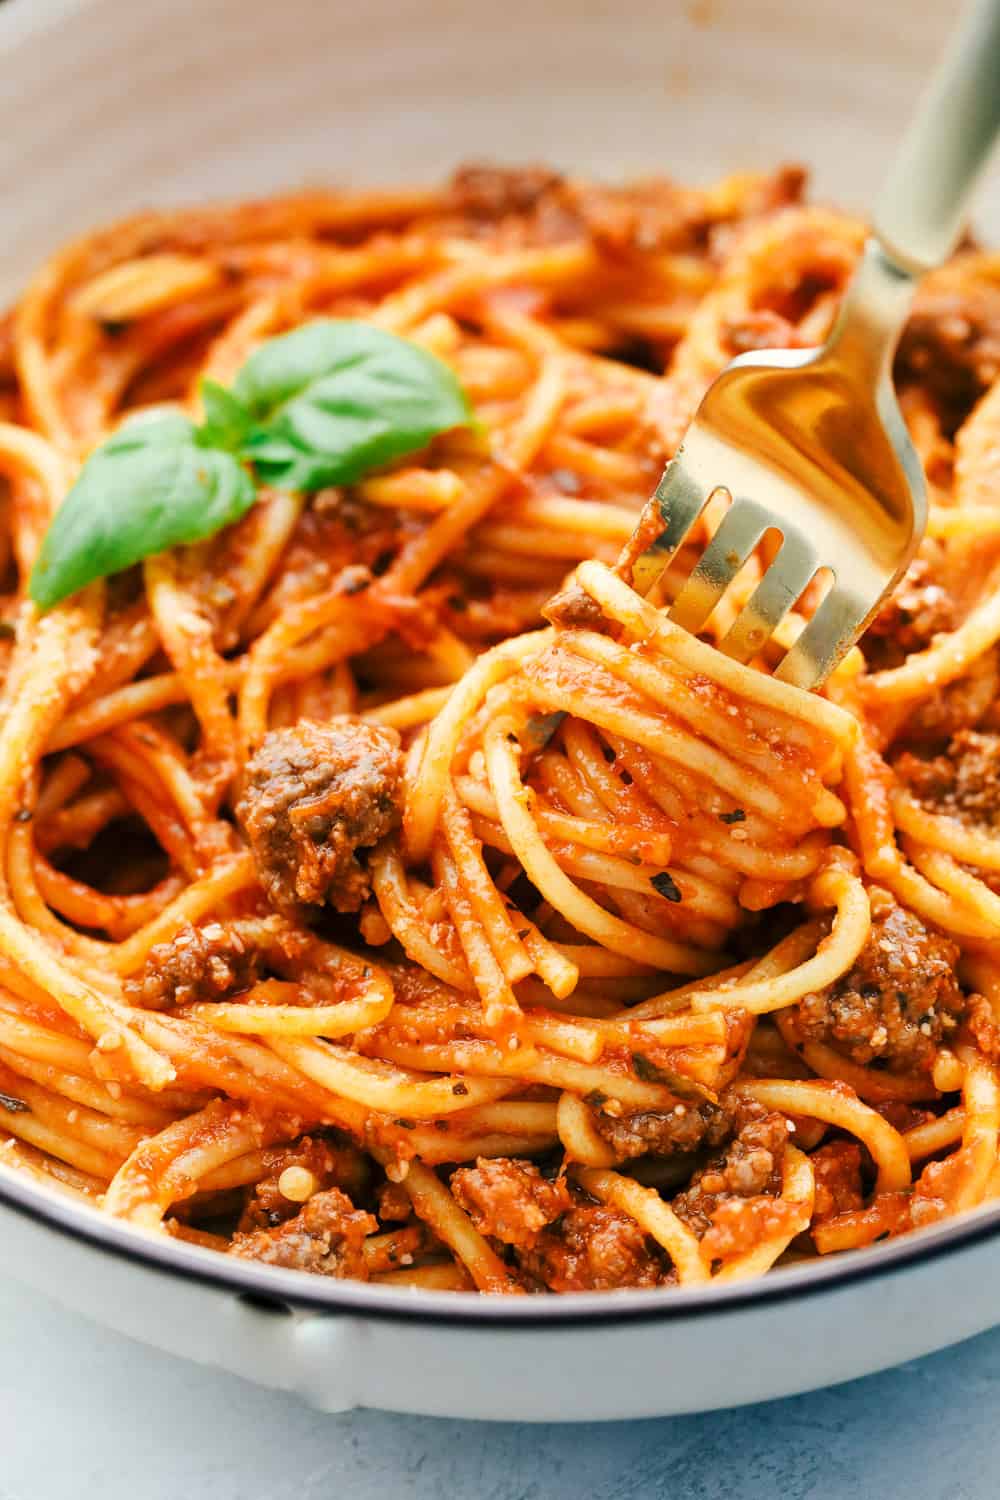
Meaty 10 min Instant pot spaghetti.

Instant Pot Spaghetti

Instant Pot cooking changed my life. All of a sudden I could cook dinners in half the time and all in one pot. It’s one of my favorite kitchen gadgets. While instant pot spaghetti may not be truly Italian, it’s Italian inspired. It’s the perfect meal when you feel like life has been a hot mess that day. It’s a hands off, no fuss, everyone will love it meal.  Spaghetti is a perfect go to meal, it’s one everyone loves and it doesn’t take that much time. And in the instant pot it’s even faster as it all cooks together. The pasta, meat and sauce, all in one pot. You are going to love it. Rich and hearty it will fill you and your family up.

Now you’re going to have to trust me on this recipe. Cooking the noodles with the sauce might seem like a gamble, it is, but it works. The temptation to want to stir will be real. Don’t give in, don’t stir. This recipe really goes against all your cooking instincts. But trust me, this works and you might be surprised about how easy and wonderful it is to have it all cook in the same pot at the same time. You may never go back to regular spaghetti again. Believe me this works and it’s delicious. This is the perfect recipe on those days when you forgot to plan ahead. Reach for your pantry staples and set the table because you’ve got this.

Quick and Easy Spaghetti Ingredients

Jarred marinara sauce makes this super easy, it’s a great short cut, especially on busy nights. You can make your own spaghetti sauce, like this favorite, which is made in the instant pot first. Then add the noodles. Or keep it quick and simple.

  • Olive Oil: To help the beef from sticking to the pot.
  • Ground Beef: Use lean ground beef.
  • Italian Seasoning: Helps to season the beef for an extra flavor.
  • Garlic Powder: Because you can never have enough garlic in Italian food.
  • Salt and Pepper: Add more or less to taste.
  • Spaghetti Noodles: It is best to break the noodles beforehand then criss-crossing them in the pot for best cooking.
  • Marinara Sauce: Two Jars of your favorite or this homemade equivalent sauce is even better.
  • Water: You need this extra fluid for the noodles to cook in.

How to Make Spaghetti in an Instant Pot

Cooking the noodles at the same time as the sauce make this recipe super fast and easy. All the work in one pot means less mess. More time to do the things you love and still put a hearty meal on the table.

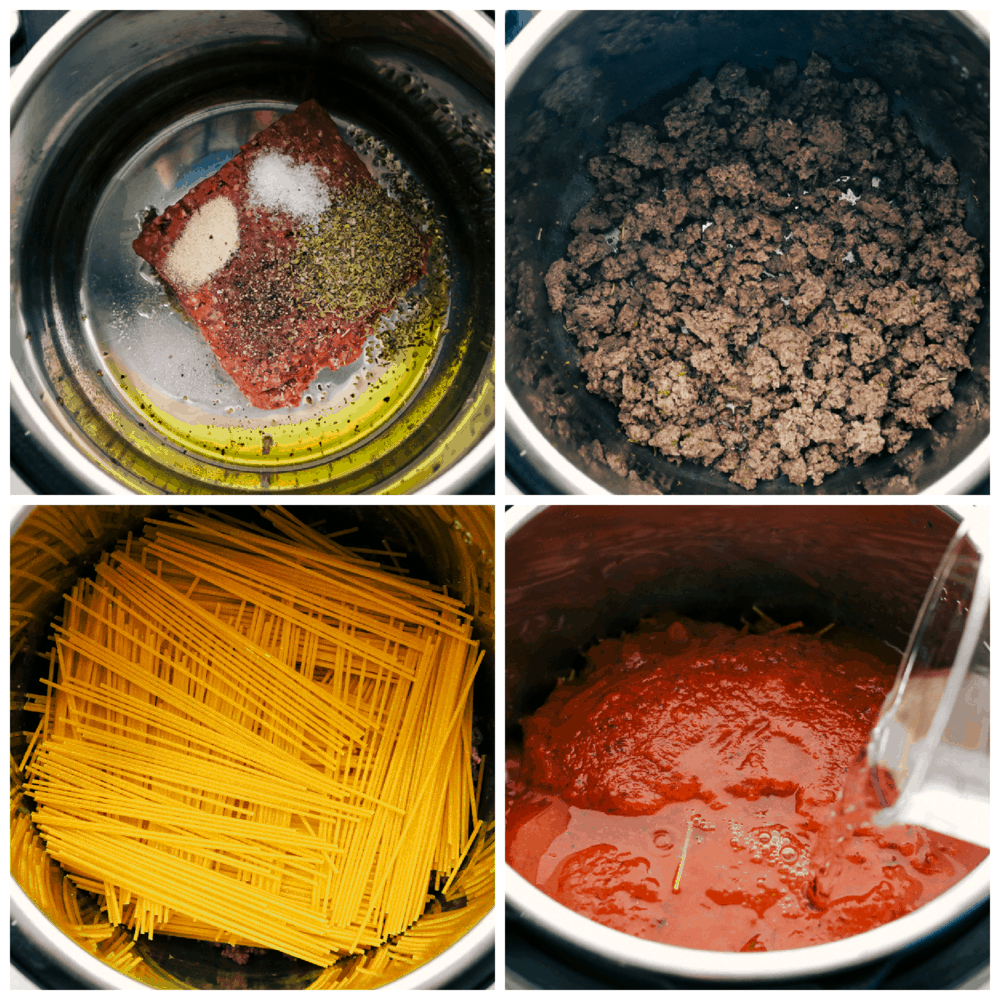
  1. Sauté: Set a 6 quart instant pot to sauté. Add the olive oil, ground beef, Italian seasoning, garlic powder, salt and pepper. Cook and crumble until no longer pink.
  2. Add: Break the noodles in half. Layer them in a criss-cross pattern so they do not stick as it cooks.
  3. Pour: Pour the marinara and water on top of the noodles.
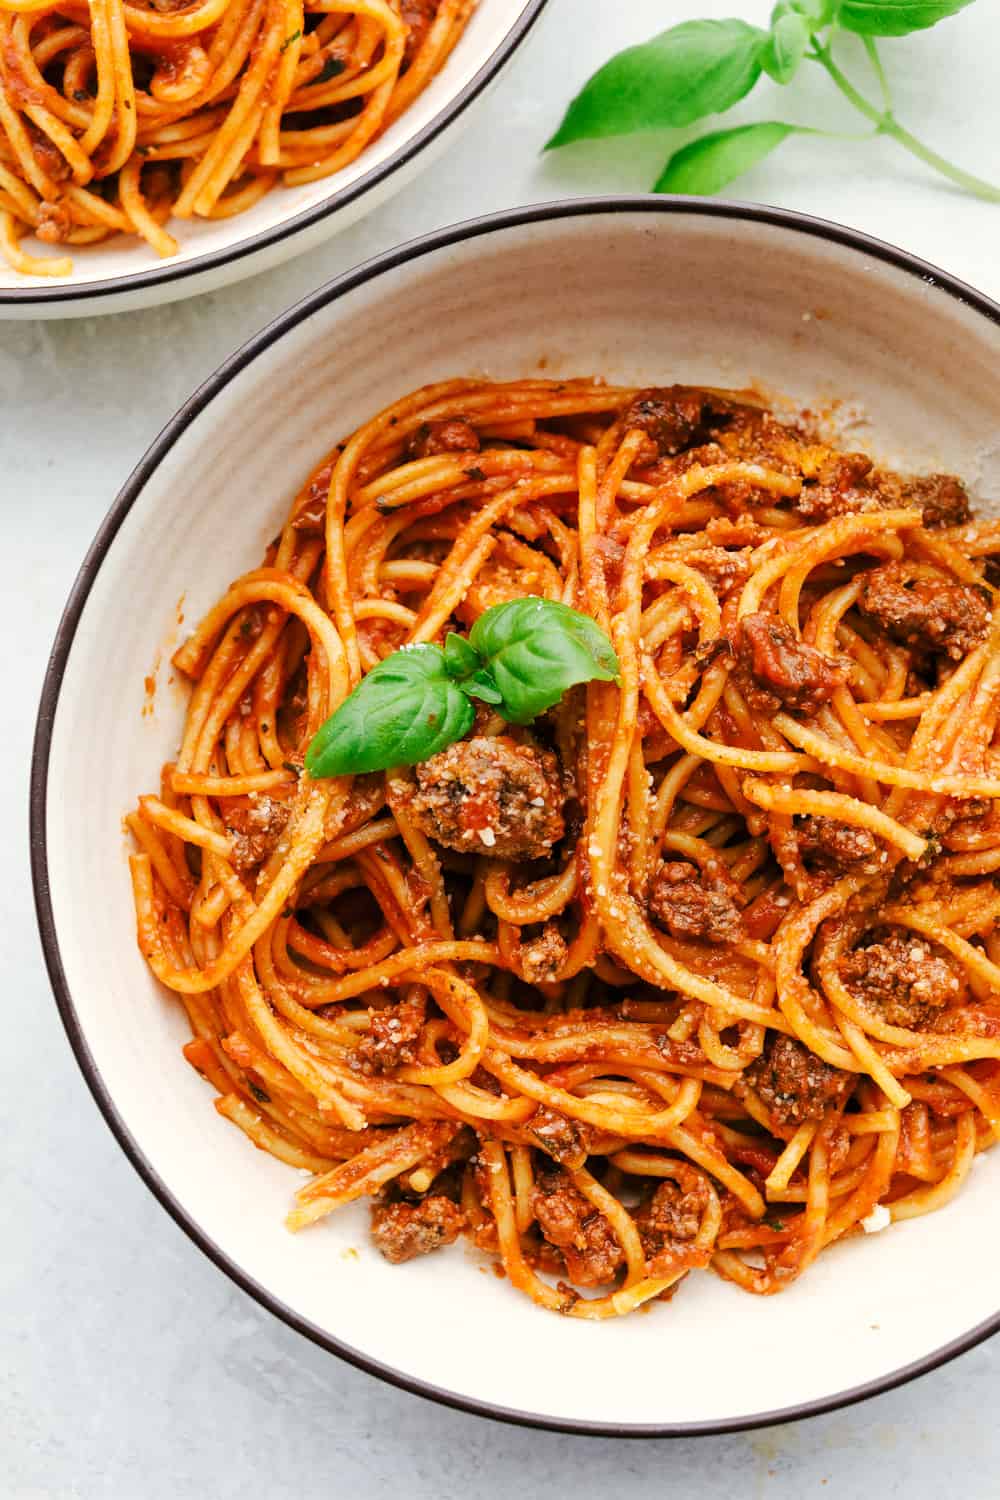
  4. Cook: Cook on high pressure for 5-7 minutes. Use the quick release and wait for cycle to complete before unlocking. Stir together and serve with parmesan and chopped basil.

Browning, seasoning and cooking spaghetti in the instant pot.

Tips For The Best Instant Pot Spaghetti

You’re going to love how easy this is, sometimes you just need to get a meal on the table and I love this one, especially if I don’t want to spend a ton of time in the kitchen. If I have a bit more time I’ll throw together this Slow cooker Italian Chicken and Potatoes or Incredible Homemade Calzone. Always family favorites!

  • Noodles: Make sure to lay your noodles in criss cross layers. This will prevent the noodles from sticking together as they cook, since you can’t stir it during cooking.
  • Swap: Take this opportunity to use whole wheat noodles and sneak in some fiber and protein. They’ll never know because it’s cooked all together.
  • Meat: Feel free to use ground turkey, ground chicken, or Italian sausage instead of beef. All will work in this recipe.
  • Scrape: After you brown the meat, add about a cup of the water to the meat and scrape the bottom of the instant pot. This helps avoid the “burn” notification that sometimes can occur during cooking.
  • Water:  If you using jarred marinara I like to place the water in the empty jars and “rinse” all the goodness out of the jar and into my spaghetti. It’s a double whammy.
  • Avoid: Avoid the urge to stir the noodles once you put them in. Don’t do it! You’ll want to but it’ll cause the noodles to get gummy and stick together.
  • Creamy: Want a more creamy sauce? Add two large tablespoons or more of cream cheese when it’s finished cooking. Gently stir till melted and thoroughly incorporated.
  • More Flavor: If you want a pinch more flavor add an extra half to 1 teaspoon Italian seasoning. This might be especially helpful if your marinara sauce seems a little bland. You want a robust full bodied sauce.
  • Watery: Don’t panic if you remove the lid and it seems watery. Give it a good stir and let it sit for 3-5 minutes.

Spaghetti in a white bowl.

Freezing and Storing Spaghetti

If there’s a chance you have leftovers, they’ll be even better the second day. I don’t know what it is about Italian food, but it’s always better after the flavors have melded together overnight. One of my favorites for leftovers is Baked Chicken Spaghetti, it is so good!  Sometimes I secretly hope there are leftovers, just so I can have them the next day for lunch. Warmed up with a slice of bread and I’m set!

  • Storing: Like most dishes, this will keep beautifully in the fridge for 4-5 days.
  • Freeze: This will freeze for 3-4 months well. If I know I’m going to freeze leftovers I’ll try to under cook the noodles just a tad bit so they are really al dente. Using the quick release valve stops the cooking process. Once the spaghetti has completely cooled I will portion out in individual freezer safe containers or bags. Thaw overnight in the fridge and warm on the stove top or microwave. Enjoy!

A fork with instant pot spaghetti wrapped around it.

More Italian Inspired Recipes

Whether it’s soup or seafood, Italian inspired recipes are so scrumptious. The combination of spices and sauces are so incredible. It truly is good comfort food. Many times the recipes come together quickly too. Try these Italian winners tonight.

Print

10 Minute Instant Pot Spaghetti

For those nights when you need something fast and easy turn to 10 minute Instant Pot Spaghetti. Superbly seasoned beef and tender noodles all cook together in a delectable sauce and is ready in no time.
Course Dinner, Main Course
Cuisine American, Italian, Italian American
Keyword instant pot spaghetti, spaghetti
Prep Time 5 minutes
Cook Time 5 minutes
Total Time 10 minutes
Servings 6 People
Calories 497kcal
Author Alyssa Rivers

Ingredients

  • 1 tablespoon olive oil
  • 1 pound ground beef
  • 1 tablespoon Italian seasoning
  • 1 teaspoon garlic powder
  • 1/2 teaspoon salt
  • 1/4 teaspoon pepper
  • 1 pound spaghetti noodles
  • 2 24 ounce jars marinara sauce
  • 3 cups water

Instructions

  • Set a 6 quart instant pot to saute. Add the olive oil, ground beef, Italian seasoning, garlic powder, salt and pepper. Cook and crumble until no longer pink.
  • Break the noodles in half. Layer them in a criss cross pattern so they do not stick as it cooks. Pour the marinara and water on top of the noodles.
  • Cook on high pressure for 5-7 minutes. Use the quick release and wait for cycle to complete before unlocking. Stir together and serve with parmesan and chopped basil.

Nutrition

Calories: 497kcal | Carbohydrates: 57g | Protein: 23g | Fat: 19g | Saturated Fat: 6g | Cholesterol: 54mg | Sodium: 257mg | Potassium: 389mg | Fiber: 3g | Sugar: 2g | Vitamin A: 14IU | Calcium: 46mg | Iron: 3mg


from The Recipe Critic https://ift.tt/2KZrGpO
https://ift.tt/3rvzjVY