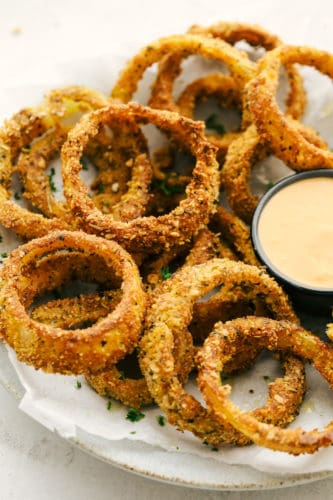
Crispy Air Fryer Onion Rings are going to be your new go to favorite. Golden, crunchy and cooked to perfection, these onion rings are so addicting!
Onion rings make the perfect side dish to your favorite meals. Pair them with Chicken, Grilled Cheese, or Burger.

Homemade Onion Rings
Along with french fries, and tater tots, onion rings are hands down one of my favorite things to get at restaurants. They are always so crispy, the onions are tender and they are so full of flavor. Now you can get the same, if not better, onion rings right in your own home. These air fryer rings are perfectly seasoned and crisp up impeccably, while the onion becomes super tender. Your family is going to love these.
Air frying these onion rings also makes them a healthier option than deep fat frying. That is definitely a win win! You can have your “fried” food and eat it too! You may want to make a double batch, because these are going to disappear about as fast as you can make them. So it’s probably a good thing these are so easy and the air fryer makes cooking them super fast. If you are making multiple batches, serve them as they come out or keep them warm in the oven. They are best hot!
Ingredients for Onion Rings
These ingredients are easy to find and probably in your pantry right now! Air fryer onion rings are packed with flavor that is going to wow!
- Flour: All purpose flour or unbleached work well.
- Baking Powder: Creates a light crispy batter.
- Eggs: To help the batter adhere to the onions.
- Panko: An ideal coating for air frying.
- Parmesan: Use finely grated parmesan for best results.
- Paprika: Adds color and flavor.
- Garlic Powder: Adds a nice kick of flavor.
- Olive Oil Spray: Use to coat the onion rings for great crunch!
Makeing Onion Rings in the Air Fryer
Similar to my Crispy Onion Rings that can be baked or fried, these are super easy. It doesn’t take much to make restaurant worthy onion rings right in the comfort of your own home.
- Cut: Slice the onions ¼ inch thickness into rings.
- Flour Mixture: In a small bowl add the flour and baking powder.
- Egg mixture: In another bowl add the eggs and whisk.
- Breading: And in the last shallow dish add Panko, parmesan cheese, paprika and garlic powder.
- Dunk: Dip one onion ring in the flour, then the egg, and lastly in the Panko mixture. Repeat with all of the onion rings.
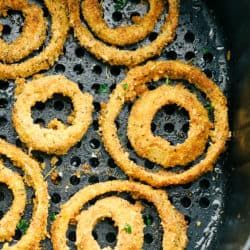
- Air Fry: Add the onion rings to the air fryer basket and put in a single layer. Spray the onion rings with the olive oil spray. Cook at 360 degrees for 8-10 minutes or until golden brown.

How to Make Crispy Onion Rings
When it comes to making the perfect batter for onion rings, there may be a few questions that come to mind. Here is my advice on making the BEST onion rings you have ever had. Follow these tips to master the art of a crispy onion ring your family will go crazy over!
- Best Onions to Use: I like the sweet onions best, vidalia are one of the best. Yellow or white onions will work too, but keep in mind that white onions have a sharper bite to them than a yellow or sweet onion.
- How to get the best onion flavor: When biting into an onion ring, you want to get a sweet and bright onion flavor. To achieve this unique flavor, you will need to start by soaking the onion slices in cold water. Allow them to chill in the water for at least 10 minutes. Dry them off completely before beginning to batter them.
- How to keep batter from falling off onion rings: In order to keep that tasty and crispy breading on your onion you will want to use cold batter. Also, make sure you shake off any excess flour before dipping the onion in the egg mixture. You need thin layers as you go.
- How to cut the onion: Cut the stem end off and remove the peel. Then trim off the root end. Now cut a thin slice off the end of the onion to keep the onion from rolling while you slice it. Finally, place the onion flat side down and cut crosswise into thick slices for the perfect onion rings.
- How to get extra crispy onion rings: For an extra crispy coating, double dip the onion rings in the egg and panko mixture. Also, when cooling the onion rings, place them on a wire cooling rack with paper towels below it so that the crispy rings are not laying directly on a pan, it can cause them to steam a bit and get soggy on the bottom.

Tips for the Best Air Fryer Onion Rings
Creating home cooked, restaurant style food at home is always a treat, like this fried rice or fish tacos that taste just like they came from your favorite take out. These air fryer onion rings along with air fryer wings and egg rolls are just that. A taste of take out in the comfort of your own home.
- Don’t Over Crowd: Don’t stack your onion rings, allow them some space so the air can circulate and really crisp them up all the way around.
- Know your Air Fryer: Every air fryer is a bit different, just like every oven or crockpot is a bit different. You may need to add more cooking time or shorten it depending on how crispy you want them and how fast your air fryer cooks. Check your first batch a couple of times to nail down the time.
- Don’t shake or Turn: Unlike some recipes that have you turn or shake your air fryer while cooking is happening, you won’t want to do that with onion rings. It will make all the batter fall off. Another reason why you don’t want to over crowd.
- Cut them the same thickness: With onions you can’t control the circumference but you can control the thickness. Keep them all the same for even cooking.
- Oil: Be sure to spray the onion rings with oil thoroughly, this is what will give the onion rings their crunch. Yes it’s oil, but remember your still not bathing them in it, so it’s still better for you than deep fat frying. Use a high smoke oil, like canola, or avocado oil for best results.
- Seasonings: These are super versatile. Feel free to add in different spices and seasonings according to your tastes. Add Italian seasoning, chili powder, cumin, smoked paprika or chipotle chili powder for variation.
- Sauces: These onion rings are super good on their own but feel free to dunk them in your favorite sauces. Try my favorite fry sauce, homemade ranch dressing, yum yum sauce or even this incredible cheese sauce for starters.

More Incredible Air Fryer Recipes to Try
Air frying is definitely making its mark on the culinary world. There are so many yummy things you can make in the air fryer that taste better and are better for you than any other way. The air fryer has a permanent spot in our kitchen and it’s used all the time. Air frying is easy, fast and oh so good! If you are new to air frying try some of these tried and true recipes that will leave you coming back for more!
- Homemade Air Fryer French Fries
- Crispy Air Fryer “Fried” Chicken
- Crispy Air Fryer Egg Rolls
- Air Fryer Roasted Garlic Broccoli
- The Best Air Fryer Chicken Breast
Air Fryer Onion Rings
Ingredients
- 2 large onions
- 1 1/4 cup flour
- 1 teaspoon baking powder
- 3 large eggs
- 2 cups panko
- 1/2 cup grated parmesan cheese
- 1 teaspoon paprika
- 1/2 teaspoon garlic powder
- olive oil spray
Instructions
-
Dip one onion ring in the flour, then the egg, and lastly in the Panko mixture. Repeat with all of the onion rings.
-
Add the onion rings to the air fryer basket and put in a single layer. Spray the onion rings with the olive oil spray. Cook at 360 degrees for 8-10 minutes or until golden brown.
Nutrition
‘
from The Recipe Critic https://ift.tt/3b2i0o6
https://ift.tt/3jQ4E2i