शुक्रवार, 5 मार्च 2021

Easy Empty Tomb Rolls

Empty Tomb Rolls are the perfect treat for Easter. Whether you have them for breakfast, brunch or dessert, they will be a huge hit!

These rolls are amazing anytime, but we love them for Easter morning! For more sweet and savory breakfast ideas try these cinnamon rolls, donut holes or German pancake.
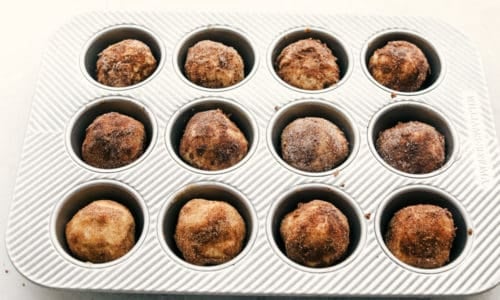
Empty tomb rolls in a basket, opened with gooey center.Resurrection Rolls

Empty Tomb Rolls are also known as Resurrection Rolls. These rolls are popular at Easter time because of their symbolism, and because they taste so delicious. The outside is covered in a buttery cinnamon and sugar coating and the inside has a ooey gooey caramel-like cinnamon and sugar syrup. They are perfect to make with the kids and while you dip and roll you can teach them the meaning of the symbols.

Whether or not you make them to celebrate Easter, you need to make these just because they are so fun. The kids will love rolling the marshmallows in butter and cinnamon and sugar and folding it up in the roll dough. Then as they cook the marshmallow disappears leaving behind the sweet spiced syrup inside that make them so fantastic to eat. Kids of all ages will love making and eating these special treats. You have to try them!

Ingredients for Tomb Rolls

Use large marshmallows that soft and fresh for best results.

  • Sugar: Sweet white sugar.
  • Cinnamon: Adds the spice that compliments the sugar.
  • Rhodes Rolls: You can use refrigerated crescent rolls or biscuits as well.
  • Marshmallows: Big fresh squishy jumbo marshmallows.
  • Butter: Do not substitute, butter is best.

How to Make Easter Tomb Rolls

Yes, these are a bit messy to make, but it is so worth it and so much fun!

  1. Prepare: Preheat oven to 350 and grease a 12 muffin tin and set aside.
  2. Sugar and Spice: In a small bowl whisk together the sugar and cinnamon.
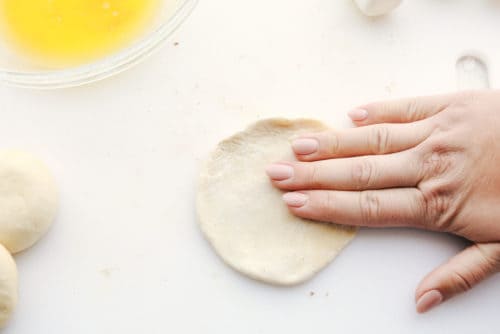
  3. Dough: Flatten out each roll into a small circle
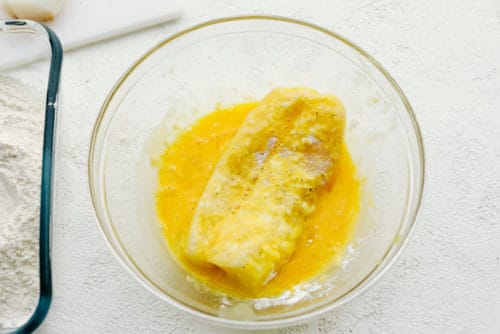
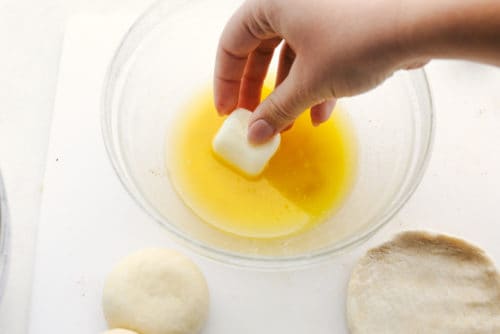
  4. Dip: Dip the marshmallow into the melted butter.
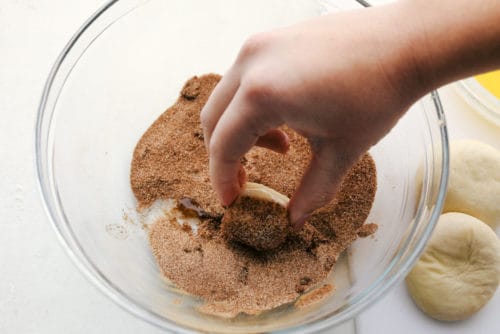
  5. Dunk: Then dip the marshmallow in the cinnamon and sugar.
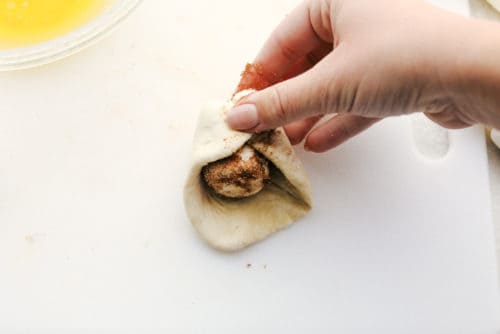
  6. Encase: Place the marshmallow into the center and fold over the marshmallow and seal.
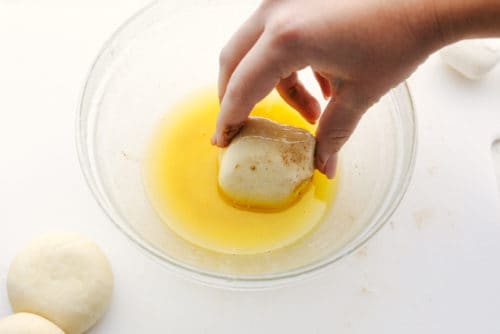
  7. Roll: Take the dough ball and roll it in melted butter.
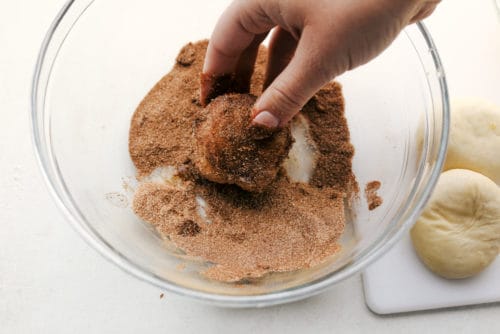
  8. Dip: Then roll in the cinnamon and sugar again. Place into the muffin tin.
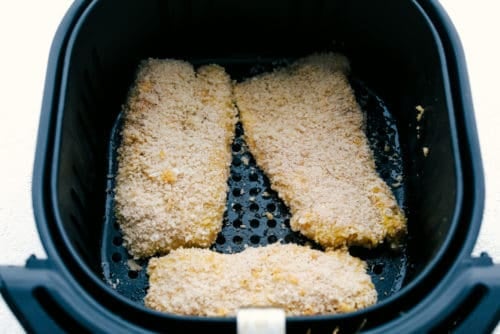
  9. Bake: Place in the oven and bake for 10-15 minutes or till cooked through. Remove and let cool.

Spreading out the dough, dipping the marshmallow in seasonings and wrapping it in the dough.

Tomb Roll Symbolism

These incredible treats are the perfect way to teach the true meaning of Easter. As you assemble the rolls with your kids you can explain what the different ingredients symbolizes. And then when you take them out, do not forget to explain the best part, the hollow inside representing the empty tomb. It is the best part. The kids and adults all love it.

  • Large Marshmallows: This represents the body of Jesus.
  • Roll Dough: Represents the wrapping of Jesus’ body or the tomb.
  • Melted Butter: Symbolizes the  oils of embalming that were used.
  • Cinnamon and Sugar Mix: This represents the spices used to anoint Christ’s body.
  • Oven: Symbolizes the tomb.
  • Hollow Inside Bun: These means the empty tomb or the empty cloths.

Dipping the roll in butter and cinnamon sugar and placing in muffin tin.

Tips for Easy Empty Tomb Rolls

These are absolutely delightful both to make and to eat. Here are a few tips to make them exquisite.

  • Dough: You can use different kinds of dough for these, from Rhodes Rolls, to homemade dough. There are lots of options. Try refrigerated biscuit or crescent dough. For extremely flakey rolls use frozen pastry or phyllo dough.
  • Thaw: If you use Rhodes Rolls and want to make in the morning you can thaw the dough in the fridge overnight and they’ll be ready to make in the morning. Let them sit at room temperature for 15 minutes at least.
  • Seal It: You will want to make sure to seal the dough so the ooey gooeyness doesn’t ooze out. Pinch the ends securely and dip your fingertips in water to help seal the edges if needed.
  • Muffin tin Must:  Using a muffin tin to put the rolls in actually will help the rolls seal. If any of the marshmallow leaks out, it will be contained and absorbed into the tomb rolls.
  • Dipping: I love to use my kids to help with this part. They love it. I encourage them to use one hand for the butter and one hand for the cinnamon and sugar mix. Then it is best if someone different seals the rolls without cinnamon and sugar or butter on their hands. This will increase the chance of them not coming apart.
  • Grease it or Parchment:  No matter how sealed the rolls are there will be some leakage. Be sure to grease the muffin tin or use parchment paper in each tin.

Opening an empty tomb roll to reveal the melted marshmallow goodness.

How to Store the Best Empty Tomb Rolls

These Tomb rolls are best eaten right from the oven, after it has cooled slightly. The melted marshmallow can harden as it cools. If you do have leftovers keep them in an airtight container at room temperature. You can reheat these in the microwave for 8-10 seconds. These will keep for up to 3 days.

Empty tomb rolls in a basket ready to eat.

More Easter Inspired Recipes

Holidays are wonderful because they mean exceptional food,  traditions, and family. Sometimes holidays mean the one time of year that you get to make that one of a kind food or have a special tradition. These tried and true recipes can help you create some amazing menus and even better memories.

Print

Empty Tomb Rolls

Empty Tomb Rolls are the perfect treat for Easter. Whether you have them for breakfast, brunch or dessert, they will be a huge hit!
Course Breakfast
Cuisine American
Keyword easter empty rolls, empty tomb rolls, ressurection rolls, tomb rolls
Prep Time 10 minutes
Cook Time 15 minutes
Total Time 25 minutes
Servings 12 Rolls
Calories 184kcal
Author Alyssa Rivers

Ingredients

  • 1/2 cup sugar
  • 1 Tablespoon cinnamon
  • 12 Rhodes Rolls thawed (can use refrigerated crescent rolls or biscuits)
  • 12 jumbo marshmallows
  • 1/2 cup butter melted

Instructions

  • Preheat oven to 350 and grease a 12 muffin tin and set aside.
  • In a small bowl whisk together the sugar and cinnamon.
  • Flatten out each roll into a small circle.
  • Dip the marshmallow into the melted butter.
  • Dip the marshmallow in the cinnamon sugar.
  • Place the marshmallow into the center and fold over the marshmallow and seal.
  • Roll into the melted butter.
  • And again in the cinnamon sugar. Place into the muffin tin.
  • Bake for 10-15 minutes and remove from the oven and let cool.

Nutrition

Calories: 184kcal | Carbohydrates: 30g | Protein: 1g | Fat: 8g | Saturated Fat: 5g | Trans Fat: 1g | Cholesterol: 20mg | Sodium: 88mg | Potassium: 7mg | Fiber: 1g | Sugar: 23g | Vitamin A: 238IU | Vitamin C: 1mg | Calcium: 10mg | Iron: 1mg


from The Recipe Critic https://ift.tt/3uYyjvi
https://ift.tt/3c1De61

गुरुवार, 4 मार्च 2021

Creamy Lemon Chicken Piccata

A quick and easy one pot meal that is on the dinner table in 30 minutes! Tender breaded chicken in a creamy lemon sauce that the entire family will love!

Chicken is a favorite protein around here with its mild flavor, you can do so many delicious recipes! You have to try these favorites, Lemon Chicken, Fried Rice and Noodle Soup!

Creamy lemon piccata chicken in a cast iron skillet.

Easy Lemon Chicken Piccata

One of our favorite meals of the week was this Creamy Lemon Chicken Piccata. My favorite part was that it was a one pot meal and ready on the dinner table in 30 minutes!  It is just like the classic chicken piccata dish, but with the added lemon tang. It gives it such a fresh and delicious taste to this creamy sauce. The chicken has a delicious breading on the outside and it is perfect served over some pasta. Everyone in my family loved this meal. It had such a delicious flavor and will be one that we make again and again!

This American Italian favorite is so creamy and delicious. Piccata literally means, pounded flat and cooked in a sauce of lemon, parsley and butter. Done in one pan and in 30 minutes means you can have an incredible meal on the table in no time. Do not be scared of the capers. They really make the dish amazing. If you have never had them, this is the perfect dish to try them with. You have to try this creamy lemon piccata!

Ingredients for Lemon Chicken

Super simple ingredients come together to make an irresistible meal. Serve this with a nice green salad and some rolls and you have dinner made!

  • Chicken: Boneless skinless chicken breasts, pounded flat if needed.
  • Salt and Pepper:To taste.
  • Flour: Creates a nice breading on the chicken.
  • Butter: Adds flavor besides a frying agent.
  • Olive Oil: Also used to cook and add flavor.
  • Chicken Broth: Flavoring and adds to the sauce.
  • Lemons: Fresh whole lemons
  • Heavy Cream: Can substitute half and half, but won’t be as creamy in texture.
  • Capers: Look for these with the pickles and jarred pepperoncinis
  • Parsley: this is optional.
  • Angel Hair Pasta: Can substitute spaghetti noodles if you would like.

Making Perfect Lemon Chicken Piccata

Take the time if you need to, to pound your chicken the same size or at least thinned out. You won’t regret it. They will cook faster and more evenly.

  1. Chicken: Heat 2 Tablespoons butter and 2 Tablespoons of oil in a large skillet over medium high heat. Salt and pepper each side of the chicken breasts
  2. If They Are Thick: If the chicken breasts are overly thick, pound them to be thinner. Cooking time will be shorter.
  3. Flour: Dredge the chicken in the flour
  4. Brown: Put the chicken breasts in the skillet. Cook for about 3 minutes on each side, or until it is cooked throughout and no longer pink. Remove from the skillet and set aside on a plate.
  5. Sauce: Turn the heat to medium low. Add broth juice from both lemons, heavy cream, and capers. Bring the sauce to a boil and return to medium low heat. Test the sauce and season with salt and pepper as needed. Allow the sauce to cook and bubble for about 3 minutes.
  6. Dish: Serve the chicken over cooked pasta and spoon the sauce over broth. Sprinkle with fresh chopped parsley.

Chicken breasts seasoned, breaded and cooked, and the creamy sauce being made.

What are Capers?

If you have never had capers before, this is the perfect introduction. Typically served alongside of chicken and salmon dishes, they add a ton of flavor. Capers are under ripened flower buds of plant known as the caper bush. The capers are picked and dried. Then they are pickled to create this tangy, salty, and briny flavor that is out of this world yummy.

These little pea sized condiments produce big flavor. A little goes a long way. Use them in salads, pasta and chicken. Because of their lemony like flavor they are favorite with fish. Give these other recipes a try that spotlight the wonders of capers. Pan Seared Scallops with Lemon Caper Sauce, Pasta Puttanesca with Chicken and Lemon Salmon Piccata. 

Upclose picture of creamy chicken piccata with lemons.

Tips and Variations for Creamy Chicken Piccata

There are a few tips and variations you can do with chicken piccata, but this recipe is perfect just the way it is.

  • Noodles: Truly any kind of pasta can be used to serve this scrumptious lemon piccata dish with. You can also serve it over steamed vegetables, rice, zucchini noodles, or anything else that seems delicious.
  • Chicken: Make sure your chicken is thin, you can pound it thin or slice it in half, either way will create the size you are looking for.
  • Flour:  You need the flour to create the great crust on the chicken and for the sauce to stick to.
  • Fresh Lemons: Do not use bottled lemon juice. It will not taste the same and could actually ruin your dish. In this recipe, keep it to the real thing.
  • Capers:  Some find the capers to salty, if you are afraid of that, just rinse the capers before adding.

How to Store Creamy Lemon Chicken Piccata

Keep this in the fridge in an airtight container for up to 4 days. Warm leftovers in the microwave. It is best to store it seperate from the pasta or whatever you are serving it with if you can.

A chicken breasts with lemon piccata sauce on a bed of noodles in a bowl.

More Chicken Recipes to Try

Chicken is so versatile. It can be used in all sorts of cuisines. American, Italian, Chinese, Mexican and everything in between. Chicken is relatively cheap protein making it an economical family friendly dish. You can boil it, fry it, grill it, bake it and roast it. And don’t forget the latest ways of cooking, instant pot and air fryer. All incredible ways to prepare chicken, so when you need a new recipe to try, look no further than here. I have you covered.

Print

Creamy Lemon Chicken Piccata

A quick and easy one pot meal that is on the dinner table in 30 minutes!  Tender breaded chicken in a creamy lemon sauce that the entire family will love! 
Course Dinner, Main Course
Cuisine Italian American
Keyword chicken recipes, creamy lemon chicken piccatta
Prep Time 10 minutes
Cook Time 15 minutes
Total Time 25 minutes
Servings 4 Servings
Calories 994kcal
Author Alyssa Rivers

Ingredients

  • 4 Chicken Breasts Whole Boneless Skinless
  • salt and pepper to taste
  • 1/4 cup all purpose flour
  • 2 Tablespoons Butter
  • 2 Tablespoons Olive Oil
  • 1 cup chicken broth
  • 2 Lemons whole
  • 3/4 Cup Heavy Cream
  • 1/4 cup capers
  • parsley for garnish, chopped
  • 1 pound Angel Hair Pasta

Instructions

  • Heat 2 tablespoons butter and 2 tablespoons of oil in a large skillet over medium high heat. (If the chicken breasts are overly thick, pound them to be thinner. Cooking time will be shorter.) Salt and pepper each side of the chicken breasts.
  • Dredge the chicken in the flour.
  • Put the chicken breasts in the skillet. Cook for about 3 minutes on each side, or until it is cooked throughout and no longer pink. Remove from the skillet and set aside on a plate.
  • Turn the heat to medium low. Add broth, juice from both lemons, heavy cream, and capers. Bring the sauce to a boil and return to medium low heat. Test the sauce and season with salt and pepper as needed. Allow the sauce to cook and bubble for about 3 minutes.
  • Serve the chicken over cooked pasta and spoon the sauce over both. Sprinkle with fresh chopped parsley.

Notes

Updated on March 4, 2021
Originally Posted on April 6, 2015

Nutrition

Calories: 994kcal | Carbohydrates: 98g | Protein: 66g | Fat: 37g | Saturated Fat: 17g | Cholesterol: 221mg | Sodium: 855mg | Potassium: 1244mg | Fiber: 6g | Sugar: 4g | Vitamin A: 914IU | Vitamin C: 36mg | Calcium: 86mg | Iron: 3mg

Save


from The Recipe Critic https://ift.tt/2OmUNFc
https://ift.tt/3uRWNpS

बुधवार, 3 मार्च 2021

Air Fryer Garlic Butter Hasselback Potatoes

Air Fryer Hasselback Potatoes are going to be your new favorite side dish. They are fried to a golden brown and the flavor is amazing!

Air fryers and potatoes just go together, everything just turns out divine. Try these other air fried potato recipes,French Fries, “Roasted” Potatoes and Baked Potatoes.

Hasselback potatoes in the air fryer with herbs and salt.

Air Fryer Hasselback Potatoes

With just a little extra time and effort you can turn ordinary baked potatoes into something extraordinary. Perfect for holidays and special occasions or just because, these garlic butter potatoes will be the hit of the dinner. The little cuts open up beautifully as they cook in the air fryer and the garlic butter oozes into every nook and granny. Topped with herbs and salt these potatoes are insanely delicious. Your whole family is going to love them.

Hasselback potatoes are simply an ordinary potato thinly slices in such a way that when they bake the slices separate and create a fan like appearance. This allows for butter, herbs and seasonings to sink deep into the cracks and throughout the potatoes. They are crispy, flavorful and super impressive! Serve them up with Slow Cooker Beef Tips, Cast Iron Pork Chops or Instant Pot Chicken.

Ingredients for Garlic Butter Potatoes

I love the extra freshness that comes from the fresh herbs, if you don’t have them you can used dried. Use half the amount of dried as you would for fresh, as dried will have concentrated flavor.

  • Potatoes: About 4-5 Russets.
  • Salt and Pepper: Add more or less to taste.
  • Butter: Butter and potatoes just go together.
  • Fresh Parsley, Thyme and Rosemary: Incredible fresh flavor.
  • Garlic: Mince the garlic for best flavor.

Making Air Fryer Hasselbacks

The hardest part of these potatoes is waiting for them to cook!

  1. Potatoes: Wash and scrub the potatoes. Slice the potatoes thinly leaving a half inch base at the bottom.
  2. Season: Salt and pepper the potatoes as desired
  3. Butter: In a small bowl combine melted butter, parsley, thyme, rosemary and garlic.
  4. Baste: Place the potatoes in the bottom of your air fryer basket. Brush the garlic herb butter along the tops of the potatoes.
  5. Bake: Cook at 360 degrees for 15-20 minutes or until tender.

Preparing potatoes for the air fryer with butter, herbs and salt.

How to Cut the Perfect Hasselback Potatoes

There are a couple of different ways to achieve this classic look, and there are a few tips to make it easier.

  1. Sharp knife: Make sure your knife is sharp and do not use a serrated knife. They’re not the right tool for the job
  2. Hasselback Cutter: Yes there is such a thing, and I use this one here found on Amazon.
  3. Spoons: If you don’t have a hasselback cutter never fear. Take two wooden spoons and place them on either side of your potato as you slice them. This will create a natural stop for your knife so you don’t accidently cut all the way through.
  4. Chopsticks:  These will do the same thing as the spoons. Place on either side of the potato and again it will create a natural stop for your knife.

Tips and Toppings!

These take a bit more time than regular baked potatoes but the taste and appearance is totally worth it.

  • Potatoes: Russets are the go to potatoes for this side dish. You can use golden or red potatoes too, but they will be softer, and the outsides will not crisp up as nicely.
  • To Peel or Not to Peel: It a total preference. We love the way the skin adds flavor, texture and crisps so nicely. It also houses a good portion of the nutrition in potatoes, but you can definitely peel them if you are not a potato skin person.
  • Flavor: Experiment with flavors and seasonings. You can use chili powder, Italian seasoning, and ranch or create your own mix of flavors.
  • Top it: Top these with cheese, sour cream, bacon, any of your favorite toppings or just a little bit more butter. You can eat them straight from the air fryer as well.
  • Baste it: For more intense flavor save half of your seasonings and reapply half way through the cooking time. The potatoes will have opened up some and allow for more butter goodness to seep down it.

Crispy air fryer hasselback potatoes on a plate.

More Air Fryer Goodness

Air frying is hands down one my most favorite ways to cook. When I can I cook it in the air fryer i will. Air frying uses circulating air to perfectly cook your food. It creates crispy golden crusts and tender juicy centers. It usually cooks food faster than in the oven or fryer. Air Frying is also more healthy than conventional methods. When “frying” in the air fryer you use less to almost no oil. It is a total win win. If you are need of some scrumptious recipes to use in yours, you have to try some of these tried and true.

Print

Air Fryer Garlic Butter Hasselback Potatoes

Air Fryer Garlic Butter Hasselback Potatoes are going to be your new favorite side dish. They are fried to a golden brown and the flavor is amazing!
Course Side Dish
Cuisine American
Keyword air fryer haselback potatoes, haselback potatoes
Prep Time 5 minutes
Cook Time 15 minutes
Total Time 20 minutes
Servings 4 Potatoes
Calories 341kcal
Author Alyssa Rivers

Ingredients

  • 4-5 small size russet potatoes
  • salt and pepper to taste
  • 1/2 cup butter melted
  • 1 teaspoon fresh parsley finely chopped
  • 1 teaspoon fresh thyme finely chopped
  • 1 teaspoon fresh rosemary finely chopped
  • 3 cloves garlic minced

Instructions

  • Wash and scrub the potatoes. Slice the potatoes thinly leaving a half an inch base at the bottom.
  • Salt and pepper the potatoes.
  • In a small bowl combine melted butter, parsley, thyme, rosemary and garlic.
  • Place the potatoes in the bottom of your air fryer basket. Brush the garlic herb butter along the tops of the potatoes.
  • Cook at 360 degrees for 15-20 minutes or until tender.

Nutrition

Calories: 341kcal | Carbohydrates: 31g | Protein: 4g | Fat: 23g | Saturated Fat: 15g | Trans Fat: 1g | Cholesterol: 61mg | Sodium: 211mg | Potassium: 725mg | Fiber: 2g | Sugar: 1g | Vitamin A: 711IU | Vitamin C: 10mg | Calcium: 33mg | Iron: 2mg


from The Recipe Critic https://ift.tt/2NWnQ2I
https://ift.tt/3sHZZm8

मंगलवार, 2 मार्च 2021

Incredible Crispy Parmesan Air Fryer Cod

Air Fryer Cod will change the way you eat fish! Crispy golden outside and flakey tender inside, you are going to love this!

We love fish at our house, especially when it tastes this amazing! More favorites include Fish and Chips, Baja Tacos and this Salmon.

Crispy parmesan air fryer cod with asparagus on a plate.

Air Fryer Cod Filets

Air frying fish is one of the best ways to cook this delicate tender meat.  The air fryer basket is perfect, it allows the circulating air to cook the outside and the inside while keeping the fish intact. So many times I have lost chunks down between the slats of a grill or they stick to the pan. Air frying gives you delicate delightful fish that looks and tastes better than any restaurant. The panko breading is perfectly seasoned and the cheese adds a touch of saltiness and nuttiness. It’s so easy to make and tastes just as delicious!

Air fried parmesan cod is the perfect dinner choice. It has a light mild flavor and it is good for you. Serve it up with some rice, vegetables, or potatoes and a nice salad. Perfect for a busy weekday or a nice weekend dinner. Put this air fryer cod in your recipe rotation.

Ingredients for Parmesan Cod

Fresh and basic, this Cod could not be any easier or taste any better! It is so good!

  • Cod Fillets: You can use fresh or frozen.
  • Salt and Pepper: Season just to taste.
  • Flour: All purpose or unbleached will work.
  • Eggs: Large lightly beaten.
  • Salt: Adds flavor
  • Panko: I do not recommend breadcrumbs but they will work.
  • Parmesan: Grated will stick best to the fish.
  • Bay Seasoning: A classic flavoring for fish.
  • Garlic Powder: Adds more flavor.
  • Olive oil spray: Use this only if you need it.

Making Crispy Air Fryer Cod

Super easy parmesan cod is going to become a family favorite!

  1. Cod: Pat the cod dry and salt and pepper.
  2. Breading Station: Create a breading station for the fish. In one bowl add the flour. In the second whisk together the eggs and salt. Then in the last bowl add the Panko, parmesan cheese, old bay seasoning, and garlic powder.
  3. Flour: First dip the cod in the flour.
  4. Egg: Then in the egg mixture.
  5. Panko: And lastly in the panko.
  6. Air Fryer: Spray the bottom of your basket with olive oil. Place the fish in the basket of your air fryer.
  7. Bake: Cook at 400 degrees for 10 minutes. Carefully flip the fish. Continue to cook for 3-5 minutes or until the internal temperature reaches 145 degrees.

Seasoning, and breading the cod.

Tips For Dipping and Breading Cod

Breading any food can be messy. Here is sure fire way to at least keep it manageable.

  • One hand: With one hand dip the cod into the flour mixture and coat evenly. Using the same hand dip it into the egg mixture, shake off any excess egg.  Then drop into the panko mixture.
  • The Other Hand:  Use your other dry hand to press the panko into the cod evenly and all over. Coat it well. Then you place in the air fryer basket. Repeat.

Breaded panko in air fryer basket.

Tips for the Best Air Fryer Parmesan Cod

I love cooking with an air fryer for lots of reasons but one of them is that it is hard to mess up your food. Air frying makes it easy to make luscious meals, every single time.

  • Don’t Over Crowd: Given the fish space to breath, if they are too close together, they will steam instead of “fry”
  • Cod: Use a good quality cod fillet. Fresh or frozen is fine. You don’t them too thin or the fish won’t have time to crisp up before it starts to dry out. Thaw frozen cod according to package directions. Pat both dry with a paper towel to remove any extra moisture. This will help the crust crisp nicely.
  • Oil: Using oil is optional but can help it become crispy. Use an oil only spray. Not a non-stick spray, such as pam, they have additives that will ruin your air fryer.
  • Panko: Panko bread crumbs are larger and absorb less moisture so they will produce the best crust. It will be crispy and golden. Regular breadcrumbs will not give you the same results.
  • Fish: This will work with any type of white fish and turn out amazing. Think snapper, tilapia, bass and haddock.

Cooked cod in the air fryer with wedges of lemon.

What to Serve Crispy Air Fryer Parmesan Cod with

This crispy cod is awesome all by itself but you can add to it as you like.

  • Sauce: Tartar sauce is a fan favorite. Malt vinegar, ranch, yum yum sauce, or a squeeze of lemon might be all you need.
  • Use it in: Use this fried cod for fish tacos, mix into a salad, or make a fish sandwich to remember.

How to Store Cod Filets

Keep leftovers in the fridge for 2-3 days. Reheat in the air fryer for 2-3 minutes or till heated through. It won’t have the same crunchiness but it will still be good. Crispy Air Fryer Cod is best right out of the air fryer.

Upclose picture of a fork cutting into the air fryer cod.

More Seafood Favorites

We love a good seafood recipe at our house. Even the kids love it.  Fish is a healthy protein that is good to put in your mix of recipes on a weekly basis. Some seafood is rich like lobster and some is mild and light like shrimp. Whatever you prefer to eat I have a recipe for you. Here are a few tried and true to get you started.

Print

Air Fryer Cod

Air Fryer Cod will change the way you eat fish! Crispy golden outside and flakey tender inside, you are going to love this!
Course Dinner, Main Course
Cuisine American
Keyword air fryer cod, cod filets, Cod Fish
Prep Time 10 minutes
Cook Time 15 minutes
Total Time 25 minutes
Servings 4 Cod
Calories 303kcal
Author Alyssa Rivers

Ingredients

  • 1 pound cod filets
  • salt and pepper
  • 1/2 cup flour
  • 2 large eggs
  • 1/2 teaspoon salt
  • 1 cup Panko
  • 1/2 cup grated parmesan
  • 2 teaspoons old bay seasoning
  • 1/2 teaspoon garlic powder
  • olive oil spray if needed

Instructions

  • Salt and pepper the cod filets.
  • Create a breading station for the fish. In one bowl add the flour. In the second bowl whisk together the eggs and salt. In the last bowl add the Panko, parmesan cheese, old bay seasoning, and garlic powder.
  • First dip the cod in the flour.
  • Then in the egg mixture.
  • And lastly in the Panko.
  • Spray the bottom of your basket with olive oil. Place the fish in the basket of your air fryer. Cook at 400 degrees for 10 minutes. Carefully flip the fish. Continue to cook for 3-5 minutes or until the internal temperature reaches 145 degrees.

Nutrition

Calories: 303kcal | Carbohydrates: 24g | Protein: 32g | Fat: 8g | Saturated Fat: 3g | Trans Fat: 1g | Cholesterol: 153mg | Sodium: 689mg | Potassium: 576mg | Fiber: 1g | Sugar: 1g | Vitamin A: 315IU | Vitamin C: 1mg | Calcium: 211mg | Iron: 3mg


from The Recipe Critic https://ift.tt/381m7jE
https://ift.tt/3dZDjtk