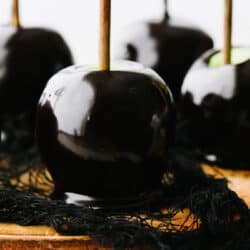
Poison caramel apples are the perfect haunted Halloween treat! The glossy black color not only looks spooky but it tastes absolutely amazing! It’s definitely a dessert that will be sure to impress your guests!
Any recipe with caramel is a hit in my book! If you want to try some more of my favorite caramel recipes then go ahead and try this Cake, Popcorn, or these amazing Brownies!

What Are Poison Apples?
A fun and spooky twist on a fall treat, these poison caramel apples are just what you need to take your holiday party up a notch! Poison caramel apples are regular caramel apples with a twist. Add in some black food coloring to make that glossy black shell and you have yourself a delicious and unique treat! I absolutely love when I can switch a recipe up to make it more festive for a holiday and these caramel apples are perfect for that!
Not only do these look perfect for Halloween but they are super easy to make! Just make sure that you are patient with the caramel. It can be tricky and you don’t want to overcook it! I have listed some tips below to help you out! Just follow those and these will turn out SOO GOOD. In fact, if you want to make an entire Halloween spread for your guests then make these Mummy Cookie Bites or these Halloween Cupcakes to go with them! Your haunted holiday party will be the talk of the town!
Ingredients in Poison Caramel Apples
You most likely already have all of these ingredients in your kitchen! The only thing you might have to go and buy ahead of time is the black food coloring. See the recipe card below for a list of exact ingredient measurements.
- Apples: I like to use granny smith apples for my caramel apple recipes. Go ahead and leave them in the fridge. They need to be chilled before starting this recipe!
- Caramel apple sticks: You can find these in the baking section or you could use popsicle sticks or lollipop sticks as well! Whichever is easier!
- Water: This is used as a base for your caramel
- Granulated sugar: This is what makes these caramel apples sweet!
- Light corn syrup: Using this ingredient will help your caramel to not crystalize.
- Salt: This enhances the flavors of all of the other ingredients!
- Heavy cream: You will want to chill your heavy cream and have that ready before you start into making these apples.
- Vanilla extract: Adds in some delcious flavor to the sweetness.
- Black food coloring: This is what will take them from a normal caramel apple to a poison caramel apple!

Let’s Make Some Caramel Apples!
These caramel apples are quick and easy to make! Take the time to color them black and your guests will be so impressed with how fancy they are!
- Wash, prep and chill the apples: Wash the apples in warm water and then dry each one. This will remove the waxy coating on the apple and help the caramel stick. Using a folded dish towel, insert the sticks in the top of the apples, right where the stem is. Use the folded towel to push the stick as straight as you can down the entire center of the apple. Place prepped apples in the fridge.
- Mix ingredients for the caramel: In a medium sized (3-4 quarts) heavy-bottomed saucepan with tall sides, add the water, sugar, corn syrup and salt. Turn the head on to medium high heat and stir constantly with a wooden spoon or heat proof spatula until the sugar is completely dissolved.
- Boil and SWIRL (Don’t Stir!): Once the mixture is boiling, stop stirring and watch closely until it turns an amber color. It may take about 10 minutes, but the change will happen fairly quickly. If it appears to be turning darker in one area much faster than the rest, gently swirl the whole pot. DON’T STIR IT!
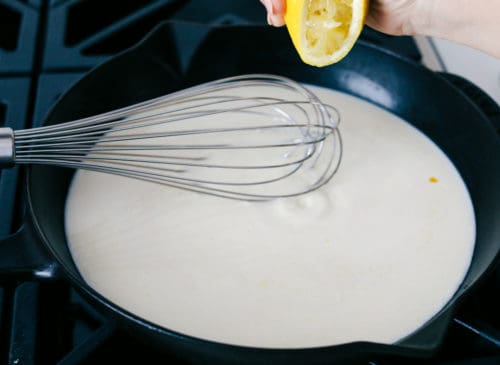
- Add cream, vanilla and black food coloring: Once it is a medium amber color, reduce the heat to medium-low and very carefully and slowly stir in the heavy cream. The mixture will bubble and steam significantly. Continue stirring until the mixture reaches 246° and then remove from the heat. Stir in the vanilla and black food coloring until you reach the desired color.
- Dip while caramel is hot and then cool the apples: Dip the apples in the hot caramel, swirling to evenly coat each one. Let the excess caramel drip off and then set the dipped apple on a piece of parchment sprayed with cooking spray or on a silicone baking mat sprayed with cooking spray. Allow to cool completely, about 45 minutes.
- Add toppings: Once the apples are completely cooled if desired you can proceed to dip them in chocolate and then in the toppings of your choice.

Quick and Easy Baking Tips
Poison caramel apples are one of the best fall treats! Being able to make them at home with homemade caramel makes them so fun and easy. Use these tips and tricks to ensure your batches turn out perfectly!
- Don’t stir the pot: Caramel can be tricky to make. If you stir your caramel with a utensil before it has the cream added you run the risk of introducing a sugar crystal into it and having to start all over. Instead of stiring it then carefully swirl the whole pot to stir your caramel around.
- Corn syrup: Adding a couple tablespoons of light corn syrup will help your caramel avoid crystalizing. It can’t protect it 100% from sugar crystals, but it can help a lot!
- Amber color: Waiting for the deeper amber color is a game of patience, but trust me, it has a big pay off! If you add the cream too soon you will end up with a pale caramel. Not only will it look different but the taste won’t be as good either! SO make sure to wait on that dark caramel color!
- Dip while hot: Dip your chilled apples when the caramel is right off the stove. It’s much easier to dip them when the caramel is very liquid. It will thicken a lot as it cools so work quickly.
- Chocolate for dipping: I find candy chocolate or almond bark works best instead of chocolate chips. Heat the chocolate up in the microwave for 20 seconds at a time and then stir it. Go ahead and do this until it’s all melted and there aren’t any lumps!

How to Store Leftovers
Homemade poison caramel apples are a delightful treat! They will be a hit at any Halloween party. Here is how to store them so that you can enjoy them for a couple of days!
- Room Temperature: With these caramel apples you can leave them uncovered on a parchment-lined baking sheet for 1-2 days. The longer they sit, the more the caramel will sweat off the apple and pool around the bottom. Do NOT put them in the fridge! The moisture will make the caramel melt off completely.
More Spooky Halloween Treats

Dinner
Mummy Hot Dogs

Desserts
Mummy Cookie Bites
Appetizers
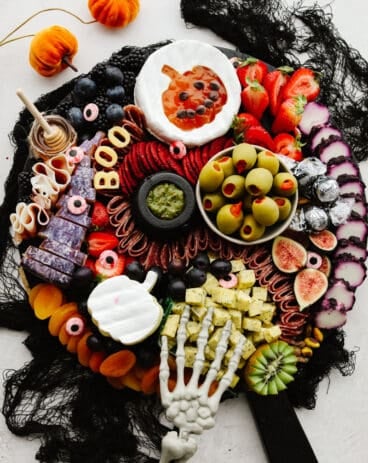
Halloween Charcuterie Board

Desserts
Halloween Cupcakes
Poison Caramel Apples
Ingredients
- 8 small Apples Chilled
- Caramel Apple Sticks or lollipop sticks or popsicle sticks work as well
- 1 Cup Water
- 1 ½ Cup Granulated Sugar
- 2 Tablespoons Light Corn Syrup
- 1 Teaspoon Salt
- 2 Cups Heavy Cream chilled
- 1 Teaspoon Vanilla extract
- Black Food Coloring
Instructions
-
Wash the apples in warm water and then dry each one. This will remove the waxy coating on the apple and help the caramel stick. Using a folded dish towel, insert the sticks in the top of the apples, right where the stem is. Use the folded towel to push the stick as straight as you can down the entire center of the apple. Place prepped apples in the fridge.
-
In a medium-sized (3-4 quarts) heavy-bottomed saucepan with tall sides, add the water, sugar, corn syrup, and salt. Turn the heat on to medium-high heat and stir constantly with a wooden spoon or heat-proof spatula until the sugar is completely dissolved.
-
Once the mixture is boiling, stop stirring and watch closely until it turns an amber color. It may take about 10 minutes, but the change will happen fairly quickly. If it appears to be turning darker in one area much faster than the rest, gently swirl the whole pot. DON’T STIR IT!
-
Once it is a medium amber color, reduce the heat to medium-low and very carefully and slowly stir in the heavy cream. The mixture will bubble and steam significantly. Continue stirring until the mixture reaches 246° and then remove from the heat. Stir in the vanilla and black food coloring until you reach the desired color.
-
Dip the apples in the hot caramel, swirling to evenly coat each one. Let the excess caramel drip off and then set the dipped apple on a piece of parchment sprayed with cooking spray or on a silicone baking mat sprayed with cooking spray. Allow cooling completely, about 45 minutes.
-
Once the apples are completely cooled if desired you can proceed to dip them in chocolate and then in the toppings of your choice.
Nutrition
from The Recipe Critic https://ift.tt/3GuDzfQ
https://ift.tt/3CtkAjg