Air Fryer “Roasted” Cauliflower is perfectly tender, crisp and full of amazing flavor. You are going to love how easy it is to make this delicious side dish!
Air Fryer vegetables are the best, they get roasted to the perfect texture both inside and outside. These tried and true recipes will prove it to you, from Potatoes, to Broccoli and Brussel Sprouts.

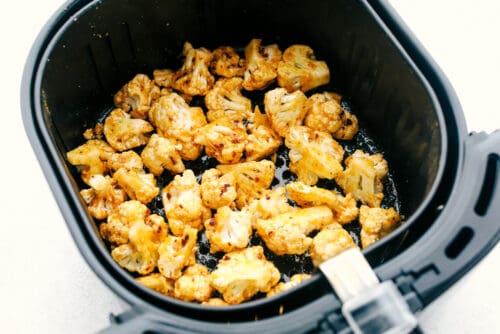
Air Fryer Cauliflower
I love my Air Fryer, it is changing the way I make food and especially my vegetables. The air fryer gets them perfectly crispy on the outside and then soft and tender on the inside, without getting them mushy. My family loves vegetables cooked in the air fryer and this roasted cauliflower is no different. And if I can get my kids to eat more vegetables, then that is a win in my book! This is going to be a the perfect side dish for any meal.
The air fryer uses circulating air to “fry” the cauliflower. It is essentially a countertop convection oven. Using the air fryer to help make your meals, frees up the oven, doesn’t heat up the kitchen and is usually a faster and healthier way to cook. The marinade in this cauliflower recipe is incredible. It really packs a punch, which is important when cooking with cauliflower. On its own it doesn’t have much flavor, so you need to add it, and this has it. You have to try this scrumptious recipe!
Ingredients for The Best Cauliflower
This air fryer cauliflower is going to come together in a snap, you are going to love how easy this recipe is.
- Cauliflower: Wash and cut your cauliflower into bite sized pieces.
- Olive Oil: You want oil to coat the cauliflower, this will help it crisp up.
- Parmesan Cheese: For best results use grated parmesan.
- Paprika: This will give the cauliflower some color and flavor.
- Garlic Powder: You will love how using a powder gives you flavor without the chunks of garlic. It’s delicious.
- Crushed Red Pepper: This is optional, you can add as little or as much as you want
- Salt and Pepper: Add to taste
How to Make Roasted Cauliflower in the Air Fryer
This could not be any easier or faster. You are going to love eating the results.
- Chop: Cut the cauliflower into small pieces.
- Sauce: IN a small bowl whisk together olive oil, parmesan, paprika, garlic, crushed red pepper and salt and pepper.
- Mix: Toss the cauliflower the mixture till it’s evenly coated. Be gentle.
- Cook: Place in air fryer basket at 390 degrees for 13-15 minutes or until crispy.

Tips For Easy Air Fryer Cauliflower
Getting the cauliflower just right is easy, you might have to double the batch, however, because these will go fast.
- Air Frying: Check your cauliflower half way thru, you might need to shake the basket to help turn the cauliflower. Check again at the minimum time to see if they are done or need additional time. Every air fryer is a bit different so yours may need more or less time.
- Don’t Overcrowd: If you have to cook it in batches, do it. You do not want to over crowd the cauliflower or it will steam instead of crisp up.
- Same Size: Try to keep the cauliflower the same size a you cut it for better even roasting.
- Don’t have an air fryer? You can roast cauliflower in the oven at 400 for 20 minutes.
Variations for Your Cauliflower
This air fryer cauliflower recipe is super customizable, make it with the seasonings and the toppings you love.
- Mexican: Use cumin, chili powder, garlic, taco or fajita seasonings for a spicy flare.
- Ranch: Cover the cauliflower in ranch seasoning and then serve with cheddar cheese and bacon crumbles.
- Buffalo: After you cook the cauliflower toss in some homemade buffalo sauce and blue cheese crumbles.
- Italian: Toss with olive oil and Italian seasoning and garlic, topped with parmesan cheese for a delicious twist.
- Sauce Dipping: Keep the cauliflower pretty neutral in seasoning then serve with your favorite sauce, Yum Yum Sauce, Ranch Dressing, or even Pesto.
Storing Air Fryer Cauliflower
The key to having great air fryer cauliflower leftovers is warming them up correctly.
- Store: Keep cauliflower in the fridge tightly covered for up to 4 days.
- Reheat: If you reheat these in the microwave they will lose their crispy outside. Reheat in the air fryer for 1-2 minutes or till crunchy and warm or reheat on the stove top for best results.

More Air Fryer Recipes to Try
Air fryers usually cook your food faster and it almost always tastes better. You can cook amazing side dishes, main dishes and even desserts without heating up the oven. That is going to be huge as summer approaches. Enjoy these tried and true recipes in your air fryer today!
- Perfect Air Fryer Steak With Garlic Herb Butter
- Seriously Amazing Air Fryer Hand Pies
- Perfect 10 Minute Shrimp
- Easy Air Fryer French Toast Sticks
- Homemade Air Fryer French Fries

Air Fryer "Roasted" Cauliflower
Ingredients
- 1 pound cauliflower
- 1/3 cup olive oil
- 3 Tablespoons grated parmesan cheese
- 1/2 teaspoon paprika
- 1/2 teaspoon garlic powder
- 1/4 teaspoon crushed red pepper optional
- salt and pepper to taste
Instructions
-
Start by cutting the cauliflower into small pieces.
-
In a small bowl whisk together olive oil, parmesan, paprika, garlic, crushed red pepper and salt and pepper.

-
Toss the cauliflower with the mixture to coat.

-
Place in air fryer basket at 390 degrees for 13-15 minutes or until crispy.
Nutrition
from The Recipe Critic https://ift.tt/2OOp7JK
https://ift.tt/3mFuDdY