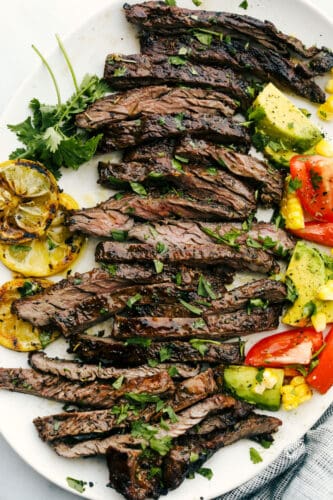
Skirt Steak Marinade is the perfect combination of spices and sauces to create a flavor that really pops! This incredible marinade works for more than just skirt steak too!
A great marinade can make all the difference to your meal, it flavors, tenderizes, and moistens meat for sheer perfection every time! Try these tried and true fan favorite marinades for Steak, Chicken, and Asian Inspired.

The Ultimate Skirt Steak Marinade Recipe
Cooking steak can be intimidating, I know it used to intimidate me. I think it was because steak is usually a more expensive cut of meat and I did not want to mess it up. Steak on its own has incredible flavor and texture. This skirt steak marinade enhances the natural flavors of the steak without overpowering it. Using the right marinade for your cut of steak can elevate it from great, to absolutely amazing. And this marinade does just that for skirt steak.
Adding marinades to meat does a few things that make it a must when cooking steak. First of all marinades tenderize the meat, helping to break down the fibers that make meat tough. Marinades add flavor. Allowing the meat to sit in the marinade for even as little as 30 minutes will infuse it with intense flavor, guaranteeing a scrumptious meal. And then it adds moisture, helping to ensure your meat is moist and tender.
Ingredients For Marinade
These ingredients are pantry staples are a great addition to any skirt steak. It is quick and easy to make! Below you will find the ingredients list in the recipe card with exact measurements.
- Soy Sauce: A great umami flavor to have on the skirt steak.
- Lemon Juice: Helps aid in the acid and flavor to help break down tough fibers.
- Olive Oil: Adds moisture to the steak.
- Worcestershire Sauce: Another perfect umami flavor I absolutely love that blends and combines well with soy sauce.
- Garlic: Fresh is best but you can use the jarred kind.
- Italian Seasoning: A perfect blend of herbs and spices. Make your own here.
- Pepper and Salt: Add to taste!
- Red Pepper: Just enough for a bit of a kick.
Instructions For Steak Marinade
This beef marinade is perfect for any steak but especially for skirt steak. It tenderizes and creates a delicious flavor locking in on the skirt steak. So simple to make, you are going to love how juicy an tender your skirt steak is.
- Whisk: In a small bowl, whisk together soy sauce, lemon juice, olive oil, Worcestershire sauce, minced garlic, Italian seasoning, pepper, salt, and a pinch of red pepper.
- Marinate: Add steaks to a resealable zip lock bag or large bowl and pour the marinade on top. Marinate for 2 hours or overnight.

Why Marinades Work Magic!
Marinades are like magic! They transform a piece of meat from ordinary to extraordinary, so let’s talk about why and how this happens to skirt steak.
- Acid or Enzyme: All great marinades will contain either an acid or an enzyme. In the skirt steak marinade, the lemon juice is our acid. It will weaken the tough fibers of the meat and enhance flavor. Creating tender flavorful meat. Do not over marinate, however, If meat sits in a marinade too long the meat will become mushy, dry, and actually tough.
- Salts: Salt plays an essential role in getting the flavors to penetrate beneath the surface of the meat. Salt is not only add on its own, but the salt found in the soy sauce and Worcestershire sauce helps too. First, the salt draws out the moisture from the meat, then as the water is reabsorbed into the meat flavors from the spices and garlic are carried with it. This allows the flavor to get deep inside the meat while helping to break down muscle fibers helping it to tenderize.
- Oil: Oil is important because it helps carry fat-soluble flavors from the spices and pepper, past the surface of the meat, and into it.
- Put it all together: When you combine acid, salts, oils with seasonings, herbs, and even sugars you allow so much more to happen to meat than just a simple brine ever could. You can tenderize tough meat, add flavor deep within and create moist cuts of meat from normally dry ones. Yup, it’s like magic. And this skirt steak marinade has all those ingredients!

The Ins and Outs of Marinading
This marinade ticks all the boxes for a perfectly balanced marinade that will create the perfect flavor. Here are some know hows for the perfect marinade everytime.
- Keep it in the Fridge: When you marinate raw meat, it should be kept in the fridge to prevent bacteria from growing. Keep it tightly sealed in the fridge for the entire time. Remove when ready to cook.
- Do Not Reuse Marinade: Because the marinade has been sitting in raw meat it should be discarded immediately and not reused. If you want to baste your meat with more marinade while cooking, make a fresh batch that has not come in contact with raw meat. Never serve marinade that has come in contact with raw meat on the side.
- How Long to Marinate: Meat can be marinaded anywhere from 30 minutes to 24 hours. Be careful to not over-marinate as it can entirely break down your meat or make it tough.
- What cuts work best for Marinating: Thinner, flatter pieces of meat work better for marinating than large ones like a roast. You can slice up larger cuts into serving size or even bite-size to get better flavor and tenderization.
- What to use: I like to use a large enough zip-lock plastic bag to put the marinade and meat together. Remove as much air as possible from the bag. You want as much of the marinade to touch the meat as possible. Then place the bag in a shallow pan so that the meat can lie flat and place it in the fridge. Flip the bag over halfway through marinating to make sure all the meat is equally flavored.

More Steak Recipes to Love


Skirt Steak Marinade
Ingredients
- 1/3 cup soy sauce
- 1/3 cup lemon juice
- 1/2 cup olive oil
- 1/4 cup Worcestershire sauce
- 1 Tablespoon minced garlic
- 2 Tablespoons Italian seasoning
- 1 teaspoon pepper
- 1/2 teaspoon salt
- pinch of red pepper
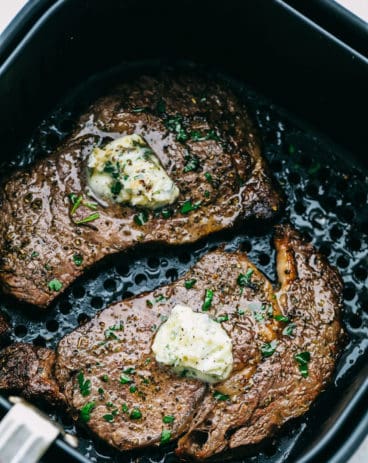
- 1 1/2 pound steaks I used rib eye New York is also great
- 2 tablespoons butter
- fresh chopped parsley
Instructions
-
In a small bowl, whisk together soy sauce, lemon juice, olive oil, Worcestershire sauce, minced garlic, Italian seasoning, pepper, salt, and a pinch of red pepper.
-
Add steaks to a resealable zip lock bag or large bowl and pour the marinade on top. Marinate for 2 hours or overnight.
Nutrition
from The Recipe Critic https://ift.tt/2RrqEGV
https://ift.tt/3zg4rg6