
These homemade Bagels are the perfect texture, chewy, dense, yet soft, and oh so delicious! Better than store-bought every time, these homemade bagels are way easier than you think!
Ah, Bread, you have to love it, and it is so much easier to make homemade than you think. You have to try these and my other favorites, you won’t regret it, Bread, Challah, and English Muffins.

Bagel Recipe
There is possibly nothing better than bagels that are homemade. These taste almost exactly like the authentic New York-style bagels. Homemade bagels are chewy and soft inside, with a crispy outside, and go perfectly with schmear! Schmear is just a fancy word for a nice slather of cream cheese, but it’s fun to say. You may never buy store-bought bagels again, especially after you see how easy these are to make.
Similar to making pretzels, you will boil the bagels before baking them. This will give them the classic chewy texture and sheen that is notorious with fresh made bagels. it also helps the bagels hold their shape while baking. Bagels originated in Poland in the 1400’s and were brought to America by Jewish immigrants. It is said that by the 1900’s there were more than 70 bagel shops just in the Lower East Side of Manhattan alone. Now you can make them in the comfort of our own home. If you can make dough and boil water, you can make bagels. Let’s do this!
What You Will Need To Make Homemade Bagels
- Warm water: This is to dissolve the yeast.
- Instant yeast: Both instant and dry active will work great in this recipe.
- Sugar: This is to help feed the yeast, so it will bloom.
- Salt: Adds flavor to the dough, do not skip it.
- Oil: Adds moisture and flavor.
- All-purpose flour: You can also use bread flour for bagels.
- Water:This is for boiling the bagels.
- Honey: Add the honey to the boiling water.
How To Make The Best Bagels
- Yeast: Mix warm water (100-105 degrees), yeast, and sugar together in the mixing bowl of a stand mixer. Set aside and allow to get frothy for about five minutes.
- Combine: Add salt, oil, and flour to the yeast mixture. Using the dough hook, mix on low speed for about 6 minutes until the dough is smooth. It should spring back if you press it with your finger and should not tear when you pull it. If it leaves an indent or tears when pulled, knead for a couple more minutes. Once it’s ready, place in an oiled bowl and cover with plastic wrap or a clean damp dish towel to rise for 1 ½ hour or until doubled in size.
- Shape: Once doubled in size, punch the dough down and turn it out onto the counter. Divide into 8 equal sections and form them into balls. Using your thumb, press it through the center of the ball and stretch it out to form the bagel ring. You may feel like you’re stretching it out too much, but the bagels will prove larger as they are boiled and baked, so the center of the ring needs to be larger than you want it after all the baking is said and done. Set the rings aside to rest for 15 minutes.
- Prep: Preheat the oven to 425.
- Boil: Bring water and honey to a boil. Being careful not to overcrowd the pot, as the bagels will expand as they boil, boil the bagels for 1 minute on each side. After removing from the boiling liquid, add any desired toppings while the dough is still tacky.
- Bake: Bake for 25 minutes. Cool completely.
- Enjoy: Toast if desired and serve with your favorite toppings.

Baking Tips for Bagels
There are recipes out there that take up to 2 days, but you can get the same results using this quick and easy recipe.
- Flour: All-purpose flour works fine with this recipe. If you want even chewier bagels, use bread flour. They will taste the same but the bread flour will make it chewier.
- Water for yeast: Use water that is between 105 and 115 degrees to activate your yeast. If it’s too hot or too cold your yeast won’t grow.
- Yeast: Both active and instant yeast work beautifully with this dough. I like activating the yeast before adding the ingredients because I can tell if it’s good or not. If your water is a good temperature, but your yeast isn’t bubbling it’s probably gone bad. Get new yeast and start again.
- Boil: Boiling the bagels will give it the classic chewy shiny exterior we have all come to love in a bagel. Adding the honey helps it brown and crisp. You can omit the honey if you want or substitute it for brown sugar. Do not over crowd the water when boiling and keep the water at a low boil, not a hard boil to help avoid wrinkles in your bagels.
- Parchment or Oiled Pan: The last thing you want is your beautiful bagels to stick to the pan. Use parchment paper or a well-oiled pan to bake them.
- Toppings: You do not need an egg wash to get your toppings to stick. As soon as you take the bagels out, they will be tacky, perfect for toppings to stick.

Shaping Into Circles
When it comes to shaping their isn’t a wrong way really, as long as they have that classic hole in the middle. I’ll give you two ways here.
- Roll it long: One way to shape bagels is to roll the sections into a long rope, not too thin and not too thick. Take the ends and overlap them slightly and roll back and forth to form a bond. This gives that classic bagel look where one end of the bagel is thicker and one is thinner.
- Roll it into a ball: This is the method I used and find it to be the easiest. Roll the sections of dough into nice uniformly shaped balls. With your thumb push through the dough till you meet your index finger on the other side. Pull and stretch the bagel shape till you have a large hole. It will rise and close both when you let it rest and boil it, so it’s ok to have a large hole.

How to Store Baked Bagels
If these don’t disappear in minutes, store them to eat later.
- Store: Keep leftover bagels at room temperature tightly sealed in a plastic bag for up to 4 days, or in the fridge for 7 days. Toast them when ready to eat.
- Freezer: Tightly wrap the bagels individually and place them in a freezer-safe bag. Freeze for up to 3 months. Let them thaw at room temperature, toast, and top as desired.

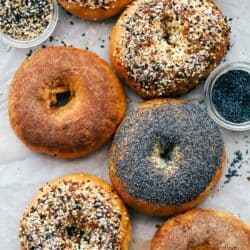
Bagel Variations
Besides the classic Everything seasoning and poppyseeds, you can get creative and top your bagels in many different ways. As well as add flavors to the dough to mix up the flavors.
- Cheese: Add asiago, cheddar, or other cheese of choice to the dough when you add the flour. Top the bagel with shredded cheese before baking.
- Cinnamon and Sugar: Add a teaspoon of cinnamon to the flour and then make up a cinnamon and sugar topping to add before to the bagel before baking.
- Salt: Use coarse salt to top the bagel. Adjust to your liking.
- Seeds: Besides poppyseeds, you can use sesame seeds or even sunflower seeds to top your bagel. I like to add sunflower seeds to the dough as well.

More Bread Recipes To Try
Side Dishes
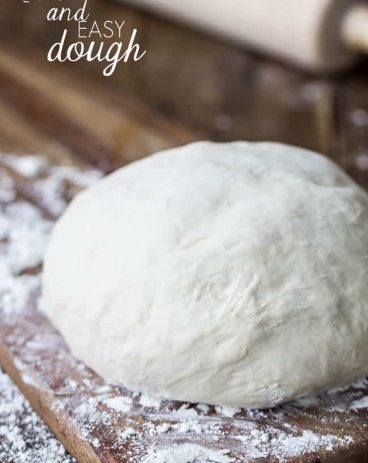
Quick and Easy Dough
Side Dishes
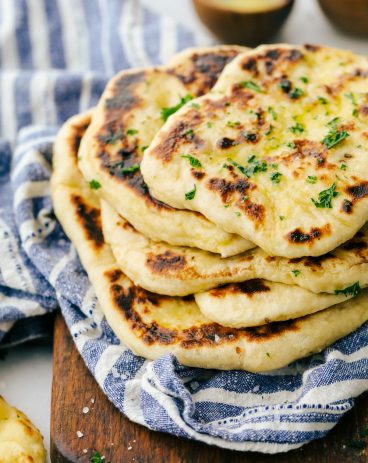
Perfect Naan Bread with Garlic Butter
Bread
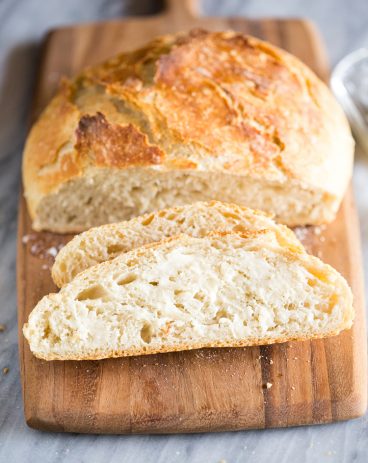
Miracle No Knead Bread
Side Dishes
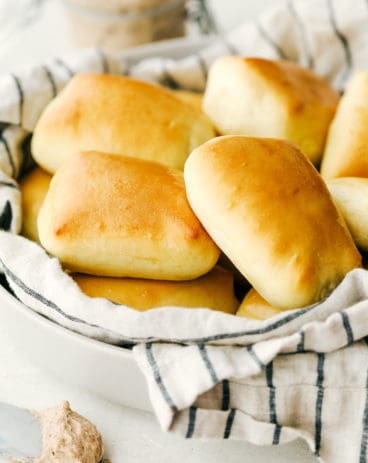
Copycat Texas Roadhouse Rolls
Bagels
Ingredients
- 1 ¼ cup warm water
- 1 Tablespoon instant yeast
- 2 Tablespoons sugar
- 1 teaspoon salt
- 1 Tablespoon oil
- 4 Cups all purpose flour
- 1 quart water
- 1/2 cup honey
Instructions
-
Mix warm water (100-105 degrees), yeast and sugar together in the mixing bowl of a stand mixer. Set aside and allow to get frothy, about five minutes.
-
Add salt, oil, and flour to the yeast mixture. Using the dough hook, mix on low speed for about 6 minutes until the dough is smooth. It should spring back if you press it with your finger and should not tear when you pull it. If it leaves an indent or tears when pulled, knead for a couple more minutes. Once it’s ready, place in an oiled bowl and cover with plastic wrap or a clean damp dish towel to rise for 1 ½ hours or until doubled in size.
-
Once doubled in size, punch the dough down and turn out onto the counter. Divide into 8 equal sections and form them into balls. Using your thumb, press it through the center of the ball and stretch it out to form the bagel ring. You may feel like you’re stretching it out too much, but the bagels will proof larger as they are boiled and baked, so the center of the ring needs to be larger than you want it after all the baking is said and done. Set the rings aside to rest for 15 minutes.
-
Preheat the oven to 425.
-
Bring water and honey to boil. Being careful not to over crowd the pot, as the bagels will expand as they boil, boil the bagels for 1 minute on each side. After removing from the boiling liquid, add any desired toppings while the dough is still tacky.
-
Bake for 25 minutes. Cool completely.
-
Toast if desired and serve with your favorite toppings.
Notes
Nutrition
from The Recipe Critic https://ift.tt/3idPxAV
https://ift.tt/3cipW62