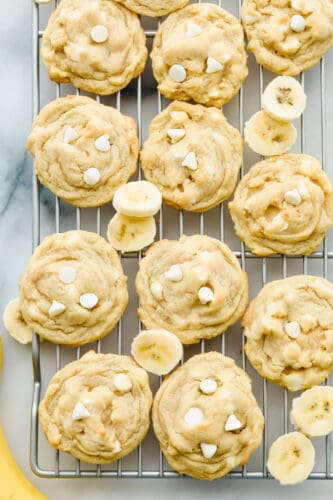
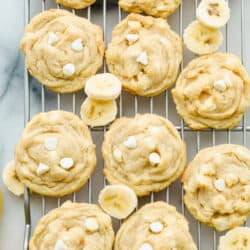
I am a lover of all things banana cream. I simply love bananas! Just try these fan favorites like Banana Bread, Banoffee Pie, and Magnolia Bakery Banana Pudding! So, I had to give these banana pudding cookies a try! The result was fantastic! These cookies have just the right amount of banana ratio and I loved the white chocolate chip chunks throughout. The white chocolate is like having real cream in the cookies. It is so scrumptious. Honestly, I couldn’t stop eating them.
Pudding is the secret ingredient here. It creates a cookie that is moist, tender, and absolutely heavenly. The banana cream pudding creates a rich banana flavor that doesn’t overpower the cookies. The banana pudding cookies are so easy and fun to make, my kids always love to jump in and help. It is a perfect activity for the whole family. Banana pudding cookies allow you to have that iconic flavor without all the work of making a pie. So go ahead make a couple of batches of these, you won’t regret it!
Pudding Cookies Ingredients
Simple and delicious banana pudding cookies! Make sure you buy the instant banana cream pudding not cook and serve pudding. Cooked pudding will not give the same impeccable results. You are going to love how moist and tender these banana pudding cookies are! For all ingredient measurements see the recipe card below.
Unsalted butter softened: Butter soft and but not melted will create the perfect texture. Make sure your butter is not melted.
Brown sugar: Brown sugar adds moisture and flavor.
Granulated sugar: White sugar creates the sweetness that makes these pudding cookies great.
Banana cream instant pudding mix: Rmember to make sure you purchase instant pudding and not cooked.
Eggs: Room tempertature eggs will mix in better than if they are cold.
Vanilla extract: Compliments the banana flavor by mellowing it just a bit.
Flour: All purpose flour give the cookies structure.
Baking soda: This will help the cookies rise.
Salt: Salt balances the sweetness.
White chocolate chips: There is something magical that happens with the creamy sweet white chocolate and bananas.
How To Make Banana Cookies with Pudding
These banana pudding cookies cook up just like regular cookies. They are fast and easy! You are going to love how fun these are to make. Make these banana pudding cookies with your family!
Prep: Preheat oven to 350 degrees Fahrenheit. Line a baking sheet with parchment paper or a Silpat baking mat and set aside.
Mixing Up the Batter: Using a mixer, beat together butter and sugars until creamy. Add in pudding mix, eggs, and vanilla extract. In a medium bowl, whisk together the flour, baking soda, and salt. Add the dry ingredients to the wet ingredients and mix until just combined. Stir in the white chocolate chips.
Baking: Drop cookie dough by rounded tablespoons onto prepared baking sheet. Bake for 10 minutes, or until slightly golden around the edges and set. Remove cookies from oven and let cool on baking sheet for two minutes. Transfer to a cooling rack and cool completely.
Tips For the Best Banana Cream Cookies
It is so easy to make these banana pudding cookies that you will want to make them all the time. The texture of the cookies will keep you coming back for more. Make a double batch so you have enough.
Pudding: Do not mix up the pudding before adding it to the mix. the pudding will go in dry. Make sure you use instant pudding, not cook and serve. It has more cornstarch in it and will change the consistency and texture of the cookies.
Mix: These cookies will mix perfectly in a kitchen aid, with a hand mixer or even by hand. Just make sure that you do not overmix the cookies.
Line: To make the banana pudding cookies cook evenly and come off your pan, line the cookie sheet with parchment paper or a silicone liner.
Scoop: Use a cookie scoop to ensure cookies that are uniform and bake evenly.
Variations of Easy Pudding Cookies
Once you start making cookies with pudding you may not go back to regular cookies. These banana pudding cookies can be customized to your liking and changed up to lots of different flavors. Let the experimenting begin!
Add-ins: White chocolate chips are a perfect combination with the banana flavor. But you can subsititue out the wite for semi-sweet chocolate or even peanut butter chips.
Crunch: For a bit more texture to your cookies, add in chopped walnuts, pecans or peanuts. Crushed Nilla Wafers or graham crackers would also make a delicious addition.
Pudding: You do not have to use banana pudding, but these will not be banana cream cookies anymore. But try vanilla, chocolate, and butterscotch for a new variation of cookie.
How to Store Pudding Cookies
Make an extra batch of these cookies and freeze them for later. Once the banana cookies have completely cooled, place them in a freezer-safe bag in the freezer for up to 3 months. Extra cookies can be stored in an airtight container for up to two weeks at room temperature.
More Cookies to Love
Cookies are a favorite! They are handheld morsels of goodness. Perfect for when you need a good dessert for a BBQ, potluck or party. Cookies can be customized for flavors, textures and size. Cookies work great because they are small, hand-held and scrumptious. Cookies are kids’ favorites so easy to make. Make them with family and friends and give them as gifts. Start with one of these tried and true cookies for a sure winner.
Banana Pudding Cookies are soft, chewy, and absolutely scrumptious. With all the banana flavor of a banana cream pie wrapped in a cookie.
CourseDessert, Snack
CuisineAmerican
Keywordbanana pudding cookies, pudding cookies
Prep Time10minutes
Cook Time10minutes
Total Time20minutes
Servings24Cookies
Calories246kcal
AuthorAlyssa Rivers
Ingredients
1cupunsalted buttersoftened
3/4cupbrown sugar
1/4cupgranulated sugar
3.4ounce packagebanana cream instant pudding mix
2largeeggs
1teaspoonvanilla extract
2 1/4cupsflour
1teaspoonbaking soda
1/2teaspoonsalt
2cupswhite chocolate chips
Instructions
Preheat oven to 350 degrees Fahrenheit. Line a baking sheet with parchment paper or a Silpat baking mat and set it to the side.
Using a mixer, beat together butter and sugars until creamy. Add in pudding mix, eggs, and vanilla extract. In a medium bowl, whisk together the flour, baking soda, and salt. Add the dry ingredients to the wet ingredients and mix until just combined. Stir in the white chocolate chips.
Drop cookie dough by rounded tablespoons onto a prepared baking sheet. Bake for 10 minutes, or until slightly golden around the edges and set. Remove cookies from the oven and let cool on the baking sheet for two minutes. Transfer to a cooling rack and cool completely.
Notes
Updated on July 30, 2021Originally Posted on April 17, 2013
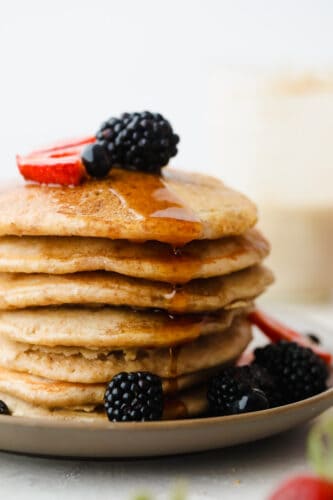
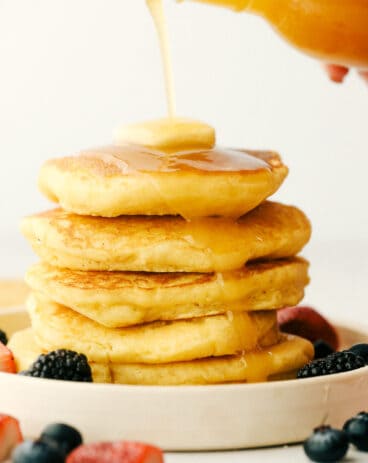
These tried and true sourdough pancakes are fluffy and delicious! They pair well with just about any toppings that you have on hand and they have just a touch of sweetness making adding maple syrup the final touch of heaven!
If you are looking for a super easy and delicious sourdough pancake recipe then you have come to the right place! These are quick and easy to make (once you have your sourdough starter ready!) Pair this with our scrambled eggs and our heavenly bacon and you are set for a breakfast that is sure to impress!
Simple Sourdough Pancakes
If you are looking for a recipe to help ease your fear of baking sourdough, then you have come to the right place! Sourdough is less intimidating than you think and can create some of THE most delicious recipes that you will make. Sourdough breathes life into a dish and helps it develop its flavor. These pancakes are light and fluffy with a hint of sweetness that will make you keep coming back for more.
Because you will need a sourdough starter (or discard), these pancakes take a bit of prep work beforehand but once you are in the kitchen baking them, it’s a fast and easy recipe that we know you will love!! We loved these pancakes so much. Try topping them with our maple syrup and these will easily become a family favorite!!
What You Need For Sourdough Pancakes
Once you make this recipe, you will want to thank us later! It uses all of your pantry staples and is one of those delicious meals that just stays constantly on your meal rotations. Trust us when we say you won’t be able to cook these fast enough on the griddle to keep up with the demand! See the recipe card below for full measurements.
Flour: The flour binds all of the ingredients together
Baking powder, Baking soda, Salt: Combined, these three help to create fluffiness in pancakes.
Sugar: Adding sugar in this recipe keeps things sweet.
Sourdough starter or discard: This is a key ingredient to this recipe. Acting as a natural yeast, it greatly adds to the flavor and texture.
Milk: Milk is necessary to dissolve the flour and start creating the whole mixture.
Egg: Eggs in the recipe allow for bubbles and helps the pancakes to rise. It is best to leave your eggs out at room temperature and beaten.
Butter: It’s best to use unsalted, melted butter.
How to Make Easy Sourdough Pancakes
Don’t let the use of sourdough intimidate you! This recipe is quick and easy to make! You’ll wonder why you were ever nervous to bake with sourdough in the first place!
Start with the dry ingredients: Grab a large mixing bowl and whisk together the flour, baking powder, baking soda, salt, and sugar. These are all of your dry ingredients and will create the base for the recipe!
Wet Ingredients are next: After you have whisked all of the dry ingredients together, in a separate medium bowl or liquid measuring cup, combine the sourdough starter, milk, eggs, and butter and whisk until combined.
Combine the wet and dry ingredients: Pour the wet ingredients over the dry and mix until combined. Don’t overmix! It should still be a little lumpy.
SOURDOUGH TIP: If you would like to gain a little bit more of a sourdough flavor, stop here and store this mix on your counter overnight and it will ferment and have more of a distinct sourdough flavor. If you don’t want this, skip this step and continue mixing!
Let’s flip those pancakes: Spray a preheated griddle (325°-350°) with some nonstick cooking spray. Pour ⅓ cup pancake batter on and cook until bubbling on top, about 2 minutes. Once the bubbles begin to pop and the pancake turns a golden brown, flip and cook for an additional 1-2 minutes. They are done once they are golden brown on the bottom.
Serve and Enjoy! Its time to top with your favorite pancake toppings and enjoy the fruits of your labors!
The Best Sourdough Pancake Tips
There are a few things that can take this recipe to the next level and we have some tips that will help you with that! These pancakes are so delectable that you will want to make sure to follow these extra tips and you will be baking like a true chef in no time!
How to mix: Make sure that once all of the ingredients are together that you don’t over mix the batter. This will result in gooey or sticky pancakes.
Melting the Butter: After you have melted the butter, let it sit until it is cooled (but still liquid). This will make it so that your batter doesn’t have large clumps!
Sourdough starter (or discard!): Make sure to prepare this beforehand. The sourdough starter is a necessary base for the batter that you will need ready as you begin to mix all of the ingredients together!
Cooking Surface: It’s best to cook the pancakes on a nonstick griddle or flat surface.
Cooking Temperature: Try to cook these pancakes on low heat. This will keep you from burning the outside of the pancake while the inside remains uncooked.
Toppings: Adding different toppings will make this dish taste new every time! Try adding maple syrup, strawberry sauce, buttermilk, fresh fruit, and chopped nuts. Add whatever you want to make this recipe your own!
How to Easily Store Homemade Sourdough Pancakes
The best part about these sourdough pancakes is that you can make some extra to store in either your fridge or freezer to enjoy later! They taste just like the day you made them and are an easy way to prepare 2 meals in 1!
Refrigerate: Once cooked, place them in an airtight container and they can last in the refrigerator for 2-3 days.
Freezer: Lay each pancake flat on parchment paper on a tray and place in the freezer for 2 hours (don’t stack them). Take them out and place them all together in a airtight ziplock bag. Or, you can individually wrap each pancake with plastic wrap and place them together in a bag and then freeze. You can freeze them for up to 3 months.
Reheat: To reheat your pancakes, you can simply microwave them for 30 seconds to 1 minute until heated through, add your toppings and enjoy!
More Breakfast Recipes to Love
If you love these sourdough pancakes as much as we do, then check out these additional breakfast recipes. Their taste and flavor will blow you away and set you up for a delightful array of tastes that will be sure to have your family and friends asking for more. These are amazing recipes can be used for breakfast OR dinner, and are sure to be a hit! Enjoy!
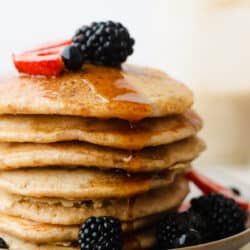
These tried and true Sourdough Pancakes are fluffy and delicious! They pair well with just about any toppings that you have on hand and they have just a touch of sweetness making adding maple syrup the final touch of heaven!
In a large bowl whisk together the flour, baking powder, baking soda, salt, and sugar.
In a medium bowl or liquid measuring cup, combine the sourdough starter, milk, eggs, and butter and whisk until combined. Pour the wet ingredients over the dry and mix until just combined. It should still be a little lumpy.
From here you have the option to cook the pancakes right away, or you can cover the dough and leave it on the counter overnight to ferment and have more of a distinct sourdough flavor.
On a griddle preheated to 325°-350° and sprayed with cooking spray, pour ⅓ cup pancake batter on and cook until bubbling on top, about 2 minutes. Flip and cook for an additional 1-2 minutes, or until golden brown on the bottom.
Serve with your favorite pancake toppings and enjoy.
Homemade pasta is way better than boxed pasta, it has a good chew and texture that you can’t get from the store. With only 5 ingredients it really is easy to make. The hardest part is waiting for it to rest before you run it through your pasta maker. I always shied away from making homemade pasta thinking it was way too hard. I couldn’t have been more wrong. Using a pasta maker takes all the hard work of rolling it out. Although you can make this using a hand roller and I tell you how below. Seriously homemade pasta is one of the best things you will ever try this year!
There are many recipes out there and opinions on how to make pasta perfectly. This recipe is it! Pasta is very forgiving and there are many amazing ways to make it. This is a classic recipe that includes Olive oil for flavor and the much-needed salt for taste. Some recipes just add salt to the cooking water, but you are going to want to add it to the pasta dough for the best flavor. These are the best noodles you will ever make. Toss them with a bit of olive oil and cheese if you want or throw them in your favorite sauce for a dinner you won’t soon forget!
Pasta Dough Ingredients
Simple ingredients come together in a special way to make amazing pasta. With just 5 ingredients you probably already have everything you need on hand. So what are you waiting for? You have to try this easy recipe today!
Flour: All-purpose flour works perfectly or semola flour works too.
Eggs: Eggs should be at room temperature to mix in fully.
Olive Oil: This is used in Italian cooking regularly.
Salt: Gives the pasta flavor.
Water: Need to create the perfect mixture.
How to Make Homemade Pasta
Follow the instructions and you’ll have perfect pasta! Homemade pasta is very forgiving so do not fret too much about it. The most important thing you want to concentrate on is the consistency when you knead the dough and letting it rest. Those are very important for creating homemade pasta that is divine.
Flour: On a clean surface, place the flour in a mound and use your hands to form a nest in the center. Add the eggs, olive oil, salt and water to the center of the nest.
Add Eggs: Use a fork to gently break the yolks of the eggs and slowly stir the center of the nest incorporating a little of the flour walls at a time until a dough has formed. Use your hands to finish working all the flour in.
Create Dough: Knead the dough for about 8-10 minutes. It’s a stiff, dry dough but it will come together into a smooth dough. Once the dough has all come together and is smooth, wrap in plastic wrap and set it in the fridge to rest for an hour. You can leave it overnight if you wish, but be sure to get it come to room temp before rolling out.
Creating the Pasta Dough
You want to keep the sections you are not using right away covered so that they do not dry out. If you do not have a pasta maker, see below for instructions on how to roll out pasta by hand.
Cut and Roll: Cut the dough into four pieces and use your hands to shape the first section into a small flat oval. Wrap the remaining three sections in plastic wrap until you are ready to roll them out.
Pasta Maker: Feed the oval piece of dough through the pasta maker on the number 1 setting. Fold the pasta into book folds, which is the two end folded in until they touch in the middle and then folded in half. Run through the pasta maker on setting 1 two or three more times before moving through the next settings on your pasta maker until the pasta is the desired thickness (I prefer setting 6 on my pasta maker.) If the dough is becoming tacky or sticky dust it with a little bit of flour. Additionally, if the dough is becoming much too long to handle you can cut it in half and work each half separately.
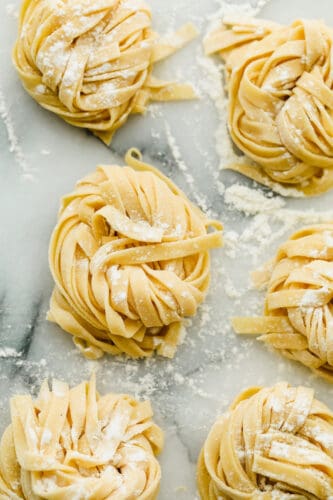
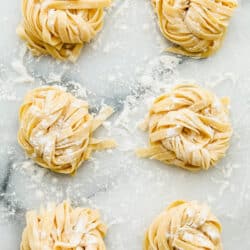
Make Noodles: Run the dough through the pasta maker using the cutting attachment to cut the shape of noodles you would like. Dust the final noodles with flour and either hang on a pasta rack or make them into pasta nests and let them rest for about 30 minutes on a floured surface.
Cook Noodles: Bring a large pot of salted water to a boil. Boil the pasta for 60-90 seconds. Toss with your favorite sauce and enjoy!
Preparing the Dough
I prefer to do this by hand, but you can make the dough in a stand mixer or food processor. If you make it in a food processor you will need to remove it and knead by hand. Once the dough comes together you can use a dough hook to knead the dough in a stand mixer.
Large Nest: Make the well in the flour large enough to hold the eggs, water, oil and salt.
Mix: Use a fork to mix the eggs thouroughly in the nest and then slowlly start bringing in the flour using the fork to start. Once a a bit of dough forms switch to your hands.
Work it: Knead the dough till your dough is smooth and taunt. It takes a long time to work the dough into the right consistency so be patient and don’t give up. You really have to work the gluten in the dough. Do not leave it shaggy and sticky.
Let it rest: This is one of the most important steps. Wrap the dough in plastic wrap and let it rest for at least 30 minutes. This relaxes the the protien so it will roll out and easily. If you do not let it rest you’ll be fighting it the whole time.
Run Dough Through Pasta Maker
Make sure you follow the directions on your pasta maker. Everyone is a bit different. Keep it floured to prevent sticking.
Cut and roll: Cut the dough into 4 sections. Work only one section at a time, keeping the other sections covered in plastic wrap.
Roll first: To make it easier to roll through your pasta roller I like to roll it a bit with a rolling pin into a nice oval shape.
Flour: If at anytime you feel like the dough is sticking to the roller or surface, sprinkle with flour to keep it loose and easy to work with.
Fold the Dough
This is an essential step so don’t skip folding the dough in the beginning. It will give you the shape you want.
Fold: After you have passed it through the pasta machine at least once or twice it’s time to start folding it. Folding the dough creates a rectangle and makes it easier to cut and keeps it even. Fold it a couple of times to get the right shape.
How to Fold: Take each end of the dough and fold it into the center so that the ends meet in the middle. Fold the dough over itself, folding it in half. This will create a nice rectangle. You may need to fold it a couple of times as you pass it through the biggest setting to get it to the right shape.
Too Long: If your dough starts to get too long to work with, cut it in half and work with a half, one at a time. Continue rolling till desired thickeness
Using a Pasta Machine
Using a pasta roller is truly a fun thing to do. It is so satisfying to roll the dough and watch it get thinner and thinner. Handle the dough with care as you put it through the roller.
Running it through the Pasta Machine: Rolling the dough is a process. You have to start big and gradually move down a size till you get the desired thickness. Start with the biggest setting, run the dough through once or twice then adjust the settings to be thinner, and thinner until you have the perfect sheet of golden pasta.
Flatten the Pasta
There are different attachments for the kitchen aid which can cut your dough into different shapes. Most pasta makers will only cut your dough into long thin strips. But those can be used for recipes still that cause for small pasta like Baked Rigatoni or Creamy Tuscan Pasta.
Flatten: If you need to, remember you can fold the dough again to get the dough into a good shape.
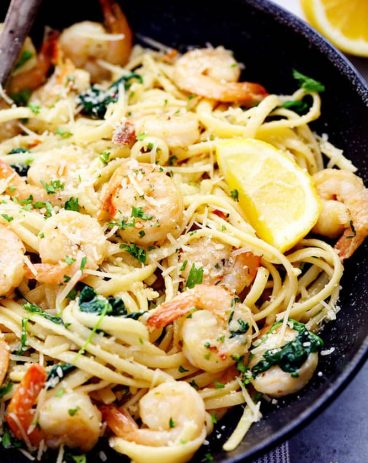
Cut: Once the dough has reached the desired thickness, run the dough through the pasta cutter for the desired shape of your noodles. Make spaghetti sized noodles for recipes such as Cacio e Pepe, or Creamy Bacon Carbonara. Use a bigger cut for dishes such as Fettucini Alfredo or Pesto. Depending on your pasta maker you can make any shape you want with this dough. Again flour the dough as needed to keep it from sticking together as you run it through the cutter. You want to dust the dough, not work the flour into it.
Making Homemade Pasta
Nesting your noodles will keep them from drying out too quickly and allow you to quickly grab them and place them in the boiling water. Salt your water for the best results.
Nest: Gather the noodles and nest them while you work with the next section of noodles. Dust with flour as needed to keep them from sticking together.
Boil: Bring a large pot of water and some salt to a rolling boil. Add the pasta and cook for 60-90 seconds. These homemade noodles will cooks so much faster than boxed dried pasta so keep an eye on it.
Tips For The Best Homemade Pasta
Homemade pasta truly is easy, it just takes some time. Your family is going to love the taste and texture of homemade noodles. You may never buy boxed pasta again.
What Flour should you use: There are definite opinions out there on what makes the best noodles. You can get gorgeous, delicious noodles by using all-purpose flour. To get a more authentic texture you can use a combination of all-purpose and semolina flour. Some might say you need “00” flour but you do not have to go buy expensive flour to get wonderful noodles.
Mixing and Kneading: You can definitely knead it by hand, but you can also use stand mixer with a dough hook. Just knead it till the dough is smooth and elastic.
Flour and Nest: When forming nests of pasta noodles, be sure to flour the noodles well so they don’t stick together as they rest. You can shake the noodles loose before dropping them in the water, or you can place the whole nest in the water and break it up as it cooks.
Reserve Liquid: When your noodles are done cooking reserve some of the pasta water in a measuring cup. Fresh noodles tend to soak up more sauce than dried noodles, so adding a tablespoon of two of starchy pasta water can help invigorate your sauce and keep it from being soaked up too much by the noodles.
No Pasta Maker? No Problem!
If you do not have a pasta roller and cutter do not fret. You can still have amazing homemade noodles that will taste absolutely luscious in any dish. They just may be a bit puffier, but every bit is as good! You can add them to soups at the end of cooking right before serving. Try them in Chicken noodles, Tomato Basil, or Minestrone.
Divide: Once the dough has rested. Go ahead and cut the dough into quarters so it is easier to work with.
Roll: Roll a section at a time on a lightly floured surface. Coat the rolling pin with flour to keep it from sticking. Dust with flour as needed. Roll the dough till it is 1/8″ inch thick.
Cut: Using a pizza cutter or a sharp knife, cut the sheet into four sections. Lightly dust the dough. Roll the sectioned dough into a roll. Cut the roll using the knife or pizza cutter into the desired thickness. You can skip rolling it and just cut the dough as well, but I find it a bit easier and faster to roll it before cutting it.
Drying and Storing Homemade Pasta
Homemade pasta is versatile and storable. I love making a double batch so we can have some now and some later. Perfect for a busy weekday or a lazy weekend. Cook up some Marinara and toss with your pasta for an easy dinner add meatballs for a bit of protein.
Dry: Use a pasta drying rack or clean hangers for drying pasta. Place cut pasta dusted with flour in a single layer over the rack or hangers and let them dry for 24 hours. Carefully remove pasta from drying rack and store in an airtight container or jar until ready to use. You can keep in the fridge if you desire. Dry pasta will hold for up to 1 month if stored in a cool, dry place.
Freeze: Arrange freshly made, uncooked pasta across a floured baking sheet. For long noodles arrange into nests. For short pastas keep in a single layer. Freeze for a couple of hours, and then transfer to double layer plastic bags. You can freeze for up to a couple of months. And you can cook straight from the freezer. No need to thaw, just dump the pasta into boiling salted water, and increase the cooking time a bit.
More Pasta Dishes
Pasta is a comfort food for sure. Noodles go with so many different flavors and ingredients, so they are good to always have around. Pasta can be a main dish, appetizer and side dish. They go perfectly in soups, salads and with your favorite meats. When we are in a big hurry, a pot of noodles tossed with leftovers creates a fast and easy meal. Pasta has that perfect texture and can be flavored however you want them. No matter how you love your pasta you have to try these tried and true favorites.
Homemade pasta is a labor of love but it is totally worth the extra work! This pasta is simple and easy, it just takes a bit of time.
CourseDinner
CuisineItalian American
Keywordhomemade pasta
Prep Time1hour30minutes
Cook Time5minutes
Total Time1hour35minutes
Servings6people
Calories208kcal
AuthorAlyssa Rivers
Ingredients
2cupsall purpose flour
3largeeggs
1Tablespoonolive oil
¾teaspoonsalt
1Tablespoonwater
Instructions
On a clean surface, place the flour in a mound and use your hands to form a next in the center. Add the eggs, olive oil, salt and water to the center of the nest.
Use a fork to gently break the yolks of the eggs and slowly stir the center of the nest incorporating a little of the flour walls at a time until a dough has formed. Use your hands to finish working all the flour in.
Knead the dough for about 8-10 minutes. It’s a stiff, dry dough but it will come together into a smooth dough. Once the dough has all come together and is smooth, wrap in plastic wrap and set it in the fridge to rest for an hour. You can leave it overnight if you wish, but be sure to get it come to room temp before rolling out.
Cut the dough into four pieces and use your hands to shape the first section into a small flat oval. Wrap the remaining three sections in plastic wrap until you are ready to roll them out.
Feed the oval piece of dough through the pasta maker on the number 1 setting. Fold the pasta into book folds, which is the two end folded in until they touch in the middle and then folded in half. Run through the pasta maker on setting 1 two or three more times before moving through the next settings on your pasta maker until the pasta is the desired thickness (I prefer setting 6 on my pasta maker.) If the dough is becoming tacky or sticky dust it with a little bit of flour. Additionally, if the dough is becoming much too long to handle you can cut it in half and work each half separately.
Run the dough through the pasta maker using the cutting attachment to cut the shape of noodles you would like. Dust the final noodles with flour and either hang on a pasta rack or make them into pasta nests and let them rest for about 30 minutes on a floured surface.
Bring a large pot of salted water to a boil. Boil the pasta for 60-90 seconds. Toss with your favorite sauce and enjoy!
Notes
When forming nests of pasta noodles, be sure to flour the noodles well so they don’t stick together as they rest. You can shake the noodles loose before dropping them in the water, or you can place the whole nest in the water and break it up as it cooks.When your noodles are done cooking reserve some of the pasta water in a measuring cup. Fresh noodles tend to soak up more sauce than dried noodles, so adding a tablespoon of two of starchy pasta water can help invigorate your sauce and keep it from being soaked up too much by the noodles.