Pork Chops with an Apple Bacon Sauce are the answer to what’s for dinner! Savory pork is smothered in a sweet and salty sauce that is going to wow your tastebuds!
Pork is a protein-packed powerhouse food. Try pork in these tried and true favorites, Sweet and Sour, Easy Pork Schnitzel, and Juicy Air Fryer Pork Chops.

Skillet Pork Chops with Apples Recipe
I love a good pork dish, including my Fall of the Bone Ribs, Ham and Cheese Sliders, and my Mushroom Smothered Pork Chops. Now I can add these pork chops with apples! Hands down these are one of the best recipes I’ve ever had! The spicy rub on the pork begins the flavor punch with a touch of heat. Next, you cook it in the bacon drippings adding a layer of saltiness. Then you add the apples for caramelized sweetness. You and your loved ones are going to love this flavor explosion!
This is an easy recipe that comes together for an absolute show-stopping dish. Perfect for Sunday dinner or a great family weekday meal, when the week just calls for it. These pork chops with apples will look like you’ve slaved all day, but we’ll keep the secret to ourselves. The freshness that comes from the thyme and rosemary goes perfectly with the smokey bacon and spiced pork chops. Apples just complement the whole dish. This looks intimidating but trusts me, this is super easy and absolutely divine!
What You Need For Pork Chops with Apples
The ingredients come together for a combination of flavors that is unparallel. The sweetness from the apples and the saltiness from the bacon and pork is a combination made in heaven. You are going to love this pork chops with apple recipe as will your family. For all ingredients listings and measurements, see the recipe card below.
- Bone in pork chops: Bone in creates a more tender moist pork chop, but you can use boneless too.
- Salt and pepper: Add more or less to taste.
- Brown sugar: Both dark and light brown sugar will both taste divine.
- Chili powder: An earthy spicy spice adds a bit of heat.
- Paprika: Made from dried red peppers, it adds a vibrant color and a mild flavor.
- Italian seasoning: Make your own Italian seasoning for the best flavor.
- Garlic powder: A pungent flavor that is golden in this recipe.
- Bacon chopped: Bacon amps up the flavor and adds a nice salty taste.
- Chicken broth: Mild in flavor it is a perfect broth to make the sauce.
- Dijon mustard: Intense and complex mix of flavor creates a nice kick.
- Cider vinegar: Acidity helps tenderize the meat and adds flavor.
- Honey: Golden sweet honey adds flavor and a hint of carmalization.
- Fresh thyme: Mince the fresh thyme, fresh will add a bright flavor.
- Fresh rosemary: Fresh and aromatic, it pairs perfectly with pork.
- Apple sliced: Use a good crisp sweet apple.
How to Cook Pork Chops and Apples
There are a few steps here but it comes together really easily. The apples will cook in the sauce giving them flavor as they soften. Make sure you cook your bacon till it’s crisp. It will add flavor and texture to the pork chops with the apple.
- Seasoning for Pork: Salt and pepper the pork chops. In a small bowl combine the brown sugar, chili powder, paprika, Italian seasoning, and garlic powder. Rub on all sides of the pork chops.
- Cook Bacon: In a large skillet add the bacon and cook until no longer pink. Remove from the pan with a slotted spoon and set aside on a plate.
- Cook Pork: Add the pork chops to the skillet and cook until no longer pink and 145 degrees. Remove the pork chops and set aside on a plate.
- Sauce for Pork Chops: Add the chicken broth, Dijon Mustard, cider vinegar, honey, thyme and rosemary. Whisk until it starts to simmer and reduce the heat and add apples. Let the sauce deglaze and simmer the apples until they start to soften.
- Put it together: Add in the pork chops and bacon and allow to heat through.

Tips for Perfect Pork Chops With Apple Bacon Sauce
The pork cooks faster than you might think. You do not want to overcook it. The sauce will help keep the pork tender and moist. And the bacon will add flavor as well as keeping it juicy.
- Pork: Pork chops are a lean cut of meat, especially if you use boneless pork chops. Lean meat will cook faster than other cuts. Use a meat thermometer and cook till the pork is 145 degrees. This way you’ll avoid dry pork. You can use both boneless and bone-in.
- Size: Try to keep the pork chops the same size when you buy them, they will cook more evenly.
- Spice: If you want to tone down the spice you can reduce the amount of chili powder. If you want it a bit spicer add a half a teaspoon more.
- Bacon: Use thick cut bacon. It is easier to cut and cook. Plus it will add even more smokey goodness.
- Apples: Any good sweet crisp apples will work. I like Jazz or Gala Apples. Avoid sour green apples. I find them too tart.
What to Serve With Pork Chops
These pork chops with apples and bacon are effortlessly incredible. These make a great family dinner. All you have to do is add some great side dishes to complete the meal. Pork chops go with so many dishes including Potatoes, Salad and Carrots. Round it out with some Bread and you have a meal worth sitting down for. Here are some other great options.

Side Dishes
Dad’s Famous Mashed Potatoes
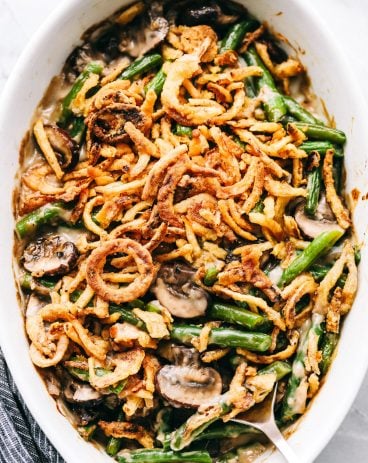
Side Dishes
World’s Best Green Bean Casserole

Side Dishes
Copycat Texas Roadhouse Rolls

Salads
Wedge Salad
Making These Pork Chops in the Instant Pot
Pork is a fantastic candidate for cooking in the instant pot. It holds up so well in the instant and comes out tender and juicy. It makes for a hands-off option to this pork chops with apples dish.
- Bacon: Turn the instant pot to saute and cook the bacon till done. Remove the bacon and set it aside.
- Sear the Pork Chops: Place the seasoned pork chops in the instant pot and sear on both sides in the bacon fat.
- Add: Add the rest of the sauce ingredients and apples and turn the instant pot to manual and cook for 8 -10 minutes. Let the pressuer relase manually. Serve with reserved bacon.

More Pork Recipes

Side Dishes
How to Bake the Perfect Bacon (Step By Step!)


Dinner
Easy Cuban Sandwich Recipe

Dinner
Slow Cooker Jambalaya

Pork Chops with an Apple Bacon Sauce
Ingredients
- 3-4 bone in pork chops
- salt and pepper
- 1 tablespoons brown sugar
- 1 teaspoon chili powder
- 1/2 teaspoon paprika
- 1 teaspoon Italian seasoning
- 1 teaspoon garlic powder
- 6 slices bacon chopped
- 1 1/2 cups chicken broth
- 1 Tablespoon dijon mustard
- 2 Tablespoons cider vinegar
- 2 Tablespoons honey
- 1 Tablespoon fresh thyme minced
- 1 Tablespoon fresh rosemary minced
- 1 apple sliced
Instructions
-
Salt and pepper the pork chops. In a small bowl combine the brown sugar, chili powder, paprika, Italian seasoning, and garlic powder. Rub on all sides of the pork chops.
-
In a large skillet add the bacon and cook until no longer pink. Remove from the pan with a slotted spoon and set aside on a plate.
-
Add the pork chops to the skillet and cook until no longer pink and 145 degrees. Remove the pork chops and set aside on a plate.
-
Add the chicken broth, Dijon Mustard, cider vinegar, honey, thyme and rosemary. Whisk until it starts to simmer and reduce the heat and add apples. Let the sauce deglaze and simmer the apples until they start to soften.
-
Add in the pork chops and bacon and allow to heat through.
Nutrition
from The Recipe Critic https://ift.tt/3As9b1X
https://ift.tt/3xwxyto