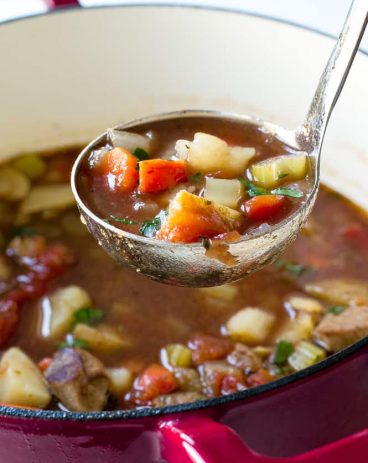
Stuffed pepper soup is delicious, hearty, and full of flavor! Filled with so many different ingredients, it’s insanely good and will definitely fill your belly!
As the weather turns colder, I love a good warm bowl of soup! Try out some of my other favorites like Creamy Zucchini Soup, Chicken Noodle Soup, and this Creamy Chicken Gnocchi Soup. They are all so delicious!

Stuffed Pepper Soup
This recipe has all of the same flavors as a stuffed pepper but this time they are packed into a delicious soup! This version of this yummy recipe is perfect for this time of year because it’s warm and cozy and makes me excited for the colder weather that’s coming! This soup has a delicious flavor to it. After you add in the beef and garlic and Italian seasonings then you put in some peppers and it really makes a unique and delicious taste!
This rich and homestyle flavor added with rice and beef has the perfect texture. In fact, this meal is a great option for those nights when you are super busy and on the go! Since it has rice, meat and veggies then you don’t even need to make any sides to go with it! But, if you decided that you did want to make it a meal with a few sides then try adding in these rolls and this salad. Either way, you can’t go wrong!
What’s in Stuffed Pepper Soup?
Using classic ingredients that you probably already have in your kitchen, this soup is SOO good. See the recipe card below for a list of exact ingredient measurements.
- Olive oil: This is used to mix in with your vegetables as you cook them up and make them nice and soft!
- Onion: I like to dice up my onion into small pieces.
- Ground beef: I used lean ground beef in this recipe but you could use ground turkey instead!
- Garlic cloves: Using fresh garlic cloves is what I did but if you don’t have any on hand then you can use minced garlic from your fridge. ½ tsp equals about 1 clove of garlic!
- Red and green bell peppers: Depending on how much pepper you want in each bite, you could cute these up to be big or small.
- Beef broth: I like to use this as the base of the soup instead of water so that it adds to the flavor!
- Tomato sauce: I used one small can.
- Diced tomatoes: Make sure that your diced tomatoes don’t have any extra flavoring to them and that they are just in tomato sauce.
- Italian seasoning: You can use store bought italian seasoning. Or, if you really want to take this to the next level then take an extra 5 minutes to make this homemade Italian seasoning!
- Salt and pepper: Use these to enhance all of the other flavors in the soup!
- Rice: You will cook your rice before you put it in the soup in this recipe!
Let’s Make Some Soup!
This stuffed pepper soup only takes about 30 minutes from start to finish! It’s a simple and easy meal that gives a fantastic taste! It’s a win-win!
- Cook onion and ground beef and set aside: In a large pot over medium high heat add olive oil and onion. Saute for 2-3 minutes or until almost tender. Add in the ground beef and cook and crumble until to longer pink. Drain grease and set aside on a plate.
- Add in and cook peppers: Add the olive oil and peppers. Sauté for 3-4 minutes or until almost tender.
- Mix together meat and peppers, add other ingredients: Add the meat back into the peppers. Add in the beef broth, tomato sauce, diced tomatoes, Italian seasoning, salt and pepper.
- Add rice and simmer: Add in the rice and stir. Let simmer for about 3-4 minutes until heated throughout.

Variations
There are a few things that you can do to change up this stuffed pepper soup! It’s so delicious as is or you can change it up to make it your own!
- Meat: If you prefer ground turkey then go ahead and use that instead! Cook it up and use it just as the recipe calls for with the ground beef!
- Add some heat: If you want to make this dish spicy, go ahead and add in some red pepper flakes!
- Thicker or thinner: Depending on the consistency that you want, add in more rice or take some away.

How to Store Leftovers
This stuffed pepper soup tastes great the next day but here is a helpful hint for you! The rice will get mushy in the soup in the fridge. So if you know that you are cooking enough to have leftovers for lunch or dinner the next day then here is what you should do!
- Separate: Instead of putting all of the rice into the pot and mixing it together, I would add rice to each individual serving.
- Store seperately: Store the soup and the rice each in their own separate airtight containers in the fridge. It will last 2-3 days in the fridge!
- Mix together and reheat: When you go to eat your leftovers, add the rice into your bowl of soup. Reheat it on the stove or in the microwave until heated through

More Yummy Soup Recipes to Try

Soup Recipes
Bacon Cheeseburger Soup
Soup Recipes
Slow Cooker Tomato Basil Parmesan Soup

Soup Recipes
Slow Cooker Loaded Baked Potato Soup
Soup Recipes
Divine Vegetable Beef Soup

Stuffed Pepper Soup
Ingredients
- 1 Tablespoon olive oil
- 1 small onion diced
- 1 pound lean ground beef
- 3 cloves garlic minced
- 1 Tablespoon olive oil
- 1 red bell pepper diced
- 1 green bell pepper diced
- 3 cups beef broth
- 1 (15 ounce can) tomato sauce
- 1 (15 ounce can) diced tomatoes
- 1 Tablespoon Italian seasoning
- 1/2 teaspoon salt
- 1/4 teaspoon pepper
- 2 cups rice cooked
Instructions
-
In a large pot over medium-high heat add olive oil and onion. Saute for 2-3 minutes or until almost tender. Add in the ground beef and cook and crumble until to longer pink. Drain grease and set it aside on a plate.
-
Add the olive oil and peppers. Sauté for 3-4 minutes or until almost tender.
-
Add the meat back into the peppers. Add in the beef broth, tomato sauce, diced tomatoes, Italian seasoning, salt, and pepper.
-
Add in the rice and stir. Let simmer for about 3-4 minutes until heated throughout.
Nutrition
from The Recipe Critic https://ift.tt/3BP0mA7
https://ift.tt/3FTL7bR