गुरुवार, 28 अक्तूबर 2021

Eggnog Fudge

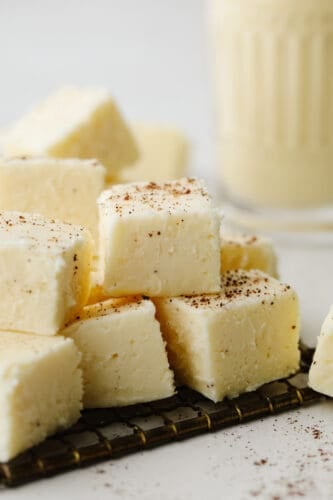
This eggnog fudge is every eggnog lover’s dream! Each bite is filled with melt-in-your-mouth white chocolate and dusted with nutmeg!

Can’t get enough of the creamy flavor of eggnog? You’ll have to try my eggnog meltaways, waffles, and pound cake. They’re absolutely delicious!

Cubes of eggnog fudge stacked on top of each other.

White Chocolate Eggnog Fudge Recipe

One of my favorite things about the holidays is all of the baking and giving that is involved. Honestly, I hated eggnog until my youngest boy became obsessed with it. Then I slowly started to like it! Last year, I baked some of my all-time favorite cookies that were also made with eggnog! Safe to say I’m a fan now. I feel like eggnog is amazing when you bake with it or incorporate it into a recipe. It’s so creamy and tastes almost like a custard!

My husband hates eggnog. But I always make him try my recipes. The eggnog cookies also became his favorite last Christmas. He made me bake them for all of the neighbors. Like the cookies, this fudge turned out amazing. And when I had my husband take a bite he said, WOW, this is actually really good! It is the perfect holiday fudge recipe. And being a lover of white chocolate, I of course LOVED this recipe! Eggnog fan or not, this eggnog fudge is a dessert that everyone can appreciate! It was easy to put together and I know that you will love it too!

What You’ll Need for Eggnog Fudge

Only 6 ingredients to make this tasty fudge! I love that I can pick these ingredients up without having to spend a fortune. Its simple ingredients make it perfect for making in large batches and giving to friends and family! If you’re looking for individual measurements, they’re in the recipe card below.

  • Eggnog: This is best made from scratch! It only takes a few simple ingredients and really amplifies the overall flavor of the eggnog fudge.
  • Sugar: Granulated sugar melts down to add the perfect sweetness to the fudge!
  • White Chocolate: I love white chocolate! It’s so rich and milky. It matches perfectly with the flavor of eggnog.
  • Butter: You can add salted or unsalted butter here. I like using salted to balance the sweetness of the fudge a little.
  • Marshmallow Cream: Adds a tasty, fluffy texture and sweet flavor.
  • Nutmeg: You’ve gotta have a little spice for the holidays! The warm, nutty flavor tastes great dusted on top.

Time to Make Fudge!

Eggnog fudge is one of the easiest desserts to make. Fudge, in general, is super simple and tastes so amazing! All you have to do is mix, melt, and cool! You’ll have to try my vanilla and peanut butter fudge recipes. They’re easy and delicious, too!

  1. Prep Your Pan: To begin, line a 9×13 inch pan with aluminum foil and lightly sprinkle with cooking spray. Set aside.
  2. Boil Eggnog and Sugar: In a large pot over medium heat, combine eggnog and sugar. Bring to a boil stirring occasionally. Once it comes to a boil, stir constantly for 10 minutes.
  3. Mix in Remaining Ingredients: Remove from the heat and add in white chocolate chips, marshmallow cream, and butter. Stir until completely melted and incorporated.
  4. Pour and Cool: Pour into your foil lined 9×13 pan and spread evenly until smooth. Sprinkle the top with nutmeg. Let completely cool to room temperature and store in the refrigerator in an airtight container.
Process shots of preparing fudge.

Tips for Making Fudge

Fudge is pretty easy, but needs certain conditions to have the best consistency! Here are a few tips and tricks on making the tastiest fudge possible. You’ll be a pro!

  • Only Use Butter: It’s best to only use butter when making fudge. A substitute like margarine has too high of a water content and will keep your fudge from setting properly.
  • Check Temperature With a Candy Thermometer: You’ll know your fudge mixture is ready to be poured into a pan when it reaches at least 234 degrees Fahrenheit. You can also test the mixture by putting a drop into cold water. If it turns into a hard ball, it’s ready!
  • Adding Nuts: This eggnog fudge is perfect for adding chopped walnuts, pecans, or almonds to!
Cut squares of fudge.

Storing Leftover Eggnog Fudge

If this creamy fudge ends up having leftovers, here’s how to keep it fresh! It’s the perfect treat to enjoy days after it’s made.

  • In the Refrigerator: Keep your fudge wrapped tightly in plastic wrap or tin foil. You can also store it in an airtight container. It will stay good for up to 1 week.
  • In the Freezer: Eggnog fudge will keep in the freezer for up to 3 months. Wrap tightly in plastic wrap or put in an airtight container before storing.
Closeup of eggnog fudge cubes dusted with nutmeg.
Print

Eggnog Fudge

This eggnog fudge is every eggnog lover's dream! Each bite is filled with melt-in-your-mouth white chocolate and dusted with nutmeg!
Course Dessert
Cuisine American
Keyword Eggnog Fudge, fudge, Fudge Recipe
Prep Time 10 minutes
Cook Time 20 minutes
Total Time 30 minutes
Servings 24 Pieces
Calories 211kcal
Author Alyssa Rivers

Ingredients

  • 1 1/2 cups eggnog
  • 4 cups sugar
  • 2 (12 ounces) packages white chocolate chips
  • 1 cup butter cut into pieces
  • 1 (7 ounces) container marshmallow cream
  • nutmeg for sprinkling

Instructions

  • Line a 9×13 inch pan with aluminum foil and lightly sprinkle with cooking spray. Set aside.
  • In a large pot over medium heat combine eggnog and sugar. Bring to a boil stirring occasionally. Once it comes to a boil, stir constantly for 10 minutes.
  • Remove from the heat and add white chocolate chips, marshmallow cream, and butter. Stir until completely melted and incorporated.
  • Pour into your foil-lined 9×13 pan and spread evenly until smooth. Sprinkle the top with nutmeg. Let completely cool to room temperature and store in the refrigerator in an airtight container.

Notes

Updated on October 27, 2021
Originally Posted on October 5, 2013

Nutrition

Calories: 211kcal | Carbohydrates: 35g | Protein: 1g | Fat: 8g | Saturated Fat: 5g | Polyunsaturated Fat: 1g | Monounsaturated Fat: 2g | Trans Fat: 1g | Cholesterol: 30mg | Sodium: 77mg | Potassium: 29mg | Sugar: 35g | Vitamin A: 269IU | Vitamin C: 1mg | Calcium: 23mg | Iron: 1mg


from The Recipe Critic https://ift.tt/3pJB2Z8
https://ift.tt/3mksZ31

Cinnamon Sugar Tortilla Chips

Cinnamon sugar tortilla chips are an easy and delicious treat! Crispy and golden, they’re perfect for all of your favorite sweet dips.

You can make so many different kinds of chips at home! Air fryer sweet potato chips, cinnamon sugar apple chips, and zucchini chips are some of my easy favorites!

Baked cinnamon sugar tortilla chips laid out on a pan.

Baked Cinnamon Sugar Tortilla Chip Recipe

Growing up, cinnamon toast was one of my favorite treats to have. It was so simple, but the mix of butter, sugar, and cinnamon was something I couldn’t get enough of. To this day, I’ll still make myself a piece of cinnamon toast as comfort food. Honestly, these amazing chips give me that same nostalgic feeling! They’re just as easy to make, but are perfectly crispy and can be used for so many different things! Make them for an after-school snack, an appetizer, or to use as ice cream topping! You can find more serving suggestions below.

I’m a sucker for chips. Especially sweet ones- and these cinnamon sugar tortilla chips are some of my absolute favorites. They are beyond easy to make. You only need tortillas, butter, cinnamon, and sugar to make them! And let me tell you! They are so unbelievably crispy and delicious without being deep-fried! I love to munch on them when they come out of the oven. They’re so warm with the best crunch! Pair these with your favorite sweet dips for a tasty treat! I have been loving them with cannoli and pumpkin pie dips.

Cinnamon Sugar Tortilla Chip Ingredients

This is the perfect snack for a busy day. Only 4 ingredients to whip up these tasty cinnamon sugar chips! My kids love to snack on them. And honestly, anything that doesn’t require a grocery trip is a winner to me! Looking for measurements? You can find them in the recipe card below.

  • Flour Tortillas: I always use flour tortillas because it’s what I have around the house. They bake perfectly, too! You can also use soft corn tortillas as a substitute. But keep in mind, corn tortillas are more delicate and will cook faster. If that’s what you choose to use, take off a few minutes of baking time.
  • Butter: Melted butter is added to the cinnamon sugar mixture to make it smooth and rich. I always use unsalted butter here to keep things sweet.
  • Sugar: Granulated sugar is a key player here. You can adjust the ratios to make it sweeter or less sweet as desired! I, personally, love these chips on the sweeter side!
  • Cinnamon: Cinnamon adds the perfect warm spice! I love any cinnamon desserts. They’re so tasty!

Let’s Make Homemade Chips!

You’re going to love how easy this recipe is! It comes together in a snap. These chips are so tasty you won’t be able to get enough! Thankfully, they’re easy to make so you can always have a second batch! My kids always devour them, so it’s nice being able to make more with ease!

  1. Preheat: To begin, preheat the oven to 350 degrees Fahrenheit.
  2. Microwave Butter: Melt the butter completely.
  3. Mix: In a small bowl, mix the sugar and cinnamon.
  4. Prep Tortillas: Lay out the tortilla and spread butter evenly over it. Then, sprinkle the two with cinnamon sugar.
  5. Cut Pieces: After cutting the tortilla into small pieces, place on a baking sheet with parchment.
  6. Bake: Next, bake for 9-11 minutes or until the tortilla is crispy. Move onto a plate then bake the second batch.
Tortilla being brushed with butter then adding cinnamon over top and cutting into triangle slices with a pizza cutter.

Tips for Cinnamon Tortilla Chips

Whether you want to enhance your tortilla chips, or don’t know what to serve them with, I’ve got you covered! These sweet and tasty chips are sure to be a favorite at your house!

  • Don’t Overcrowd Chips: If you’re making a double batch of these chips, either bake each batch separately or use 2 baking sheets. Overcrowding your chips in a pan will keep them from cooking thoroughly. Air flow is necessary fo the perfect crunch!
  • Other Flavors: For a perfect fall treat, you can add a little homemade pumpkin spice to your cinnamon sugar mix! I’ve loved this variation. You can also dip these in melted chocolate for a decadent twist!
  • Dips and Serving Suggestions: I usually serve my cinnamon sugar tortilla chips alongside a sweet dip. S’mores dip, melted caramel, fudge, and cheesecake dip all taste absolutely divine paired with these chips. Caramel pumpkin cheesecake dip is also delicious! Perfect for a fall party.

Storing Leftover Chips

Here’s how to store your cinnamon sugar tortilla chips and enjoy them later! You’re going to love having these around. They’re perfect for munching on!

  • At Room Temperature: Store your leftover chips in an airtight container. They will stay good for 3-5 days. If you want to extend the shelf life a little, use less butter when baking them. Oils make them more perishable over time.
Picking up one cinnamon sugar chip.
Print

Cinnamon Sugar Tortilla Chips

Cinnamon sugar tortilla chips are an easy and delicious treat! Crispy and golden, they're perfect for all of your favorite sweet dips.
Course Dessert
Cuisine American
Keyword cinnamon sugar tortilla chips, cinnamon tortilla chips
Prep Time 5 minutes
Cook Time 10 minutes
Total Time 15 minutes
Servings 4 people
Calories 339kcal
Author Alyssa Rivers

Ingredients

  • 6 medium flour tortillas
  • 1/4 cup butter
  • 1/2 cup sugar
  • 1 tablespoon cinnamon

Instructions

  • Preheat the oven to 350 degrees.
  • Melt the butter completely.
  • In a small bowl mix the sugar and cinnamon.
  • Lay the tortilla flat and brush butter evenly over it. Sprinkle the two with cinnamon sugar.
  • Using a knife or a pizza cutter, cut the tortilla into small triangles and place it on a baking sheet with parchment.
  • Bake for 9-11 minutes or until the tortilla is crispy. Move onto a plate then bake the second batch.

Nutrition

Calories: 339kcal | Carbohydrates: 50g | Protein: 4g | Fat: 15g | Saturated Fat: 8g | Polyunsaturated Fat: 1g | Monounsaturated Fat: 5g | Trans Fat: 1g | Cholesterol: 31mg | Sodium: 410mg | Potassium: 81mg | Fiber: 2g | Sugar: 27g | Vitamin A: 360IU | Vitamin C: 1mg | Calcium: 71mg | Iron: 2mg


from The Recipe Critic https://ift.tt/2ZwtjCA
https://ift.tt/3vQMlji

बुधवार, 27 अक्तूबर 2021

Pumpkin Cheesecake with Caramel Sauce

This pumpkin cheesecake that is drizzled with caramel sauce is the ultimate fall dessert. It’s rich, creamy, and spiced to perfection!

Having a homemade cheesecake for dessert is definitely a way to impress your guests. It doesn’t matter if you’re feeling key lime, chocolate, or mint oreo… there is a cheesecake for every craving!

A side view of a slice of pumpkin cheesecake.

Amazing Caramel Pumpkin Cheesecake Recipe

Pumpkin cheesecake is a rich and creamy dessert loaded with all of the classic fall spices! I love that it looks like a professional chef baked it up but it’s simple to make! If you have always wanted to try and bake cheesecake but thought it would be too hard then this recipe is for you. This cheesecake has a delicious gingersnap crust topped with a layer of silky pumpkin cheesecake. Then, put on some whipped cream and homemade caramel sauce and you have a dessert to remember. It’s so good that you will be wanting to have dessert before dinner! 

This is recipe is a great take on a traditional pumpkin pie when it comes to taste and texture! Not only does it taste insanely delicious, but it looks like it came straight from a bakery! Because of that, pumpkin cheesecake has been my new go-to for Thanksgiving dessert! If you love having different options for for your holiday dessert then try these pumpkin pecan pie bars and pumpkin bread pudding! They are great ones that still bring in that delicious fall flavor but switch things up from traditional pies!

Pumpkin Cheesecake Ingredients

You are going to LOVE how amazing this cheesecake turns out! In fact, I bet you want to make it again soon after! See the recipe card below for a list of exact ingredient measurements.

  • Gingersnap Crumbs: Make sure your gingersnap crumbs are finely ground. You can throw them in a food processor for best results. Gingerbread cookies can also be used in place of gingersnaps.
  • Granulated Sugar: This adds sweetness to your crust and help all of your ingredients meld together when baked.
  • Butter: I use unsalted butter that is melted.

Pumpkin Cheesecake

  • Granulated Sugar: For sweetness. You can also use brown sugar for a richer flavor.
  • Cream Cheese: This is the foundation of the cheesecake. Make sure it is at room temperature before adding to your mixture! It will help everything to mix together more smoothly.
  • Vanilla Extract: This will add a richer flavor to your cheesecake. Use pure vanilla extract for best results!
  • Canned Pumpkin: This is the star of the show! Opt for a high-quality pumpkin. If you really want to take this flavor to the next level then try making this homemade pumpkin puree. It’s so easy!
  • Eggs: This is the binding agent for your cheesecake. Because of this, it will help everything set in place. Make sure your eggs are room temperature before adding them in.
  • Cinnamon: A necessity for any fall flavor. Provides a delicious earthy spice.
  • Ground Cloves: This adds an aromaic and slightly sweet flavor.
  • Ground Ginger: Adds that bright, delicious gingerbread cookie flavor.
  • Nutmeg: Added for a warm, nutty spice.
  • Whipped Cream: Used for topping. You can make your own with heavy cream, but I prefer the ease of canned.
  • Caramel Sauce: Decadent caramel brings everything together! I use this for topping. You can use pre-made caramel but I think homemade caramel sauce really levels up this whole recipe.

Let’s Bake a Cheesecake!

Making a pumpkin cheesecake at home doesn’t have to be complicated! Use these super easy steps to create a dessert that will make sure to get a “WOW!” from your guests!

  1. Prep Oven: Preheat oven to 350 degrees F.
  2. For Cookie Crumbs: Use a food processor to crush the cookies into fine crumbs. Then, measure out 2 cups of crumbs and pour them into a mixing bowl. Add ¼ cup sugar and melted butter and stir to combine.
  3. Prepare Pan: Next, cover the outside bottom of an 8-inch springform pan with foil, securing the foil partway up the outer sides of the pan.
  4. Press Into Pan: Press the crumb mixture into the bottom and about half way up the sides of the springform pan.
  5. Bake and Set Aside: Bake the crust for 5 minutes. Remove from oven and set aside while you make the cheesecake filling.

For the Pumpkin Cheesecake

  1. Mix cream cheese, sugar and vanilla: In a large mixing bowl combine the room temperature cream cheese, 1 cup of sugar, and vanilla. Mix with an electric mixer until smooth.
  2. Add in the rest of the ingredients: Add the pumpkin, eggs, cinnamon, cloves, ginger and nutmeg and mix until smooth, but don’t over mix. Pour the filling into the prepared pan.
  3. Prepare water bath: Grab a pan that’s larger than the cheesecake pan and fill it with about ½ inch of water, to make a water bath.
  4. Add in cheesecake pan: Place the cheesecake pan inside the dish with the water.
  5. Bake: Bake for 60-70 minutes, or until the sides of the cheesecake have just set and the center is just barely jiggly.
  6. Cool: Remove it from the oven (it will continue to bake as it cools). Remove the tinfoil and allow the cheesecake to cool completely on a wire cooling rack.
  7. Cover and refrigerate: Once cooled, cover the pan with plastic wrap and refrigerate for several hours, or overnight.
  8. Remove pan sides: When the cheesecake has chilled in the fridge, remove the pan sides (I like to gently run a dull butter knife along the inner edge of the pan before I release the springform pan sides).
  9. Serve: Serve with caramel sauce (homemade or store-bought) and whipped cream on top, if desired.
4 pictures showing how to make a cheesecake crust and how to start mixing pumpkin cheesecake filling.

Tips & Tricks for Baking Cheesecake

These are some of my personal tips on ways to customize and perfect your pumpkin cheesecake! You will be baking like a pro with a delicious fall treat in front of you in no time!

  • Crust substitutes: I like to bake pumpkin cheesecake with a gingersnap crust because I love that flavor combination! But, you could also use a graham cracker crust! It has a perfect sweet flavor that pairs well with pumpkin.
  • Room temperature ingredients: It is important to make sure your eggs and cream cheese are at room temperature before adding them into your mixture. When ingredients are at room temperature they will make for a much smoother finish!
  • Use full-fat ingredients: Although this isn’t the healthiest of recipes, it sure does taste delicious!! Creams and cheeses with high fat content will yield you the creamiest, most delicious cheesecake.
  • Don’t overbake: Overbaking your cheesecake can lead to cracks and a dense texture. Keep an eye on it while it is in the oven to achieve the best creamy texture.
  • Keep the oven closed: It is best to keep the oven door closed during the baking process. By opening the oven door, you let out heat! This can cause your cheesecake to bake unevenly. Use the oven light instead!
  • Let it cool completely: I know it is beyond hard to wait for such a delicious dessert! But, it you don’t let your cheesecake cool completely before eating it then it will be mushy mess! This may take a few hours. In fact, I like to let mine chill overnight for the best results!
  • Toppings: Besides a drizzle of tasty homemade caramel, there are many other toppings that taste great with this cheesecake. Try adding in some chopped nuts, fudge, marshmallow cream, or pumpkin spice!
A slice of cheesecake being served.

Storing Leftover Pumpkin Cheesecake

Not only is this recipe delicious, but it stores really well! You can have a slice of rich and creamy goodness whenever. It will keep for days (even months, if stored properly in the freezer!) and tastes just as delicious as the day you made it.

  • In the refrigerator: Store for up to 4 days in an airtight container.
  • In the freezer: When kept in an airtight container or wrapped tightly in plastic wrap, pumpkin cheesecake will keep for up to 2 months. Thaw for one full day in the fridge before serving.
A slice of pumpkin cheesecake drizzled with a homemade caramel sauce.

A Reader’s Review

“Consisted of the best season’s ingredients, definitely a keeper! Gorgeous photos, too!”
2pots2cook
 
 
Print

Pumpkin Cheesecake with Caramel Sauce

This amazing Pumpkin Cheesecake with Caramel Sauce is sure to become your new favorite fall dessert! It starts with a simple homemade gingersnap crust, then a layer of silky pumpkin cheesecake, topped with whipped cream and a drizzle of caramel sauce.
Course Dessert
Cuisine American
Keyword pumpkin, pumpkin cheesecake
Prep Time 15 minutes
Cook Time 1 hour 30 minutes
Total Time 1 hour 45 minutes
Servings 8 Slices
Calories 653kcal
Author Alyssa Rivers

Ingredients

Gingersnap Crust

  • 2 cups finely ground gingersnap crumbs about 10 ounces
  • 1/4 cup granulated sugar
  • 7 tablespoons unsalted butter melted

Pumpkin Cheesecake

  • 1 cup granulated sugar
  • 3 (8 ounce) packages cream cheese (room temperature!)
  • 1 teaspoon vanilla extract
  • 1 cup canned pumpkin or homemade pumpkin puree
  • 3 large eggs room temperature
  • 1 1/2 teaspoon cinnamon
  • 1/4 teaspoon ground cloves
  • ½ teaspoon ground ginger
  • 1 1/4 teaspoons nutmeg
  • whipped cream for topping
  • caramel sauce for topping

Instructions

For the Gingersnap Crust

  • Preheat oven to 350 degrees F.
  • Use a food processor to crush the cookies into fine crumbs. Measure out 2 cups of crumbs and pour them into a mixing bowl. Add ¼ cup sugar and melted butter and stir to combine.
  • Cover the outside bottom of an 8-inch springform pan with foil, securing the foil partway up the outer sides of the pan.
  • Press the crumb mixture into the bottom and about halfway up the sides of the springform pan.
  • Bake the crust for 5 minutes. Remove from the oven and set aside while you make the cheesecake filling.

For the Pumpkin Cheesecake

  • In a large mixing bowl combine the room temperature cream cheese, 1 cup of sugar, and vanilla. Mix with an electric mixer until smooth.
  • Add the pumpkin, eggs, cinnamon, cloves, ginger, and nutmeg and mix until smooth, but don’t over mix. Pour the filling into the prepared pan.
  • Grab a pan that’s larger than the cheesecake pan and fill it with about ½ inch of water, to make a water bath.
  • Place the cheesecake pan inside the dish with the water.
  • Bake for 60-70 minutes, or until the sides of the cheesecake have just set and the center is just barely jiggly.
  • Remove it from the oven (it will continue to bake as it cools). Remove the tinfoil and allow the cheesecake to cool completely on a wire cooling rack.
  • Once cooled, cover the pan with plastic wrap and refrigerate for several hours, or overnight.
  • When the cheesecake has chilled in the fridge, remove the pan sides (I like to gently run a dull butter knife along the inner edge of the pan before I release the springform pan sides).
  • Serve with caramel sauce (homemade or store-bought) and whipped cream on top, if desired.

Notes

Updated on October 27, 2021
Originally Posted on September 19, 2018

Nutrition

Calories: 653kcal | Carbohydrates: 60g | Protein: 9g | Fat: 43g | Saturated Fat: 24g | Cholesterol: 181mg | Sodium: 440mg | Potassium: 301mg | Fiber: 2g | Sugar: 41g | Vitamin A: 6300IU | Vitamin C: 1mg | Calcium: 129mg | Iron: 3mg


from The Recipe Critic https://ift.tt/3vLTq4M
https://ift.tt/3bfIBOV