बुधवार, 3 नवंबर 2021

Homemade Toffee

Homemade toffee is super simple with no candy thermometer required! This buttery chocolate treat is a must-make recipe this holiday season.

I love this time of year because of all the desserts! For even more sweet goodies, be sure to try my peanut brittle, caramels, or this delicious fudge!

A closeup stack of 4 pieces of toffee.

Easy and Delicious English Toffee Recipe

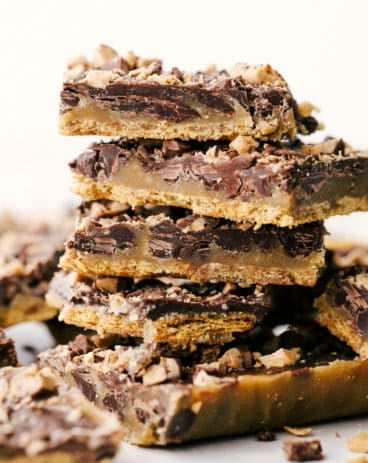
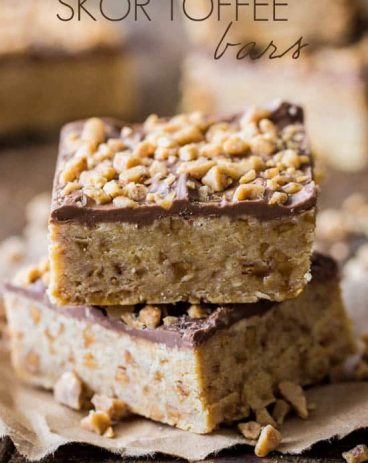
Chocolate and toffee have always been one of my favorite combinations. I loved Skor bars growing up, and to this day still get super excited when there’s toffee around. That’s why I love this time of year! You start to see things like toffee, brittle, peppermint bark, and everything pumpkin spice appear in the stores! So, to ring in the colder weather and delicious desserts… I present to you- my favorite homemade toffee recipe. It’s as easy as it gets! And the best part is, you can make it without a candy thermometer! Whether you’re a seasoned baker or just starting out, this is a delicious foolproof recipe. It’s going to become one of your favorites!

This recipe starts with a layer of buttery, golden-brown toffee. It only takes 4 simple ingredients to make! It is then layered with almonds, pecans, and smothered in melted milk chocolate. It’s the best one-pan dessert to make, and perfect for feeding large groups of people! It’s always a crowd-pleaser. As long as the ratios are the same, you can switch out the nuts and chocolate for any kind you prefer! You can even omit the nuts entirely. It’s up to you! No matter how you choose to make it, homemade toffee has an incredible flavor you won’t be able to get enough of.

Ingredients for Homemade Toffee

Homemade toffee is made up of all inexpensive ingredients. You might even have them all in your pantry! The short, simple ingredient list makes this perfect for making big batches of toffee on a regular basis this holiday season. It’s the simplest ingredients that always create the most delicious result! If you’re looking for measurements, you can find them in the recipe card at the end of the post.

Toffee

  • Butter: This is what makes your toffee rich and creamy! I like to use salted butter here.
  • Sugar: A must for the perfect sweetness! Granulated sugar works best. It melts down and makes the most amazing caramelized color!
  • Salt: Salt is added to balance sweetness and enhance overall flavor.
  • Vanilla: If you add pure vanilla extract, your homemade toffee will have a richer flavor with more depth.

Nuts and Topping

  • Almonds and Pecans: A mixture of both almonds and pecans is used here. I like the chewy texture of almonds paired with the buttery texture of pecans. They pair so well with the flavors of chocolate and toffee!
  • Milk Chocolate Chips: Added on top for the melty chocolate layer! You can substitute this with dark or white chocolate, as well.

How to Make Toffee at Home

Making homemade toffee isn’t as complicated as you would think! In just a few simple steps, you too can enjoy this buttery chocolate treat! It’s the best!

  1. Toast Almonds: Let’s make some toffee! To start, get all of your ingredients measured and set out before you start the recipe. Then, place your almonds on a plate and microwave them for 2-3 minutes on high to toast them.
  2. Prep Baking Sheet: Line a baking sheet (preferably a 9×13 pan) with foil and place the almonds in a single layer on the foil – space them out as best you can.
  3. Melt Ingredients Together: Add sugar, butter, vanilla, and salt to a large sauce pan (at least 2-quarts and it needs to have a thick bottom. Don’t use a thin metal one or your toffee will burn!) and melt over medium heat, stirring throughout.
  4. Cook Toffee Mixture: When ingredients are completely melted, continuously stir and gradually increase heat to medium-high. Keep stirring, stirring, stirring for 9-15 minutes until the toffee is a golden brown color (similar to the color of the raw almonds). As soon as it reaches that color, quickly pour over almonds in your prepared pan.
  5. Layer Chocolate: Next, allow to cool for about 2-3 minutes, then sprinkle with chocolate chips. Allow to sit for another couple of minutes so the chocolate chips will melt, then spread over the toffee. Sprinkle with chopped pecans and allow to cool completely. (If you put the pan in the fridge it will speed up the process a bit).
  6. Break and Enjoy: After toffee and chocolate has completely cooled, use a butter knife to break apart the toffee. Store in an airtight container at room temperature.
Process shots of preparing mixture and adding to pan.

Tips for Making Successful Homemade Toffee

This toffee recipe is super easy and SO good! To make sure you get the best results each time, use these extra tips and tricks! Your next batch is going to be to die for!

  • Use Butter: Butter is a necessity when making candies like toffee. Butter substitutes like margarine have too high of a water content and will keep it from hardening. Plus, butter makes your homemade toffee rich and delicious!
  • Avoid Humid Days: If it’s too humid when you’re making toffee, it won’t set properly. This is why this recipe is perfect for colder, cooler weather. If it’s too hot and humid, your toffee will end up chewy.
  • Keep Temperature Steady: While this recipe doesn’t need a candy thermometer to make, one thing I will say is to keep your cooking temperature steady. Sudden drops or increases in temperature can make you candy consistency uneven.
  • Adding Flavors: Homemade toffee is an easy treat to customize. Sometimes I like to drizzle a little salted caramel sauce on top of the chocolate layer! You can also switch up the nuts for things like peanuts or cashews. Swap out milk chocolate for dark or white chocolate! Another thing that is super tasty is adding spice to your chocolate. You can add a little cinnamon, nutmeg, or even things like chai spice for a little extra fall flair.
Toffee broken up into multiple pieces.

Storing Leftover Toffee

Homemade toffee has a nice, long shelf life and can be enjoyed again and again. It’s perfect for giving to friends and family as a gift! Here’s how to store for best results!

  • At Room Temperature: Keep your toffee pieces in sealed bags or an airtight container. Make sure the toffee is away from any heat sources or it may melt. It will stay good for up to 2 weeks!
Closeup of broken toffee pieces.
Print

Homemade Toffee

Homemade toffee is super simple with no candy thermometer required! This buttery chocolate treat is a must-make recipe this holiday season.
Course Dessert
Cuisine American
Keyword homemade toffee, toffee
Prep Time 15 minutes
Cook Time 15 minutes
Total Time 30 minutes
Servings 16 people
Calories 327kcal
Author Alyssa Rivers

Ingredients

  • 1 cup whole raw almonds
  • 1 cup butter cut into 1-inch cubes
  • 1 cup sugar
  • 1/4 teaspoon salt
  • 1 teaspoon vanilla
  • 2 cups milk chocolate chips
  • 1/4 cup finely chopped pecans

Instructions

  • Get all of your ingredients measured and set out before you start the recipe. Then place your almonds on a plate and microwave them for 2-3 minutes on high to toast them. Line a baking sheet (preferable a 9×13 pan) with foil and place the almonds in a single layer on the foil – space them out as best you can.
  • Add sugar, butter, vanilla, and salt to a large saucepan (at least 2-quarts and it needs to have a thick bottom – not a thin metal one or your toffee will burn!) and melt over medium heat, stirring throughout.
  • When ingredients are completely melted, continuously stir and gradually increase heat to medium-high. Keep stirring, stirring, stirring for 9-15 minutes until the toffee is a golden brown color (similar to the color of the raw almonds). As soon as it reaches that color, quickly pour over almonds in your prepared pan.
  • Allow to cool for about 2-3 minutes, then sprinkle with chocolate chips. Allow it to rest for another couple of minutes so the chocolate chips will melt, then spread over the toffee. Sprinkle with chopped pecans and allow to cool completely. (If you put the pan in the fridge it will speed up the process a bit).
  • After the toffee and chocolate are completely cooled, use a butter knife to break apart the toffee. Store in an airtight container at room temperature.

Video

Notes

Updated on November 2, 2021
Originally Posted on November 26, 2014

Nutrition

Calories: 327kcal | Carbohydrates: 30g | Protein: 3g | Fat: 22g | Saturated Fat: 11g | Cholesterol: 34mg | Sodium: 153mg | Potassium: 73mg | Fiber: 2g | Sugar: 27g | Vitamin A: 405IU | Vitamin C: 1mg | Calcium: 54mg | Iron: 1mg


from The Recipe Critic https://ift.tt/3mDnH2A
https://ift.tt/3GKSanx

मंगलवार, 2 नवंबर 2021

Mouthwatering Cinnamon Roll Waffles

You just can’t beat a delicious cinnamon waffle that is drizzled with a cream cheese glaze! It tastes just like a cinnamon roll in waffle form!

I love anything that tastes like a cinnamon roll! So if you’re like me then you MUST try this Monkey Bread, these amazing Pancakes, or these Cookies!

A cinnamon roll waffle with a cream cheese glaze.

Cinnamon Roll Waffles

These cinnamon roll waffles are to die for! I cannot get over their addicting flavor and texture. These are the perfect breakfast for a special occasion! Because let’s be honest… We usually have cold cereal or frozen waffles for breakfast each day! But try these out for a birthday or holiday and everyone will be so excited that you did! In fact, cook up this Breakfast Casserole, these Homemade Breakfast Sausages, and these Apple Streusel Muffins for a brunch to remember!

We just got a new waffle maker and I wanted to try it out with these! The waffles turned out amazing. They have such a crisp outside and a soft and fluffy inside. Plus, the cinnamon flavor in the waffles was perfection! These were just like a cinnamon roll in waffle form. And then you top them with that homemade cream cheese glaze! Well, let’s just say that you can’t get me to stop at just one!

What’s In Cinnamon Roll Waffles?

You are going to be shocked when I tell you that you probably already have all of these ingredients in your kitchen! This makes it a no-brainer to try these out now! See the recipe card below for a list of exact ingredient measurements.

  • Flour: I just used all purpose flour for this recipe!
  • Baking powder: This is the ingredient that will help your waffles rise and get all fluffy!
  • Salt:The salt is here to enhance the flavors of all of the other ingredients!
  • Sugar: This balances out that strong cinnamon taste to make it perfect.
  • Cinnamon: You can use more or less than this recipe calls for, depending on how strong you want the cinnamon flavor to be!
  • Eggs: Adding eggs to your batter helps keep the waffles light.
  • Buttermilk: You can use storebought buttermilk! Or, if you want to step this recipe up then be sure to make this homemade buttermilk!
  • Vegetable oil: The oil keeps the waffles moist.
  • Vanilla: A tiny bit of vanilla complements all of the other flavors so well!

Cream cheese glaze

  • Butter: Use unsalted butter that is at room temperature. It will mix better if it’s not cold!
  • Cream cheese: Soften your cream cheese before using it by letting it sit out at room temperature for a while before you plan on baking with it.
  • Powdered sugar: I use this instead of granulated sugar because this dissolves better and creates a much smoother glaze!
  • Vanilla: This will add a tiny bit of flavor to the glaze.

Let’s Make Some Waffles!

These cinnamon roll waffles will be done in about 25 minutes! So cook them up for breakfast, brunch, or even dinner! They are amazing!

  1. Preheat waffle iron and mix dry ingredients: Preheat waffle iron. In a large bowl whisk together the flour, baking powder, salt, sugar, and cinnamon.
  2. Whisk wet ingredients and combine: In a separate bowl whisk together eggs, buttermilk, vegetable oil, and vanilla. Add to the dry ingredients and combine.
  3. Bake waffles: Spray waffle maker with non stick spray and add ½ cup batter to center. Bake for 3-4 minutes or until waffles are golden brown.
  4. Make the cream cheese glaze: Beat together butter, cream cheese, sugar, and vanilla. Soften in the microwave for 20 seconds to pour easily over waffles.
4 pictures showing the steps of how to make waffle batter and a cream cheese glaze.

Waffle Making Tips

If you want these cinnamon roll waffles to turn out just perfect, I have some tips for you! They are so simple and easy but make the biggest difference!

  • Don’t overmix: We all want to mix the batter to get all of the lumps and bumps out! But… If you overmix the batter then it becomes sticky and will not cook up as well! Mix until combined and then be done!
  • Don’t open the lid: I know that it’s tempting to open the lid and check to see how the waffles are doing while they are cooking… But don’t do it! It can cause your waffle to rip in half and then it will never cook up normally.
  • How to know when a waffle is done: If you are resisting lifting up the lid too soon then you are probably wondering how you know that they are done then! Well, the key to this is watching the steam! There should be steam coming out of the waffle maker as you cook them up. Then, when the waffle is done, the steam will stop! Go ahead and open the lid when you see the steam stop and your waffle should be cooked to perfection!
A cinnamon roll waffle with cream cheese glaze being drizzled on it.

Mix-in and Topping Ideas

These cinnamon roll waffles are perfect as is! But if you start to cook them up as much as I do, then you may want to add things in just to mix things up a little bit. Here are a few things that you could try!

  • Mix-ins: You can try switching things up by putting things directly into the batter! Try some mini chocolate chips, sprinkles, shredded coconut or even some classic raisins!
  • Toppings: If you love the batter how it is and just want to change out what you put on top, that’s super easy too! Try topping it with some berries, some chocolate sauce or mini chocolate chips. You could also try some sliced walnuts or almonds for a crunchy texture!
A cinnamon roll waffle being cut into with a fork.

How to Store Leftovers

These cinnamon roll waffles are fantastic for freezing and saving for later! So, go ahead and eat all that you want now. In fact, you should just double the recipe while you are at it! The leftovers that come from this are SOO GOOD!

  • Refrigerate: If you know that you are going to be eating them more during the week then you don’t need to freeze them! Just place them in an airtight container in your fridge. They will last 3-4 days in there!
  • Freezer: If you are making these ahead of time or making extras to save for breakfast or dinner later, then freezing them works great! Let the waffles cool down and then arrange them on a baking sheet. Then, place the baking sheet in the freezer for 2 hours. (Freezing them beforehand helps them not to stick together!) After that, you can take the waffles out and put them into a (labeled with the date) airtight container or ziplock bag. They will last for 3-4 months in your freezer.
  • Reheating frozen waffles: If you are reheating your waffles from frozen, go ahead and preheat your oven to 350 degrees farenheit. Place the waffles on a baking sheet that is lined with parchment paper and cook them for 10-15 minutes (or until cooked through). Or, if you are only cooking one or two at a time then go ahead and cook them right up in your toaster!
Print

Mouthwatering Cinnamon Roll Waffles

You just can't beat a delicious cinnamon waffle that is drizzled with a cream cheese glaze! It tastes just like a cinnamon roll in waffle form! 
Course Breakfast, Main Course
Cuisine American
Keyword cinnamon roll waffles
Prep Time 20 minutes
Cook Time 4 minutes
Total Time 24 minutes
Servings 6 servings
Calories 319kcal
Author Alyssa Rivers

Ingredients

  • 2 cups flour
  • 4 teaspoons baking powder
  • 1/4 teaspoon salt
  • 2 Tablespoons sugar
  • 1 teaspoon cinnamon or more to taste
  • 2 large eggs
  • 1 1/2 cups buttermilk
  • 1/2 cup vegetable oil
  • 1 teaspoon vanilla

Cream cheese glaze:

  • 4 Tablespoons butter room temperature
  • 2 ounces cream cheese softened
  • 3/4 cup powdered sugar
  • 1/2 teaspoon vanilla

Instructions

  • Preheat waffle iron. In a large bowl whisk together the flour, baking powder, salt, sugar, and cinnamon.
  • In a separate bowl whisk together eggs, buttermilk, vegetable oil, and vanilla. Add to the dry ingredients and combine.
  • Spray waffle maker with non-stick spray and add ½ cup batter to center. Bake for 3-4 minutes or until the waffles are a golden brown color.

For the cream cheese glaze:

  • Beat together butter, cream cheese, sugar, and vanilla. Soften in the microwave for 20 seconds to pour easily over waffles.

Notes

Updated on November 2, 2021
Originally Posted on October 9, 2014

Nutrition

Calories: 319kcal | Carbohydrates: 25g | Protein: 5g | Fat: 22g | Saturated Fat: 13g | Cholesterol: 113mg | Sodium: 673mg | Potassium: 153mg | Fiber: 1g | Sugar: 23g | Vitamin A: 791IU | Calcium: 120mg | Iron: 1mg


from The Recipe Critic https://ift.tt/3BJEntS
https://ift.tt/3mAuDgT

Quick and Easy Coconut Rice

This coconut rice is now going to be one of your go-to side dishes! Fluffed to perfection this rice is SO GOOD and is super easy to make!

Every dish needs some delicious rice to go with it! Try serving it with this Jerk Chicken, Baked Coconut Shrimp, or even this delicious Cilantro Lime Butter Salmon. I love them all!

Coconut rice in a bowl with a wooden spoon.

Coconut Rice

This coconut rice is insanely delicious! It has the perfect subtle hint of coconut flavor. You can taste it but it doesn’t take over. This is why this is going to become your go-to side dish! This pairs so perfectly with shrimp, chicken, and especially anything that has a cilantro-lime flavor! It complements just about everything and is a fun twist on your classic white rice!

Luckily, this recipe not only tastes amazing but it is SO easy to make!! If you have a few extra minutes before your meal then you should definitely be making this coconut rice! It’s got the perfect taste and texture from using only 5 ingredients. Plus, it only takes about 15 minutes to make! So there really isn’t any excuse to put off making this! Start now and then you will have the best go-to side dish for everything!

Ingredients You Will Need to Make Coconut Rice

This recipe only uses 5 (yes 5!) ingredients to make this amazing rice! Try it once and then you will never go back to regular rice. See the recipe card below for a list of exact ingredient measurements.

  • Jasmine rice: Jasmine rice is a MUST because it brings out the most flavor!
  • Coconut milk: Just grab a can of come coconut milk at the store and you will be all set!
  • Coconut water: Using coconut water instead of regular water helps to bring forth that subtle coconut flavor a bit more.
  • Sugar: Since coconut is not too sweet naturally, this tiny bit of sugar brings just the right amout to the flavor!
  • Salt: Salt is used to enhance the taste all of the other flavors and ingredients.

Let’s Make Some Rice!

Set aside 15 minutes for this side dish and you will be good to go! It goes with just about everything so go ahead and give it a try. You’ll love it!

  1. Mix ingredients: In a medium sized sauce pan combine jasmine rice, coconut milk, water, sugar and salt.
  2. Boil, reduce heat and cover: Bring to a boil and reduce heat to low and then cover it for 12-14 minutes or until rice is tender and liquid is absorbed.
4 pictures showing the steps on how to cook rice.

Mix-in and Topping Ideas

This tried and true coconut rice can be mixed with so many different things. You can use it as a side dish OR you can add in a few other ingredients and then eat it just like that! I have come up with a few ideas that you can start with!

  • Sliced almonds: Any nuts will work but I especially love almonds with rice.
  • Peppers: Orange, red or yellow peppers are the best with this rice!
  • Beans: Mix this with some black beans or pinto beans and combine different textures.
  • Toasted coconut: Coconut rice isn’t naturally sweet like you would think. Add in some sweetened toasted coconut and make this dish sweet instead of savory.
  • Avocado: Mixing in avocado not only will add in a creamy texture but its so healthy for you!
  • Cilantro: Adding cilantro to rice is always a good idea!
Coconut rice in a bowl with cilantro and a spoon.

How to Store Leftovers

This rice is great for leftovers! Store this in your fridge in an airtight container and then it will last for 3-4 days. All that you have to do is reheat it in the microwave until it’s warm! You can use it for lunches or dinners all week long!

Print

Quick and Easy Coconut Rice

This coconut rice is now going to be one of your go-to side dishes! Fluffed to perfection this rice is SO GOOD and is super easy to make!
Course Side Dish
Cuisine American, Mexican
Keyword coconut rice
Prep Time 5 minutes
Cook Time 15 minutes
Total Time 20 minutes
Servings 6 people
Calories 236kcal
Author Alyssa Rivers

Ingredients

  • 2 cups jasmine rice
  • 1 (14 ounces of canned) coconut milk
  • 1 1/4 cup coconut water
  • 1 Tablespoon Sugar
  • 1/2 teaspoon salt

Instructions

  • In a medium sized sauce pan combine jasmine rice, coconut milk, water, sugar and salt.
  • Bring to a boil and reduce heat to low and cover for 12-14 minutes or until rice is tender and liquid is absorbed.

Nutrition

Calories: 236kcal | Carbohydrates: 51g | Protein: 5g | Fat: 1g | Saturated Fat: 1g | Polyunsaturated Fat: 1g | Monounsaturated Fat: 1g | Sodium: 249mg | Potassium: 196mg | Fiber: 1g | Sugar: 2g | Vitamin C: 1mg | Calcium: 29mg | Iron: 1mg


from The Recipe Critic https://ift.tt/3EvVmkQ
https://ift.tt/3mBDHlM

सोमवार, 1 नवंबर 2021

Cafe Rio {Copycat} Sweet Pulled Pork

Perfectly sweet and tender, pulled pork is the absolute best when it comes to meat for your meal! This tried and true recipe is definitely one for the books!

This pork is SOO GOOD and a recipe that you will use again and again! If you loved this pork, then try these Tacos, this Tenderloin, or this delicious Sweet and Sour Pork!

Sweet pulled pork made into a salad.

Sweet Pulled Pork

Cafe Rio is a restaurant in Utah that makes the best sweet pulled pork! It’s so good that I wanted to be able to make it whenever I wanted because I absolutely love sweet pulled pork! It is so tender and juicy that it literally falls off of my fork when I go to eat it. It is the absolute perfect meat to add to a salad because it’s thin and saucy!

This sweet pulled pork only takes a few minutes to put together. You marinate the meat overnight. Then, you cook it all day in the slow cooker and so when you go to take it out, it’s perfectly done. So not only does this taste divine but it’s a set it and forget it kind of meal! When it’s finished, I love making it into a salad with some rice, shredded lettuce, tomatoes, tortilla strips, and this amazing cilantro ranch dressing. It tastes exactly like the salad from Cafe Rio! This is definitely a recipe that you and your family will love!!

Ingredients for Sweet Pulled Pork

This recipe is not only simple but it only takes a few ingredients to make! See the recipe card below for a list of exact ingredient measurements.

  • Pork shoulder roast: Getting the right cut of meat is important to making this work. If you can’t find this in your grocery store then ask your butcher to help you!
  • Coca Cola: This is what will soak into your meat overnight making it so tender and juicy!
  • Brown sugar: The brown sugar adds the absolute perfect sweet taste to the pork.
  • Garlic salt: Needing to add just a bit of savory, this garlic salt does the trick!
  • Green chilis: These green chilis add in a little bit of spice without the heat.
  • Red enchilada sauce: This helps to add flavor and to thicken up the sauce.

Let’s Make Some Pork!

This sweet pulled pork only takes a few minutes to put together and will be totally worth the wait in the end! Go ahead and try it, you will be so glad that you did!

  1. Marinate: Add the pork to a gallon sized ziplock bag and add ¼ cup brown sugar and 1 cup Coca Cola. Let marinate for 3 hours or overnight.
  2. Rub with spices and cook: Drain the marinade and add the pork to a 5 quart slow cooker. Rub with garlic salt and pour 1 cup of coke and cook on low for 7-8 hours or high for 5-6.
  3. Shred the pork: Carefully remove the pork from the slow cooker and discard the liquid. Shred the pork and return it to the slow cooker.
  4. Make the sauce: In a blender or food processor add can of diced green chilis, enchilada sauce, and 1 cup brown sugar. (can use less if needed.)
  5. Add sauce to meat and serve: Add the sauce to the pork and stir. Then, let it cook for an additional hour and serve.
4 pictures showing how to marinate pork and how to make the sauce.

Quick Tips

This sweet pulled pork is so amazing! I have come up with a few tips to making this meat turn out just right!

  • Marinate: I know that it’s tempting but DON’T skip the step to marinate this pork. If you can do it overnight, then that will turn out the best. This step is when the meat really soaks in all of those delicious flavors. It’s what makes it so tender and juicy!
  • Don’t use diet: When you are putting in your Coke, don’t use diet! Make sure that it’s regular and not sugar free. You could also use regular Dr Pepper or Root Beeer if you don’t have any Coke!
  • What to make with it: You can make this into a salad, toast up some buns and make some pulled pork sandwiches or even eat it with some potatoes and rolls. The options are endless, this sweet pulled pork is so delicious!
Sweet pulled pork being cooked in a slow cooker.

How to Store Leftovers

This is a recipe that can be made ahead and frozen for later! Or, you could store your leftovers and eat them for lunch or dinner throughout the week!

  • Refrigerate: Once your pork has cooled then you can store it in an airtight container. Put it in your fridge and it will last 3-4 days!
  • Freeze: Let your pork cool. Once it has, wrap it up in aluminum foil and place it in an airtight container or a ziplock bag. Label the container with the date. Put it in your freezer and it will last for up to 6 months!
  • Reheat: To reheat leftovers from the fridge then you can just use the microwave. Reheat it for 1-2 minutes until it’s warm. If you are reheating it from frozen then you can use a slow cooker! Put it in your slow cooker on low for 3-4 hours. It may take longer depending on how much meat was frozen. It’s done and safe to eat when it reaches 165 degrees farenheit!
A close up of shredded pork on a salad with toppings.
Print

Cafe Rio {Copycat} Sweet Pulled Pork

Perfectly sweet and tender, pulled pork is the absolute best when it comes to meat for your meal! This tried and true recipe is definitely one for the books! 
Course Dinner, main dish
Cuisine Mexican
Keyword pulled pork, sweet pulled pork
Prep Time 3 hours 15 minutes
Cook Time 7 hours
Total Time 10 hours 15 minutes
Servings 6 people
Calories 470kcal
Author Alyssa Rivers

Ingredients

  • 3-4 pounds pork shoulder roast
  • 6 cups Coca Cola not diet, divided
  • 1 1/4 cup brown sugar divided
  • 1 teaspoon garlic salt
  • 1 can diced green chilis
  • 1 (10 ounce) can red enchilada sauce

Instructions

  • Add the pork to a gallon-sized ziplock bag and add ¼ cup brown sugar and 1 cup Coca-Cola. Let marinate for 3 hours or overnight.
  • Drain the marinade and add the pork to a 5-quart slow cooker. Rub with garlic salt and pour 1 cup of coke and cook on low for 7-8 hours or high for 5-6.
  • Carefully remove the pork from the slow cooker and discard the liquid. Shred the pork and return it to the slow cooker.
  • In a blender or food processor add a can of diced green chilis, enchilada sauce, and 1 cup brown sugar. (can use less if needed.)
  • Add the sauce to the pork and stir. Let cook for an additional hour and serve.

Notes

Updated on November 1, 2021
Originally Posted on August 1, 2012

Nutrition

Calories: 470kcal | Carbohydrates: 68g | Protein: 27g | Fat: 10g | Saturated Fat: 3g | Polyunsaturated Fat: 1g | Monounsaturated Fat: 4g | Cholesterol: 93mg | Sodium: 591mg | Potassium: 559mg | Fiber: 1g | Sugar: 66g | Vitamin A: 33IU | Vitamin C: 8mg | Calcium: 69mg | Iron: 3mg


from The Recipe Critic https://ift.tt/2ZGiBdy
https://ift.tt/3jY3ov0