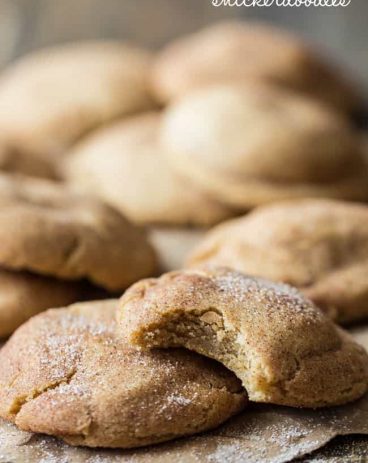
Ok, we all know that I have tried my fair share of snickerdoodle recipes. Some turn out ok, some are terrible and a few are actually even really good. But… Trust me when I tell you that these are the absolute best snickerdoodles!! This recipe has been perfected and makes the softest, most mouthwatering cookies that you’ve ever had!
The amount of cinnamon is perfect. It’s not a subtle taste but it’s not too strong either and you taste it in every single bite! These cookies fly off of my counter when I make them! So if you are going to make them then you should just double the recipe from the beginning. You will for sure want the extra cookies so you will be so glad that you did! This snickerdoodle recipe is insanely delicious and your family and friends will all be asking for the recipe!
Ingredients You Need to Make Snickerdoodles
You probably already have all of these ingredients in your kitchen. So these should be super easy to whip up! See the recipe card below for al list of exact ingredient measurements.
Flour: I used all purpose flour to make these cookies!
Cream of tartar: This not only helps make the cookies soft but it brings in a slight tang that we all know and love in a snickerdoodle cookie!
Baking soda: This is used in cookies to help them rise so that they aren’t flat and hard.
Salt: I use salt to enhance the flavors of the other ingredients.
Butter: I used unsalted butter that I softened to room temperature. This helps it so that it mixes in more smoothly!
Granulated Sugar: You need sweet sugar to make your cookies taste as delicious as they do!
Eggs: The eggs will bind all of the ingredients together so that they mix well.
Vanilla extract: The vanilla adds a bit of flavor to the sweet taste.
Cinnamon Sugar
Granulated sugar and Cinnamon: This is what you will roll the dough in to get that sweet cinnamon sugar flavor!
Let’s Make Some Cookies!
These snickerdoodles take less than an hour to make… and that includes baking time! They are super easy and your kids will love helping you make them!
Prep: Preheat the oven to 375° and line a baking sheet with parchment paper.
Whisk: In a medium sized bowl whisk together the flour, cream of tartar, baking soda and salt. Set aside.
Beat eggs and sugar, combine: In another medium bowl beat the butter and sugar together until pale and fluffy, about 4-5 minutes. Add in the eggs and vanilla and beat for another 2 minutes. Be sure to scrape down the sides of the bowl to make sure everything is well combined.
Combine all ingredients and chill: Add the dry ingredients in to the wet and mix until fully combined. Cover the bowl with plastic wrap and chill for 30 minutes.
Mix up cinnamon and sugar: While the dough chills, combine the sugar and cinnamon in a small bowl.
Form balls and roll them, then bake: Form the dough into equal sized balls, about 1 inch and roll in the cinnamon sugar and coat evenly. Place the coated balls on the baking sheet keeping about 2 inches between them. Bake for 10 minutes. Allow to cool for a few minutes on the pan before transferring to a cooling rack.
Baking Tips
These snickerdoodles are so delicious! You can make them for a party, get together or just for an after school snack! Here are some ideas on how you can make them perfectly!
Room temperature ingredients: I know that this can take a bit of thought beforehand but it really helps! Make sure to take all of your refrigerated ingredients out and put them on the counter a few hours before you plan on baking. Bringing your ingredients to room temperature really helps them mix nicely together and makes the dough really smooth!
Don’t open the oven door: I know that it’s tempting to open the oven door while you are baking your cookies. After all, you just want to see how they are doing! But, when you open the door while you are baking, you let a lot of the heat out. This makes it so that your cookies will bake unevenly.
Underbake: Remove the cookies from the oven while they still look gooey in the center. They will continue to bake on the hot tray after they have been removed from the oven!
How to Freeze the Dough
If you just want to keep some snickerdoodle dough on hand so that you can bake these later, you totally can! Sometimes it’s nice not to have to prep and skip straight to baking the cookies!
Freeze: After you roll the dough in the cinnamon sugar mixture then place them on a baking sheet and put them in your freezer for 2 hours. After they have frozen solid the you can take them out and put them in an airtight container . You can store it for up to 2 months!
To Bake Frozen Cookie Dough: Preheat your oven to 400 degrees. Put your frozen dough onto a baking sheet that has been lined with parchment paper. Bake them for 8-10 minutes or until golden brown.
How to Freeze and Store Leftover BAKED cookies
If you want to have a quick dessert on hand, then these are the cookies for you! You can do all of the baking beforehand, freeze them and all that you have to do is pull them out of the freezer and you’re done! So, bake the cookies up and let them cool. Then, place them in an airtight container or ziplock bag. Make sure to label it with the date! These will last in your freezer for up to 2 months. You can eat them right out of the freezer or you can set them on the counter for 15 minutes to thaw!
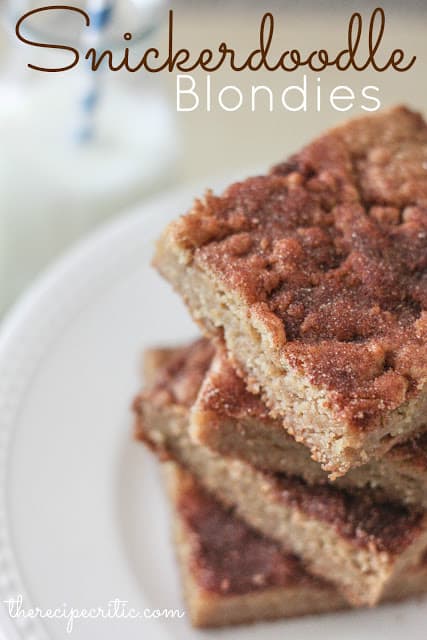
More Amazing Snickerdoodle Recipes
The flavor of a snickerdoodle cannot be beat! That’s why I absolutely love any recipe that includes the flavor in it! SO if you love it as much as I do then you are definitely going to have to try out these recipes! They are all so different but have that delicious sugary cinnamon flavor that we all love! Yum!
These snickerdoodle are delightfully soft and full of delicious cinnamon flavor! They are SOO GOOD and you won't be able to stop at just one!
CourseDessert
CuisineAmerican
KeywordSnickerdoodle, snickerdoodle cookies
Prep Time45minutes
Cook Time10minutes
Total Time55minutes
Servings30Cookies
Calories155kcal
AuthorAlyssa Rivers
Ingredients
3CupsAll Purpose Flour
2TeaspoonCream of Tartar
1TeaspoonBaking Soda
½TeaspoonSalt
1CupUnsalted ButterSoftened but not too soft
1 ½CupGranulated Sugar
2largeEggs
1TablespoonVanilla Extract
Cinnamon Sugar
1/3CupGranulated Sugar
1 ½TablespoonCinnamon
Instructions
Preheat the oven to 375° and line a baking sheet with parchment paper.
In a medium sized bowl whisk together the flour, cream of tartar, baking soda and salt. Set aside.
In another medium bowl beat the butter and sugar together until pale and fluffy, about 4-5 minutes. Add in the eggs and vanilla and beat for another 2 minutes. Be sure to scrape down the sides of the bowl to make sure everything is well combined.
Add the dry ingredients in to the wet and mix until fully combined. Cover the bowl with plastic wrap and chill for 30 minutes.
While the dough chills, combine the sugar and cinnamon in a small bowl.
Form the dough into equal sized balls, about 1 inch and roll in the cinnamon sugar and coat evenly. Place the coated balls on the baking sheet keeping about 2 inches between them. Bake for 10 minutes. The cookies will look quite underbaked, but that's how they should look! Allow to cool for a few minutes on the pan before transferring to a cooling rack.
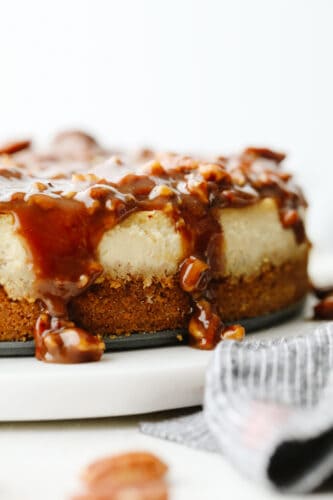
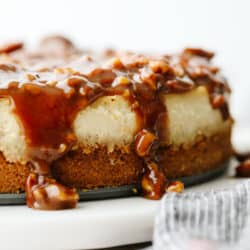
This dessert is everything you love about pecan pie, drizzled on the most decadent, creamy cheesecake! Each bite of pumpkin pie cheesecake will wow you!
I love pecan pie. Honestly, I never thought it could be upgraded until I tried this incredible pecan pie cheesecake! This knockout recipe takes all of the things you love about traditional pecan pie and blends it with the tangy, creamy flavors of cheesecake! I know that pecan pie is a little too sweet and rich for some people. This recipe is the solution! The bright, tangy flavor of the cheesecake balances the sweetness of pecan perfectly! You’ve got to try it and see!
This pecan pie cheesecake recipe is golden. Not only does it impress wherever it goes, but it’s not too hard to make! I’ve broken it up into simple steps and provided you with all of the tips and tricks you need for the best results. In no time, you’ll be baking it like a pro! This is the perfect dessert for switching up Thanksgiving. Trust me, you and yours are going to go crazy over it. Each nutty, tangy bite is an absolute dream. And if you’re craving more fall-flavored cheesecake, you’ll love my pumpkin cheesecake with caramel sauce, as well!
Pecan Pie Cheesecake Ingredient List
Sorry diet, this recipe is not for you. In order to make the best pecan pie cheesecake, you’re going to want to use all full-fat ingredients! The end result is well worth it, believe me. It’s the most creamy, nutty dessert out there! Here is everything you need to put it together! And as always, measurements are located in the recipe card below.
Crust
Graham Cracker Crumbs: You can’t go wrong with a graham cracker crust! A golden, nutty crust is the perfect foundation for your cheesecake.
Granulated Sugar: I add a little sugar to the crust for sweetness. It gives it a nice caramelization when baked, too!
Unsalted Butter: Melted, unsalted butter gives your crust richness and helps to pack and hold.
Cinnamon: You can’t go wrong with a little cinnamon in your crust! It adds a touch of fall flavor.
Salt: Added to enhance flavor.
Cheesecake
Cream Cheese: Softened, full-fat cream cheese is the key player in this dessert!
Sour Cream: For a little extra tang and fat content.
Granulated Sugar: Sweetens up your cheesecake mixture!
Dark Brown Sugar: In addition to granulated sugar, I love adding brown sugar for a deeper flavor.
Cinnamon: A mild spice balances the sweet pecan pie topping perfectly.
Vanilla Extract: If possible, use pure vanilla extract here! It will make all the difference in your pecan pie cheesecake’s flavor.
Eggs: Needed for binding ingredients together.
Pecan Pie Topping
Unsalted Butter: Needed to make your topping smooth and rich!
Dark Brown Sugar: With dark brown sugar, you get the most amazing sweet flavor and deep, golden color.
Heavy Cream: This makes your topping extra rich and tasty.
Salt: Added to enhance and balance flavors.
Pecans: I like a combo of whole and chopped!
Vanilla Extract: Again, pure vanilla extract works wonders here. You’ll love the difference in flavor!
Making Your Cheesecake Crust
Let’s make a delicious foundation! The crust is just as important as the rest of the layers.
Preheat: First, preheat oven to 325° Fahrenheit.
Mix: In a large bowl, mix graham cracker crumbs, sugar, and melted butter together. This should resemble damp sand.
Pack: Pour your crumb mixture into the prepared springform pan and press evenly into the bottom of the pan and up the sides of the pan. You can use the bottom of a flat glass or a flat measuring cup to really press it in well and get a nice, even crust.
Bake: Next, you’re going to bake for 10 minutes.
Cool: Allow to cool completely. So easy!
Making Cheesecake Filling
This is the most important step! Making a moist, delicious cheesecake base is a lot easier than you think! It has a bit longer of a cook time, but it is well worth it! Your pecan pie cheesecake is going to be absolutely mouthwatering.
Mix Cream Cheese: First, add your softened cream cheese to the mixing bowl of your stand mixer and beat with a paddle at medium/high speed for about 1 minute. Scrape down the sides and bottom of the bowl and beat for a few seconds more.
Add in Sugar and Sour Cream: Next, add sugar, brown sugar and sour cream and mix at medium-low speed until just combined. Scrape the bowl again and mix 10 seconds.
Mix in Eggs: Add eggs and beat on low speed until combined, about 30 seconds-1 minute. Scrape the bowl again.
Flavor: Finally, add vanilla and cinnamon. Beat until just combined. At this point, your batter should be smooth and fairly runny.
Baking The Cheesecake
Wrap: Using 18-inch heavy duty aluminum foil, wrap the outside of your springform pan with 4 sheets of foil.
Place in Water Bath Pan: Next, place your wrapped pan in a deep roasting pan. You can alternatively use a baking sheet, so long as the sides are about 2 inches deep. Add your cheesecake batter to the springform pan.
Add Hot Water: Using very hot water, add water to the baking sheet until there is about 1 ½ inch of water around the springform pan. On a rack in the lower third of the oven, carefully move your pan into the oven.
Bake: Next, bake for 1-1 ½ hours. After about an hour of baking, check the cheesecake’s consistency. A slight jiggle of the pan (while still in the oven) should tell you if it’s ready or needs more time. The cheesecake should be jiggly, but not liquid. If it seems very liquidy still, give it 15 more minutes and check it again.
Allow to Cool: Once the cheesecake is firm, yet jiggly, turn the oven off but leave the cheesecake in the oven until it has cooled down. Don’t open the oven during this time! The purpose of this step is to allow the cheesecake to cool slowly. Doing this will prevent it from cracking, as one of the biggest reasons cheesecakes crack is the drastic temperature change going from the hot oven into the much cooler kitchen. Once the oven and the cheesecake are cooled, remove from the oven and carefully remove the foil lining the pan. Chill in the fridge for at least 6 hours.
Add Topping: Before serving, run a knife around the edge of the pan to ensure an easy release when the springform is removed. Top with the pecan pie topping and enjoy!
Keep it Moist!
You may shudder at the fact you must cook your cheesecake in a water bath. Unfortunately, it is the only way to guarantee the creamiest, most decadent cheesecake. If you do not want to place the cheesecake in the water bath you can achieve the same results by putting the pan of water on the rack directly beneath the cheesecake.
How to Make Pecan Pie Topping
This is my favorite step! It’s so easy to make. Truly, it looks as good as it tastes! This topping is what is really going to bring your pecan pie cheesecake together.
Melt Butter and Sugar Together: Firstly, melt the butter in a medium saucepan. Add the brown sugar and whisk for about 2 minutes, until the mixture is bubbling.
Mix in Remaining Ingredients: Add the heavy cream and salt and whisk until combined. Add in the pecans and mix until they’re fully coated. Remove from the heat and stir in the vanilla. Allow to cool for about 10-15 minutes before pouring on top of the cheesecake.
Ingredient Tips and Tricks
Use Full Fat: For the best consistency and richness in your cheesecake, use full-fat cream cheese and sour cream. Now is not the time to use low-fat. Save that for your other recipes, you will love the difference it creates when seeing how velvety smooth it is.
Room Temperature Ingredients: To create that smooth luscious filling, you will want all your ingredients (cream cheese, sour cream, eggs, etc.) at room temperature. If your ingredients are too cold they can cause lumps. Take your ingredients out and let them sit for up to 2 hours.
Making the Best Pecan Pie Cheesecake
Pecan Pie Cheesecake is rich, creamy, caramel-y, and nutty! It’s a delightful dessert to serve at any holiday gathering. Here are some tips for making a successful cheesecake!
Do Not Overbeat: When you overbeat your batter, it will put too much air in the mixture, which can cause it to split or rise and fall drastically. Beat with a paddle on low to medium speed and stop as soon as it is all mixed.
Grease Your Spring Form Pan: Even if your springform pan is non-stick you will want to grease it. Lightly oil with a cooking spray or with some cold butter rubbed over all the surfaces very lightly. The extra work is worth the peace of mind that it will come out.
No Peeking: After you have gone to all that trouble of the water bath, you need to let it do its job. Resist the urge to open the oven and peek at your cheesecake. You will release all that hard-earned steam and could cause your cheesecake to crack.
Let it Cool: You will know your cheesecake is done when there is a slight wobble to the center. Do not stick a knife or a thermometer inside it. It will crack it. Once it is done, turn off the oven and let it come to room temperature inside the oven. This takes about an hour and helps it from cracking. Remove from oven and place in the fridge for 6-8 hours or overnight.
Storing Leftover Pecan Pie Cheesecake
Cheesecake is very easy to store, which makes it the ideal dessert to make ahead. It keeps well in the fridge and can even be frozen!
In The Refrigerator: Once cooled to room temperature, this cheesecake can be covered with plastic wrap and stored in the fridge for up to 5 days. It’s best to wait until you’re ready to serve the cheesecake to top it with the pecan pie topping. Once topped, it will keep for up to 2 days in the fridge as the pecan pie topping will weep the longer it sits in the fridge.
Can I Freeze Pecan Pie Cheesecake?
Definitely! You can prepare the cheesecake part of this recipe and wrap it in 2-3 layers of plastic wrap before putting it in the freezer. It holds up well for up to 3 months in the freezer. Before serving, remove the plastic wrap and allow it to thaw in the fridge. Top with the pecan pie topping once it has thawed and you’re ready to go!
More Pecan Goodness
Sweet, nutty, and divine- here are more pecan recipes you need in your life! Cake, sticky buns, bars, and more! No matter the craving, there’s a pecan recipe for it. Whether you’re making these for a holiday dinner or just a Tuesday night, they’re sure to please!
This dessert is everything you love about pecan pie, drizzled on the most decadent, creamy cheesecake! Each bite of pumpkin pie cheesecake will wow you!
Mix graham cracker crumbs, sugar, and melted butter together. This should resemble damp sand.
Pour your crumb mixture into the prepared springform pan and press evenly into the bottom of the pan and up the sides of the pan. You can use the bottom of a flat glass or a flat measuring cup to really press it in well and get a nice, even crust.
Bake for 10 minutes.
Allow to cool completely.
Cheesecake Filling
Add your softened cream cheese to the mixing bowl of your stand mixer and beat with a paddle at medium/high speed for about 1 minute. Scrape down the sides and bottom of the bowl and beat for a few seconds more.
Add sugar, brown sugar, and sour cream and mix at medium-low speed until just combined. Scrape the bowl again and mix for 10 seconds.
Add eggs and beat on low speed until combined, about 30 seconds-1 minute. Scrape the bowl again.
Add vanilla and cinnamon. Beat until just combined. At this point, your batter should be smooth and fairly runny.
Baking The Cheesecake
Using 18-inch heavy-duty aluminum foil, wrap the outside of your springform pan with 4 sheets of foil.
Place your wrapped pan in a deep roasting pan. You can alternatively use a baking sheet, so long as the sides are about 2 inches deep. Add your cheesecake batter to the springform pan.
Using very hot water, add water to the baking sheet until there is about 1 ½ inch of water around the springform pan. On a rack in the lower 3rd of the oven, carefully move your pan into the oven.
Bake for 1-1 ½ hours. After about an hour of baking, check the cheesecake’s consistency. A slight jiggle of the pan (while still in the oven) should tell you if it’s ready or needs more time. The cheesecake should be jiggly, but not liquid. If it seems very liquidy still, give it 15 more minutes and check it again.
Once the cheesecake is firm, yet jiggly, turn the oven off but leave the cheesecake in the oven for another hour or so, until the oven has cooled down. Resist the temptation to open the oven during this time! The purpose of this step is to allow the cheesecake to cool slowly as the oven cools. Doing this will prevent it from cracking, as one of the biggest reasons cheesecakes crack is the drastic temperature change going from the hot oven into the much cooler kitchen. Once the oven and the cheesecake are cooled, remove from the oven and carefully remove the foil lining the pan. Chill in the fridge for at least 6 hours.
Before serving, run a knife around the edge of the pan to ensure an easy release when the springform is removed. Top with the pecan pie topping and enjoy!
Pecan Pie Topping
Melt the butter in a medium saucepan. Add the brown sugar and whisk for about 2 minutes, until the mixture is bubbling.
Add the heavy cream and salt and whisk until combined. Add in the pecans and mix until they’re fully coated. Remove from the heat and stir in the vanilla. Allow cooling for about 10-15 minutes before pouring on top of the cheesecake.
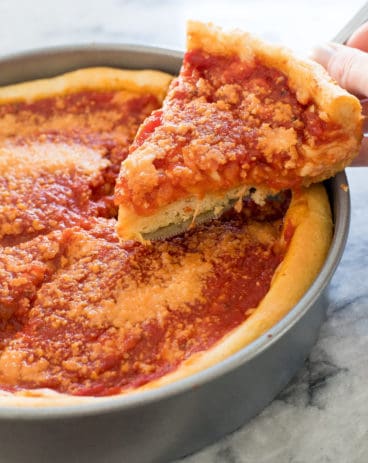
Pepperoni rolls are absolutely delicious and savory! These only take about 20 minutes to make and are the perfect meal for those on the go nights!
I love anything that has to do with pizza and so do my kids! Once you are done making this delicious recipe then go ahead and try this French Bread Pizza, these Pizza Sliders, and this amazing Eggplant Pizza!
What is a Pepperoni Roll?
If you are looking for a delicious and easy meal that you can make over and over with your kids, this is it! This pepperoni roll is a super simple way to make a pepperoni pizza but it looks fancy and tastes incredible. You just spread out some dough, cover it with all of your favorite sauces, cheeses and toppings and roll it up! It cooks up to perfection and because of how it’s rolled up, then you get the amazing flavor in every single bite. Plus, there is no crust to worry about for those picky eaters!
You can also switch up this pizza roll easily! Change out your sauce to BBQ sauce and add in some cheese and cooked grilled chicken. Or instead of pepperoni, you could add in some ham and pineapple! That’s why this recipe is so fun! You and your kids can easily change things up and make it unique to you and whatever you like to eat the best! Serve it with this yummy salad and lemonade and then your meal is done! Give it a try! It’s so quick and easy you will be making this again and again!
Ingredients in a Pepperoni Roll
The main list of ingredients is so easy and simple! And like I said, you can add or take away whatever you need to make this your own! See the recipe card below for a list of exact ingredient measurements.
Rhodes white bread: I like to keep things simple and just buy the dough already pre-made!
Pepperoni: Switch this up for any kinds of meat that you like! Or, go ahead and add even more in addition to the pepperoni.
Pizza sauce: You can get pizza sauce from the store or you can use some Homemade Pizza Sauce
Mozerella cheese: This classic cheese is perfect for this recipe! Use as much or as little as you would like!
Parmesan cheese: You can use shredded parmesan cheese or the kind from the can in your fridge!
Garlic salt: By garnishing the tip with this,you get the best subtle flavor added to the pepperoni roll!
Butter: You will need to melt you butter to use to brush on top of the pepperoni roll. This give it that crisp, golden brown color and texture.
How to Make a Pepperoni Roll
This dinner is perfect for those busy nights when you are running all over the place! It only takes 20 minutes and is so delicious!
Prepare the pizza: Let bread thaw out from the freezer for a few hours. Roll the dough out to about an 11×11 square. Spread your sauce with a large spoon and then add on your mozzarella cheese. Lay the pepperoni in rows covering the top. Roll the dough up.
Brush on butter, add garnish and bake: Melt the butter and brush it on top of the rolled dough. Sprinkle it with parmesan cheese and some garlic salt. Bake at 375 for 15-25 minutes.
Ideas for Different Toppings
These pepperoni rolls are so easy to change up! You could make them different each time and then still have them often. If you do this then no one will ever get sick of them! Here are a few ideas:
Meat: You can add in different meats! Try ham, sausage, salami, canadian bacon, grilled chicken or even cooked regular bacon!
Sauce: Change up the sauce and then make it an entirely different pizza! You can try alfredo sauce or this homemade BBQ sauce.
Toppings: This is where you can really switch things up! Add in olives, peppers, tomatoes, pepperoni… Really, anything that you love on a pizza, throw it on now! It will not only change up the taste but it adds in some healthy toppings as well!
Dip It!
If you want to level up this pepperoni roll then you can make some dips for it! Slice it up and put them on a platter with some Homemade Pizza Sauce, Homemade Ranch Dressing, or some Homemade Marinara. This takes it from an easy meal to a delicious appetizer or even an after-school snack!
How to Store Leftovers
You can double the recipe and eat these for leftovers all week! They are super delicious!
Refrigerator: Store the pepperoni rolls in an airtight container in your fridge. Then, they will last 3-4 days!
Freezer: Wrap up your baked pizza roll in plastic wrap or tinfoil and store it in an airtight container (make sure you write the date on it!). It will last up to 3 months!
Reheating: If you are reheating from frozen then bake them at 350 degrees for 25-30 minutes or until heated through.
More Pizza Recipes to Try
Pizza is the best because you can get so creative with it! There are so many different ways to eat it and so many things to top on it! I’ve rounded up a couple more recipes that are unique and will keep you making pizza for a while and you won’t even have to cooke the same recipe twice! Your kids will love these! They are tried and true recipes that the whole family can enjoy!
Let bread thaw out from the freezer for a few hours. Roll the dough out to about an 11×11 square. Spread your sauce with a large spoon and then add on your mozzarella cheese. Lay the pepperoni in rows covering the top. Roll the dough up.
Melt the butter and brush it on top of the rolled dough. Sprinkle it with parmesan cheese and some garlic salt. Bake on a baking sheet at 375 for 15-25 minutes.
Notes
Updated on November 3, 2021Originally Posted on June 1, 2012