Crab Rangoon are a fun, party appetizer that’s filled with real crab meat, cream cheese and seasoning. Wrapped in a wonton wrapper and deep fried, these are irresistible!
My favorite things to order at our local Chinese restaurant are always Egg Rolls, Kung Pao Chicken, Fried Rice and crab rangoon. So when we were stuck at home for months and were craving takeout, I decided to make my own crab rangoon. And it was so much easier than I thought, and dare I say, even better than takeout because you can enjoy them freshly fried!
What you Need to Make Homemade Crab Rangoon
When I see short ingredient lists like these, I always know it’s going to be a success. Crab meat is so delicious on its own that you don’t really need much else. So the seasoning and cream cheese are there to complement the flavors. If I’m having an appetizer like crab rangoon, I always choose the deep fried version over a baked version because baked just doesn’t cut it. To get that extra crispy wrapper, fried is what works.
To make these crab Rangoon, you’ll need only a few ingredients:
Fresh or frozen crab meat
Cream Cheese
Carrots
Celery
Garlic Powder
Worcestershire Sauce
Wonton Wrappers
Egg
How to Wrap Crab Rangoon in Rice Paper
Wrapping crab Rangoon is easy, and you can go with any shape you like. I used square wonton wrappers and placed the filling in the center. Brush some egg around the edges to seal the wrappers. Then just bring the opposite edges together on both sides to create a square pocket. Make sure it’s sealed properly or the filling can ooze out while deep frying which creates splatter in the oil. While sealing the wrappers, press gently in such a way that you remove as much air as possible. You can make these in advance, and keep them covered in the fridge for 3-4 hours till you are ready to fry. These take only minutes to fry which makes them the perfect make-ahead appetizer!
Tips to Making the Best Crab Rangoon Recipe
Wonton wrappers are easily available in the freezer section of most supermarkets and Asian grocery stores. For these perfect crab pockets, you can also use frozen crab meat, canned crab meat or even imitation crab sticks. Just make sure to thaw well if using frozen before making the filling to avoid any extra liquid. If using imitation crab meat, make sure to dice it finely before adding it to the filling.
We love serving crab rangoon with some Sweet Chili Sauce. You can also use soy sauce or your favorite Asian dipping sauce. This is one of those appetizers that absolutely everybody loves so make sure to make extras because these disappear fast!
Crab rangoon is a delicious Chinese appetizer made with a real crab filling, wrapped in wonton wrappers and deep fried till golden brown.
CourseAppetizer
CuisineAsian American
Keywordcrab rangoon, crab rangoon recipe
Prep Time20minutes
Cook Time10minutes
Total Time30minutes
Servings20pieces
Calories65kcal
AuthorRicha Gupta
Ingredients
8ouncesfresh Crab Meator imitation crab meat
4ouncesCream Cheese
1/4cupfinely diced Carrots
1/4cupfinely diced Celery
1.5teaspoonWorcestershire Sauce
1/2teaspoonGarlic Powder
1/4teaspoonSalt
20-25square Wonton Wrappers
2tablespoonsOil for Frying
Instructions
Place the crab meat, cream cheese, carrots, celery, garlic powder, worcestershire sauce and salt in a bowl and mix together to form the filling for crab rangoon.
To wrap crab rangoon, take a square wonton wrapper and place two teaspoons filling in the center. Brush the edges with whisked egg and bring opposite ends of both sides together to form a pocket shape. Repeat till all the filling is consumed. While making one piece, make sure the other wrappers are covered with a damp cloth or they'll dry out.
Heat a skillet of 4 inches oil to 350 degrees and fry the crab rangoons, a few at a time, till golden brown. This should take 3-4 minutes.
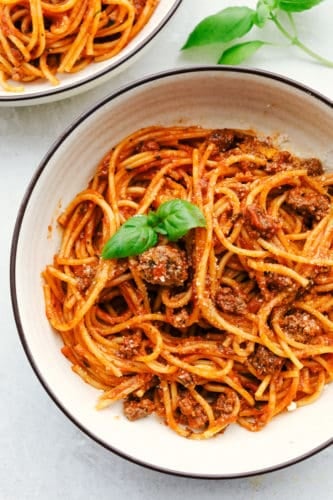
For those nights when you need something fast and easy turn to this 10 minute Instant Pot Spaghetti. Superbly seasoned beef and tender noodles all cook together in a delectable sauce and is ready in no time.
Instant Pot cooking changed my life. All of a sudden I could cook dinners in half the time and all in one pot. It’s one of my favorite kitchen gadgets. While instant pot spaghetti may not be truly Italian, it’s Italian inspired. It’s the perfect meal when you feel like life has been a hot mess that day. It’s a hands off, no fuss, everyone will love it meal. Spaghetti is a perfect go to meal, it’s one everyone loves and it doesn’t take that much time. And in the instant pot it’s even faster as it all cooks together. The pasta, meat and sauce, all in one pot. You are going to love it. Rich and hearty it will fill you and your family up.
Now you’re going to have to trust me on this recipe. Cooking the noodles with the sauce might seem like a gamble, it is, but it works. The temptation to want to stir will be real. Don’t give in, don’t stir. This recipe really goes against all your cooking instincts. But trust me, this works and you might be surprised about how easy and wonderful it is to have it all cook in the same pot at the same time. You may never go back to regular spaghetti again. Believe me this works and it’s delicious. This is the perfect recipe on those days when you forgot to plan ahead. Reach for your pantry staples and set the table because you’ve got this.
Quick and Easy Spaghetti Ingredients
Jarred marinara sauce makes this super easy, it’s a great short cut, especially on busy nights. You can make your own spaghetti sauce, like this favorite, which is made in the instant pot first. Then add the noodles. Or keep it quick and simple.
Olive Oil: To help the beef from sticking to the pot.
Ground Beef: Use lean ground beef.
Italian Seasoning: Helps to season the beef for an extra flavor.
Garlic Powder: Because you can never have enough garlic in Italian food.
Salt and Pepper: Add more or less to taste.
Spaghetti Noodles: It is best to break the noodles beforehand then criss-crossing them in the pot for best cooking.
Marinara Sauce: Two Jars of your favorite or this homemade equivalent sauce is even better.
Water: You need this extra fluid for the noodles to cook in.
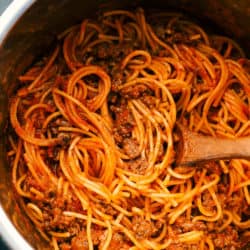
How to Make Spaghetti in an Instant Pot
Cooking the noodles at the same time as the sauce make this recipe super fast and easy. All the work in one pot means less mess. More time to do the things you love and still put a hearty meal on the table.
Sauté: Set a 6 quart instant pot to sauté. Add the olive oil, ground beef, Italian seasoning, garlic powder, salt and pepper. Cook and crumble until no longer pink.
Add: Break the noodles in half. Layer them in a criss-cross pattern so they do not stick as it cooks.
Pour: Pour the marinara and water on top of the noodles.
Cook: Cook on high pressure for 5-7 minutes. Use the quick release and wait for cycle to complete before unlocking. Stir together and serve with parmesan and chopped basil.
Tips For The Best Instant Pot Spaghetti
You’re going to love how easy this is, sometimes you just need to get a meal on the table and I love this one, especially if I don’t want to spend a ton of time in the kitchen. If I have a bit more time I’ll throw together this Slow cooker Italian Chicken and Potatoes or Incredible Homemade Calzone. Always family favorites!
Noodles: Make sure to lay your noodles in criss cross layers. This will prevent the noodles from sticking together as they cook, since you can’t stir it during cooking.
Swap: Take this opportunity to use whole wheat noodles and sneak in some fiber and protein. They’ll never know because it’s cooked all together.
Meat: Feel free to use ground turkey, ground chicken, or Italian sausage instead of beef. All will work in this recipe.
Scrape: After you brown the meat, add about a cup of the water to the meat and scrape the bottom of the instant pot. This helps avoid the “burn” notification that sometimes can occur during cooking.
Water: If you using jarred marinara I like to place the water in the empty jars and “rinse” all the goodness out of the jar and into my spaghetti. It’s a double whammy.
Avoid: Avoid the urge to stir the noodles once you put them in. Don’t do it! You’ll want to but it’ll cause the noodles to get gummy and stick together.
Creamy: Want a more creamy sauce? Add two large tablespoons or more of cream cheese when it’s finished cooking. Gently stir till melted and thoroughly incorporated.
More Flavor: If you want a pinch more flavor add an extra half to 1 teaspoon Italian seasoning. This might be especially helpful if your marinara sauce seems a little bland. You want a robust full bodied sauce.
Watery: Don’t panic if you remove the lid and it seems watery. Give it a good stir and let it sit for 3-5 minutes.
Freezing and Storing Spaghetti
If there’s a chance you have leftovers, they’ll be even better the second day. I don’t know what it is about Italian food, but it’s always better after the flavors have melded together overnight. One of my favorites for leftovers is Baked Chicken Spaghetti, it is so good! Sometimes I secretly hope there are leftovers, just so I can have them the next day for lunch. Warmed up with a slice of bread and I’m set!
Storing: Like most dishes, this will keep beautifully in the fridge for 4-5 days.
Freeze: This will freeze for 3-4 months well. If I know I’m going to freeze leftovers I’ll try to under cook the noodles just a tad bit so they are really al dente. Using the quick release valve stops the cooking process. Once the spaghetti has completely cooled I will portion out in individual freezer safe containers or bags. Thaw overnight in the fridge and warm on the stove top or microwave. Enjoy!
More Italian Inspired Recipes
Whether it’s soup or seafood, Italian inspired recipes are so scrumptious. The combination of spices and sauces are so incredible. It truly is good comfort food. Many times the recipes come together quickly too. Try these Italian winners tonight.
For those nights when you need something fast and easy turn to 10 minute Instant Pot Spaghetti. Superbly seasoned beef and tender noodles all cook together in a delectable sauce and is ready in no time.
CourseDinner, Main Course
CuisineAmerican, Italian, Italian American
Keywordinstant pot spaghetti, spaghetti
Prep Time5minutes
Cook Time5minutes
Total Time10minutes
Servings6People
Calories497kcal
AuthorAlyssa Rivers
Ingredients
1tablespoonolive oil
1poundground beef
1tablespoonItalian seasoning
1teaspoongarlic powder
1/2teaspoonsalt
1/4teaspoonpepper
1poundspaghetti noodles
224 ounce jarsmarinara sauce
3cupswater
Instructions
Set a 6 quart instant pot to saute. Add the olive oil, ground beef, Italian seasoning, garlic powder, salt and pepper. Cook and crumble until no longer pink.
Break the noodles in half. Layer them in a criss cross pattern so they do not stick as it cooks. Pour the marinara and water on top of the noodles.
Cook on high pressure for 5-7 minutes. Use the quick release and wait for cycle to complete before unlocking. Stir together and serve with parmesan and chopped basil.
Slow Cooker Creamy Chicken and Broccoli over Rice is a super easy delicious meal the whole family will love! Moist chicken and tender broccoli combine in a cheesy sauce that’s absolutely divine.
Slow Cooker meals are the best! Just put the ingredients in and let the slow cooker do the work and put a restaurant worthy meal on the table. It’s perfect for busy days, lazy weekends and everything in between. Try these slow cooker dinner winners tonight. Slow Cooker Beef Bourguignon, Slow Cooker Jambalaya and the Best Slow Cooker Mongolian Beef.
Creamy Chicken and Broccoli with Rice
Do you ever make something in the crockpot and think, wow this has been one of the best things that I have made? Yeah those thoughts came to my mind as I was eating this like a starving pregnant woman.
This is absolutely fantastic. As a food blogger, you are constantly making and trying new things. This will be made again and again at our house. And when you make something over and over as a food blogger you know that it is good! The cheesy cream sauce of this chicken and broccoli was the best. The flavors maintained though out the cooking process. Then you add in the broccoli and serve it over rice. A delicious meal all in one!
Creamy Chicken and Broccoli Ingredients
Pantry staple ingredients make this recipe easy and quick to throw together. My secret ingredient is the cajun seasoning. You’ll add just enough to add a nice kick of flavor but not make it spicy. It’s absolutely luscious.
Chicken Breasts: Use boneless, skinless chicken breasts for easier prep.
Cream of Chicken Soup: You can buy this at the store or make your own for a truly amazing sauce.
Cheddar Soup: This can usually be found near the canned cream soups in the soup section.
Chicken Broth: This will intensify the flavor of the chicken.
Salt: Just to taste
Cajun Seasoning: Adds a unique blend of spices for a dish that’s divine.
Garlic Salt: Adds a nice bit of garlic flavor.
Sour Cream: Adds super creaminess and richness.
Broccoli Florets: You can use fresh or frozen.
Cheddar Cheese: I like to use medium cheddar for a good cheesy tang.
Making Slow Cooker Chicken and Broccoli
You are going to love how easy this to put together. It’s always the best when you can sit back and let the slow cooker do all the work for you. Cooking it in the slow cooker melds all the flavors into the chicken creating moist tender chicken as well as packed with flavor. The broccoli is tender and not mushy which is perfect, and with an extra bit of cheese no one is complaining at the table when this is served!
Dumb: Spray the crockpot with cooking spray and put in the cream of chicken soup, cheddar soup, chicken broth, salt, cajun seasoning and garlic salt. Stir to combine and until smooth.
Place: Put the chicken in the bottom of the crockpot, make sure it’s covered with the soup mix.
Cook: Cover and cook on low for 4-6 hours or high for 3 hours. The last 30 minutes of cooking, shred the chicken with two forks.
Add: Add in the broccoli, sour cream and cheese. Cook for about 30 more minutes until the broccoli is tender and heated through.
Serve: Serve over rice and garnish with more shredded cheese if desired. I would say you should desire more cheese.
Tips and Variations for Slow Cooker Chicken
Yes, this is a casserole, and yes I love casseroles. They are one of the best ways to have a complete meal on the table that tastes scrumptious. It has protein, it has veggies and it has a carb. All you need is a fruit salad and maybe some rolls and you are set. You are going to love it!
Chicken: If you have extra time in the beginning, you can pre cut the chicken into bite sized pieces before cooking it and skip the shredding part at the end. Just add the sour cream, broccoli and cheese still the last half hour of cooking. Skinless, boneless chicken thighs would also work for this dish, but I would pre cut them, as they won’t shred as easily.
Rice: We love this served over white rice, but it can be served over other things with just as much success. Try subbing in brown rice, pasta, quinoa, riced cauliflower, a baked potato, or sweet potato to serve this over instead. All will taste amazing!
Broccoli: If you are worried about having crunchy broccoli you can partially steam your broccoli before adding it to the slow cooker. Both fresh and frozen might need it and it depends on your tastes. You can also add other veggies to mix it up a bit. Add in sautéed mushrooms, peppers and onions for flavor, color and texture.
Top it: Top this dish with extra cheddar cheese a dollop of sour cream or crumbled bacon. Any of these or all of them would be divine.
Turn up the Heat: You can add extra cajun seasoning if you want a spicer dish. Although I wouldn’t recommend it if you’re feed young ones.
Can I Make this in an Instant Pot?
Yes, you can! But it’ll take a little tweaking, and you’ll have to babysit it more. Because of that I do like this recipe as is in the slow cooker.
Add whole chicken breasts to a lightly greased instant pot. Add in the spices and chicken broth. Pressure cook for 15 minutes. Remove the chicken and shred. Add back to the pot and add in the broccoli, and soups.
Turn on the sauté feature of your instant pot and bring the dish to a boil. Stirring often let cook till broccoli is crisp tender.
Turn off the instant pot and stir in the sour cream stir till mixed in. Replace the lid and let the mix sit and heat through about 10 min. Serve over desired options.
More Slow Cooker Favorites For All Occasions
Slow cooker recipes are here to stay. We have instant pots, air fryers and such, but the slow cooker is still a favorite and always will have a spot in the kitchen. Slow cooking creates juicy main dishes with flavor and texture infused within. It’s a wonderful way to have dinner ready for you when you get back from work or running errands. It’s a method of cooking here to stay and these winners are exceptional in the slow cooker.
Spray crockpot with cooking spray and put cream of chicken soup, cheddar soup, chicken broth, salt, cajun seasoning, and garlic salt into the crockpot. Stir the soups and seasonings together until smooth. Place the chicken in the bottom of the crockpot.
Cover and cook on low for 4-6 hours or high 3 hours. The last 30 minutes of cooking, shred the chicken with two forks and add the broccoli, sour cream, and cheese. Cook for about 30 more minutes until the broccoli is tender and heated through.
Serve over white rice and garnish with more shredded cheese if desired.
Video
Notes
Updated on December 26, 2020Originally Posted on January 27, 2014
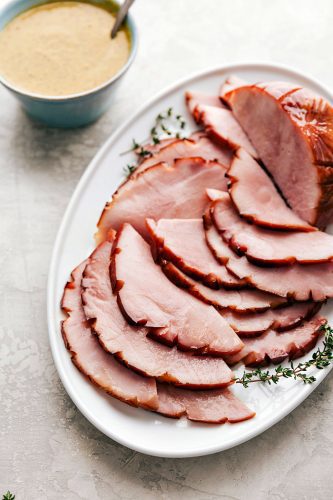
This Honey Glazed Ham is a deliciously prepared ham coated with a brown sugar and honey sweet glaze mixture and then baked to a tender, juicy perfection in every slice. Perfect for your holiday meal!
Lately I have been craving ham. Isn’t that weird? I couldn’t wait to bake this ham just so I could eat it with my family and have leftovers. I have been eating ham sandwiches almost every day and I can’t seem to get enough of it. This baby has been having some weird cravings. From fruit, to ham. Pretty opposite if you ask me!
A lot of people ask me questions on how to bake the perfect ham. It is pretty simple but there are a few tricks to get your ham to taste fantastic. My favorite glaze to use is a simple honey glaze and it gives the ham a perfect sweet flavor. Here are a few tips that I go by when cooking my ham.
What you Need to Cook Honey Brown Sugar Ham
Honey Glazed Ham is a one of my favorite meals during the holidays! I love the smell of it baking in the oven, the juicy first cut and the warmth it brings in our home and our hearts! It is a comforting meal that is sure to please everyone gathered around your table.
Ham: about 5 pounds big and precooked.
Honey: for a sweet, sticky glaze.
Butter: combines and melts in with the sweeter ingredients.
Dark corn syrup: a great thickener and sweet taste.
Brown sugar: tastes a bit like toffee and turns into a caramel taste when melted with butter.
Whole cloves: this is a strong and sweet with a little bitterness to it.
How to Cook a Precooked Ham
This ham is a precooked ham that is purchased at our local grocery store. If you choose a larger ham simply double the glaze mixture to have enough to cover over your ham. This honey glazed ham is one of the most tender and juicy hams you will ever have. Sweet, and savory honey ham will be your show stopping meal on Christmas Day.
Simple ingredients for this simple recipe that doesn’t take long to prepare and bake. Every slice comes out juicy and tender with a beautiful golden brown color. This honey ham glazed is a tried and true favorite and will become your family tradition soon enough.
Let your ham rest: Take the ham out of the refrigerator and allow it to rest 30 minutes before cooking. Preheat the oven to 325 degrees.
Cook glaze mixture: Prepare the glaze by heating honey, butter, dark corn syrup, and brown sugar in a medium saucepan on medium low heat.
Prepare the ham: Line a 9×13 inch pan with aluminum foil. If scoring the ham, lightly score the top into diamond shapes and place the ham in the pan. If using whole cloves, put them in between the lines you scored, but remove before cutting and eating.
Brush the glaze on and bake the ham: Brush the glaze on top and create a foil tent over the ham. Bake the ham according to how many pounds you have. Usually 15 minutes per pound. Brush the glaze over the ham every 15 minutes.
Broil the ham: Once the ham is cooked, remove the foil tent and caramelize the top by turning the oven to broil and letting the ham get dark for about 3-5 minutes. Remove the ham from the oven and pour remaining glaze over the top.
How Do you Know When your Ham is Cooked?
Most hams are already precooked. Essentially you are warming up your ham in the oven. The thickest part of the ham needs to be cooked to at least 145 degrees Fahrenheit according to the proper food safety temperature.
Make This a Complete Meal
This Honey Glazed Ham has all the feels around the holidays. It is a classic tradition in most homes and carried on from generation to generation. I am a tradition kind-of girl and love this Honey Glazed Ham with a few of my favorite sides here:
Classic honey glazed ham is simple and easy to make with little ingredients. This sweet glaze is so good and tenderizes the ham while baking.
These tips will help you make your holiday dinner what everyone is raving about. Golden, tender ham that is juicy when sliced thin is pure heaven this holiday season. Try these tips to perfect your holiday dinner this year!
Picking your ham: pre-cooked and bone in is one type of ham or precooked without the bone. With these choices the ham is already juicy and great for left overs.
Scoring your ham: Before I cook my ham, I score the top in diamond shapes. This not only adds a beautiful presentation, but allows the glaze to seep into the ham. You can also put whole cloves into the cracks, but remove them before carving and eating.
Cutting the Ham: Once your ham is fully cooked, it can be served at warm or cool temperatures but never straight out of the oven. Let the ham rest for about 10 minutes before cutting. And ham can be stored in the refrigerator for up to a week.’
Baking the ham: place your ham cut-side-down into your baking pan. This will help the meat stay juicy with the tinfoil over top.
Use aluminum foil: make sure to use aluminum foil or a cover over your honey glazed ham so it does not dry out.
Let your ham rest: after baking your ham, let it sit on the counter to rest. This is a great time to finish making and setting up your holiday dinner.
Serve with yellow mustard or spicy brown mustard at the table. You can also add a tablespoon of spicy mustard or honey mustard to the glaze for a hint of sweet and spicy flavor.
Frequently Asked Questions
These are great questions to ask and will help you when making this honey glazed ham. It is so simple to make and comes together beautifully. Soon you will be cooking your very own honey glazed ham and enjoy your holiday dinner with your family. A delicious sweet honey glaze that gives your ham the perfect flavor!
Do I slice the ham before cooking? No, this is not recommended. You can score the outside of the ham but slicing the ham will dry it out.
How much ham per person? Usually it is about 1/2 pound of ham per person. If you are wanting left overs at the end estimate 1 pound per person when buying your ham.
How big of a ham should I buy? This is a great question for baking the ham. You may have several people coming but the important part is how big your pan is that will be baking it in. A 6 to 8 quart pot or 12 x 16 pan fits about a 6 to 7 pound ham.
Will a ham cook overnight? Yes! This is a great idea when needing more time for other things during the day. Simply preheat the oven to a 275 degrees. Follow the instructions for preparing and baking the honey glazed ham. Bake uncovered for 6 to 7 hours. While baking continue to spread the glaze over the ham.
Do you cover your ham? Yes, this is a great way to avoid your ham from over baking and becoming dry. At the end of baking the ham remove the aluminum foil and broil it for a crisp outer layer.
Should I glaze the ham before cooking? Yes! Brush the glaze mixture over top and into the ham as much and best that you can. Continue to glaze the ham throughout the baking process every 15 to 20 minutes for best results. When the ham is finished cooking brush the remainder of the glaze mixture and broil the top and outside layer of the ham. This will leave a caramelized look and texture on your ham.
Variations for Glazed Ham
This is a tried and true honey glazed ham favorite that we make year after year in our family. This Spiced Rub Brown Sugar Pineapple Glazed Ham or this Slow Cooker Honey Garlic Mustard Glazed Ham are other great ways to enjoy a classic ham recipe this holiday season. I love the traditional honey glazed ham recipe but there are some variations that can be made.
Sweetener: instead of honey try using maple syrup or add a little extra brown sugar.
Syrup: if you do not have dark corn syrup on hand, molasses works great in replace of it.
Spices: you can omit garlic clove if you would like. This is an optional ingredient and try cinnamon or nutmeg in replace of it.
Extra flavoring: add pineapple juice or apple cider over top. Even orange juice or cranberry juice for a fruitier flavor.
Storing Honey Glazed Ham
This honey glazed ham is perfect for making ahead, storing for left overs and even freezing! It is a great way to enjoy ham even more this holiday season. This honey glazed ham is all the greatness to your holiday meal and adds so much flavor that everyone will be raving about.
Here are the best ways to store your honey glazed ham this holiday season:
Thawing a frozen ham: If you ham is already frozen, simply place it in the refrigerator for 24 to 48 hours until it is completely thawed before baking.
Making honey glazed ham ahead of time: Place in the oven over night and cook at a low temperature warming it up slowly.
Refrigerate: Simply follow the instructions and bake your ham. Once it is cooled and rested, place in a ziplock bag or airtight container and store up to 1 week in the refrigerator.
Can you freeze honey glazed ham? Yes! This is a great meal to freeze for later. After your ham is cooked, place your ham either sliced or not sliced in a ziplock bag and lay flat for up to 1 month.
Warming up honey glazed ham: When ready to warm up, place your ham in the refrigerator and let thaw. Reheat in the microwave or oven until warmed through. Try not to over heat leaving it dry and rubbery.
Here are delicious recipes to make with left over ham
Classic Honey Glazed Ham is a deliciously prepared ham coated with a brown sugar and honey sweet glaze mixture and then baked to a tender, juicy perfection in every slice. Perfect for your holiday meal!
CourseDinner, Main Course
CuisineAmerican
Keywordham, honey glazed ham
Prep Time20minutes
Cook Time1hour
Total Time1hour20minutes
Servings12people
Calories287kcal
AuthorAlyssa Rivers
Ingredients
1(5 pound)ham
2cuphoney
2/3cupbutter
1/4cupdark corn syrup
1Tablespoonbrown sugar
whole clovesoptional about 1/4 cup
Instructions
Take ham out of the refrigerator and allow to rest at least 30 minutes before cooking. Preheat oven to 325.
Prepare the glaze by heating honey, butter, dark corn syrup, and brown sugar in medium saucepan on medium low heat.
Line a 9x13 in pan with aluminum foil. If scoring the ham, lightly score the top into diamond shapes and place the ham in the pan. If using whole cloves, put them in between the lines you scored, but remove before cutting and eating. Brush the glaze on top and create a foil tent over the ham. Bake the ham according to how many pounds you have. Usually 15 minutes per pound. Brush the glaze over the ham every 15 minutes.
Once the ham is cooked, remove the foil tent and caramelize the top by turning the oven to broil and letting the ham get dark for about 3-5 minutes.
Remove the ham from the oven and pour remaining glaze over the top. Cut into thin slices and enjoy!
Video
Notes
Updated on December 25, 2020Updated on December 14, 2019Original Post on December 16, 2018