The holiday of love is just around the corner, and you need to try out this Valentine’s day charcuterie board! It’s packed with meat, cheeses and all sorts of festive red and pink fruits and candy to start the holiday off right.
A charcuterie board has something for everyone! If you want to try some more delicious Valentine’s treats, then go ahead and make these cookies, cheesecake, or these delicious brownies.

Valentine’s Day Charcuterie Board
A classic charcuterie board (pronounced shar-koo-tuh-ree) board is made of meats and cheeses. You can serve this as an appetizer, as a snack, or even fill it with a few more hearty slices of meat and make it a fun meal! But because these platters are becoming so popular, I’ve decided to add in a few fruits and candies to not only add in some color and texture but to make it festive for the holiday!
My kids love it when I make a charcuterie board! They think it’s so fun to help me decide what to put on and then tell me where to put it. This Valentine’s charcuterie was filled with so many delicious spreads and fruits. It made it hard not to eat it all up before I made it! The best part about these is that you can easily switch things out to your favorite foods and make them your own! I make them for all of the holidays because they are such a hit with friends and family!
Perfect Valentine’s Day Charcuterie Board
Start with the Cheese and Meats
Cheese is part of all classic charcuterie boards, so you can’t skip this step! It not only lends itself to a savory taste, but the texture of cheeses is just so different than anything else on the board. Plus, this is where you can get really creative with the flavors that you choose and then introduce your guests to new flavors. Here is a list of the cheese that I used for this Valentine’s charcuterie board:
Cheese
- Garlic and Herb Boursin
- Wensleydale with cranberries
- Sharp cheddar
- Plain Goat Cheese with Pink Food Coloring
Meat
- Italian Dry Salami
Spread
- Grape Jelly
I didn’t use a ton of meat and cheese on this board because I knew that I would be mixing in many other things like fruit and candy. If you are doing a board with only meats and cheeses, then you will need more. Some other ones that you can try are Dutch Spicy Kaas Red, green and white square cheese, Creamy Toscano Cheese, Beemster Cheese, Peppered Salame, and Proscuitto.

What Fruits Do I Use for a Valentine’s Charcuterie Board?
The fruit may be my favorite part of this charcuterie board! This is where I can get a huge variety in color, texture, and taste so that I can bring in a little something for everyone! When I am making a charcuterie board for a holiday, like this Valentine’s Day one, then I especially like to bring in all the fruits in those holiday colors. Everything that I used on this board is pinks, reds, and purples.
- Cherries
- Blueberries
- Strawberries cut into half
- Raspberries
- Grapes
Think about whatever occasion you are making this board for and then cater your ideas to that occasion! Fruits that I have used on other boards are apples, bananas, blackberries, green grapes, pineapple, and oranges. Add whatever you want into these and then arrange them in different places on the board so that they are spread out.

It’s Time for the Candy!
This is my kids’ favorite part of any holiday charcuterie board that I make… The treats! The candy on this board brings in so much color and then just takes the fun level up a notch. You can go crazy and use whatever kind that you love! Because you are making this during a holiday time then it will be super easy to find themed candy in your seasonal aisle at your grocery store.
- Lindor Chocolate Truffles
- Conversation Hearts
- Cinnamon Hearts
- Chocolate Hearts wrapped
Let’s Make a Valentine’s Charcuterie Board!
Putting this together is so much fun, and I love that they are different every single time. Get creative and change things up if you want. Make this your own!
- Start with the cheese: Over the heart shape charcuterie board, start assembling your board by adding the cheeses.
- Arrange salami: Next, add the salami. I used a small cup and arranged the salami like a flower.
- Add fruit: Then, you will want to add in your fruits and fruit jam.
- Put on the treats: Fill in the board with candies and chocolates.
- Garnish: Add roses for an extra touch and then you can serve this up to all of your guests!

Charcuterie Board Tips
Charcuterie boards change every time you make them which is why this Valentine’s Day board is so fun! I love making these for holidays because they are so festive. Here are a few ideas on how to make this board your own!
- Use different shapes: Using cookie cutters to make different shapes on the board really takes it up a notch! Cut out some cheese using cookie cutters. On this one, I cut some spread in the shape of a heart on the cheese.
- Add in decorations: I added in some roses for Valentine’s Day but you can also add in other things like a lace doily or any other heart themed decorations that you have on hand.
- Switch up the treats: For a charcuterie board that your kids will love, add in some cookies or crackers. Around the holiday you can even find some that are heart shaped or colored!
Tried and True Valentines's Desserts

Desserts
Chocolate Covered Strawberries
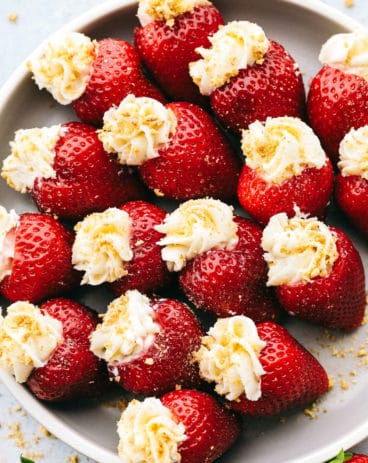
Desserts
Cheesecake Stuffed Strawberries
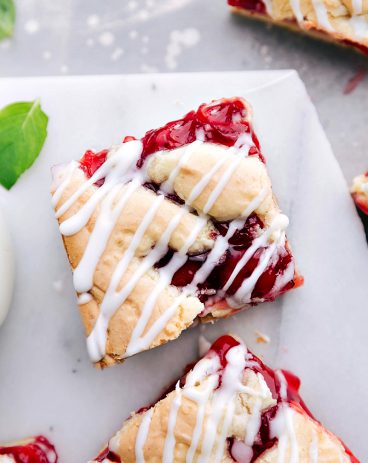
Desserts
Cherry Pie Bars

Valentine’s Charcuterie Board
Ingredients
- 1 package Italian Dry Salami made into flowers
- 1/2 cup Grape Jam
Fruit
- 1 bag Cherries
- 1 package Blueberries
- 1 package Strawberries cut into half
- 1 package Raspberries
- 1 bag Red Grapes
Cheese
- 1 package Garlic and Herb Boursin
- 1 wedge Wensleydale with cranberries
- 1 brick Sharp cheddar
- 8 ounce Plain Goat Cheese with Pink Food Coloring
Candy
- i package Lindor Chocolate Truffles
- 1 bag Conversation Hearts
- 1 bag Cinnamon Hearts, found at Trader Joe's
- 1 package Chocolate Hearts wrapped
Instructions
-
Over the heart shape charcuterie board, start assembling your board by adding the cheeses.
-
Next, add the salami. I used a small cup and arranged the salami like a flower.
-
Add in your fruits and fruit jam.
-
Fill in the board with candies and chocolates.
-
Add roses for an extra touch!
Nutrition
from The Recipe Critic https://ift.tt/3FUydJo
https://ift.tt/32rQW1g