Alyssa Rivers December 05 लेबलों वाले संदेश दिखाए जा रहे हैं. सभी संदेश दिखाएं

रविवार, 5 दिसंबर 2021

Simple Charcuterie Board

A simple charcuterie board is all that you need for any holiday or event! Filled with all of your favorite things, it will for sure be the star of the show!

If you love charcuterie boards and want to see some large ones that are customized for holidays then check out this Fall and this Halloween Charcuterie Board! They are so fancy and gorgeous!

A small and simple charcuterie board.

What IS a Charcuterie Board?

A charcuterie (pronounced shar-Koo-tuh-ree) board is basically a board that has a mixture of different kinds of meats, fruits, and cheeses. Although, you can really make it a mixture of anything that you want! I have made some after-school snacks for my kids that are filled with candy, rice Krispy treats, carrots, and fruit snacks! These boards can be exactly what you want which is what makes them so fun!

If you have no idea where to start then this is the perfect post for you! I am going to go through, step by step, exactly what you need to make a simple charcuterie board. I will tell you what I used and also a bunch of other ideas that you can add to yours as well! By the end, you will be a pro and want to make one for every occasion! Once you start then I bet that you have a hard time not making one for every occasion! Have a party and then make this Hot Crab Dip, this Cranberry Salsa, and these Saucy Asian Meatballs to go with it!

Let’s Start with the Cheese!

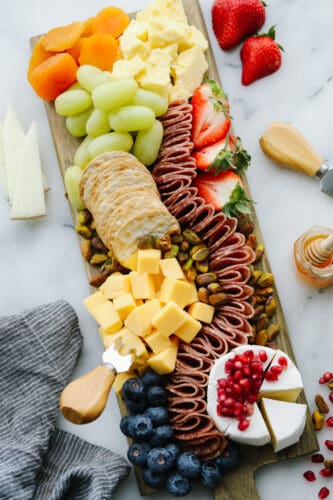
Cheese is a great place to start on a simple charcuterie board! I used double cream brie and English cheddar on my board but here is a list of a bunch of options that you can use too! It’s best to have a variety of 4-6 cheeses (depending on how big you want your board to be). So choose your favorites and then start with those!

  • Hard cheese: Asiago, parmesan or aged gouda
  • Firm cheese: Colby jack, cheddar, manchego or gruyere
  • Soft cheese: Marscapone, burrata, double cream brie or muenster cheese.
  • Crumbled cheese: Blue cheese, feta or goat cheese

The flavor of the cheese is the best when the cheese is at room temperature so take your cheese out about 30 minutes before serving! Then, it will taste delicious! You will want to do larger chunks of your hard cheese and cubes of your firm cheese. The soft cheese can then be shaped with cookie cutters to make it look extra fancy!

Let’s Pick Out Which Meat to Use!

I only used Italian dry salami on this board because I just wanted that pretty and simple train of it down the middle of the board. BUT you can add in as many meats as you want to for your board!! Here are a bunch of ideas for meat that you can use and then you can make it your own!

  • Italian Dry Salami
  • Prosciutto
  • Calabrese salami
  • Genoa salami
  • Applewood Smoke Salami
  • Mortadella

Thin slices of meat work best for a simple charcuterie board! They are easy to place on the board and then you can shape them how you like. Plus, they are thin so that people can eat a few different types of meat without filling up on just one kind!

A zoomed in picture of cheese, salami and blueberries.

What Fruit to Use on a Simple Charcuterie Board

The fruit is my favorite part of a charcuterie board! Not only does it add in a much-needed fresh taste but it brings in SO much color! You can cut up the fruit and then add it to the top of your cheese to really take it to the next level! That’s what I did with the pomegranate seeds. Here are a few fruits that I used plus a bunch more ideas so that you can change things up!

  • Dried apricot
  • Strawberries
  • Green grapes
  • Pomegranate
  • Blueberries
  • Red Grapes
  • Raspberries
  • Cantelope
  • Mango
  • Pineapple rings
  • Kiwi
  • Bananas
  • Orange slices

When you have fruit that needs to be sliced (like bananas) then slice those up and place them just before serving so that they don’t brown. It’s usually good to have 4-5 different fruits on a charcuterie board to mix up the taste, texture, and color! Plus, then it will be different every time you make it.

A picture of crackers and pistachios on a charcuterie board.

Crackers and Nuts Are Next!

You will definitely want to add in some crackers to go with all of the meats and cheese! My kids love making little sandwiches out of everything! The nuts are a great addition and can really add some salty taste to everything. I used baked crackers and pistachios on this board but here are some more ideas to mix things up!

Crackers

  • Baked crackers
  • Ritz Crackers
  • Wheat Thins
  • Triscuts
  • Chicken in a Biscuit crackers
  • White Sonora crackers
  • Sea Salt Crackers
  • Rice crackers

Nuts

  • Pistachios
  • Almonds
  • Walnuts
  • Pecans
  • Peanuts
  • Cashews

I also like to switch things up and then add in some slices of Crostini or some Bruschetta to my boards as well! Make sure that if you are adding in any nuts that you don’t have guests who are allergic! If you want to eliminate the nuts altogether then try adding in some seeds or veggies instead. Then you have a board that will work for everyone. I love adding in some roasted pumpkin seeds. They are delicious and easy to eat!

A simple charcuterie board filled with fruits, crackers, nuts and meats.

Last, You Add in the Spreads

The last food item that you need to round up before you put together your simple charcuterie board is some spreads! These add-in a great texture and I really love the look of them on a board too. I didn’t use any spreads on this board pictured but if you want to use some then here are some ideas that I have used in the past:

Get a few small bowls and put some of these spread in them! Then, place them on your board. I think having 2-3 spread options is always a great idea and everyone loves them! It really helps add a lot to the board for looks and taste!

Put it All Together!!

Now, the last step is to put it all together! If you decide to add in some spreads then put those bowls on first so that you can work around them!

  1. Cheese: Start assembling your board by adding the cheeses.
  2. Spread out the meats: Add the meats. Then, shape them like I did on this board or just spread them out and use them in different spots!
  3. Fruit: Add in your fruits.
  4. Finish it up: Fill the board in with crackers and then your nuts.

Use Some Chocolate on Your Simple Charcuterie Board

You don’t have to stick with only meats, cheeses, and nuts for your simple charcuterie board! In fact, I love adding sweet factor-like chocolate candies to all of my boards. Then I have sweet and savory on the same board! Here are a few ideas of extra things that you can switch out or add to your board.

  • Chocolate Covered Almonds
  • Whoppers
  • Ghiradelli Chocolate Squares
  • Cinnamon almonds
  • Caramels
Print

Simple Charcuterie Board

A simple charcuterie board is all that you need for any holiday or event! Filled with all of your favorite things, it will for sure be the star of the show! 
Course Appetizer
Cuisine American
Keyword charcuterie board, simple charcuterie board
Prep Time 20 minutes
Total Time 20 minutes
Servings 12 people
Calories 95kcal
Author Alyssa Rivers

Ingredients

Meat:

  • 24 slices Italian Dry Salami

Cheese:

  • 1 small wheel Double Cream Brie, cubed
  • 1 wedge English Cheddar, cubed

Fruit:

  • 12 Dried Apricot
  • 4 Strawberries
  • Grapes
  • Pomegranate
  • 15 Blueberries

Nuts and Crackers:

  • Pistachios
  • 1 package Baked crackers

Spreads to serve it with:

  • Honey
  • Jam

Instructions

  • Start assembling your board by adding the cheeses.
  • Next add the meats.
  • Add in your fruits.
  • Fill the board in with crackers and nuts.

Nutrition

Calories: 95kcal | Carbohydrates: 6g | Protein: 4g | Fat: 6g | Saturated Fat: 2g | Polyunsaturated Fat: 1g | Monounsaturated Fat: 3g | Cholesterol: 14mg | Sodium: 409mg | Potassium: 169mg | Fiber: 1g | Sugar: 5g | Vitamin A: 291IU | Vitamin C: 3mg | Calcium: 8mg | Iron: 1mg


from The Recipe Critic https://ift.tt/3xWfaf9
https://ift.tt/3olhmK5

Cranberry Cake

This cranberry cake is soft, fluffy and full of delicious cranberry flavor! Drizzled with an orange glaze on top, this cake is perfect for the holidays!

I’m all about eating cake for breakfast, brunch and dessert! Try out this Coffee Cake, this Blueberry Lemon Pound Cake or these amazing Orange Cranberry Muffins!

Cranberry cake being sliced.

Delicious Cranberry Cake

So, the big question is do I eat this for breakfast, brunch, or dessert? Well… because of the fruit taste and delicious orange glaze, I totally think this can be eaten at any time of the day! I love a cake that mixes and matches flavors! This one has that cranberry taste mixed into the batter and onto you add in a creamy, slightly orange flavored glaze. When you mix the two together… It’s SOO GOOD!!

Not only do I think that this cake is amazing but I love how easy it is to make!! It only takes 15 minutes to put together and then all you have to do is pop it in the oven and wait! I know, I make that sound easy but when you’re hungry, waiting is the hardest part. It is so good and I love serving it at brunch along with some Apple Streusel Muffins, Blueberry Scones, and this amazing Cherry Almond Cream Cheese Breakfast Braid! Try them all, everyone will go crazy over them!

Ingredients You Need to Make Cranberry Cake

This cake is quick and easy to make! You probably have most of these ingredients in your pantry. Especially around the holidays because that’s when we all have cranberries in our fridge already! See the recipe card at the bottom of the post for exact measurements.

  • Butter: I like to use unsalted butter that has been softened to room temperature!
  • Orange zest: This fresh flavor really takes this recipe to the next level.
  • Granulated sugar: The sugar helps sweeten this up and gives a delicious contrast to the tart cranberries.
  • Egg: The egg helps to bind all of the ingredients together!
  • Vanilla: This adds a slight flavor to the sweet sugar!
  • Flour: All purpose flour is what I used and it works great in this recipe.
  • Salt: The salt in the recipe enhances all of the flavors of the other ingredients!
  • Baking powder: This is what helps the cake rise and stay soft and fluffy.
  • Fresh cranberries: Using fresh cranberries adds a delicious tart flavor to this cake. You can’t have cranberry cake without them!
  • Buttermilk: You can use store bought buttermilk but if you don’t have any on hand then try making this homemade Buttermilk instead!
  • Coarse sugar: This is for topping on your cake!

Glaze

  • Powdered sugar: I use powdered sugar instead of granulated sugar because this dissolves much faster and creates that delicious and smooth texture.
  • Heavy cream: This will mix in with the powdered sugar making it thick and creamy.
  • Fresh orange juice: My favorite part of the glaze! This flavor combined with the cranberries is SOO GOOD.

Let’s Make Some Cake!

I love the flavor and the texture of this cranberry cake. It’s perfect for the holidays because of the festive cranberries. But let’s be honest, I bake this all year long!

  1. Preheat oven and combine: Preheat the oven to 350°. Grease an 8 or 9 inch square pan and set aside. In a medium bowl cream together the butter, orange zest and sugar. Add the egg and vanilla and beat until combined.
  2. Whisk: In a separate mixing bowl whisk together 1 ¾ cup of flour, salt and baking powder. Toss the cranberries in the remaining ¼ cup of flour.
  3. Combine and fold in cranberries: Add the flour mixture to the creamed mixture a little at a time, alternating with the buttermilk, until fully combined. Gently fold in the cranberries.
  4. Add batter to pan, bake and let it rest: Spread the batter into the prepared baking pan. Sprinkle with coarse sugar. Bake for 35-40 minutes or until a toothpick comes out clean from the center. Let rest for 15 minutes before topping with the glaze and serving.

Glaze

  1. Mix and drizzle: Mix the powdered sugar, heavy cream and orange juice together until smooth. Drizzle across the top of the slightly cooled cake.
4 pictures showing the steps on how to make the batter.

Baking Tips

This cranberry cake is easy enough that anyone can make it! Here are a few tips to help you make it turn out just right!

  • Don’t overmix: When you over mix or set your mixer to mix on high then you add more air to your batter! Use room temperature ingredients so that you don’t have to mix so many lumps and do it on a lower speed.
  • Don’t open the oven door: I know that it’s tempting to open the oven door while you are baking your cake. But when you open the door while you are baking, you let a lot of the heat out. This makes it so that your cake will bake unevenly. Use the oven light instead of opening the door!
  • Room temperature ingredients: I know that this can take a bit of thought beforehand but it really helps! Make sure to take all of your refrigerated ingredients out and put them on the counter a few hours before you plan on baking. Bringing your ingredients to room temperature really helps them mix nicely together and makes the dough really smooth! 
An orange glaze being drizzled on the cake.

Varitations

This cranberry cake is so easy and delicious! And, you can mix a few things up to make this cake work just for you! Here are a few ideas.

  • Cut the cranberries in half: I like to leave the cranberries whole in this recipe but if you like more, smaller bites of cranberries then you can cut them all in half before mixing them in the batter! Then you are sure to get that tart cranberry taste in every single bite!
  • Frozen cranberries: I love using fresh ingredients every chance that I can but you can use frozen cranberries in a pinch! You can leave them whole or chop them up.
  • Buttermilk: No buttermilk, no problem! You can make this Homemade Buttermilk instead!
  • Sugar topping: You can use demerara, turbinado or raw sugar for the topping of sugar. Some will have more crunch than others but they will all taste delicious!
  • Add a topping! If you want, you can try adding in some sliced almonds, pecans or walnuts to the top of your cake!
Cranberry cake cut into squares.

How to Store Leftovers

This cranberry cake is great to make ahead and eat later! Here is how you can do that or store any leftovers that you may have.

  • On the counter: Once your cake has cooled then wrap it tin plastic wrap or store it in an airtight container. It can last on your counter for up to a week.
  • Freeze: To freeze this cake, wrap it up in plastic wrap and then a layer of foil. Write the date on the foil and this cake can last in your freezer for up to 2 months. When you are ready to eat, thaw it overnight at room temperature (keep it wrapped while thawing). Enjoy!
A slice of cake on a plate with a fork and cranberries.
Print

Cranberry Cake

This cranberry cake is soft, fluffy and full of delicious cranberry flavor! Drizzled with an orange glaze on top, this cake is perfect for the holidays!
Prep Time 15 minutes
Cook Time 45 minutes

Ingredients

  • ½ Cup Unsalted Butter Softened
  • Zest from 1 Orange
  • ½ Cup Granulated Sugar
  • 1 Egg
  • 1 Teaspoon Vanilla
  • 2 Cups Flour Divided
  • 1 Teaspoon Salt
  • 2 Teaspoons Baking Powder
  • 2 Cups fresh cranberries
  • ½ Cup Buttermilk
  • 1 Tablespoon coarse sugar for topping

Glaze

  • 1 Cup Powdered Sugar
  • 1 Tablespoon Heavy Cream
  • 2 Tablespoons Fresh Orange Juice

Instructions

  • Preheat the oven to 350°. Grease an 8 or 9 inch square pan and set aside. In a medium bowl cream together the butter, orange zest and sugar. Add the egg and vanilla and beat until combined.
  • In a separate mixing bowl whisk together 1 ¾ cup of flour, salt and baking powder. Toss the cranberries in the remaining ¼ cup of flour.
  • Add the flour mixture to the creamed mixture a little at a time, alternating with the buttermilk, until fully combined. Gently fold in the cranberries.
  • Spread the batter into the prepared baking pan. Sprinkle with coarse sugar. Bake for 35-40 minutes or until a toothpick comes out clean from the center. Let rest for 15 minutes before topping with the glaze and serving.

Glaze

  • Mix the powdered sugar, heavy cream and orange juice together until smooth. Drizzle across the top of the slightly cooled cake.


from The Recipe Critic https://ift.tt/3IvJJxo
https://ift.tt/3EoUOOk